According to Microsoft statistics, more than half a billion people use the Windows operating system. However, the average user only knows about a third of all functions. However, some of the unknowns are useful. They can significantly speed up work and make a person’s life easier. For example, Wi-Fi Direct on the tenth version of the OS. As soon as the feature appeared, many thematic blogs actively discussed it. However, now everyone is quiet. But in vain, because this is a universal option. How enable Wi-Fi Direct and use this standard on Windows 10?
More about the standard
Before you enable Wi-Fi Direct, you need to understand what it is. Wireless Direct is a relatively new standard that provides connectivity to other devices. The connection occurs without an intermediary. Roughly speaking, the function allows the user to connect several devices to each other and exchange information through them. However, data transfer is not the only possibility of improved Wi-Fi. Direct is often compared to a Bluetooth wireless connection. It's practically a combination of Bluetooth and WiFi.
Please note that Direct is not available on all computers, laptops and smartphones. This is not the same as regular Wi-Fi. To use the improved standard, you need its support - a special module (adapter). If there is no chip, then the device will not support Direct.
The principle of operation is simple: two or more gadgets are connected using this standard without intermediaries. This means that the connection does not use a router or access point to redirect the signal. The main difference from a Bluetooth wireless connection is higher speed, distance and reliability, since the information is securely protected.
What is it used for?
This type of connection is often used to display a picture from a laptop to a TV. Not only “large” devices are equipped with a suitable chip, but also some tablets and phones. When connecting, it is important to remember that the connection requires support for the standard on all sides. That is, all devices must be equipped with the necessary adapter. Another purpose is file transfer. This is a faster method compared to FTP, Bluetooth, USB, etc. Also, the user can use this method to display an image through a projector or send files to a printer for printing.
Connecting a PC to a TV via Wi-Fi Direct
Before connecting Wi-Fi Direct to your TV, you should make sure that the equipment itself has a wireless protocol or Wi-Fi adapter. The connection will be made through the Smart device menu (for convenience, you need to set the Russian language). However, first you need to specify the correct DLNA server data on your computer and open access to the necessary folders.
To do this, open the standard Windows 10 Explorer, select “Network”, then “Network discovery”. The system gives simple instructions, and in some cases automatically displays multimedia servers, which means everything is ready for work. Once file sharing has been achieved, there are a few simple steps left to take:
- Create a private network.
- From the list of devices connected to this network in Explorer that appears, select the one you need.
- Enable DLNA and go to the TV menu, selecting the appropriate section (for example, in LG it is SmartShare). This displays the contents of allowed folders for viewing in Windows 10.
- You can watch media on a big screen by right-clicking the “Play on...” section and selecting the TV device model.
Important! Thanks to Wi-Fi “Direct” for Windows 7, 10 software, you will be able to access the Internet by simply connecting to the host, while remaining in a secure domain common to everyone.
Wi-Fi Direct is a set of software protocols that establishes a wireless connection between two or more devices without a router. The standard is characterized by a long data transmission distance, good speed and ease of configuration. There are no difficulties connecting a PC, printer, TV, web camera or wireless headphones, because it easily combines equipment from different brands.
source
Safety standard
In addition to a large number of application methods (from connecting to a printer to watching movies via TV or projector), Wi-Fi Direct is a secure standard for information transfer. The chip uses encryption and secure connection methods. In this way, developers prevent third parties from gaining access to other people's devices. Therefore, if the user creates a network, neighbors will not be able to join his TV. Also, information transmitted in this way is reliably protected.
Please note that Direct can be used to create an access point and connect to it from other computers or phones.
The adapter uses Wi-Fi Protected Setup as well as WPA2. These are two technologies that provide maximum protection. When connecting, you will need to enter a PIN code.
How to completely remove Microsoft Wi-Fi Direct Virtual Adapter
As you probably know, a Windows computer can easily be turned into a Wi-Fi access point that other devices can use to access the Internet (Wi-Fi hotspot in Windows 8, How to share WiFi with Windows 10). However, normal means Microsoft did not provide for the removal of such an access point in Windows 10 when it is no longer needed.
The organization of the operation of such an access point is implemented by creating a separate virtual Wi-Fi adapter, which is called:
- In Windows 7 - Microsoft Virtual WiFi Miniport Adapter
- In Windows 10 / Windows 8.1 - Microsoft Wi-Fi Direct Virtual Adapter
As usual, the Microsoft virtual Wi-Fi adapter is removed
Typically, users remove a virtual Wi-Fi adapter as follows:
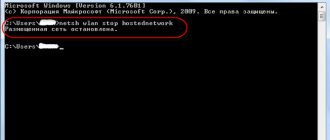
- A running hosted network is shut down: netsh wlan stop hostednetwork
- Disallow running a hosted network: netsh wlan set hostednetwork mode=disallow
- After this, open the “Device Manager” (Devmgmt.msc) in the Network adapters section, look for an inactive device named Microsoft Wi-Fi Direct Virtual Adapter, and use the context menu to disable it (Disable Device) and/or remove it (Delete).
Note. You can also disable this adapter from the PowerShell command line using the command: Get-NetAdapter -InterfaceDescription “Microsoft Wi-Fi Direct Virtual*” | Disable-NetAdapter -Confirm:$false
- After this you need to restart the computer
However, the problem is that when the Microsoft virtual Wi-Fi adapter is disabled in this way, after restarting the computer, this device again appears in the list of network cards
The fact is that with such a shutdown, the hidden virtual adapter still remains in the system (it is not deleted), and if you need to create a new access point, a new virtual adapter with an order index will appear in the system (Microsoft Wi-Fi Direct Virtual Adapter #2 , Microsoft Virtual WiFi Miniport Adapter #3, Microsoft Virtual WiFi Miniport Adapter #4, etc.), and it will still use the configuration of the old access point. Thus, several virtual adapters can be present in the system at the same time, and only one of them can be active.
How to properly reset Microsoft Virtual WiFi Miniport Adapter
The access point settings are stored in the registry, so to clear them, you need to delete the HostedNetworkSettings DWORD parameter in the HKLM\System\CurrentControlSet\Services\WlanSvc\Parameters\HostedNetworkSettings registry branch.
You can delete a parameter with the command:
reg delete hklm\system\currentcontrolset\services\wlansvc\parameters\hostednetworksettings /v hostednetworksettings
Now you need to restart your computer. After booting, check that the hosted network settings are reset
net start wlansvcnetsh wlan show hostednetwork
The Settings field in the Hosted network settings section should remain set to Not configured.
Removing a Microsoft virtual WiFi adapter on a computer with an Intel WLAN card
With Intel WLAN adapters, there is another problem. If the Intel My WiFi Technology module is installed on your computer (usually installed with the Intel PROSet/Wireless driver package), the system may have 2 Microsoft Virtual WiFi Miniport network adapters, which cannot be removed.
In this case, you need to find Intel PROSet/Wireless in the list of installed software in the control panel, change it and remove the Intel My WiFi Technology component.
After this, one virtual adapter should disappear. The second one can be removed using the method described above.
winitpro.ru
Technology characteristics
Since Direct is a modified version of traditional Wi-Fi, its characteristics have remained virtually unchanged. The frequency at which Direct operates remains the same: 2.4GHz or 5GHz. The quality of the connection and the speed of data exchange depend on the number of connected devices and obstacles in the form of other waves of the same frequency, walls, etc. Under ideal conditions, the gadget picks up the signal at a distance of up to 200 meters.
Direct allows you to create entire groups of gadgets and connect to one point. It works on the principle of a local area network (LAN). This way, users can play online by connecting to each other.
Minuses
In addition to the advantages of being able to connect to other equipment without access to the network, exchange data, transmit media content in real time and high standard security, Wi-Fi Direct technology has several disadvantages:
- High speed of information transfer is not only an advantage. At the same time, the gadget consumes more energy. If you use a laptop without mains power, the battery will drain much faster.
- Many connections clog frequencies. If the technology is used in an office, the devices are usually interconnected. This entails pollution of the airwaves, because the more waves of the same frequency interrupt each other, the worse the signal. The problem can be partially solved by adding two bands - 2.4 GHz and 5 GHz.
- Direct's security is significantly higher than that of Bluetooth. But to access the Internet, it is recommended to use regular Wi-Fi. Direct should be enabled only if you need to display an image somewhere, connect to a printer, transfer files, and so on.
- Not all gadgets support relatively new technology. A special adapter is required for use. You can find out whether the function exists in the following way: remove the laptop lid, look at the name of the module, find information on the Internet.
Miracast Windows 10: how to enable and configure?
Surely many users of computer systems who have high-tech high-resolution television panels at home with a screen diagonal larger than that of a monitor or laptop would like to broadcast the signal from their device to the TV. This is why Miracast technology (Windows 10) was created. We will learn how to enable this option in this article. The advantages, as you might have guessed, are undeniable. After all, the user gets a second monitor, and a much larger one at that. On your TV, you can significantly expand the capabilities of some useful programs, as well as view the necessary graphics or your favorite video, subject to maximum comfort.
What is Miracast?
So, let's start by understanding what Miracast Windows 10 technology is. How to enable this element will be discussed a little later and in some detail. For now, we will only note that the use of such a “trick” allows you to completely abandon the use of wires or HDMI cables when transmitting a signal from a computer or laptop to a television panel.
It is clear that in many ways this approach plays a key role in using Miracast technology in Windows 10. How to enable (instructions will be given later) such an element of the system? In principle, there is nothing particularly complicated here. However, along the way, it is worth taking into account some restrictions and mandatory conditions imposed on the use of this type of connection.
Advantages and disadvantages of Miracast technology
To begin with, let's look at a few positive and negative aspects that determine the user's choice in one direction or another.
The absence of wires has already been said. It goes without saying that there is no connection between a computer or laptop and a TV. In most cases, it is this aspect that influences the user’s decision to use Miracast Windows 10 technology. How to enable it on all compatible devices? Yes, it’s very simple - using a regular router and a wireless network. In addition, if you delve a little deeper into the essence of the question of how to enable Miracast Windows 10 and then configure it for the most comfortable experience, it is not difficult to make sure that this technology is cross-platform and is not limited only to the use of Windows-based computer systems.
Quite simply, you can connect any other devices to the TV. For example, smartphones and tablets running Android or iOS operating systems. Finally, when transmitting a signal using such a connection, there is no loss of picture quality. However, with all the advantages of this technology, some disadvantages cannot be ignored. First of all, the disadvantage is that only the picture that is currently displayed on the transmitter device is positioned on the television panel screen. Although all devices connected to each other should work stably, in practice you can notice quite frequent failures when establishing a communication session between devices.
Miracast Windows 10: how to enable and configure this technology? Preliminary acquaintance
Now a few more words about creating a connection. Today there are two main methods: Miracast and Intel WiDi. They are, in fact, complete analogues of each other. But the second technology has broader capabilities and is characterized by stable communication.
However, the general principle of connecting computer terminals or laptops to modern TVs is common among beggars: using a Wi-Fi Direct connection. In other words, if you have a router at home that provides such a connection, in theory there should be no problems with the connection.
Main conditions for correct operation of compatible devices
At this stage, before figuring out how to enable Miracast Windows 10, you should clearly understand some basic requirements, without which you simply will not be able to connect.
As is probably already clear, both your computer, laptop, and TV must support Miracast technology. It may be called differently on the television panel. For example, on modern Samsung TVs, the menu usually includes a Screen Mirroring item located in the network settings.
It goes without saying that the computer and laptop must be equipped with a built-in or external Wi-Fi module. Some systems may require installation of additional Intel Wireless Display software. If your TV does not have built-in support for Miracast, you will have to connect an additional adapter. But, as it turns out, this is unnecessary. Since almost all modern models are already equipped with built-in tools.
Miracast Windows 10: how to enable? Setup instructions
Now we have come to the main stage. So, the user is going to use Miracast technology Windows 10. How to enable and configure this item? As easy as pie. We assume that all devices that are supposed to be combined with each other have the specified support and meet the necessary technical characteristics.
To enable the module, we first use the settings section, called up, for example, by searching the Start menu. Then the devices section is selected. In the window on the left side there is a line of connected devices, and on the right there is a button for adding new equipment, which you need to click on. First select Miracast, and after scanning, select the desired TV panel. Before creating a connection, make sure that the specified settings are active on the TV itself. If for some reason the connection was not established, simply repeat the above steps. To remove devices, use the command of the same name.
Similar solution for WiDi
This is what concerned Miracast Windows 10. I think it’s clear how to enable the function. Let's look at a similar Intel WiDi module.
To create a connection, simply launch the pre-installed Intel Wireless Display utility and follow the instructions of the “Connection Wizard”. During the connection process, a special code may be requested, which will be displayed on the TV panel. Otherwise, everything is simple. And there is practically no special user participation required here.
Practical use and possible connection problems
Let's move on to practical use. How to set up Miracast Windows 10? Firstly, you should note that when connecting, you can use some settings on both the computer and the TV. But that's not what we're talking about now.
Secondly, to enable broadcasting, you should use the same settings and devices section, and then go to the projector. The item for enabling image transfer to the screen is used here. As you can see, everything is simple. In some cases, problems may also occur. There could be many reasons for this. However, most often failures occur in the case of, for example, a poor Wi-Fi signal. What else could it be?
Separately, it is worth saying that some devices from different equipment manufacturers may simply be incompatible with each other, either due to competition in the market, or for some other reason. Here, no matter how hard you try, nothing good will come of it. One solution to the problem may be to purchase and install a special wireless adapter with full Miracast support on the TV panel. As a rule, there are no problems with computer systems, even if the graphics adapter is not a discrete video card, but an integrated one like Intel HD Graphics. In this case, this does not play a special role.
Conclusion
So we’ve figured out the Miracast technology in Windows 10. I think it’s already clear how to enable and configure this module. As a rule, even the most unprepared user should not have any problems at any stage of creating a connection, since the entire process is as automated as possible. The main condition is technology support from the computer and TV, as well as a good Wi-Fi signal level. Please note that when establishing a communication session, you don’t even need to change anything in the router settings, not to mention opening additional ports or anything like that.
fb.ru
What devices can use Wi-Fi Direct?
The list of supported devices includes the following:
- computers (with an adapter) and laptops - for connecting to other devices, transferring files, broadcasting media content on TV, etc.;
- TVs - to display the content of other devices, for example, a tablet, smartphone, laptop, PC;
- projectors and printers;
- phones and tablets.
Useful information: Other technologies are often used together with Wi-Fi Direct. For example, DLNA or Miracast. This software is designed for broadcasting videos and photos to other monitors and TVs.
Connecting using Wi-Fi Direct (without a wireless router)
The TV can be directly connected to a Wi-Fi/Wi-Fi Direct compatible device (e.g. smartphone, computer) that also supports the “DLNA Push Controller” function. Device contents such as photos/music/videos can be played on the TV. No wireless router (or access point) is required to use this feature.
Steps
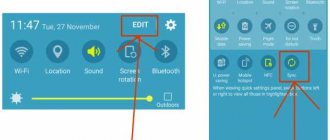
- Press the HOME button, and then select [Settings].
- Select [Network] → [Wi-Fi Direct] → [On].
- Select [Wi-Fi Direct Settings].
- Select the TV name displayed on the TV screen with the Wi-Fi Direct device.
If your device does not support Wi-Fi Direct, press the OPTIONS button and select [Manual].
- Use a Wi-Fi Direct/Wi-Fi device to connect to your TV.
- Send content from your Wi-Fi Direct/Wi-Fi device to your TV.
For more information, see the device instructions.
If the connection fails
When the standby screen for Wi-Fi Direct settings is displayed, press the OPTIONS button, then select [Manual]. If your device supports WPS, select . Otherwise, select [Other Methods] and follow the on-screen instructions to complete the setup.
Connecting to another device
Follow the above steps to connect your devices. You can connect up to 10 devices simultaneously. To connect another device when 10 devices are already connected, disconnect the unnecessary device, then connect the desired device.
How to enable Wi-Fi Direct on Windows 10
First, you need to make sure that the function is available on the desired devices. If you can’t find information about the Wi-Fi adapter on the Internet, then try using the following guides. If you can turn it on, the device is equipped with direct connection technology.
Direct activation via key combination
To enable the network, do the following:
- Press the “Win” + “P” key combination on your laptop or computer keyboard.
- In the window that appears, select the “Connect to a wireless display” option. It is located at the bottom of the screen.
- Click on the device in the list (the function on the other gadget must be enabled).
How to enable Wi-Fi Direct through Windows settings
If the previous method did not work, then try connecting through the “Options” window. As a rule, both methods work on Windows 10, but it depends on the second gadget:
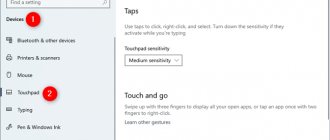
- Go to the "Options" window. Enter its name in the search bar, in the Start menu, or press the key combination “Win” + “I”.
- Select the "Devices" section. Click on "Add devices".
After this, the search for available connections will begin.
Connection problems and solutions
Despite the simplicity and convenience of the settings, many users encounter data transfer failures or the system refuses to connect. Malfunctions may be due to the problems described below.
Lack of current driver version
In the context menu called by simultaneously pressing the Win and R keys, the line “Connect to a wireless display” does not appear. This indicates that there is no current version of the driver or the hardware is not able to support this function.
Testing assumptions is done using the cmd.exe console (command line) as follows:
- Press the Win and R keys simultaneously or launch “Search in Windows” located on the Taskbar.
- In the window that opens, enter “cmd” and click “OK”.
- After starting the console, write the command: “netsh wlan show drivers” and press “Enter”. To establish a connection, just update the driver if the “Hosted network supported” option is “No”. When using the latest version of the driver, the lack of connection indicates the need to replace the adapter with a modern model.
Connection error despite correct setup steps
If all drivers are updated, the latest model equipment is used and the sequence of actions is followed, but it was not possible to connect the equipment, then you can perform the following actions:
- reboot the equipment - both the PC and the connected device;
- change the connection method;
- reduce the distance between devices - there may be interference along the signal path that limits communication.
In the current high competition, many manufacturers limit the compatibility of devices from different brands. In this case, the connection problem cannot be solved without replacing the gadgets themselves.
Using Wi-Fi Direct technologies on Windows 10 allows you to establish a wireless connection with almost any nearby gadget. By connecting all devices, you can create a home network, completely excluding the router from it. You can distribute the Internet through a network adapter.
Previous post How to use Wi-Fi on Russian Railways trains?
Next Post Best Methods to Hack Wi-Fi Password