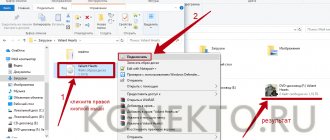
Hello! Today I will tell you how to rollback and restore the Windows operating system using the Symantec Ghost program! The question will immediately arise, “Why do I need this?”, so, imagine that a virus has entered your computer, or something happened to the files of the Windows operating system, after which the OS will not boot...
At such moments, the thought comes to you: “Oh God! You will have to reinstall Windows again, look for Drivers again, and reinstall programs. And why did this happen to me and today?”, so, so that such thoughts do not enter your head and spoil your nervous system, this method of restoring the system was invented.
Symantec Ghost 11.5 is the most simple and easy-to-use program for creating, backing up and restoring an image of hard drive (hard drive) partitions.
The essence of the method is Recovery using Ghost:
- download LiveCD (click here: LetitBit.net) or (click here: DepositFiles.com) (my build, with the Symantec Ghost program, with SATA drivers already loaded, for laptops and PCs, with new hard drives)
- burn the LiveCD image onto CD-R or USB .
- install clean Windows .
- install the necessary Drivers.
- install the necessary software.
- make a backup copy (read how to do it below) of the partition on which your operating system is installed using the Symantec Ghost .
And now, after your operating system has died, for some reason, you can always return Windows with the Drivers and necessary software already installed.
Create a backup!
1. Click on the “OK”
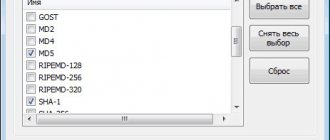
2. From the navigation menu, select a backup method:
From disk to disk - Local - Disk - To Image (partition for image)
3. Select the source disk (the disk of which the backup copy will be made, that is, the disk where your installed operating system is located) - Click “OK”
4. Choose the place where your backup copy will be stored. In the future, this image can be recorded on any media and placed on a shelf so that it is always at hand.
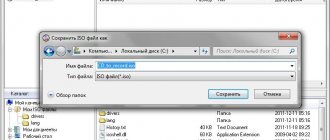
5. In the “File name : ” , enter the name of the image, for example “WindowsXpSP3” , then click on the “OK” , note, “Files type:” - the type should be “ *.GHO”
6. Next, select the compression method, usually I select “NO” , but you can also select “Fast” .
7. The image has been created successfully! 
Norton Ghost is a necessary and sufficient program
Today I want to tell you not about another piece of hardware, but about a program. Utilities designed for overclockers are virtually invisible in the world. For example, I have long been approaching full-scale testing of programs designed to test the stability of an overclocked system. Two things stop me: firstly, such a check will require a lot of time, which we don’t have :o). Secondly, I have not yet found a single worthy program among such programs :o(. Therefore, to begin with, I decided to talk about a program that, at first glance, has nothing to do with overclocking - Norton Ghost. It’s great if you know about the capabilities of this program or even use it or something similar. This note is for those who still spend long hours, adding up to weeks and months, reinstalling their operating system or cleaning it. So, what can this program do? At first glance, quite a bit: it allows you to save an image of the entire hard disk or one of its partitions and then, if necessary, recreate a disk or partition from the image. In addition, the program allows you to copy the contents and structure of partitions from one disk to another. Nothing special, I thought , when I briefly glanced at the description of this program on the CD that came with my new motherboard - it’s just another backup program, and I can copy data from disk to disk without it. I threw the CD into the far corner and still regret that I didn’t immediately figure out the capabilities of the utility :o(.
Who is the program intended for? For everyone :o). Primarily for testers. This morning you tested the Intel845D motherboard, and in the evening you need to test the video card on the SiS motherboard and what should you do, rearrange Windows twice a day? How long will this take? Or keep your own HDD for each chipset? You'll go broke.
It is clear that there are not so many testers in percentage terms, but many computer users value the safety of their data and regularly perform backups. You can use a streamer or CD-RW, you can organize a RAID, or you can use Norton Ghost.
Overclockers are also not the most numerous, but they are a very respected part of users :o). What happens when you overclock the processor? Freezes, reboots, installation and demolition of test programs are terrible. And how to live with all this rubbish when you have finally decided on the capabilities of your processor? Reinstall again?
Well, you are an ordinary user who works on a computer, maybe dabbles in games, has never driven and is not even going to overclock anything or install batches of beta versions of programs downloaded from the Internet. It is well known that even when working in such a gentle mode, over time, the stability of Windows decreases, and the frequency of errors and freezes increases. You can, of course, pore over the registry for an hour, clean out the accumulated garbage, with the risk of deleting something you need due to insufficient qualifications or simply through inattention, defragment it, but with Norton Ghost everything is done much easier and faster.
My recipe for using the program is very simple. First, you need to divide your hard drive into at least two partitions: a small system partition and a data partition, a working partition. For the system partition for Windows 98, I usually allocate 0.8-1.2 GB, and divide the rest into two more parts, one for work and games, and the second for archives and documents. The number of partitions depends only on your desire and the capacity of the hard drive :o), but it should not be less than two. Although, if you have several HDDs, then one can be entirely dedicated to the system.
Then you still need to install Windows :o(. The procedure is tedious and routine, but you can console yourself with the fact that this is the last time you do this for the next few months, or even years. Immediately after installing the system, even before installing drivers and programs, immediately
make an image of a clean, unsullied operating system. For Windows 95 and 98 users, it is enough to reboot into MS-DOS mode and run Ghost.exe, but for others you will have to boot from a floppy disk.
The program interface is extremely simple and clear. You select the disk or partition you want to make an image of, then which disk or partition to save the image on, the file name and compression level.
announcements and advertising
2080 Super Gigabyte Gaming OC for 60 rubles.
Compeo.ru - the right comp store without any tricks
RTX 2060 becomes cheaper before the arrival of 3xxx
Ryzen 4000
series included in computers already in Citylink
The price of MSI RTX 2070 has collapsed after the announcement of RTX 3xxx
Core i9 10 series is half the price of the same 9 series
The price of memory has been halved in Regard - it’s more expensive everywhere
If you suddenly don’t understand something, which I deeply doubt, you can read the description or look at it in pictures using Shockwave technology on the Symantec website dedicated to the program. In addition, you can find a bunch of materials on this topic on the Internet, and perhaps the rules for working with the program are in the description for your motherboard.
In principle, you can limit yourself to creating an image of “clean” Windows. If necessary, in a couple of minutes you can recreate your undamaged operating system from an image. The downside is that you will have to install drivers for quite some time, install programs and games, adjust colors and resolutions, and all the benefits of using Norton Ghost will be lost. Personally, I rarely use such a “from scratch” system installation, only when changing the configuration globally. The next step is to create a full-fledged working version of the operating system.
I won’t tell you how to install drivers and what resolution is better to choose - you know all this better than me. Let's assume that everything is already configured, there are drivers, DirectX and a favorite picture on the desktop. It's time to install programs and games. This is where some care is needed. By default, applications tend to be installed on drive C, that is, on our system partition, but in this case the volume of data will increase by 600 megabytes with each installed game, and the time to create the image, to unpack it, and the size of the disk for storing the image will accordingly increase not infinite. This situation cannot suit us in any way, so all the programs you use need to be divided into two main groups: those that necessarily require installation and those that, once installed, can be used as much as you like. In my experience, the vast majority of programs do not require installation! There is a not entirely correct, but very simple way to check which class a program belongs to. Try moving the entire directory with the program to another disk, partition, or simply another folder and run the program from there. In 99% of cases, she will earn money in a new place without any problems. We install such a program on drive D, the working partition. For example, in the long name C:\Program Files\Adobe\Photoshop suggested during installation, it is enough to change the first letter and we will get the path D:\Program Files\Adobe\Photoshop that is quite suitable for us. Of course, any other options that suit you are possible.
If the program necessarily requires installation, then again two options are possible :o). For small programs or programs that take a long time to install, you can make an exception with reboots and install them on the system drive. We will install the remaining programs later.
So, immediately after installing the drivers and customizing the system to suit our personal preferences (colors, resolutions, etc.), we install only
those programs that you use regularly and which require installation.
For example, my antivirus program was one of these. After this, we immediately
create a “working” image of the operating system, completely ready for use.
That's all. Now you can do whatever you want with your operating system, install and uninstall any programs and even delete a couple of system files :o). Because you know that at the slightest failure, at the very first signs of instability, you just need to boot from the floppy disk, launch Norton Ghost and in about three minutes you will get your operating system back, completely customized according to your preferences
. All we have to do is install the rest of the programs, which are large in size and definitely require installation, and make shortcuts for programs and games on the “working” disk. To avoid fiddling around for a long time, I first made a copy of the Desktop, Start Menu and Favorites folders, and then copied them to the system drive.
There are several more important nuances that will help you comfortably use Norton Ghost:
- Before creating the image, reassign the standard location of the C:\My Documents folder, for example, to D:\My Documents, then you will not lose the necessary piece of paper when overwriting drive C.
- Norton Ghost works great with CD-RW. If you wish, you can save the image to a CD-R, and Ghost will make it bootable, and then boot from the CD, rather than from a floppy disk.
- The size of the system disk should be minimally sufficient to install the system, a small number of programs that necessarily require installation, and a swap file. If you use Hibernate mode, you will need additional space.
- Do not install programs on the system disk so as not to lose them when the image is overwritten. Lack of disk space will hinder you from installing something large, but out of habit you can accidentally install something small on drive C.
- To reduce the size of the image, the paging file can be moved from the system disk to the working disk.
- Depending on the version of the program, you can copy discs from a computer to a computer connected via a network or USB. Very convenient for system administrators or assemblers who need to install an operating system on several computers of the same type.
- The program understands many file systems, and no preliminary formatting is required to unpack the image. If the size of the disk or partition to which the image is unpacked is larger or smaller than the original one, the program will automatically adjust the sizes or you can change them yourself.
- Now, in order to have several operating systems on one computer, it is not necessary to use multi-booters and waste disk space with unused operating systems. It is enough to have an image that, when compressed, takes up much less space and unfolds in a few minutes.
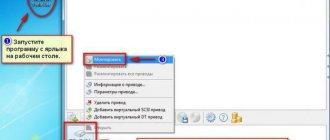
- The program understands many parameters entered on the command line. You can create a floppy disk where you can explicitly tell the program which image to unpack and where. Then, by inserting the floppy disk into the floppy drive and rebooting the computer, in a few minutes you will receive an automatically restored system. The method is especially convenient if you set up the system for someone, and after a couple of days they call you and say in a plaintive voice that nothing is working again. It’s almost impossible to explain something to an unprepared person over the phone (I tried it myself :o)), going back to set it up again breaks it. Now all you have to do is say: “Insert the floppy disk labeled Ghost and press Reset” and this will solve all the problems. Similarly, you can configure the program to automatically create an image.
- If you don’t have the program at hand, you don’t need to download the multi-megabyte installer. The only file you will need is ghost.exe, it can be found on ftp servers and its size is less than 700 kilobytes. Another useful utility is Ghost Explorer. The program allows you to view the contents of the image and, if necessary, unpack only one file or directory. She can add something to the image or, on the contrary, remove it.
- There are similar programs from other manufacturers, such as Drive Image from PowerQuest or Paragon Drive Backup. Try them, maybe you will like them more.
How to restore the Ghost image?
You must select Local - Disk - From Image . The next step, like the backup method above, is simply selecting the source of the image backup file.
Just in case, I’ll give an example in the form of pictures so that you don’t get confused when rolling back the operating system! There are different situations.
1. Select our disk where you want to restore your operating system, that is, the disk where Windows is located, which does not start or is damaged for some reason .
2. Select the image that we want to restore, in our case it was “WindowsXpSP3”.
I hope I described everything in an accessible and understandable way, now you don’t have to waste time searching for Windows, where to download it, how and where to write it down, where to look for the necessary firewood, and so on...
End! Write all questions in the comments of this post!
Creating a partition (disk) image
1 Click Local. 2 Select Partition , i.e. Partition (section). 3 Select the To Image item. This means that we want to save the partition to the image:
4 Select a physical disk.
5 Click OK :
6 Select the partition (section). 7 Click OK :
8 From the top drop-down menu, select another drive where you want to place the image of the first drive. 9 In the File name
, enter a file name.
10 Click Save to save the file into which the image will be written:
11 Select the compression level. We recommend choosing Fast : 12 Now the program asks “Continue creating the image?” We answer Yes
The creation process starts. You need to wait until the progress reaches 100%:
When completed, you will see a message like this. Click Continue :
Now you can click on Quit and restart the computer with the RESET button.
Attention! Keep in mind that to create a full backup of Windows 7 or Windows 8.1, create an image of not only the partition with the operating system itself (the example of which the instructions are written), but the boot partition, if there is one on the disk. A backup copy of the latter may also be useful to you.
The Windows7 boot partition takes up 100MB. The Windows8.1 boot partition takes up 350MB.