Using a laptop or desktop PC on the Windows 7 operating system, users often encounter problems loading it, system freezes, or a blue screen. The main causes of these problems may be viruses, deletion of system files and low-quality software. To solve these problems, just use system restore points .
These restore points are designed to restore the OS to a point in time when it was stable . Each restore point is created automatically when there are some changes in the system. For example, when installing a driver or software.
In this material we will pay special attention to the command line , with which we will restore Windows 7. By restoring the OS through the console, you will significantly speed up the process. Our article will be of particular interest to novice system administrators and advanced PC users.
Running System Restore in the console when the OS boots normally
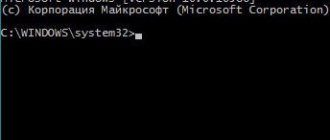
If in Windows 7, after loading, unstable operation is observed, programs do not open, system components freeze and do not work, then in this case it is necessary to roll back to the previous saved point. Let's launch the console as Administrator. To do this, go to the “ Start ” menu and type “ CMD ” in the search. Then right-click on the result found and select “ Run as administrator ” from the context menu.
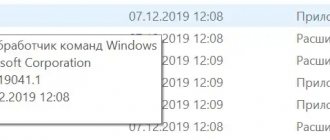
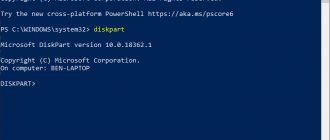
After these steps, the console will start in Administrator mode. In the running console window, enter the command rstrui.exe
After executing the command, the System Restore Wizard will open. Click the Next > button in the window that appears to proceed to selecting recovery points.
Let's select a suitable restore point at which Windows 7 functioned normally and continue.
In the window that opens, click the Finish button and confirm the message. After confirming the message, we will start a system rollback to the selected restore point. If the restoration is successful, you will see a corresponding message.
As you can see, launching recovery through the console is not difficult at all.
System Restore Using the Command Line
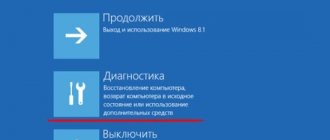
Start your computer in safe mode. While Windows 7 is starting, press the F8 key on your keyboard several times until the Windows Advanced Options menu appears, then select Safe Mode with Command Prompt from the list and press Enter. When downloading Windows 10, 8.1, it is better to use a bootable USB flash drive. When loading the installation media, click System Restore as shown in the screenshot below.
The System Restore link will take you to the Select Actions section, where you need to click Troubleshooting and then Command Prompt.
If the computer boots, read the instructions:
When Command Prompt mode loads, type the following line: cd restore and press ENTER. Then type this line: rstrui.exe and press ENTER.
In the window that opens, click “Next”.
Select one of the available system restore points and click Next (this will restore your computer system to an earlier time and date).
In the window that opens, click “Done”.
If you are dealing with a ransomware infection, download and scan your computer with recommended malware removal software, after restoring your computer to a previous date.
Please note that in some cases, system restore will not fix security infections—malware may be hiding in restore points. After restoring the system, scan your computer with anti-spyware software.
Restoring via the console in safe mode
The recovery method described below is necessary if Windows 7 cannot be started in the usual way. To go to the Windows alternative boot menu, press the F8 key when the system starts (there may be other options, for example, Del or others). In this menu you need to select the item shown in the image below.
By selecting this item, the operating system will boot without a graphical interface , and the only means through which you can control the system will be the console . In the console window, enter the already familiar command rstrui.exe
By executing this command we will open the System Restore Wizard. Let's select a suitable access point in the wizard.
And click the Next button >. Then we will run system recovery.
From the example it is clear that it is identical to the previous one. The only difference is that Windows starts in safe mode with console support. Typically, this method almost always works, even if the system is heavily damaged by viruses , since at startup the OS loads only the main drivers and there is no access to the Internet.
Starting Windows 10 Recovery Mode
back to menu
Reboot in Safe Mode
Before restoring, you need to make sure that there are no malicious files on the system. If a virus attack has damaged Windows, then it is worth conducting a deep scan of the entire computer.
First of all, we reboot our PC in safe mode. To do this, open the Start menu.
Find the “Options” item and open it by clicking the left mouse button.
Options
Now click on “Update and Security” → “Recovery” → “Special boot options”.
Find the “Restart now” option and select it.
As a result of this, the “Select Action” will open in front of you.
This item gives us three actions to choose from; select the “Diagnostics” position.
Action selection
In the window that opens, select “Advanced options”, and finally “Download options”.
From the proposed list of reboot options, we need to “Enable Safe Mode”.
Boot Options
Click on the “Reboot” button.
This mode can also be selected in a short way: go to “Start”, hold down the Shift key and click on the “Reboot” action. The screenshot describes in detail:
Safe Reboot
The same function can be set by default via the command line.
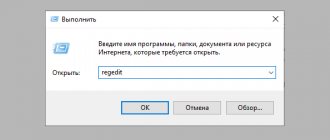
First, open it (it’s shown above exactly how) and enter just one command:
bcdedit /set {default} bootmenupolicy legacy and press Enter.
Place to enter
We close our terminal window and safely restart the computer in the usual way.
During system startup, press the F8 key and a menu for selecting a boot method will appear in front of us.
back to menu
VIDEO: Restoring Windows 10 using the command line
Restoring Windows 10 using the command line
Video instruction
back to menu
Virus cleaning
It doesn’t matter at all what kind of antivirus you use.
Before the system recovery process, be sure to check your PC for harmful programs or files.
Use "Deep Scan" for this.
Computer scan options
back to menu
Safe mode with command line
Let's start our computer. After a few seconds, press the F8 key so that the boot selection window appears on the screen.
We follow the familiar path: “Diagnostics” - “Advanced parameters” - “Command line”.
The screenshots show the entire path in detail.
We can move using mouse clicks or keyboard arrows.
After each selection, methodically press Enter to enter.
Action selection
Advanced Options Menu
In some cases, the “Startup Repair” item can help us. It's also found in advanced options. This is a built-in system utility that can automatically fix or repair Windows boot.
Built-in utility
In the window that opens, simply select the name of the operating system from the list provided (if there are several of them).
After the automatic process of eliminating problems that prevent Windows from loading correctly, our computer will work normally.
If this method does not help, we resort to the command line.
In the input field, write the command
bcdboot.exe, then put a space.
Next we need to specify the system drive letter (mostly C) and enter the name of the operating system (Windows).
Ultimately the command will look like this:
bcdboot.exe C:\Windows
back to menu
VIDEO: Windows 10 Command Line
Windows 10 Command Prompt
Video instruction
back to menu
How to find out the system drive letter?
We will also use the command line for this. Enter the command
diskpart and then press Enter
After opening this command, we write
list disk , press Enter.
We will see information about all the disks that are on the computer.
From this list we need to find the system one. We are recruiting
sel disk 0.
After this, the disk we need should automatically be selected.
To open detailed information about him, write
detail disk
Disk selection
In the new information window we see the name of the required system disk.
Shown in detail in the screenshot:
detailed information
This search is made in order to avoid errors during recovery.
The name of the system drive, which is assigned to it by default, does not always match the letter on the command line.
In our case, D turned out to be systemic:
To exit the “diskpart” service, enter the word
Exit and press Enter.
Now we can return to the fixing process by typing the command
bcdboot.exe D:\Windows
Press Enter again.
Ending the process
If you followed all the instructions correctly, a message will appear indicating that the download files were successfully restored.
Close the command line and reboot your device.
back to menu
VIDEO: Windows 10 UEFI recovery using the command line
Repairing Windows 10 UEFI using the command line
10 Ways to Restore Windows Using the Command Line
We hope that our tips helped you effectively deal with problems starting the Windows operating system.
We have described in detail the mechanism for working with the console, which will help you manually enter the necessary configurations.
9.6 Overall Score Restoring the system is easy
The instructions describe all the ways to restore the system via the command line. Options from Windows XP to “ten” are considered.
Running System Restore in the console using the Windows 7 installation disc
If the second method does not help restore the system, then the only option to start recovery using the console is an installation disk or bootable USB flash drive . Let's turn on our PC and boot from the Windows 7 installation disk.
Now let's move directly to the console itself. To do this, click the “ System Restore ” hyperlink, which will start a search for installed systems.
Let's select the operating system we need and move on to the next window.
In this window, select the “ Command Prompt ” item, after which it should definitely start.
In the console, we will type the command rstrui.exe that is already familiar to us. After executing this command, the recovery wizard will start. The work of the master is identical to the examples described above. Therefore, we will skip further description of the recovery wizard.
Windows emergency recovery using a bootable USB flash drive
Situations are possible when, after successfully creating a system restore point, the user cannot get to the desired menu even through safe mode. Often, this happens due to damage to important system files. The most reliable method to solve the problem is to use the Windows 7 installation disk.
First of all, you will need a bootable CD or USB media. If you do not have the original disk with the “seven”, you can create it manually. Special software designed for writing a disk image to a drive will help, for example: UltraISO , WinSetupFromUSB , Acronis True Image , Rufus or similar utilities. More details about these applications and their functionality are provided in this article.
So you have a bootloader. Let's figure out what to do next.
- Insert the bootable USB flash drive into the USB port (or CD into the drive);
- Turn on the computer and immediately (before the Win 7 start logo appears), press the Del or F2 key several times (by default);
There are other buttons for calling up the BIOS. We suggest reading useful articles on how to get into the BIOS from a desktop computer, as well as how to load the shell on different laptop models.
- In the BIOS itself, look for and select the Advanced BIOS Features item (or Hard Disk Boot Priority, depending on the shell manufacturer);
- Click on the line First Boot Device (or 1st Drive);
- Specify your flash drive or CD as the primary device instead of the hard drive and press Enter;
- To save new settings, press F10, then exit the shell with the ESC key;
- A reboot will occur and a black screen will appear with the words Press any key to boot from usb or cd, dvd;
- As a result, the standard Windows installation interface will launch; in its lower left part, select “Restore operating system” (as shown in the screenshot);
- Next, we proceed as in the first paragraph of the article. We restore the operating system using one of the available backup points.
If you were able to fix the problem and everything worked, do not forget to disconnect the flash drive or CD, then go into the BIOS and return the main HDD to the first position in the section with the priority of the startup equipment.
Recovering the Windows boot record using the console
Using a PC with the Windows 7 operating system, users often encounter problems loading it and receive messages of this type when the OS starts.
Or something like that.
MBR boot record or a corrupted BCD . You can solve this problem using the Bootrec.exe . Using the " /FixMbr " and " /FixBoot " commands, the utility can create a new boot entry and fix it.
To use these commands, we need to boot from the installation disk and launch the command prompt, as in the previous example. Let's use the first command “ /FixMbr ” of the Bootrec.exe .
By running this command we have fixed our MBR . If this command does not help, then use the second command “ /FixBoot ” of the Bootrec.exe .
By running this command we will create a new boot entry that will allow Windows 7 to start.
The example shows that using Bootrec.exe in most cases, you can restore or fix the boot record in Windows 7. I would also like to note that the main reasons that damage or overwrite the boot record are:
- Resizing the local disk with the operating system using special software;
- Installing old Windows operating systems over new ones . For example, installing Windows XP on the same PC with Windows 7 installed;
- Write a third-party boot sector that Windows does not support . For example, linux bootloader GRUB;
- Various viruses and malware.
By paying attention to the reasons that damage or overwrite the boot record, you can keep your PC in working order.
Steps to restore Windows 7 via Command Prompt
There are many reasons why the “seven” may stop starting, but the “Command Line” should be used in such cases:
- Restoring the hard drive;
- Boot record (MBR) corruption;
- Violation of the integrity of system files;
- Problems in the system registry.
In other situations (for example, problems due to viral activity), it is better to use a more specialized tool.
Let's look at all the cases, from the most difficult to the simplest.
Method 1: Restoring disk functionality
One of the most difficult startup errors not only for Windows 7, but also for any other OS is problems with the hard drive. Of course, the optimal solution would be to immediately replace the failed HDD, but a free drive is not always at hand. You can partially restore the hard drive using the Command Line, but if the system does not start, you will have to use the installation DVD or flash drive. Further instructions assume that the user has them at his disposal, but just in case, we provide a link to the manual for creating an installation drive.
- Before starting the procedure, you need to prepare the computer BIOS accordingly. A separate article on our website is devoted to these actions - we present it here so as not to repeat ourselves.
Connect the flash drive to the computer or insert the disk into the drive, then reboot the device. Press any key to start downloading files.
Select your preferred language settings and click Next.
- At this stage, click on the “Startup Recovery” item.
Here are a few words about the features of hard drive recognition by the recovery environment. The fact is that the environment defines the logical partitions and physical volumes of the HDD differently - drive C: it designates the reserved system partition, and the partition with the operating system itself will be D: by default. For a more precise determination, we need to select “Startup Recovery”, since it indicates the letter of the desired partition.
- Once you have found out the data you are looking for, cancel the startup repair tool and return to the main window of the environment, in which this time select the “Command Prompt” option.
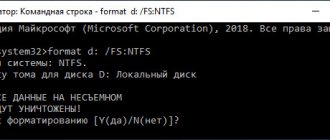
Please note that if the system is installed on drive D:, then the command should include chkdsk E:, if on E:, then chkdsk F:, and so on. The /f flag means starting an error search, the /r flag means searching for bad sectors, and /x means unmounting the partition to make the utility easier to operate.
- Now the computer needs to be left alone - further work occurs without user intervention. At some stages it may seem that the execution of the command is frozen, but in fact the utility has stumbled upon a hard-to-read sector and is trying to correct its errors or mark it as bad. Due to such features, the procedure sometimes takes a long time, up to a day or more.
This way, of course, the disk cannot be returned to its factory state, but these actions will allow you to boot the system and make backup copies of important data, after which you can begin to fully treat the hard drive.
Method 2: Recover Boot Record
A boot record, otherwise known as MBR, is a small partition on a hard drive that contains a partition table and a utility for managing system booting. In most cases, the MBR becomes damaged when the HDD has problems, but some dangerous viruses can also cause this problem.
Restoring the boot partition is possible only through the installation disk or flash drive, which is why it is not too different from bringing the HDD into working order. However, there are several important nuances, so we recommend that you refer to the detailed guides below.
Method 3: Fixing damaged system files
The vast majority of situations where system recovery is required are related to problems with Windows system files. There are many reasons for failures: the activity of malicious software, careless user actions, some third-party programs, and so on. But regardless of the source of the problem, the solution will be the same - the SFC utility, which is easiest to interact with via the Command Line. Below we provide you with links to detailed instructions for checking system files for integrity, as well as recovery in almost any conditions.
Method 4: Fixing problems with the system registry
The last option in which it is advisable to use the Command Prompt is if there is critical damage in the registry. As a rule, with such problems, Windows starts, but big problems arise with performance. Fortunately, system components like the “Command Prompt” are not subject to errors, so through it you can bring the installed Windows 7 into working form. This method is discussed in detail by our authors, so please refer to the following guide.
Conclusion
We have looked at the main types of failures in Windows version seven, which can be fixed using the Command Line. Finally, we note that there are also special cases such as problems with DLL files or particularly unpleasant viruses, but it is not possible to create instructions suitable for all users.
Thank the author and share the article on social networks.
BCDboot utility
The Windows 7 installation disc contains another great utility that can be used to restore the OS. Let's also boot from the installation disk into the command line. Then enter the command shown below.
In our case, Windows is installed on the “E:\” drive, so we specified the path in the “ E:\windows ” command. By running this command we will restore the BCD as well as the bootmgr .
By entering the bcdboot.exe command in the console, you can see a description of the utility, as well as a list of additional keys that can be used when starting it.
Console utility MBRFix
This console utility comes bundled with the multiboot Hiren's Boot CD .
Hiren's Boot CD is a disk with dozens of programs that help many computer scientists and system administrators. The main task of MBRFix is to restore the Windows boot loader. The Hiren's Boot CD image can be downloaded from the official website www.hirensbootcd.org. After booting from Hiren's Boot CD , we will be taken to its boot menu.
In this menu, select “ Mini Windows XP ” and press Enter. By completing this step, we will download a portable version of Windows XP with the necessary utilities to diagnose and repair the system, including our MBRFix . Now let's go to the “ HBCD Menu ” from the shortcut on the Desktop. Then in the “ Programs ” menu go to the “ Partition/Boot/MBR/Commandline/MBRFix ” items.
This will allow us to open the MBRFix . In the console window, enter the command MBRFix.exe /drive 0 fixmbr /win7 /yes
This command will repair the boot record and bootloader , allowing Windows 7 to start.
Using Hiren's Boot CD with the MBRFix is especially convenient if you do not have the original disk with the seven.
Let's sum it up
In this material, we tried to look at all the ways to restore Windows 7 using the command line. Therefore, after reading this article, you can easily restore the functionality of your computer running Windows 7.
I would also like to note that if the OS system files are severely damaged or erased, then it will not be possible to restore the system or its boot loader. Therefore, if this is exactly the case for you, then backup all important information on your hard drive and reinstall Windows .
We hope that our material will help you restore your system or its boot record, and will also allow you to avoid similar problems in the future or quickly solve them.
System Restore Errors
It happens when Windows recovery is accompanied by certain errors. Let's look at the most common of them.
Error 0x80070005
Error 0x80070005 during Windows 10 system recovery indicates that there are problems with access rights, read more here.
Error 0x80070003
Error 0x80070003 when restoring a Windows 10 system occurs in various cases, for example, a weak network signal or a conflict between files and system components. Find solutions to this problem here.
Error 0x80070017
If error 0x80070017 appears when restoring the Windows 10 system, most likely some system files are damaged, this is the most common reason. Read more about fixing the error here.
Error 0x81000203
System Restore error 0x81000203 Windows 10 is related to the System Restore component. You can eliminate it in several ways, which we will discuss in more detail in a separate article.