For reference
Bluestacks is a popular emulator that creates an Android environment within the desktop operating system. The “parasite” feeds on the iron of the “donor”, but is not voracious.
The software is in demand in the market due to:
- optimized operation of gaming applications;
- convenient configuration of aspects of the emulator operation;
- intuitive user interface.
System requirements
To operate correctly, the program requires resources, which it can only take from a desktop platform (in our case, a PC). The official website of the project provides the following information about the “appetites” of the emulator:
- operating system – Win7 and higher;
- central processor - any component from Intel or AMD;
- RAM – minimum 2 GB;
- free space – at least 4 GB;
- fresh graphics and sound drivers;
- Administrator rights are required.
Installation
To install the emulating Bluestax application:
- Go to the official website of the project (or use the link below) and download the software distribution for the current platform.
- Double click to launch the Installer Wizard.
- Click on the installation item.
- After a while, the emulator will start and you will have to sign in to your Google account.
The procedure is simple and does not require significant time expenditure - everything here is done for the sake of primitivization, which we talked about earlier.
Let's sum it up
Bluestacks is a popular emulator that is popular in the market. Developers with enviable consistency release system updates, accompany the brainchild and are constantly searching for software faults.
| We recommend! InstallPack | Standard installer | ||
| Official BlueStacks distribution | Silent installation without dialog boxes | Recommendations for installing the necessary programs | Batch installation of multiple programs |
Our site recommends InstallPack, with its help you can quickly install programs on your computer, more details on the site.
source
Instructions - how to install BlueStacks on a Windows computer.
With the help of these detailed instructions, even a primary school student can install BlueStacks on a computer. Installing an Android emulator on a PC with Windows OS is not so difficult without it, but there are still a couple of nuances that you need to know about in order to avoid mistakes when installing BlueStax.
Hello. Without knowing how familiar you are with the computer and the degree of your readiness for installation, let’s go over a couple of preparatory steps. To correctly install the BlueStacks emulator on your computer, and this is categorical, you need to download the final version of the emulator from the official website, and at the same time study the system requirements. The article will open in a new tab - BlueStacks is a free emulator, read the system requirements, download the official version and come back.
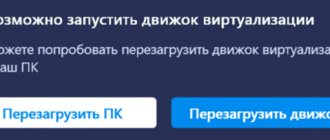
And in order to be sure to install BlueStacks on computers that meet the requirements, you need to check whether virtualization is enabled and whether it is supported by the processor at all - pre-installation setup and testing of the computer. Without virtualization, Android emulators will install on a PC, but under Windows they will slow down like the cheapest smartphones.
We will consider the pre-installation preparation. You did an excellent job, downloaded the BlueStacks application from the office. program website, enabled virtualization on the processor, let's move on to the simplest thing - installation. Decide on the hard drive partition - where we will install the program, “D” or “E” - where there is more free space, I do not recommend using the system “C” to install BlueStax.
Launch the downloaded “BlueStacks2_native_… .exe”, in the window that appears, give the go-ahead to the standard Windows security prompt, and firmly click on “Run”.
The program will begin unpacking; upon completion, a window with a license agreement will appear, send it to “Next”. In older versions of Windows, a User Account Control window will pop up, click “Yes”.
Let's return to the question of disk partition - click on the word "Browse", select "D" or "E", the program will create a BlueStacks package and install Android into it. 16GB of memory, new applications will be installed in this folder and will not clog or eat up free space on the system partition “C”.
We check the presence of “checkmarks” in the BlueStax application and communications store, press the button - “Install”, the status bar appears.
The BlueStax application is installed - don’t interfere, sit back, meditate, and wait for the emulator installation to finish. We check whether it is connected to the Internet (it will start faster and without errors), click “Finish”. If you did not uncheck the “Launch BlueStacks” box, the application will begin initializing.
How quickly the Android emulator will start depends largely on the characteristics of your PC - the configuration of modern computers. After waiting a little, you should eventually see the following picture in the program.
Click on the gear - “Settings”, in the Android settings tab that opens, add a Google account and agree to the terms of use of the service.
Congratulations! You have successfully downloaded and installed BlueStacks on your computer. The program is accepted by Windows and is ready to install Android games and applications, both directly from Google Play and from separately downloaded APK files from other sources - installation of games and applications.
If something goes wrong with the emulation, it freezes, or doesn’t start for a very long time - click on the gear in the top right, in the drop-down menu on - “restart the Android module”. Also see: BlueStacks errors and how to solve them.
source
How to install cache?
To install the cache you will need to do the following:
- Download the game you are interested in from Google Play.
- Install a file manager.
- Installing the game in the APK extension.
- Moving the game cache to the required folder.
When the apk file of the game is downloaded, you need to install the manager in the emulator. To do this, you need to launch BlueStacks and open “System Applications”, and then go to the Google Play tab. You need to enter “ES Explorer” in the search bar. When the file manager is found, you should go to the page for this extension and click “Install”, and then you must agree to the terms. The explorer window will no longer be needed and the user should go to the main screen of the emulator.
After this, the game is installed. To install, click on the “Install APK” button. Then you should select the file with the previously downloaded game. In BlueStacks, installing the cache is done by moving the files to the desired folder. To do this, open the folder, which can be found in the following location paths, and paste the copied data:
- C:\Users\%Username%\Documents\;
- C:\Users\%Username%\Pictures\.
When the folder is open, you should return to the emulator program, and during this, ES Explorer will launch. After this procedure, the user clicks on the “menu” button located in the top left corner. Then you need to select the Internal Storage tab, located in Local Storage. There you should open the Windows folder, where you indicate the path to the location of the copied cache files (Pictures or Documents). Then you should click on the document and hold down the left mouse button for a few seconds. This will open the file menu, where you should select “Copy”.
After this, the user must go to the panel with the “menu” button and select “Home Folder”. Here you should open the Android folder and select the directory with the value obb. Afterwards you need to create a root system with an English name, like the game cache. For example, com.wb.goog.mkx if this is Mortal Kombat X. The user selects the created folder and clicks "Insert". This will help transfer the files to the resulting directory. This will take some time for the cache to migrate completely.
Installing and configuring BlueStacks for Windows
BlueStacks HD App Player is a special program that allows you to run Android applications on the Windows operating system. By installing BlueStacks, you get a shell on your Windows PC, into which you can download the desired programs and games directly from the Play Market without the need to use an Android smartphone. The emulator allows you to run Android applications in windowed or full-screen mode, and almost everyone can handle it. BlueStacks version 0.8.11.3116 (the latest at the time of writing this article) comes pre-installed with Android 4.0.4. A huge advantage of the emulator is that it supports Windows XP.
Installing BlueStacks
You can install BlueStacks by downloading the online installer from the official website. If you have a limited connection, you can find an offline installer on the Internet. At the moment, there are many assemblies with pre-installed games, but we will install them from the official website. So, download and run the installation file. Click “Continue” (Fig. 1), then select the location where we want to install (I left it as default), and click “Next” (Fig. 2). In the next dialog we see two checkboxes, leave them enabled to allow downloading games from the Play Store, as well as synchronizing games, and click on the “Install” button (Fig. 3). The installation of BlueStacks will begin, which may take several minutes (Figure 4).
Upon completion of installation, the emulator will launch in full screen mode (Fig. 5), and the built-in Android OS will be initialized and configured (Fig. 6). During the setup process, you will be asked to log in to your Google account to be able to install applications from the Play Store (Fig. 8), which will consist of two steps.
Click “Continue”, two login options will be offered: creating a new account and logging into an existing one. I chose the second option since I already have an account. In the next window you need to enter your login (Google email) and password (Fig. 9). The default input language is Russian. To switch to English, you need to configure your keyboard layout. To do this, click on the keyboard icon next to the clock and select the “Setting input methods” option. In the window that opens, click “Android Keyboard” (Fig. 10), then – “Input languages” (Fig. 11), uncheck “System language” and check opposite: “Russian” and “English (USA)” (Fig. 12 ).
Then click the “Back” button (the first button in the lower left corner). The English language has appeared in the layout menu (Fig. 13), set the “Use physical keyboard” switch to the “OFF” position for mouse input from the keyboard on the screen and enter your username and password in the appropriate fields, then click on the “Login” button. Upon successful login, you will be prompted to backup the system (I refused it by unchecking the corresponding box), and click “Next” (Fig. 15). A window will appear notifying you about the successful completion of the first step and a request to complete the second step (Fig. 16), click on the “Continue” button.
You will be prompted to re-enter your password to log into your account, enter the password and click the “Login” button (Fig. 17). The familiar window indicating successful authorization will appear (Fig. 18), after clicking the “Let's Go!” button. and accepting the terms of use of Google Play (Fig. 19), you will be redirected to the Play Store to install games and applications (Fig. 20).
Instructions
To begin with, we will talk about the parameters that can be changed from the program itself: graphics, language and screen. And to change the rest you will need an additional utility. In the article we will go through each point.
But, unfortunately, it is currently impossible to remove the mouse cursor in BlueStacks.
Graphic arts
Open the Bluestacks program. To get to the options menu, click first on the top icon, and then on the first item.
The Screen tab will immediately appear . Here, set the optimal resolution and DPI. It all depends on the power of the computer. If you have an average system, then stop at 1280 x 720 and 160 DPI .
For productive ones, set them to maximum. To apply the changes, click on the reboot button.
To continue setting up graphics in BlueStacks, go to the "Engine" . In the top section, you should activate the OpenGL , if it is not activated. Next, you need to allocate at least 1024 MB of memory to the system (preferably 2048 MB). And in “ CPU ” - the maximum number.
Language
Changing the language in BlueStacks is done directly from the Android platform options. In the third version of the program, you can get to them from the “System Applications” on the desktop.
And in the fourth, just click on the icons from the screenshot below.
Scroll to the page that appears (in both cases) to the “Language and input” and open it.
Next, open “Language” and select the appropriate translation from the list.
Orientation and full screen mode
Sometimes, to use apps comfortably on BlueStacks, you need to flip the screen. But here’s the problem: there is no such function directly in the Android emulator. You won’t be able to find it even with a strong desire. The Internet will offer you a bunch of strange methods, for example, editing the registry. But they are too bulky and stupid.
We suggest downloading a special application that expands the standard capabilities of the system. Rotation Control will do the job perfectly (Root is not required).
To download it, open Google Play and use the search function.
Once on the appropriate page, click on “Install” and then on “Open” .
All that remains is to activate the “ Start controlling rotation ” .
Now launch any other application. Next, pull out the notification shade. A new column with several icons will appear in it. They are responsible for the change in orientation.
And to make BlueStacks full screen, click on the corresponding icon below or press the F 11 .
But this can be done directly in the running application.
Device
And finally, we’ll figure out how to change the virtual device model in BlueStacks. For these purposes, you will need the previously mentioned Tweaker utility. You can download it from this link. Extract the contents of the archive to a convenient directory and open the BlueStacksTweaker5.exe .
Further procedure:
- Go to the "Settings" .
- You will find the necessary options in the “Device” .
- At the end, click on “Apply” .
- Close the utility and restart Bluestacks.
Installing applications from the Play Store
To install the desired game, use the search (Fig. 21), then on the game page click “Install” (Fig. 22) and “Accept” (Fig. 23). The game will download and install. After that, it can be launched from the main page (click on the “Home” button, the second button in the lower left corner) (Fig. 24).
You can also launch games from the Android menu. To enter the menu, click on the button with a plus sign in the upper right corner.
When starting games, information about the control keys is displayed. To prevent the window from appearing every time you launch it, check the “Don't show again for this app” box and click the “Close” button.
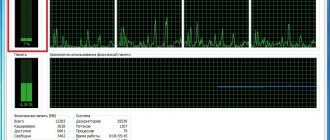
When installing applications, do not forget that the emulator has limited memory (8 GB), which is taken from your computer's hard drive. You can view the amount of remaining memory by clicking on the “Settings” button in the Android menu, and then “Memory”.
How to remove the cursor in Skyrim
One of the most common bugs in Skyrim is the appearance of a second cursor. If other applications are running in parallel with the game, this problem occurs quite often.
Applications can simply be closed so that the application works normally and the system cursor does not appear at the same time as the game cursor.
Sometimes it is enough to simply minimize and expand the game using the Alt+Tab key combination. If this solution does not help, Double Cursor Fix may come to the rescue. This fix prevents the annoying cursor from appearing after minimizing the game. Once installed, the plugin starts running along with the fun. To do this, you need to copy the file from the archive to the Skyrim root folder.
Skyrim is an adventure role-playing story with a huge open world
The problem with the mouse cursor can be solved if you go to the device settings, check the box next to “Display mouse pointer trail” and move the slider to the minimum value.
For fans of Skyrim and Dark Souls, a huge number of fixes and utilities have been released to help solve technical problems, making the competition process more comfortable.
Installing applications from your computer
On the Internet you can find a large number of Android games and applications for offline installation. To do this, download the installation file (extension “.apk”) to your computer and double-click on it.
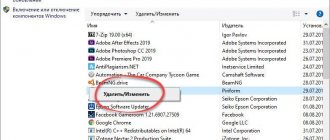
When closing a window, the emulator's work does not actually end, but only its shell closes. To shut down the program completely and free up memory, click on the BlueStacks icon in the Windows tray and select the “Quit” context menu option.
Testing BlueStacks on computers of different power (video):
3D game "Asphalt 8". Launch in BlueStacks (video):
source
Install BlueStacks on PC
To be able to run games and applications designed for Android on your computer, you will need to install an emulator. By simulating the operation of a smartphone with an installed OS, it allows users to install their favorite instant messengers, social networks like Instagram adapted for mobile devices and, of course, games. Initially, BlueStax was considered a full-fledged Android emulator, but has now retrained itself as an entertainment and gaming application, continuing to develop in this direction. At the same time, the installation process has become even simpler than before.
Step 1: Check System Requirements
Before installing the program, be sure to check its system requirements: it may be slow on your weak PC or laptop and generally not work very correctly. Please note that with the release of a newer version of BlueStax, the requirements may change, and usually upward, since new technologies and the engine usually always require more resources.
Step 2: Download and Install
Having made sure that the emulator is suitable for the configuration of your PC, proceed to the main part of solving the task.
You will be redirected to a new page where you will need to click on “Download” again. The file is a little over 400 MB, so start downloading while you have a stable internet connection.
Run the downloaded file and wait until the temporary files are unpacked.
We are using the fourth version, in the future it will be different, but the installation principle will remain the same. If you want to get started right away, click Install Now.
The change is made by clicking on the word “Folder” and working with Windows Explorer. After that, click “Install Now”.
We are waiting for the installation to complete successfully.
Once completed, the emulator will be launched immediately. If this is not necessary, uncheck the corresponding item and click “Finish”.
Most likely, you will decide to open BlueStacks right away. The first time you will have to wait 2-3 minutes while the initial setup of the visualization engine takes place.
Step 3: Set up BlueStacks
Immediately after launching BlueStax, you will be asked to configure it by connecting your Google account to it. In addition, it is recommended to adjust the performance of the emulator to the capabilities of your PC. This is discussed in more detail in our other article.
Now you know how to install BlueStacks. As you can see, this is a very simple procedure that will not take you much time.
Thank the author and share the article on social networks.
source
How to enter setup mode
Before making changes to the program settings, check the technical capabilities of the device. To do this, install a demanding game via Google Play. The user checks how the application will work on the default settings. The engine is responsible for this, allowing you to change the technical capabilities. The settings window may pop up before launching each game. To disable this function, uncheck the “Show this window at the beginning” checkbox. If necessary, you can open a window with advanced parameters in the game by pressing Ctrl+Shift+H.
To make changes to camera or motion controls, the corresponding settings open only when you first enter the game. Otherwise, at startup, an area appears at the bottom. The panel has several buttons in the lower right corner. To enter the configuration mode, you will need to click on the keyboard icon called “Open button configurator”. The user can then make advanced changes. Under some circumstances, the settings panel can be enabled on the BlueStacks home screen.
To enter the options menu from the main screen, click on the gear located in the upper right corner. The settings menu will open, where the following categories are highlighted:
- Screen.
- Engine.
- Quick hiding.
- Notifications.
- Settings.
- Backup and recovery.
- Update.
- About the product.
To improve or decrease performance, make changes to the screen and engine settings in the BlueStacks settings. The user is given a choice between DirectX and OpenGL. It depends on your needs and compatibility with the game. OpenGL uses the video card driver. Compared to DirectX, it will be more powerful. It is necessary to choose one of the engines if the game crashes or other problems arise when starting.
In the tab there is an item “Use advanced graphics engine”. This feature should be activated for demanding games. If the item indicates that it is in beta testing, then irregularities in operation are observed. Here you can adjust the number of processor cores required for use in the game. Additionally, you can change the amount of RAM to reserve in the emulator.
The number of cores must be selected based on the capabilities of the processor. Operation may be affected by the load level of applications and other processes. If the settings cannot be changed, then you should enter the BIOS and enable kernel virtualization. The amount of RAM varies, as does the number of processor cores. In this case, it is worth considering the number of brackets installed in a computer or laptop and their hardware size. The BlueStacks emulator limits the amount of available RAM and does not allow you to use more than 50% of the free part.
Emulator system requirements
Each program has its own system requirements. Among them are minimal and recommended. The minimum requirements ensure that the program will run. But no one promises normal work. Here are the minimum BlueStacks requirements:
- CPU (SoC): Intel or AMD;
- RAM: 2GB (minimum);
- HDD: 5GB;
- OS: Microsoft Windows 7;
- Updated video card drivers.
With this configuration the emulator will start. However, there can be no talk of any productivity. If you want to enjoy your favorite toys to the fullest, then you should look at the recommended Bluestacks system requirements. Here they are:
- CPU (SoC ): Intel or AMD Multi-Core with virtualization enabled in BIOS;
- Video card: Intel, Nvidia or ATI (preferably discrete);
- RAM: 8GB or more;
- HDD: 5 GB, solid state drive (SSD);
- Network: Broadband;
- OS: Microsoft Windows 10;
- Updated video card drivers.
With this computer configuration, you can already enjoy all the delights of mobile toys. If you are sure that your PC will definitely support this emulator, then you can safely proceed to the installation process. More about it in the next chapter.
Setting up camera and shooting controls
Control of vision and weapons in shooting games is usually done with the mouse. Mouse movements control your view, and the left button is usually assigned to punches or shots. In the control setup mode, a panel with icons will appear on the screen in front of you. Among them there will be a crosshair, this is the virtual camera control tool. Drag it to the part of the screen where you need to implement eye movement.
Installing Bluestacks on a computer
Now let's move on to the installation process. It is not as difficult as some people think. Moreover, the installation wizard will do almost everything without your help. All you have to do is click a few buttons.
But first you have to download the installation file. To do this, it is better to use the official website of the developer. It is there that you can find the current version without any “surprises”. So, here are the instructions telling about the algorithm of actions:
- Go to www.bluestacks.com and press the “Enter” button. “Download BlueStacks” button (light green) and click on it.
- We wait for the download to complete and open Windows Explorer. Go to the downloads directory, look for the file you just downloaded and double-click on it.
- The installation wizard will launch. “Accept software license” checkbox and click on the “Install now” .
Nothing more is required from the user. The installation will start automatically. After the installation is complete, the wizard will check the capabilities of the computer's hardware platform. All that remains is to perform the initial setup of the emulator: log into your Google account.
Setting up the accelerometer in racing
Touching or swiping on a computer is reassigned in the form of clicks and gestures with the mouse while holding the left button. Changing the settings for a game with an accelerometer is done after installing it. The emulator offers to change the controls yourself.
For games where the smartphone is the steering wheel, the computer defaults to keyboard buttons. Therefore, in the settings menu you can see the active areas of the screen. Some racing games introduce dynamic keys in these parts. To activate them, you will need to press these buttons. By default, this is done using the spacebar or arrow keys on your keyboard.
In-game accelerometer settings use the WASD buttons. In this case, W becomes the element of gas use, and S - the brake. If the game allows you to make turns with your smartphone, then on your computer you should enter the “Tilt” function. In the standard settings, the crosshairs indicate the buttons “left,” “up,” “right,” and “down.” If it is difficult to control the arrows, you can reassign them to convenient keys. The procedure is carried out in the same way as for other buttons. By entering the properties of the crosshair, you can change the angle and speed.