Windows
Author Irina Luneva
Date
Oct 11, 2016
27,457
Share
Microsoft Office programs have made the work of office workers much easier. The PowerPoint application allows you to make presentations, Publisher will help you develop a small booklet or even a newspaper and magazine, Access will allow you to control databases, Excel makes it possible to create tables with information and manage them, and set certain formulas for changes.
- LiveJournal
- Blogger
And this is not a complete list of useful utilities from the Office suite.
- Step by step instructions on how to make a line
- First option
- Second option
- Third option
- The fourth option is to make an underline
- Underlining text in Word 2003
The most popular application, which is used not only by employees, but also by students, is MS Word. What can I say, such a program will not be superfluous in the household. This is a text editor in which you can create reports, write term papers, leave notes and prepare an important document.
There are also more “advanced” editors on the Internet, but the functionality of MS Word can hardly be called meager. Selecting second and third level headings, drawing a table, choosing the best font, changing the color, underlining the text at the bottom in Word - no problem. Although difficulties arise, they are due to the ignorance of users. Not everyone knows how to make a line in Word and where to find the corresponding item in the menu.
And the underline is an important element. It allows you to mark important points in the text and separate one part of it from another. Therefore, it’s worth figuring out how to make a ruler in Word 2010. When the user masters such functions, text formatting will not cause problems.
Signs and special characters on the keyboard
The operation of a laptop keyboard usually does not require the installation of additional software. The only exception is the functioning of “hot keys”, for which it is necessary to install special utilities downloaded from the manufacturer’s website. The remaining buttons, including those that allow you to add a dash or any other punctuation mark, work on the drivers preinstalled in the BIOS.
Depending on the selected layout, some punctuation buttons change their location. You can safely use an exclamation mark, a dash, and an opening and closing parenthesis. Even a simple dash turns into an underscore when you press the Shift key.
Most punctuation marks and special characters should be placed this way by first holding down the Shift button. If, for example, a colon is drawn above the number “6” on the right, then you can put it on the Russian layout by pressing Shift. If the layout is English, then the character that is located on the button on the left will be printed. To help you better understand the difference, here is a table with all the punctuation marks in Cyrillic (Russian) and Latin (English) layouts:
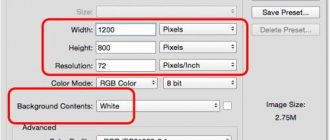
If you need to insert characters into the text that are not on the keyboard, then use a special table that shows combinations of the Alt key with numeric codes.
Using such tables (they are different), you can insert almost any symbol, from a note to a paragraph, an emoticon or a heart.
How to make underscores on a MacOS keyboard
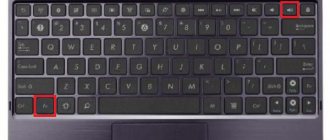
On an Apple keyboard, the underscore key is located in the same place - between 0 and =. To create an underscore on a MacOS keyboard, you need to take 2 simple steps:
- Depending on the OS version, change the layout using ctrl+space or cmd+space .
Changing layout on MacOS
Combination for underline on MacOS
So we figured out how to make an underscore on the keyboard. We hope that the article helped you learn something new!
When writing, not only letters are used, but also punctuation marks: period, colon, comma, exclamation point, dash, etc. In addition to punctuation marks, there are special symbols on a laptop keyboard - for example, a hash mark, a dollar sign, and a line for an underscore, which can be made from a dash. In this sense, the laptop keyboard is completely identical to a regular computer keyboard, offering a similar set of punctuation marks.
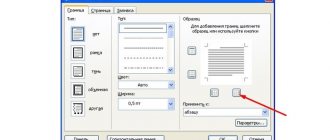
Emphasizing with a shape
The final way to make underlines without text is to insert a shape called a “Line”. In order to use this method, you need to go to the “Insert” tab, click on the “Shapes” button and select the “Line” shape.
After this, your cursor will turn into a cross, which means you can draw a shape. To make the line straight, hold down the SHIFT key on the keyboard and, without releasing it, draw a horizontal line.
By default, the line will be blue. To change its color, select it and go to the Format tab and change the line style.
You can also change other line settings on the Format tab. For example, here you can add additional effects to the line. To do this, click on the “Shape Effects” button and select one of the proposed effects in the menu that opens.
With these effects, you can add shadow, reflection, glow, smoothing, embossing, or even 3D rotation to your highlight.
How to remove underline in Word
How to write on the underlined line in Word
Hello, dear readers! You've probably had to work with stencil texts, that is, with a document partially filled with information. Places to be filled in such texts are indicated by horizontal lines at the bottom of the line. Since you are here, you are probably interested in learning how to write on an underlined line in Word so as not to spoil the original design of the text. Let's look at several options.
Most often, when composing stencil texts, underscore is used to create lines (a combination of the Shift keys and the underscore, which is located to the right of the number zero in the top row of the keyboard). When filling these lines, the line shifts to the right, which violates the original formatting of the document. What to do in this situation? Let's look at the options.
By typing
The combination of holding down the "Shift" key and the "-" key on the upper number row will allow you to enter the underscore character "_". A certain number of characters will allow you to create a long underline. When printing a document, this method is relevant, since you can enter the necessary information into a blank line with an underline.
Underline without the ability to type over it
However, it is impossible to print over such a line in the document itself. There is the following method for this.
Underlining using a table
Using a table with one cell, you can easily create an underline without text. In order to use this method, insert a 1 by 1 table into the required place in the text document. If necessary, reduce the size of the resulting table and move it to the required location.
After this, place the cursor inside the table and go to the “Design” tab. Here you need to click on the arrow that is located next to the “Borders” button and select “No border” in the menu that appears.
After that, click on the arrow next to the “Borders” button again and now select the “Bottom Border” menu item.
The result is a table with only the bottom border displayed. Such a table can be used as an underline.
A line in Word over which you can write text
Creating a line in MS Word over which you can write text
When working with the MS Word text editor, it is often necessary to draw an even straight line under one of the lines.
As a basic formatting function, there is an “Underline” button, which, when pressed, draws a similar line under the typed and highlighted text, or facilitates the introduction of new characters with such a line below them.
Further in the material we discuss the main ways of how to make a line in Word without text (for versions of Word 2003 and 2010).
By typing
The combination of holding down the "Shift" key and the "-" key on the upper number row will allow you to enter the underscore character "_". A certain number of characters will allow you to create a long underline. When printing a document, this method is relevant, since you can enter the necessary information into a blank line with an underline.
Underline without the ability to type over it
However, it is impossible to print over such a line in the document itself. There is the following method for this.
Word Software
To get a line over which you can later type the required text, you should activate the “Underline” formatting function by pressing the corresponding key or the hot combination “CTRL + U”.
"Underline" option
Then you should press:
- "TAB" to immediately get a visible line. One click will create a line whose length is equal to the value set for the tab size in the paragraph options.
- “SPACE” (space) the required number of times. However, this underline will be invisible. If at the end of it (behind the last space) you turn off the “Underline” function and start typing (at least put a dot), then an underline will appear.
By clicking anywhere on such a line, you can print text that will be displayed on top of it.
Text over underline
The line will increase as the printing process progresses. You can remove extra underscores, like regular characters, by pressing “DEL” or “BACKSPACE”.
Important! In newer versions of Word, the Underline formatting icon is located on the Home tab of the taskbar.
Changing the line type
In the case when the line is drawn through the described function, you can change its appearance by making it bolder, bifurcating it into two stripes, or replacing it with a dotted line. For this:
- In newer versions of Word, there is an arrow next to the Underline icon that allows you to open a context menu and choose the appearance of the line you create.
Selecting a line type using the arrow next to the “Underline” button
- The universal way is to select the underline, open the “Font” menu and make all changes through it.
Selecting a line type in the font menu
Conclusion
Using any of the proposed methods, you can leave space for a signature in a Word text document. The specific method of drawing this line is determined by the purpose of the document (for printing, for filling out electronically).
The best way to thank the author of the article is to repost it on your page
how to make a line in Word without textline in Word without text
Source: https://helpadmins.ru/kak-sdelat-chertu-v-vorde-bez-teksta/