- Why remove the video card driver?
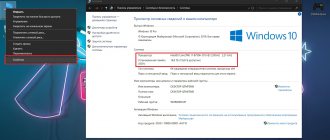
- Standard way to remove a driver
- Removing the driver from Device Manager
- Uninstalling a driver using the Display Driver Uninstaller (DDU) utility
- Manual driver removal
Removing drivers for any devices, including video cards, is carried out according to the same scheme.
The main difference between a graphics driver is that it consists of a fairly large number of files and supporting system programs. The user's task when removing a video card driver is to get rid of all these files (including executable program files). Otherwise, when you subsequently install a new version of the software, various problems with the device may occur. Let's look at all the main ways to uninstall video card drivers, including manual “clean” removal (i.e., all driver files stored on the hard drive).
Why remove the video card driver?
Main reasons:
- There are problems with the video card or the programs that use it (3D games do not start/crash/slow down, the monitor turns off/flashes spontaneously, high-quality video does not play/slows down, colors are displayed incorrectly on the computer display, and much more).
- Another video card was connected to the computer, and the driver from the previous card now needs to be removed to avoid problems.
- The new version of the driver does not install and gives an error that the computer already has video card software (i.e. it is not possible to update the driver).
There may be other reasons. Anyway, let's get started.
How to fix nvstlink.exe
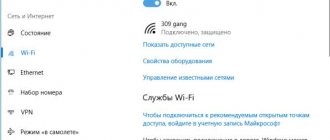
Keeping your computer neat and tidy is one of the best ways to avoid problems with NVIDIA Display Control Panel. This means running a scan for malware, cleaning your hard drive with cleanmgr and sfs/scannow to remove unnecessary programs, monitoring any startup programs (using msconfig), and turning on automatic Windows updates. Remember to always make regular backups or at least identify restore points.
If you have a more serious problem, try to remember the last thing you did or the last thing you installed before the problem. Use the resmon command to determine the processes causing your problem. Even in case of serious problems, instead of reinstalling Windows, you should try to repair your installation or, in the case of Windows 8, by running the command DISM.exe / Online / Clean-image / Restore Health . This allows you to restore the operating system without losing data.
To help you analyze the nvstlink.exe process on your computer, you may find the following programs useful: Security Task Manager displays all running Windows tasks, including built-in hidden processes such as keyboard and browser monitoring or startup entries. The Unified Security Risk Rating indicates the likelihood that it is spyware, malware, or a potential Trojan horse. This antivirus detects and removes spyware, adware, Trojans, keyloggers, malware and trackers from your hard drive.
Standard way to remove a driver
This method may not work if the driver was not installed using an official installer (i.e., using one of the driver installation utilities).
- Open the Windows Control Panel from the Start/Start menu. Click on the “Uninstall a program” or “Programs and Features” item (depending on the settings for displaying the “Control Panel” items).
- A list of programs installed on the computer will be displayed in the newly opened window.
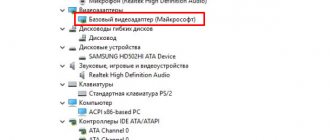
- We are interested in programs related to the video card. In our case, we are dealing with a graphics adapter from NVIDIA.
- The image above highlights all three graphics card programs - the graphics driver itself, the audio driver, and the PhysX software. In the case of NVIDIA video cards, the GeForce Experience application may also be present here.
- If you have an AMD or Intel video card, you will see the corresponding icons in the list of installed programs.
- Next, simply right-click on the name of the video card driver and select the only item in the drop-down menu “Change/Delete”. Follow the onscreen instructions and your computer will restart.
- Removing the driver usually leads to the uninstallation of all additional video card software. If this does not happen (i.e., the software from the video card is still in the list of installed Windows programs after rebooting the PC), remove it manually.
Is Nvstlink.exe safe, or is it a virus or malware?
The first thing that will help you determine whether a file is a legitimate Windows process or a virus is the location of the executable file itself. For example, a process like nvstlink.exe should run from C:\Program Files\NVIDIA Corporation\306.97-desktop-win8-win7-winvista-32bit-english-whql.exe and nowhere else.
To confirm, open Task Manager, go to View -> Select Columns and select Image Path Name to add a location column to Task Manager. If you find a suspicious directory here, it may be a good idea to investigate this process further.
Another tool that can sometimes help you detect bad processes is Microsoft Process Explorer. Launch the program (it does not require installation) and activate "Check Legends" in the "Options" section. Now go to View -> Select Columns and add “Verified Signer” as one of the columns.
If the status of the Verified Subscriber process is listed as Unable to Verify, you should take a look at the process. Not all good Windows processes have a verified signature label, but none of them have bad ones.
The most important facts about nvstlink.exe:
- Located in C:\Program Files\NVIDIA Corporation subfolder;
- Publisher: NVIDIA Corporation
- Full Path: C:\Program Files\NVIDIA Corporation\306.97-desktop-win8-win7-winvista-32bit-english-whql.exe
- Help file:
- Publisher URL: www.nvidia.com
- Known to be up to 1.28 MB in size on most windows;
If you had any difficulties with this executable, you should determine if it is trustworthy before deleting nvstlink.exe. To do this, find this process in the task manager.
Find its location (it should be in C:\Program Files\NVIDIA Corporation) and compare its size with the above facts.
If you suspect you may be infected with a virus, you should try to fix it immediately. To remove the nvstlink.exe virus, you need to Download and install a complete security application such as Malwarebytes. Please note that not all tools can detect all types of malware, so you may need to try several options before you are successful.
In addition, the functionality of the virus itself may affect the deletion of nvstlink.exe. In this case, you should enable Safe Mode with Networking , a safe environment that disables most processes and loads only the most essential services and drivers. When you can run a security program and complete system analysis .
Removing the driver from Device Manager
If your graphics card's software icons are missing from Programs and Features, you can uninstall the driver from Device Manager. The steps are as follows:
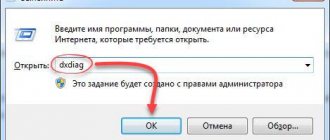
- To launch Device Manager, you can also use the Start/Start menu or Control Panel, or execute a command from the corresponding system application. The last option: press the key combination “Win + R”, and in the “Run” window that appears, enter the command devmgmt.msc and click “OK”.
- The following window will open:
- Expand the "Video adapters" section. It will display the name and model of the video card:
- Right-click on this name, then select “Delete” from the context menu. This will open a dialog box. Check the box next to the item (if available) “Remove driver programs...”, then click “OK”.
- In some cases, before uninstalling, the manufacturer asks you to indicate the reason for uninstalling the driver - select any option and click “OK”.
After removing the driver, the computer will restart.
What is nvstlink.exe?
nvstlink.exe is an executable file that is part of the NVIDIA Display Control Panel program developed by NVIDIA Corporation . The software is typically about 1.28 MB in size.
The .exe file name extension represents the executable file. In some cases, executable files can damage your computer. Please read the following to decide for yourself whether the nvstlink.exe file on your computer is a virus or Trojan horse that you should remove, or whether it is a valid Windows operating system file or a reliable application.
Recommended: Identify nvstlink.exe related errors. (optional offer for Reimage - Website | License Agreement | Privacy Policy | Remove)
Uninstalling a driver using the Display Driver Uninstaller (DDU) utility
Display Driver Uninstaller is an amateur (there is no guarantee of 100% performance) free program designed to remove drivers for NVIDIA, AMD and Intell video cards. The DDU utility can be downloaded from our website () in the form of a ZIP archive:
- Unpack the downloaded archive to any location on your disk.
- Right-click on the “Display Driver Uninstaller” file and select “Run as administrator” from the context menu.
- When launched for the first time, DDU will ask the user to make some settings:
- You can leave everything as is. But if you need to completely remove the driver, we recommend checking all the boxes under the “Driver Settings” section (NVIDA or AMD). When you complete the settings, click the “Close” button.
- Also, when launched, the Display Driver Uninstaller program reports that Windows was not loaded in safe mode. There is nothing wrong with this, although in some cases errors may occur when deleting certain driver files. If necessary, you can boot the OS in this mode, but here we will not consider how exactly to do this (you can easily find it on the Internet).
- In the main program window, in the “Select device type” menu, set “Graphics processor”, and under it - the name of the video card manufacturer.
- Select one of three driver removal modes on the left side of the window. We recommend the first option - “Delete and reboot”.
- Follow the instructions on the screen. After rebooting, the driver will be removed.
How to clean your computer's RAM
RAM is a scarce and coveted resource for many applications. Some of them are launched by the user deliberately, others enter at the request of the system or are included in startup, others penetrate against the owner’s wishes, and some, like viruses, deliberately harm him. Therefore, it is necessary to restore order in this matter by sequentially clearing each category.
Close unnecessary programs and applications
The easiest and most painless way to free up some physical memory is to close applications that are not currently in use. Windows 7 shows all open programs in the form of icons on the bottom panel of the screen, and the proprietary Aero interface allows you to quickly view the appearance of their working windows. It is better to close everything that is not needed during the current work session to increase performance.
You should also pay attention to browsers. As a rule, their interface is built in the form of a set of tabs, each of which is perceived by the system as a separate process that requires the consumption of resources. By closing unused tabs, we free up some memory.
The task manager also contains a list of running applications, which is located in the corresponding tab.
In this window you can also shut down any program, but this should not be abused. Crashing the application may result in the loss of unsaved data, as well as some problems the next time you launch it. In addition, Windows 7 cannot always correctly recognize all dependent processes; some may remain in RAM, wasting computer resources unnecessarily. However, ending an application using Task Manager becomes the best tool when the program is frozen and unresponsive to user input. In this case, you should use the “End task” option without any doubt.
Stop background processes and services
Some programs (for example, torrents) intentionally leave part of their processes in memory, consuming computer resources in the background. Therefore, after closing them, it is better to check the “Processes” tab of the Windows “Task Manager” again and delete everything unnecessary.
Not all active Windows 7 services are needed by the user, so some of the physical memory can be freed by stopping some of them.
Manual driver removal
Various glitches always occur with Windows operating systems, incl. and when removing or installing any drivers. Malicious programs can also interfere with the process of standard software uninstallation. Be that as it may, the video card driver can also be removed manually. The main requirement here is that your Windows account must have administrator rights, otherwise the driver files will not be able to be deleted.
Before deleting, make sure that Windows Explorer displays hidden and system folders and files:
- Open “Control Panel” and enter “Settings” in the search bar in the upper right corner of the window. The “Explorer Options” item will appear on the left side of the window. Click on it.
- In the newly opened window, go to the “View” tab.
- Lower the slider in the “Advanced options” block all the way down. Then uncheck (if checked) the box next to “Hide protected system files”, and also move the switch under the “Hidden files and folders” section to the “Show hidden files, folders and drives” position.
- Click "Apply" and close this window.
Next, you need to determine the name of the video card driver files and their location on the disk. This can be done in the Task Manager program:
- Double-click on the name of the video card in the “Device Manager”, then go to the “Driver” tab.
- Click on the “Details” button. After a few seconds (depending on the number of driver files) you will see the following window:
- The “Driver Files” block will provide a complete list of files belonging to the video card driver and their location on the hard drive.
- Next you will have the painstaking work of finding and deleting these files. Finding them is not difficult - just follow the path indicated in the “Driver files” block.
It is recommended to use this method of uninstalling the driver only as a last resort (if no other method has worked).
Method number 2. Activating virtual memory cleaning via the search bar
To clear the system’s virtual memory, use the search bar. Call up the Start menu, where there is a convenient search bar at the bottom - that’s where we enter the name of the file gpedit.msc. Next is the Enter key.
Then we will see a new window that opens - “Local Group Policy Editor” - and in it we make a choice according to the following scheme: “Computer Configuration”, then “Windows Settings”, then “Settings” Security Settings.
The last window will provide us with a separate list in which we need to select the “Local Policies” folder,
and then the final item - the line “Security Options”.
By clicking on this line, as in the first method, we find another line “Shutdown: Clear virtual memory pagefile”. We activate the “Enabled” status in the same way as in the first method, and then click “OK”. That's it, the process is completed successfully.
Cleaning and unloading the Windows 7 operating system
When you activate the game program, a window appears with the inscription “The amount of video memory is less...” followed by an indication of the size, for example, 64 KB. At the same time, it is well known that the user has a good, powerful computer with a modern video card carrying a large amount of built-in RAM. As a result, some games become unavailable. This behavior is a consequence of the video memory of the display adapter being full. We will tell you how to clear video memory on the Windows 7 platform later, but for now we will give an example of an error window:
It's quite strange that Windows is unable to effectively manage the built-in memory of the video adapter. Such problems were not uncommon during the reign of DOS.
There, the size of video memory was strictly limited, and the memory itself was not subject to virtualization - uploading to disk if the limits were exceeded. The image on the screen was uniquely mapped onto a fixed memory section, and all operations with it were performed by changing the value of the bytes of this section. Or by modifying the color registers installed on the adapter board. Modern hardware and software work differently.
How to clear virtual memory in Windows 7
More advanced users should know this command as it displays system load information and updates it in real time.
# top -p 897110 top — 16:11:19 up 143 days, 13:09, 1 user, load average: 7.02, 6.89, 6.96 Tasks: 1 total, 0 running, 1 sleeping, 0 stopped, 0 zombie Cpu(s ): 19.2%us, 4.8%sy, 0.1%ni, 75.3%id, 0.6%wa, 0.0%hi, 0.1%si, 0.0%st Mem: 65773676k total, 42553788k used, 23219888k free, 6596532k buffers Swap: 2097144k total , 0k used, 2097144k free, 27375052k cached PID USER PR NI VIRT RES SHR S %CPU %MEM TIME+ COMMAND 897110 root 20 0 378m 34m 500 S 0.0 0.1 0:04.77 httpd.itk
Note the VIRT and %MEM columns. The last column shows information that is very similar to what was obtained by the previous command. But the VIRT column displays the used virtual memory.
In short, virtual memory is a combination of RAM and swap that is used by a running process.
Note that the top command is limited by the size of the window, causing it to ignore any information that does not fit on the screen.
Getting used memory from /proc
The last command to obtain memory occupied by the processor is to access the /proc pseudo-file system.
# cat /proc/897110/status |grep -i VMSIZE VmSize: 387496 kB
Again, the result will be displayed, which is similar to the one obtained earlier - the virtual memory used by the Apache web server process.
So, using the Apache process as an example, we looked at the ways in which you can see the memory occupied.