Over time, the operating system accumulates a huge number of different drivers for both built-in components and peripheral devices. Sometimes such software is simply no longer needed, or for some reason it does not function properly, which leads to the deletion of all files associated with this driver. Not all users know exactly how to uninstall such components, so today we want to introduce you to all the available methods for achieving this goal in Windows 10.
Method 1: Third Party Software
I would like to start by considering third-party tools that allow you to clean the OS of unnecessary drivers. This method will be optimal for very novice users who are not confident in their abilities or simply want to simplify the uninstallation process as much as possible. There are many different applications whose functionality is focused on removing software. Unfortunately, we will not be able to consider them all, but we suggest using the example of one program called Driver Fusion to analyze the general principles of uninstallation.
- Click on the link above to go to a detailed review of Driver Fusion and download the program from the official website. After completing the installation of the free or full version, launch the software and through the left panel go to the “Driver Cleaner” section.
- Check out the list of equipment categories here. Select the one that includes hardware with unnecessary or incorrect drivers.
- After selecting a component or a separate device, you can view a list of installed files. To clear them, click on the specially designated button located in the center at the top of the window.
- Confirm the uninstallation by selecting “Yes”.
- When using the trial version, you will be notified that some of their files cannot be deleted. Getting rid of them will only happen after purchasing a premium build, which is the drawback of Driver Fusion.
If the shortcomings of the application discussed above are critical for you or it does not suit you for some other reason, we advise you to study the review of other popular thematic solutions on our website, where the author describes in detail the pros and cons of all representatives of such software. This review will help you choose the right software and quickly get rid of unnecessary drivers.
Read more: Programs for removing drivers
How to completely remove drivers from the system
If the methods described above do not help or you want to achieve complete removal, then you can try to remove the driver using special programs. Below we will look at several such programs, briefly describing their capabilities.
- Display Driver Uninstaller (DDU) is a free program for removing video card drivers from AMD and NVIDIA. DDU allows you to completely remove the driver and all traces of it from the operating system. For the most secure removal, it is recommended to boot your computer in safe mode, run DDU and perform the removal. You can read more about this program in the article “How to completely remove the NVIDIA GeForce or AMD Radeon driver.”
- Driver Sweeper is a free program for removing various drivers and cleaning the operating system from their traces. Driver Sweeper can backup old versions of drivers, which allows you to restore previously deleted drivers to the system.
- Driver Genius is a shareware program and a powerful driver manager. Allows you to make backups, as well as remove and restore drivers.
Method 2: Device Manager Menu
The following methods described in today's material will involve the use of the built-in functionality of the operating system. Most often, users use the Device Manager menu to get rid of unnecessary drivers, so we’ll talk about it first.
- First, let's pay attention to users who cannot log into Windows normally after unsuccessful driver installation, which most often concerns graphics software.
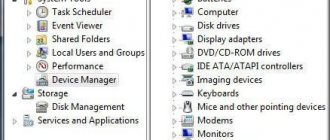
In this case, deletion can only be done through safe mode. In Windows 10, you can enter it via a bootable USB flash drive or disk. Read more about this below. Read more: Safe Mode in Windows 10 - After successfully logging into the OS, right-click on “Start” and in the context menu that opens, go to “Device Manager”.
- Look through the list of categories presented and expand the one to which the necessary equipment belongs.
- Click on the line with the device RMB and select “Remove device”.
- Confirm its removal in the warning window that appears.
- If in the same window there is an item “Delete driver programs for this device,” you should definitely check it.
After this, the list of devices will be immediately updated, and all you have to do is restart your computer for all the changes to take effect. If you are in safe mode, exit it as shown in another instruction on our website, which you can access by clicking on the link below.
How to roll back to a previous driver version in Windows 10
Driver rollback is needed in order to diagnose problems in your hardware or work around a bug in a new driver version. For example, you notice problems with your hardware and are trying to find their source, or immediately after updating a driver, you have problems with stability or performance. The process of rolling back a driver is similar to the procedure for removing it.
- Press Win + X and select Device Manager .
- Find the category you need in the list of devices, expand it and select the required component. For example, a video card.
- Right-click on the device and select Properties . Go to the Driver tab and click Roll Back . Here you may encounter that the rollback button will not be available. This means that previous versions of drivers are not saved in the system. Some drivers are designed in such a way that they automatically remove previous versions after updates. If you are faced with such a situation, then the only option for you is to remove the driver, download the previous version of the driver from the manufacturer’s website and further installation. Also keep in mind that Windows only stores one previous version of the driver. In other words, the system does not maintain an archive of all installed drivers.
- If the Rollback is available, feel free to click on it, confirm the action and wait for the procedure to complete.
After the rollback is complete, restart your computer.
Method 3: Application Section
In some cases, which most often concerns graphics adapters and sound cards, software is installed on the computer, which is related to drivers, but may have a graphical interface and will be considered a full-fledged application displayed in the corresponding menu. Then, when you remove it, the drivers will also be cleaned, which allows you to achieve the desired goal. You can check the presence of such tools and uninstall them like this:
- Open Start and go to the Settings menu.
- In the new window, select the “Applications” category.
- Wait for the list to load and start searching. For example, in the screenshot below you see software related to the NVIDIA driver, and removing it will lead to a complete or partial failure of the adapter.
- Roughly the same applies to software from Realtek, which is associated with sound cards built into motherboards. Having found the desired line, simply click on it with the left mouse button.
- Next, click on the “Delete” button that appears and wait for the proprietary uninstallation window to load.
Usually, when the uninstallation window opens, you just need to follow the instructions provided and carefully read the various footnotes so that you know what components are being removed and what it will lead to. When finished, be sure to restart your computer to update the information. In most situations, this can be done directly from the uninstaller window.
Method 1: Uninstall using uninstaller
1. Open the Start menu and go to Settings.
2. Go to the "Applications" section.
Video card
NVIDIA
Scroll down a little until you see a list of NVIDIA software.
Click on "NVIDIA Graphics Driver". The “Delete” item will open at the bottom, click on it.
Confirm the action.
Repeat the same steps with the remaining programs.
AMD
In the list of programs, look for items with installed software from “AMD Catalyst” and remove everything one by one.
Intel HD Graphics
Intel HD Graphics is a graphics adapter built into the processor core, the driver of which I would not recommend removing. It may come in handy if the external video card fails or you decide to disconnect it from the computer.
The procedure itself is similar: you need to find the item “Intel Graphics Driver or Intel HD Graphics” in the list and remove it.
Sound card and printing devices
Most motherboard models come with a built-in Realtek High Definition Audio sound card by default. The application icon looks like this.
Clicking the “Uninstall” button initiates the uninstallation process.
Print drivers can also be found in the list by name. The most popular among them: Canon, HP, Kyocera, Epson and others. If your printer or scanner is no longer available to you, you can remove all software and free up memory on your PC.
In some cases, the uninstaller for devices can be found by name in the Start menu and can be cleaned without going to Settings.
Method 4: Print Management app
The name of this method already suggests that it is suitable only for those users who want to remove printer drivers. Windows 10 has a separate classic application that allows you not only to view a list of all files associated with printing equipment, but also to delete unnecessary ones in just a few clicks. Sometimes this method is more effective than the previous ones, since it erases any mention of the printer in the system.
- To open the Print Management application, expand Start and enter its name in the search.
- In the window that opens, in the left pane, expand the “Print Servers” section.
- Expand the Drivers category.
- Review the list of available files and select the appropriate one.
- From the Advanced Actions menu, select Uninstall Driver Package.
- Confirm your intentions to uninstall.
- Wait for this process to complete. The screen will display the progress and all the necessary details.
- Once the “Driver package has been removed” notification appears, you can close the current window.
In exactly the same way, any drivers associated with printing equipment and scanners that were connected to the computer are cleared with further installation of the corresponding software.
Driver Sweeper driver removal assistant
In addition to the built-in tools of Windows 10, you can also use third-party software. In this article we will look at the Driver Sweeper , which is distributed free of charge and has a Russian-language interface.
First, find it on the Internet and download the program installer. Next, install the utility; the installation process occurs in a standard manner and should not cause problems.
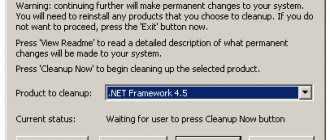
.NET Framework 3.5 was not installed on your computer , then Windows will offer to download it when you launch Driver Sweeper. Click “ Download and install this component ”.
We wait until the necessary files are downloaded and installed.
When the installation is complete, click “
Close ”.
Now let's launch Driver Sweeper. The default language in the program is English. To switch to the Russian language, in the left panel in the “ Options ” section, go to “ Language Russian in the drop-down list on the right and then click the “ Apply ” button.
Go to the “ Analysis and Cleaning ” section. There, check the boxes for deletion and click “Cleaning”.
A window will appear asking if you are sure you want to continue. We agree. We also confirm the reboot.
Method 5: Removing hidden devices
If you pay attention to Method 2, you will notice that through Device Manager you can only remove drivers for the hardware that is currently connected to the computer. As for disconnected devices, they are in a hidden state and many of them will never be connected to this PC again. There is a method that allows you to remove such hidden devices through the same menu, but to do this you will have to perform one simple setup.
- Open “Start” and go to “Settings” by clicking on the designated gear-shaped button.
- In the window that opens, you are interested in the “System” section.
- Scroll down to the very bottom of the left panel and go to “About the system”.
- In this window, find the line “System information” and left-click on it.
- A new menu “System” will open, where you should click on the clickable inscription “Advanced system parameters”.
- In “System Properties”, on the first “Advanced” tab, click on the “Environment Variables” button.
- The first block is called “User Environment Variables”. Below it is the “Create” button, which you can click.
- Set the variable name to "devmgr_show_nonpresent_devices" and set its value to "1", then apply the changes.
- Check the current setting by looking for the created variable in the block.
- Now all that remains is to display the hidden equipment and remove it. To do this, open Device Manager in any convenient way.
- In the "View" pop-up menu, activate the "Show hidden devices" option.
- All hidden devices will be highlighted in blue. Find the required one, right-click on the line and click “Remove device”.
Now, when you reconnect the remote device, the operating system will not recognize it and the installation will begin again. If there is no longer a need to display hidden devices, you can disable this function by unchecking the item discussed above.
In today's article, we talked about five methods for removing drivers in Windows 10. All you have to do is select the one you are interested in and, following simple instructions, quickly complete the task with a minimum amount of effort.
We are glad that we were able to help you solve the problem. Add the Lumpics.ru website to your bookmarks and we will be useful to you. Thank the author and share the article on social networks.
Describe what didn't work for you. Our specialists will try to answer as quickly as possible.
Uninstall via Programs and Features
In most cases, drivers that you installed manually can be removed like regular programs, that is, through the Control Panel.
To do this, you need to open the “Control Panel” (in Windows 10, you need to press Windows-R and execute the CONTROL command) and go to the “Programs - Programs and Features” section.
Here you will see a list of all programs that are installed on your computer. To find the driver you need, you can use the search.
To remove a driver, simply right-click on it and select the “Delete” or “Delete / Change” option.
After this, the installer will start, responsible for installing and uninstalling the software. With it, you can remove the driver like any other program on your computer.
If you are using Windows 10, then you can start uninstalling programs through the Options menu. To do this, open "Settings" (for example, using the Windows-i combination) and go to the "Applications - Applications and features" section.
There will be exactly the same list of installed programs as in the Control Panel. Here you can find the driver you need and remove it from your computer.