Installing Avidemux
The program is open source and distributed absolutely free. Not only Linux is supported, but also Windows and MacOS. You can download the installation package for your operating system on the program's official website. As for Linux distributions, the program is quite popular and you can install it from the official repositories.
For example, to install on Ubuntu, run:
sudo apt install avidemux
After installation is complete, the program will be located in the main menu of your system.
Main program window
First you need to understand the program interface. The main window looks like this:
It can be divided into the following main parts:
- Menu bar - located at the very top and allows you to select some options;
- Encoding panel - located on the left, here you can specify codec parameters for video transcoding;
- Preview area —view the current video frame;
- Navigation and Toolbar - At the very bottom there is a bar that allows you to navigate through the video and use various tools.
To open a video for editing, just select the menu “File” -> “Open” :
Program interface
Before starting work, you need to pay attention to the appearance of the editor and the main window, where the processing work will be carried out.
The composition of the main working window is simple, it contains:
- Menu is a line with the ability to select the desired options (at the very top).
- Encoding area - necessary for encoding the video (left).
- Preview screen - needed to see how work on the frame is progressing (in the center)
- Toolbar - there is the main functionality, tools for processing and moving through the video file.
To get started, you need to open the file . on “file” in the menu , and select “open” . Also nearby are the buttons:
- “Edit” or “Edit” - you can cancel the last action;
- “Recent” / “Recently” - shows recent files and projects;
- “Video” / “Video” - allows you to apply filters to the video;
- “Audio” / “Audio” – respectively, a filter for the track;
- “Auto” —automatic video encoding;
- “Tools” is a service where you can enter commands for videos.
Methods for printing a large picture or poster on several A4 sheets
Transitions between videos are suggested in the “GO” / “Transition” , and for help and assistance you can contact “Help” / “Help” .
Trimming video in Avidemux
Most often, Avidemux is used to trim videos; here it is quite convenient and at the same time simple to do. Let's say you want to remove a certain section from a video. Move the slider to the beginning of this section, then press the button labeled A:
A rectangle will appear on the playback bar, marking the selection area. Next, move the slider to the end of the section and press the button labeled B:
This will place a marker at the end of the selection and give you a section of the recording marked for deletion.
To delete it just press Del. This way you can remove everything unnecessary from the recording. All that remains is to preserve what is left. Now you know how to use Avidemux to trim video and audio tracks.
How to use Avidemux? It turns out everything is simple, I’m shocked!
Hello everyone Oh guys, I don’t even know what to tell you, today I’ll show you how to use the Avidemux program. The funny thing is that there’s nothing complicated here, but damn, I remember how I just installed Avidemux and immediately thought, well, this is such a crazy complicated thing that I definitely won’t be able to figure it out! But it turned out that in fact he was a simpleton, do you understand? This is a simpleton, I will prove it to you today!
But what kind of program is Avidemux anyway? With this program you can trim a video, you can cut out some fragment from a video, you can convert a video from one format to another, in general, you can do a lot. Yes, the Avidemux program is simple in principle, but when I tried to understand how it works, I failed to understand it. Well, I just couldn’t understand! So I even abandoned this understanding, and then one day on the forum I found information about how to use Avidemux and damn it, everything fell into place, what a joke!
So look, I launched Avidemux, this is what this program looks like:
Now look, at the top there are two main buttons, these are the Open file button and the Save file button:
That is, the first button is for selecting the file you want to edit, and the second button is to save the result, so to speak, that is, save the modified video to a file. In general, let's upload one video to Avidemux as an example; I have a trailer for some new film. Well, click the first button and select the file, it’s on my desktop:
Now the video has been loaded into Avidemux and you can do something with it:
Well, what are we going to do? First, let's try to cut some fragment from the video, see how to do it. This means that at the bottom of the program there will be a slider, using it you set a point that will be the starting point of the segment. Just grab and drag the slider where you need it, so I dragged it here:
Have you set the starting point? Great, now press button A, this button:
This button activates the cutting area, so to speak. But we only set the starting point, but we did not set the end point, that is, the ending, so to speak. To set it, you need to drag the slider again as much as you need, and then press the button again, but this time:
As a result, you should get the indicated area in such a thin blue frame:
Now this area can be cut, to do this, simply click Edit at the top and a menu will pop up in which you need to click Cut:
That's all, and this fragment is no longer in the video! To save your changes, you need to click the Save video button, I wrote about it at the beginning. You can also save if you simply hold down the Ctrl + S buttons, there is also a File button at the top, if you click it, there will also be a Save As option there
Well, that is, you got the point, right? You just need to mark the area first and then you can cut it out. Or you can copy it and then paste it somewhere. I’ll now show you how to do this, but before that I have to explain something else to you. So what is a segment? This is point A and point B, that is, the segment is the area from point A to point B, I hope this is clear. That is, if you set point A, then you then need to set point B, if you set point B, then you need to set point A, it’s kind of stupid, I understand, it’s just that the buttons are red, then these buttons set exactly these points are A and B. You place the slider in the place you need and then press the button to set point A or B, depending on which point you set first, that is, the starting point (A) or the ending point (B). Well, is it a little clear? Otherwise, I’m already a little tired and I’m probably not explaining everything to you quite adequately...
For example, let's copy one segment and paste it in another place. So what are we doing? Now I will show you not exactly the same way as the first time, I will show you differently, especially so that you understand everything as much as possible. So we set the starting point, move the slider, let it be here, for example:
Since I’m going to put the second point BEFORE this one, that is, move the slider to the left, then in order to mark the point that I’ve now put, I press the B button (with a red color):
Point B is given:
Now we need to create point A, as you already understood, I started from the end, not from the beginning. I move the slider to the left, and here I will have point A:
And now I press the button to set point A, this button:
The result was a segment like this (a rectangle made from a thin blue frame):
That's it, now you can do something with this segment! And I decided to copy it, I click Edit at the top and select Copy from the menu:
That's it, I copied it. Now you need to paste it, but for this you again need to prepare the area, that is, make a rectangle out of a thin frame and paste the segment that we copied there. Well, although a rectangle with a frame is certainly not a particularly correct expression, but damn, I think you understand what I mean
That's it, I selected the segment, and there I clicked Edit again and in the menu I already selected the Insert item. And this is how I was able to take and copy a fragment from one area of the video and paste it into another, and everything was actually done conveniently.
Thoughts out loud after I wrote this article. Maybe you don’t need to SELECT an area to insert a video? Maybe you should just set the slider in the right place and insert the video there..?
Nevertheless, just a moment of attention, I still have to write to you so that you understand about points A and B (sorry if I’ve already bothered you with this), look, here are these buttons in the program:
A segment of video, if you want to mark it, then it must be point A and point B, that is, from the beginning (A) to the end (B). If you mark a segment from right to left, then you set the first point with button B, and set the second point accordingly with button A, since you mark the area from right to left! Do you understand? If you mark an area from left to right, then everything is as usual, set point A and then point B. Guys, I had to tell you this, I don’t know why, but I had to, I was gnawing at the thought that someone might not understand...
In general, the Edit menu has the following items, they are also convenient (I didn’t notice them before):
That is, you can put a slider somewhere and then give it a marker (I just called it a dot) using this menu
Well, I think it’s now clear how to copy/cut/paste/delete a fragment? You see, in fact, everything is simple!
We've talked about how to work with video, and what remains to be shown is how to change the video format. Well, that is, convert video from one format to another. Well, I’ll tell you this, there’s nothing complicated here either. So look, in order to convert a video from one format to another, you first upload the video to Avidemux, then on the left you will have all sorts of settings, well, here they are:
Do you see that there is something like Video Decoder there from the very beginning? This is something you don’t touch unless necessary, that is, you don’t press the Settings button there for no reason. Then comes Video Output, this is where you must select some kind of video codec with which you will convert the video, here I chose Mpeg4 AVC (x264). Then, once you have chosen the codec, there will also be a Settings button at the bottom, where you can further configure something, here is the window for these settings:
Let's move on, what else do we have there? Yeah, here comes Audio Output, the same thing here, only here, as you already understood, it means audio. Here I selected MP3 (lame) and there is also a Settings button so that you can further adjust the sound quality:
As I understand it, each audio or video codec has its own additional settings
Well, now all we have to do is select Output Format, that is, the format of the future file; I didn’t change anything here, but left AVI Muxer as default. So these are the settings I ended up with, look:
That's it, now to save the video in a new format, you need to click this button:
Then I choose where exactly I will save the file, well, I will save it to the desktop, as usual:
Next I received another message, then I clicked Yes (it seems to say something like a bad idea, it seems like that or it seems to me):
Well, the conversion process began:
By the way, you can also set the priority, I set it to High and everything seemed to go a little faster
While it’s working there, I’m also showing you the Advanced tab in the same window, where our selected settings are shown:
Then, when everything was done, I saw this message:
Well, everything went fine! As a result, this resulting AVI file was half the size of the original, which was in MP4 format, such pies
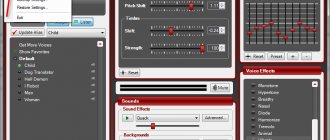
Now look, you can still set up filters (such as effects), well, although I should have shown this earlier, but still. In general, look, you have chosen the codec in Video Output, right? Well, there will be a Settings button at the bottom, and even lower there will be a Filters button, so click it, and the following window will appear:
So what do we see here? On the left you have a list of filter sets, if you select one there, you will see what filters are there. But all these filters are not activated, well, for example, I selected Color, here are the filters there are:
You see, there are two columns here, on the left there are filters (Available Filters), on the right it is empty (Active Filters). Why is that? Because the filters are there, but they are not used because they are not activated! What needs to be done to make them active? For the filter that you need, you double-click on it and then configure it (but the settings window does not always pop up), then this setting will be saved on the right as the active filter, do you understand? Well, let’s use the Color > Contrast filter as an example, that is, this one:
Double-click on it and the filter setting will pop up, and this is where you can change the contrast of the video:
At the top there are sliders for changing the contrast, you can also scroll the video itself (there is a slider above the video), well, to more accurately set the contrast. Once you have configured everything, click OK. That's it, now the filter is added to the Active Filters column:
The same goes for music, that is, where Audio Output is, I selected MP3 (lame), then clicked the Filters button and this is the window that appeared:
Well, that is, there seem to be no problems, everything can be configured, when I figured out what was what in Avidemux, I realized that everything here is elementary simple, yolkin palkin! But when I just installed it, I honestly couldn’t drive into it at all, it’s such a damn joke
That's all guys, I think everything is clear what I wrote here?
Honestly, if I wrote something wrong, then I apologize! But I hope that everything written here is normal. Good luck to you in life and may everything go well for you and may you always be in a great mood. Home! Avidemux how to use 10/22/2016
Video filters
One of the most interesting features of Avidemux is its video filters. They allow you to apply various effects to your video, just like in professional editors. For example, you can reduce the frame size, change FPS, rotate the video and much more. All of them are available from the “Video” -> “Filters” menu:
Here you can select the filter you need and configure its parameters. To activate a filter, simply double-click on its name. Then configure its parameters, for example, for the crop filter, you need to specify the size of the cropped areas on each side:
After completing the settings, click "Ok" . Also in the window with a list of filters, you can click “Preview” to see what happens. For example, for a 180 rotation filter:
True, in Linux all menu labels and filter names are in English, so you will have to navigate it a little to use Avidemux.
How to trim video on computer in Avidemux
Don’t be alarmed that the Avidemux installation is in English - you don’t need to change anything there and there are no pitfalls...
After installation, run the program - it will detect the system language and everything will be fine.
We indicate the video that needs to be trimmed...
...the editor will digest it within a few seconds...
Use the cursor to move the slider along the playback scale to the beginning of the cropping section, specify it using the blue buttons or along the timeline...
Video encoding
Another action that is very often performed using Avidemux is changing the encoding of video files. In the left panel you can select different codec options. You can select the codec for saving video, audio, and the format in which the file will be saved.
First select Output Format, this is the container in which the video sequence will be placed, as well as the audio tracks. The following formats are supported: AVI, MPEG, MKV, FLV, MP4, Webm. You can choose one of them, it is useless to recommend anything, as it depends on your situation, in most cases you can choose MP4. But that's only half the story. You also need to select codecs for video and audio.
The following codecs are supported for video:
- Divx is slow and has few settings;
- Xvid - gives good quality and has many settings;
- Lavcodec - high speed and good quality;
- Mjpeg - good quality;
- Mpeg - good quality, works with most files;
- H263 - works for most video files;
- Huffyuv - good quality, not supported everywhere;
- VCD/DVD/SVCD - good quality, but slow;
- XVCD - fast.
As for the choice, everything is the same as with the container. But in most cases, it is enough to choose something common, for example, Mpeg or Xvid. Among the audio codecs supported here are AAC, MP2, MP3. Under each item there is a button “Configure” , with which you can configure the encoding parameters. But usually everything will work with the default settings. Next, all you have to do is save the file.
Trimming files
We can safely say that this program is a champion in the simplicity and functionality of video editing. So, let's go ahead and open Avidemux. How to trim a video? Very simple! Add the desired video file for editing. By moving the playback slider, we fix it in the place where you want to trim the video. If we need to trim the video from the beginning to the selected frame, then click on the “Edit” menu and select sector “B”. On the keyboard this is the "]" icon. And everything that ends up in the left highlighted part of the track is deleted by pressing the “Delete” button.
In the case when you need to cut only the ending of the video, place the “A” marker in the right place and the “[” icon on the keyboard. The “Delete” button deletes the selected fragment, the one on the right. If you need to add another video to this project, then open this new file in the program. On the edit track, these two files will appear as one whole video stitched together. The first file is at the beginning, the second is at the end.
If we just need to cut out a small fragment in this video, then we set the marker in the desired place “B”, the “]” icon on the keyboard. Then we move the slider forward and place the marker “A” in the right place, and the “[” icon on the keyboard. Use the “Delete” button to delete the selected fragment. To save our movie, select the MP3 (lame) audio codec in the “Audio” group. To output the movie, select the format we need, for example MP4. Save the video, give the movie a name and click “Save.” Notice how quickly the video is saved and is not re-encoded! Important addition. Try to ensure that your source files are in the same format, then there will be no problems with encoding.
Saving videos
After completing all the changes, all you have to do is save the resulting video. To do this, open the “File” and select “Save” or click the save button under the menu:
Then all you have to do is wait for the encoding process to complete and you're done. As you can see, using Avidemux is very simple.
Saving video recording
After all the edits have been made, sound and audio editing, adding and cutting files, all that remains is to figure out how to complete the work process correctly. The completion of the operation varies depending on whether the user intends to continue working on the project, or whether the video recording is the final version. When further work on the project is expected, saving is carried out as follows:
- In the “File” menu, expand the “Project Script” item, where you select the “Save as project” task.
- The video file will be automatically saved in the program, with the possibility of further editing.
Users appreciate the ability to save an unfinished project in the program, since sometimes the work on creating a video file can take a long period. If the work on creating a video is completed, after verifying the correctness of codecs and formats, previewing the video, making sure that the resulting project meets the requirements, you will need to perform the following manipulations:
- Go to the “File” tab and select the “Save As” task.
- Specify the address where the program should place the finished video file.
- Confirm saving and wait for the process to complete.
As you can see, saving the created video file is not positioned as a difficult task; it is performed as in any other programs and applications.
conclusions
In this article we looked at how to use the Avidemux program. With it you can perform most basic actions, as well as apply filters. Many of the available filters are not supported in all free video editors, and therefore the program can be very useful.
Related posts:
- Installing DeadBeef on Ubuntu
June 20, 2016
- Streaming via VLC
December 29, 2016
- Installing Adobe Flash Player on Ubuntu
May 16, 2017
- How to crop a photo in Gimp
November 30, 2017
Applying filters (special effects)
You can find and configure audio filters by sequentially going through the “Audio Output”
->
“Filters”
, as shown in the screenshot. Setting them up is unlikely to cause you any difficulties.
Special filters for video are found in the following “Video Output”
->
"Filters"
.
Select any of the filters presented in the left window, for example, “Noise”
- noise reduction or
“Sharpness”
- sharpness or
“Colors”
- color, etc.
“+”
icon (below) to confirm .
The active filter will appear in the right window. The result of its application on the video can be seen immediately by clicking on the “Preview”
.
Video cutting in Avidemux
Trim videos (mp4 and flv) without re-encoding in Avidemux
How to slow down a video and how to speed up a video
Avidemux's functionality is focused on actions with video recordings, even the control panel itself with built-in tools indicates this. However, the limited capabilities and complexity of management repel professionals, so the program is only suitable for home use. Today we will discuss in detail all aspects of working in this software.
We'll take one template, showing examples of how certain tools function. Let's touch on the main points and subtleties of Avidemux. Let's start with the first stage - creating a project.
Adding files
Any project begins with adding files to it. The program in question supports video and photos. They are all added the same way:
Video setup
Before you begin trimming or other actions with downloaded objects, it is recommended to configure their encoding to be able to apply filters and avoid further conflicts with audio overlay or playback speed. This is done in just a few steps:
Working with audio
Unfortunately, you cannot add audio separately and move it around the entire timeline. The only option is to change the voice acting of a previously downloaded recording. In addition, you can use filters and activate multiple tracks. These procedures are carried out as follows:
Applying filters to videos
Transformation
Let's start with the first section called "Transformation"
. Filters responsible for working with personnel are included here. For example, you can flip the image vertically or horizontally, add fields, a logo, darken certain areas, change the frame speed, crop the image, rotate the image to the desired angle. Setting up the effects is intuitive, so we won’t go through each of them; all you have to do is set the appropriate values and go to the preview.
The preview mode does not have any special features - it is made in a minimalist style. The panel below contains a timeline, movement and playback buttons.
It is worth noting that you can only view the applied effects in this mode. The window in the main menu displays only frames.
Interlace
Effects in the Interlace
are responsible for adding fields. With their help, you can split pictures into two screens, merge or separate two images, which creates an overlay effect. There is also a tool for removing double frames after processing.
Color
In the "Color"
you will find tools to change brightness, contrast, saturation and gamma. In addition, there are functions that remove all colors, leaving only shades of gray, or, for example, shift shades for synchronization.
Noise reduction
The next category of effects is responsible for reducing noise and applying convolution filtering. We recommend using the "Mplayer Denoise 3D"
, if the project will be compressed when saving. This function will prevent large quality losses and ensure normal anti-aliasing.
Sharpness
In the "Sharpness"
There are only four different effects, one of which works approximately the same as the tools in the
Noise Reduction
.
You can sharpen edges or erase embedded logos using MPlayer delogo2
and
Msharpen
.
Subtitles
One of the significant disadvantages of the program in question is the inability to independently add any inscriptions on top of graphic elements. Of course, in "Filters"
There is a tool for adding subtitles, but these must be files of certain parameters, which are practically not configured in any way after downloading and do not move along the timeline.
Video trimming
Another disadvantage of Avidemux is the inability to independently edit and crop added videos. The user is provided only with a recording trimming tool that works on the AB principle. Read more about this process in our other guide at the following link.
Create a slideshow from photos
As mentioned above, the software in question interacts correctly with photographs, but the functions present in it do not allow you to fine-tune their display and quickly change them. You can only create a regular slideshow, but this will take a lot of time and effort, especially if you add a lot of images. Let's look at how this is done:
Repeat the entire algorithm with all other images and proceed to saving. Unfortunately, transition effects and additional processing cannot be achieved in any way. If you are not satisfied with the functionality of Avidemux, we recommend that you read our other articles on the topic of creating slideshows.