When working in the Microsoft Word word processor, users use frames to format text in Word. When designing, a frame frames a fragment of text on a page, a paragraph, or all the text on a sheet of document.
With the help of a frame, important parts of the text are highlighted, and the appearance of the document is visually decorated using formatting elements. Therefore, frames are often used when designing Word documents.
The program has a built-in function for creating frames, and there is a ready-made Word frame template. The user can make a regular frame or a beautiful decorative frame, depending on his preference, or the appropriateness of this type of design in a particular document.
When designing Word, frames in various variations are inserted into the text of the page, or the entire page of the document, for example, the title page, is framed with a frame. In the Word text editor, you can create several types of frames, depending on the tasks of document design, so the user can choose a sample frame in Word at will.
The text frame in Word is used for the following types of inserts:
- Frame for words and sentences - a frame surrounds words or sentences in the text of a document.
- Paragraph Frame—Inserts a frame around one or more paragraphs of text.
- Frame for a document sheet - all the text on a document page, or the entire page along the edges of the document, is framed.
Depending on the situation, the user can make a simple frame or an original, beautiful frame made in the form of a picture.
How to make a frame in Word, how to make a frame around text? In this article we will look at ways to insert a frame in Word, which can be used for different types of document design.
This guide provides instructions that are appropriate for different versions of Word: MS Word 2020, MS Word 2020, MS Word 2013, MS Word 2010, MS Word 2007.
How to make a border around a paragraph in Word
Now we will look at how to make a frame around text in Word by highlighting a specific paragraph on a document page. First you need to select the text around which the frame will be framed.
In different versions of the application, the names of the menu sections are different, pay attention to this point when working.
In Word 2020, follow the steps:
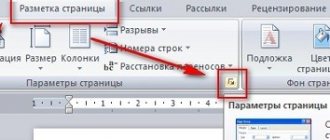
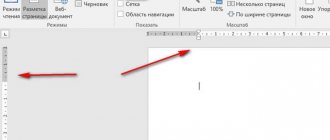
- Enter the "Design" menu.
- Go to the “Page Background” group, click on the “Page Borders” button.
In Word 2020 and Word 2013, do the following:
- Go to the "Design" tab.
- In the Page Background group, click on Page Borders.
In Word 2010 and Word 2007, do the following:
- Open the Page Layout tab.
- In the Page Background group, select Page Borders.
Next, the same steps are performed:
- In the “Borders and Fill” window, in the “Border” tab, select the border type: “frame”, and then configure the settings for inserting a frame into the text of the document.
- Set the type of frame to be created:
- choose a type from various solid or broken line options;
- select the frame color and desired width;
- indicate the scope of application: to the paragraph.
- Look at the example where you can add or remove some borders from the frame.
- Click on the "OK" button.
As a result, the desired paragraph on the Word document page is highlighted with a frame, according to the previously selected parameters.
On one page of a Word document, you can insert a border around a paragraph, text (individual words or sentences), or the entire sheet. When designing, you can make several frames of different types on one page.
Adding frames in different versions of the editor
This section is suitable for those who want to understand how to make a frame in Word. The process is quite similar in all editor variants, but there are still slight differences. Let's start with the oldest version.
Frames in Word 2003
Open the document into which you want to insert a border. Next you need to do the following:
- Go to the control panel, which is located at the top of the editor. There, find and click on the “Format” tab
- In the drop-down menu you should select "Border and Fill"
- Next, go to the “Page” tab
- Here we select all the necessary parameters: width, line type and frame option. Then we indicate which part of the document it should be added to and click OK.
Frames in word 2007
- Open the desired document
- Go to the toolbar and click on the “Page Layout” button
- In the list of commands that opens, you need to select “Page Borders”.
- If everything is correct, a dialog box will open.
- Now open the “Page” tab, and on the left side click “Frame”.
- All that remains is to select the necessary parameters - here by analogy with the previous version. When you're done, you need to click OK. The document will be framed.
Frames in Word 2010
Here the process is similar to that discussed above. Therefore, let's try to expand the editor's standard set a little. There is a large set of frames for Word: pictures, all kinds of lines, and even frames in the form of GOST frames. We offer you to download three sets (see how to download files from the Internet):
- Several interesting pictures for frames
91 frames for Word documents 91_ramkidlyaWord.rar60.7 KB 141245 Downloads Details
Date of: 11.02.2015 - GOST framework
GOST framework for Word Forms_A4_to_Word.rar9.5 MB 124149 Downloads Details
Date of: 11.02.2015 - Patterned frames for text
Patterned frames for text in Word ramki-uzor.rar1.2 MB 171721 Downloads Details
Date of: 05.06.2015
The archives contain a pretty good set of frames. Launch, see which ones suit you, and use them.
Note. If you need additional information to be provided below the frame in your document, you can add it using footnotes (see Footnotes in word)
A short instructional video:
Update. Added a set of patterned frames. Jun 5, 2015
We would also like to recommend you an interesting article on downloading videos from Twitter. There are many interesting videos on this social network, but there is no download tool. We have solved this problem - you can read it at the link.
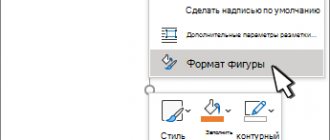
Inserting text into a frame - method 2
You can use another method to insert text into a frame:
- From the Insert menu, go to the Text group.
- Click on the "Text Field" button.
- From the Built-in drop-down menu, select Simple Label.
- Drag the editable field to the desired location in the document, and then write the desired text there.
- To complete editing, click inside the Word document.
How to make a frame around text in Word
On a document page, you can create a border around text by adding borders around the edges of specific text.
- Select text in a Word document.
- In the “Home” menu, in the “Paragraph” group, click on the arrow next to the “Borders” button.
- In the menu that opens, you can select the location of the borders.
For example, for a solid frame, the “External Borders” option is suitable; you can select frames with only top or bottom borders, or, conversely, with right or left borders.
- Select the appropriate frame option.
- Click on the "Borders and Shading..." item to select the options on the "Border and Shading" page, which are described earlier in the article.
How to make a frame around a page in Word
When designing a document, you often need to frame all or some pages in a Word document. To do this you need to do the following:
- In the “Home” tab, go to the “Paragraph” group, click on the arrow next to the “Borders” button.
- In the context menu, select “Borders and Shading...”.
- In the Borders and Shading window, click the Page tab.
- Configure visual parameters for displaying a frame on the document page.
- Select options for inserting a frame.
Word has the following options for inserting a border on pages:
- entire document—the frame will appear on all pages of the document;
- this section - the frame will be inserted only on this section of the document;
- for this section (only the 1st page) - display a frame only on the first page of the document;
- for this section (except for the 1st page) - insert a frame on all pages of the document except the first sheet.
After applying the settings, the pages in the Word document are outlined with a frame.
How to Make a Nice Border Around Text in Word
In some cases, it is necessary to insert a beautiful frame into the document. Word has built-in frame templates that you can use to change the appearance.
As a result, a beautiful frame will be added around the document page:
- In Word, go to the Home menu.
- In the Paragraph group, click the arrow on the Borders button.
- In the drop-down menu, click on “Borders and Shading...”.
- In the Borders and Shading window, click the Page tab.
- Click on the "frame" option, select the type, width, and then in the "Picture" option, select the appropriate frame template.
- In the preview section, evaluate the frame option, and then select areas of the document to apply the settings.
Word document pages have beautiful borders.
Methods for creating a frame
There are several ways you can use to make a frame for your coursework.
- Freehand drawing. You can choose a suitable stencil and draw a frame manually on all coursework sheets.
- Using AutoCAD. Students familiar with this program can make a frame using it and then print it on blank sheets of paper in the required quantities. These sheets must subsequently be used when printing the text of the course work.
- Using built-in Word tools. This method is considered the simplest and fastest; you just need to use the capabilities of the “Page Layout” tab. We will consider this method further step by step.
How to make a frame for coursework in Word (2007-2016)
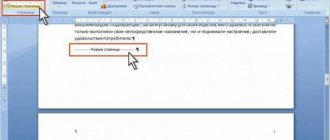
After creating a new document, go to the “Page Layout” tab. Here, call the “Page Settings” menu and set the required fields. Typically, schools set standard values for fields, but your university or college may well change any parameters at its discretion. So be sure to find out exactly what fields need to be followed when completing coursework at your school.
Next you need to insert “breaks” in the document. This must be done so that the frame appears only on those pages where it is needed. For example, there is no need to draw a frame on the title card; it would most likely be a mistake. Breaks also help if you need to create different borders on different pages.
Go back to the “Page Layout” tab, then click on the “Breaks” menu. In the drop-down list, select “Next Page”. Thus, the first page will remain for the title page, and we will start creating the frame from the next one.
Returning to “Page Layout”, select the “Page Borders” menu and mark the sheet type – “frame”. Click on the “Options” button and set the required frame margins. The standard values are:
- 21 pt top;
- 31 pt bottom;
- 26 pt left;
- 19 pt right.
Here, in the “Relative” drop-down menu, select “text”, and then check the “always ahead” option.
Having double-checked the entered data, click “OK” and admire the newly created frame.
Next, insert a table at the bottom of the page. First of all, select the “Insert” tab, find the “Footer” menu in it and uncheck the “same as in the previous section” option.
Then we insert a table with nine columns and eight rows using the corresponding menu in the same tab. The height of the cells should not be more than 0.5 cm, and the width should be set in accordance with the requirements of your educational institution. The standard width is (from left to right): 0.7cm, 1cm, 2.3cm, 1.5cm, 2.3cm, 6.77cm, 1.5cm, 1.5cm, 2cm.
The table is ready. Now you need to enter the necessary information into the cells (name of educational institution, department, title of work, etc.), merging the cells if necessary. If you go to the next page, the same frame will appear on it.
and then install.
If necessary, move the header table to the bottom edge of the frame.
Automatic page numbering
To auto-number pages, click on the corresponding cell in the table. Then select the “Footer” menu, then the “Design” tab. Here, click on the “Express Blocks” button, then go to the “Field” menu. Next, set the desired numbering format in the “Page” field. Click “OK” and check the numbering that appears in the selected cell.
How to remove a frame in Word
If the frame is no longer needed, the user is faced with the question of how to remove the frame in the text inserted in Word. It's quite simple to do this:
- Go to the “Page Background” group and click on “Page Borders”.
- In the “Border and Fill” window, in the “Border” or “Page” tabs, depending on the type of frame in this document, click on the “none” button, and in the “Apply to:” option, select the paragraph or pages from which you want remove frames.
Download the finished frame for coursework for free
How else can you make a frame? Take it ready! Millions of students have framed their work, and there are many templates and samples of coursework frames available. If you don’t have time to master all the intricacies of working with frames, you can download a ready-made frame template according to GOST completely free of charge.
Now you know how to make frames in Word for a term paper or dissertation. To make everything as clear as possible, watch the video on creating frames with a stamp for coursework in accordance with GOST. It remains only to remind you that a professional student service is always ready to help with tasks - from creating a frame to writing an essay or an entire thesis.