How to connect TV to PC via HDMI
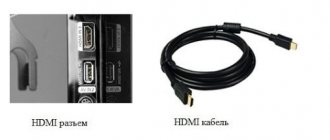
In order to connect two devices via HDMI, you must first check the presence of ports of the specified type on the system unit and on the TV. In most modern TVs, such ports are located on the sides of the TV. They can also be located on the back wall of the television receiver, and in many models they are duplicated, that is, they are located both at the side and on the back wall.
HDMI ports on the side of the TV:
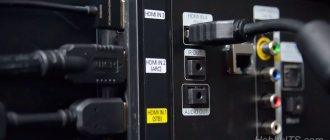
On a laptop, such ports (like on a TV, there can be 2 or more of them) are usually located on one of the side walls or on the front bottom of the device.
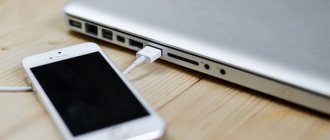
Photo of the side wall with the HDMI cable inserted into the port:
The last thing you need to connect devices is a cable. The cable must be equipped with appropriate connectors, and its length must provide the required distance between the laptop and the TV.
HDMI cable.
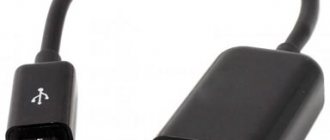
In some cases, for ease of cable connection, an HDMI corner is used. This is a special design in which the output is connected to the input at an angle of 90˚.
HDMI corner:
This device allows you to connect an HDMI cable to the port when the TV is hanging on the wall and connection in the usual way is impossible due to the small distance between the back of the TV and the wall, or the complete absence of such a distance.
Connecting a laptop to the TV must be done with the devices turned off, and both devices must be turned off not only from the control panels, but also disconnected from the network.
As a result, the connection algorithm looks like this.
- Turn off the laptop and close it, turn off the TV using the remote control.
- Unplug the power plugs of both devices from the outlet.
- Wait 2-3 minutes for the power supply capacitors to discharge.
- Connect the cable to the HDMI port of the laptop at either end.
- Insert the second end of the cable into a similar port on the TV.
- Remember or write down the port number if there is more than one.
- Plug the devices into a power outlet and turn them on.
Further actions boil down to setting up the signal transmission and setting up its reception by the TV.
When you turn on the TV, a notification should appear on its screen that there is no signal, or that the input device has not been selected. This is normal.
To set up your TV, you need to find the “INPUT” button or the “SOURCES” button on its remote control.
Type of buttons.
Pressing these buttons will take the TV to the input device settings page (this can be an antenna input, HDMI input, AV input).
Next, by pressing the “left”, “right” buttons, or the “up”, “down” buttons, select the required port and press the “OK” button. The TV setup is now complete.
To configure the laptop, you also need to select an operating mode, just remember that it is the output signal that is being configured, not the input signal.
There is no need for special, manual screen resolution settings, as this happens automatically. Manual entry of resolution parameters is carried out mainly when necessary. Therefore, setting up a laptop comes down to choosing the operating mode of the TV as a monitor.
There are 4 such modes:
- The TV screen is turned off, only the standard screen works;
- the TV duplicates the image on the gadget display;
- the television receiver shows an expanded image than the display;
- Only the TV is turned on, the standard computer device is turned off.
In three major systems (Windows 7, 8 and 10), to select an operating mode, just press a combination of two keys - Win and P. When you press these keys, the “Project” menu will appear and offer you to select one of the above modes.
Following the above instructions is usually sufficient for normal operation of both devices.
However, sometimes situations arise when, for various reasons, normal operation does not occur. Let's look at some of these reasons.
No image
To see what output mode is set: you need to press the combination of the “Win” keys and the English “P” key. After this you should see a window like this. Choose one of the last three options. But the best ones are “Duplication” and “Projector Only”.
Try to disconnect everything you can from the TV. Including all sorts of TV receivers, USB drives. This also applies to connections via AV ports. In general, turn it off - that’s it!
On LG TVs, there is a function that allows you to manage connections. But she also gets in the way. Press the button with the house icon on the remote control, then select “Settings” - “Advanced.” Settings" - "General" - scroll down to the "SIMPLINK (HDMI-CEC)" function
Now set it to “Off” mode.
Screen frequency changes
Windows 10
- Right-click on the desktop. There should be two squares labeled 1 and 2. 1 is your computer or laptop, and 2 is your TV;
- Scroll and find “Advanced display options”;
- Now you need to go to the properties of the second display, go to the “Monitor” tab and set a friend’s frequency. If your TV operates at a frequency of 60 Hz, then set this. Sometimes you need to set it to 25 Hz to make it work on older TVs. Click “Apply” and “OK”;
Windows 7
- Right-click on the desktop and select “Screen Resolution”;
- In the “Screen” line you need to select the second image. so that it is in front;
- Go to the “Advanced parameters” tab – “Monitor”, set the desired frequency and click “Apply”;
The image is not output to the TV via HDMI - reasons and solution
The image on the TV screen that should be transferred to it from the laptop may not appear for a number of reasons.
Cable is faulty
Before using the cable, you must carefully inspect the cable itself and the connectors at its ends. The HDMI cable is created using a special technology and its main faults that can be detected at home are mechanical damage. When inspecting the cable, pay attention to the following:
- connector contacts (their integrity and the absence of oxides on them);
- integrity of connector housings (the connector should not be loose in the housing);
- integrity of the cable itself (damage to the overall insulation, exposure or break of one or more cores);
- absence of any additional adapters, joints, connections;
- absence of dust or debris in the connector contact set housing.
The only way to eliminate all of the above shortcomings is to replace the entire cable. Even removing dust accumulated in the contact set is quite difficult due to its small size.
Even seemingly small damage to the cable insulation can lead to disastrous results. This can be either a loss of signal at the most inopportune moment, or a failure of one or both ports.
TV is not configured
Correctly setting up your TV consists of selecting the signal source in the TV settings menu, but some TV models may begin to broadcast a picture with cropped edges of the image. This indicates that the system was unable to correctly set the resolution of the image produced by the computer. To check that the TV is connected and configured correctly, you need to perform a number of operations.
- Check that the HDMI port numbers on the PC and TV match.
- Carefully inspect the cable, check the tightness of the cable connector in the port socket (prevent the connector from “losing” in the socket).
- Check that the TV settings are correct (use the “INPUT” or “SOURCES” button to enter the menu for selecting an input device for the TV).
- Check the HDMI port number specified in the TV settings.
A possible cause of the failure may be that additional equipment is connected to the television receiver, for example, an antenna. To eliminate all possible failures, you need to disconnect the connectors and disable all unnecessary functions in the settings.
To finally make sure that the TV is working or malfunctioning, you can try connecting another video device (for example, a monitor) to the computer.
By connecting a monitor or another TV to a computer with the same cable, you can clearly conclude that the TV is faulty if the picture appears on another device.
Before you perform any steps to connect to or disconnect from an HDMI cable port, you must unplug the device from the network. Significant voltage is transmitted through the cable, and if you pull the connector out of the socket while the device is turned on, an “arc” that appears between the contacts of the connector and the port, invisible to the eye, can damage the port.
Laptop or PC is not configured correctly
If, after replacing the TV, it turns out that it and the cable are working, then perhaps the cause of the failure is a malfunction or incorrect configuration of the laptop. To check this version, you need to press two keys - Win + P. The combination will open the image output settings menu, in which you need to check whether image output is disabled. Of the four possible options for importing an image, you need to choose one of those in which the TV is involved.
Video card problem
One of the reasons for the laptop not working correctly may be the incorrect operation of the video card. It is she who is responsible for outputting images from a computer or laptop. The card may be faulty, but then the gadget will not work equally with both the TV and the standard display. If the display works normally, but the connected TV does not, then the problem may be in the video adapter driver. To eliminate this reason, you need to visit the manufacturer’s website and download the VGA driver that matches the installed operating system and laptop model. Algorithm of actions:
- check the serviceability of the display;
- go to the site;
- find your model;
- download the version suitable for the OS;
- install the driver on the “machine”.
The laptop may have two video adapters installed, then it is better to replace both. After installing the new driver, it is better to repeat the image output setting procedure.
Connection port not working
The picture on a TV connected to a laptop using an HDMI cable may not appear due to a problem with the port being used. You can only check by connecting a known working TV or monitor and a tested cable. It is better to check with working devices after a short visual inspection. A working port should not have one.
- Broken, rusted, oxidized or bent contacts.
- The contact set must be clean and free of dust or dirt.
- The port socket itself should not be loose or loose.
If the connector has good, intact, but slightly dusty contacts, then they can be cleaned by mechanically removing dust (blowing with air). All other faults can only be removed in a specialized workshop or service center.
Viruses on your computer
A rare occurrence is when the output of images from a laptop to a TV is interfered with by virus programs that have penetrated the PC. In this case, only preliminary installation of anti-virus software on the laptop can help. To protect yourself from such problems, you need to check your laptop for viruses before connecting. For this purpose, you need to run the Kaspersky Anti-Virus program or its equivalent. After launching the anti-virus program, you need to select the “Full scan” item in its menu and only after receiving a notification that there are no viruses, try connecting the laptop to the TV.
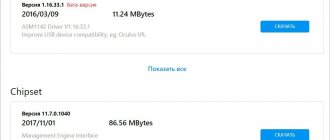
Video card drivers
Unfortunately, a very common situation among novice users is trying to update a driver in Device Manager, receiving a message that the most suitable driver is already installed, and then being convinced that the driver is really updated.
In fact, such a message only says that Windows does not have other drivers and you may well be told that the driver is installed when “Standard VGA Graphics Adapter” or “Microsoft Basic Video Adapter” is displayed in Device Manager (both of these options indicate that that the driver was not found and a standard driver was installed, which can only perform basic functions and usually does not work with multiple monitors).
Therefore, if you have problems connecting a second monitor, I strongly recommend installing the video card driver manually:
- Download the driver for your video card from the official NV website > Another option related to drivers is possible: the second monitor worked, but suddenly it stopped being detected. This may indicate that Windows has updated the video card driver. Try going to the device manager, opening the properties of your video card and on the “Driver” tab, roll back the driver.
Why is there no sound playing?
A common problem is when the image appears on the TV screen, but the sound does not. In this case, first of all, go to the TV settings menu and check whether the sound is turned on or not, and also check the volume level.
On your laptop you need to go to the “Playback devices” menu
The list of devices must indicate the TV you are using. Next, you need to select it by right-clicking on it and clicking on “Set as default”. If TV is not specified, then by right-clicking on an empty area you can open the following items: “Show disconnected devices” and “Show disconnected devices”. You can activate them by checking the box next to each one.
If there is no result after the above steps, you can try reinstalling the video card driver. To do this, you just need to download and install it.
When reinstalling the video card driver, the HDMI cable does not need to be disconnected.
Checking for signal presence
If the TV receiver has stopped seeing the computer and as a result does not display an image on the screen, you need to check the signal by doing the following in turn:
- inspect the equipment, determine the connectors and type of cable through which the connection will be made;
- disconnect the TV and computer (laptop) from the network;
- connect both devices with a proven HDMI cable;
- turn on the television panel, use the remote control to select the connector to which the cable is connected;
- turn on the laptop - if there is a signal, an image will appear on the television panel;
- if there is no signal, you need to open Device Manager on your PC and see what active connections the computer sees;
- If the device detects a connection via an HDMI cable, but there is no image on the screen, you need to connect the equipment with a VGA or DVI cable and select the appropriate input on the TV.
If the image does not appear on the television panel, you should contact a service center, as this indicates an internal failure of the TV.
How to check the signal
The most effective way to check the presence of a signal or the operability of the entire assembled system is to alternately replace individual parts of the system with known-good analogues. However, a second set of devices used is not always at hand, so the best way would be to work on the principle of “disassembled and carefully reassembled again.” You can proceed according to the following method.
- I disconnected everything from the network and waited 3-5 minutes.
- I disassembled the entire system into individual elements.
- I checked the functionality of the TV, even by turning it on via an antenna.
- I checked the cable by connecting a desktop computer monitor to the system unit.
- I checked the functionality of the laptop.
- I carefully assembled it again and wrote down the port numbers.
- Reconfigured both devices.
In 90% of cases, such “assembly and disassembly” gives a positive result. The point here is that during initial assembly, it’s easy to make a mistake - click the wrong thing, insert it in the wrong place.
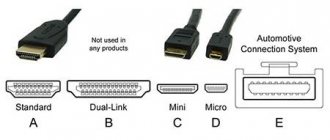
An HDMI cable is typically omnidirectional, meaning there is no difference in which side of the cable the device is connected to. However, there is a type of cable in which the output plug is marked with a triangle, the apex of which is directed towards the contact set. Such a cable will not work in the opposite direction.
Correct connection
The best way to fix something is to do it again, but this time correctly. So let's try to connect again, maybe you're just doing something wrong.
- Pull out the connected cable and plug it back into the HDMI port and immediately remember which one it is. I have it at number 2;
- We connect to any free port on the laptop;
- Or on the system unit of a personal computer;
- Now on the remote you must turn on the button that displays all connections to the TV. This could be a button labeled “Input” or “Source”;
- Now the following section will open in the menu, where all the ports and inputs are presented. Select the one through which you connected your laptop or computer;
- One more thing - on some TVs there is also a menu that indicates the type of device being connected. This is necessary to ensure that the image is of acceptable quality. Therefore, find the button to change the name and select “PC” or “Laptop”;
If there is no picture on the screen, but you still see this unfortunate inscription, then move on. Also, if there is still a picture, but no sound, then go to the last chapter.
The PC “does not see” the second monitor: enable detection of the second monitor in the system settings
Another reason for the second monitor not being recognized may be incorrect system settings on your computer. In this case, follow the steps below to pair the second monitor with your computer:
- Go to “Control Panel”, select the option “All Control Panel Items | Screen | Screen Resolution" and click the "Define" button
- Click on the found monitor and select the “Extend these screens” menu item.
- If you are establishing a connection to a wireless display, click on the “Detect” button and wait until the connection with the monitor is established.
Solving the problem
Knowing the causes of the main violations in the symbiosis of a computer and TV, any problem can be eliminated.
Troubleshooting algorithm:
Most likely, the equipment was changed before this. For example, a new video card has been installed. Seeing this outcome, the TV might as well reset its settings. Start over with our guide above. Check the signal source, destination, etc. This applies to both audio and video.
- What to do if the laptop does not see the TV via HDMI?
Most likely, you need to select the right source on your TV. Switched on devices must see each other. There is information that cables of different versions of standards are not always compatible with equipment. So with v1.3 everything worked, but with v1.4 the picture does not appear. Sometimes you need to add a second monitor manually in the video card settings, but this is more relevant to desktop computers.
How to switch? Like I said: read the instructions. One way or another, it is unlikely that it will be possible to switch the output programmatically (via the BIOS and, especially, through drivers) - most likely, this is done physically, using special devices. jumpers on your motherboard (if you are using an on-board video card), or on the video card itself.
The topic of the conversation should rather have been called “How to connect a TV to a computer via HDMI.” Most beginners do the procedure incorrectly, asking questions that are difficult for a professional to answer. Let us remind you: HDMI is a high-performance digital media content transmission interface. Images, music, other entertainment content. Will it be possible to listen to music on TV? It will be possible from a home theater, if you have one! The HDMI port was invented as a high-performance means of transmitting information. Let’s skip a few words, find out why the TV doesn’t see HDMI, and how to fix it.
Connecting a TV to a Computer HDMI