There's no shame in improving your photos—both amateur and professional photographers do it. Changing the lighting, simple effects or a little retouching can make a big difference in the end. Since not everyone knows how to use Photoshop, it is better to use one of the automated web applications that will do all the work for you.
No matter how bad your images are, these services will automatically adjust saturation, sharpness, and more. Just upload the photo you need to one of the services and the platform will automatically fix the most common problems in less than a minute.
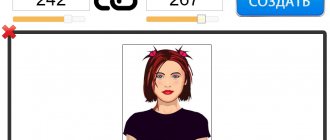
PinkMirror: improve your selfie in one click
Unlike the other apps discussed in this article, PinkMirror works exclusively with faces. If you want to improve your selfies, this is the site you should test first.
After you upload the image, you will need to mark the special masking points that the program will suggest. PinkMirror will then launch a series of filters, including lip enhancement, skin smoothing, teeth whitening, red eye reduction, etc. Next, you can go to the settings to choose the level of enhancements, and then compare the before and after image.
Once you've finished editing, you can download the image, but there will be a PinkMirror watermark in the lower left corner. You'll have to pay for a photo without a watermark, but if you can crop them, you'll get a great profile picture for social media. An interesting feature is the facial analysis function, which costs $10. It will show the level of attractiveness using a 100-point system in different parts of the planet (America, Europe, Africa, Asia). After all, beauty is assessed differently everywhere.
Programs to improve photo quality
Nowadays, the choice of image processing software is huge, so even beginners can easily find a suitable option for themselves. Let's discuss the most popular and well-thought-out photo editors.
Lightroom
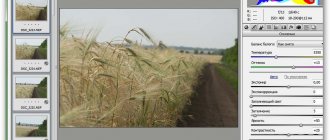
Initially, Lightroom was conceived as a simple program where photographers would sort and process photographs, exporting them later either to Photoshop for further editing, or saving them in the desired format. Today Lightroom is a photo editor with enormous capabilities. It seems that it is impossible to understand the sea of tabs, sliders and buttons without a couple of years of intensive study of the functionality, but this is an illusion - in most cases, improving the quality of photos in Lightroom is carried out in minutes.
The main advantages of using Lightroom are:
- Targeted at photographers - initially the editor was created specifically for them; it was tested by seasoned professionals who tried to do everything possible to make it easier to work in the program.
- Intuitive interface - despite the large set of tools, it is not difficult to understand the basic methods of processing frames.
- Sorting – in Lightroom it is almost limitless. Users can apply flags, ratings, tags, and then sort images by them.
- Catalogs - all photographs are structured according to catalogs, and the program fully reflects their tree, providing the ability to quickly access any image. This significantly reduces the time spent searching.
- Rich tools – adjusting white balance, exposure, clarity, creating vignettes, cropping, etc. The list is endless. The convenience is that you can equally easily process both RAW and JPEG files.
- Presets are a system of settings for photos that are applied in one click. Presets are often called weapons of mass destruction because they allow you to edit a lot of footage (for example, a two-hour shoot) in a matter of seconds - almost like a magic wand. The idea is that it is enough to process one photo, save a preset with the actions performed, and then apply it to the rest of the frames. However, you must understand that the shooting conditions (especially the light) must be the same. Moreover, it is not necessary to create your own preset - it is easy to choose from ready-made ones, of which there are many today.
Download link - adobe.com
Helicon Filter
The program is great for improving the quality of photos, since it does not require specific knowledge and has a convenient and intuitive interface. Helicon Filter will appeal to both beginners and professional photographers, as it contains popular functionality, including tools for:
- retouching;
- noise elimination;
- increasing sharpness;
- eliminating the “red eye” effect;
- creating vignettes;
- adding text and other effects;
- framing;
- changing the size (and weight) of the photo, etc.
Important: the advantage of Helicon Filter is the ability to install a full-fledged graphic editor absolutely free of charge. There is also a paid version - it has some differences, but amateurs will be quite comfortable starting with the option available free of charge.
Download link - helicon-filter.ru.uptodown.com
Zoner Photo Studio
An editor designed for viewing and sorting images, as well as processing them. There is also a mobile version, thanks to which users quickly share photos. Zoner Photo Studio is similar in functionality to Lightroom, as it also provides the ability to work with photo libraries. The main advantages of the program are the following:
- wide range of tools;
- batch processing of images;
- availability of a mobile version;
- thoughtful interface;
- compatible with all Windows operating systems;
- functional free version.
Important: it is worth keeping in mind that the free version of the program only allows you to view frames in RAW format, but not process them. Thus, experienced photographers who usually shoot in RAW will have to pay.
Download link - zoner.com
Improve Photo: remove freckles and pimples
All of the listed services for improving photos in one click work on the same principle. The only difference is the quality they achieve. Unlike other editors, Improve Photo gives you two enhancement options to choose from.
Here's a good example. Imagine a photo with brightness increased by 75 percent in one click. Now imagine a similar image, but the brightness has been increased by 45 percent. If you can compare both photos, it will be very easy to choose the one that looks better (taking into account the original). This is exactly what Improve Photo allows you to do.
This feature will be useful for those who do not want to get too perfect images without the slightest defect. For example, you don't want to remove your freckles, otherwise you won't look like yourself. Despite this, many automatic photo editors will remove them from your skin, but Improve Photo will leave them in the first option and remove them in the second. Then you can compare the heavily and moderately retouched options and choose the one you like best.
Method two: Unsharp Mask / Smart Sharpen
The second method is an extension of the first and is intended to solve the problem of increasing color saturation, causing the effect of color fringing. If you use a merged layer to sharpen it and switch its blending mode to “Brightness,” the effect of excessive color saturation is leveled out.
This option illustrates how the benefits of localized sharpening and brightness sharpening can be combined into one method.
Step 1
Change the High Contrast layer's blend mode back to Normal. Then apply a Threshold adjustment to the “Color Contrast” layer: Image - Adjustments - Threshold:
Select “Normal” from the layer palette blending mode menu:
Go to Image - Adjustments - Threshold to apply the Threshold correction.
Step 2
Image Retouching: Post-Processing for Skin Softening
Drag the slider located directly below the histogram to isolate edges that need sharpening. This is done to highlight any areas that you don't want to sharpen in white. Click OK.
Paint over any areas that aren't shown white using a Threshold adjustment to sharpen them. For example, in the photo below, the remaining pixels around the mouth, nose, and eyes have been painted over, as opposed to other areas that are filled in with white. It's set as the foreground color:
Drag the Histogram slider to isolate edges that need sharpening:
The pixels around the mouth, nose and eyes are colored differently from the other areas, which are painted white (set as the foreground color).
Step 3
Go to the Channels palette and Ctrl+click (Windows), Command+click (Mac OS) on the RGB thumbnail, or click the Load Channel as Selection icon in the Channels palette to load the color transition details as a selection . Go back to the Layers palette and drag the Background layer onto the New Layer icon to duplicate it.
Drag the duplicate Background layer on top of the other layers:
Drag the background layer onto the new layer icon to duplicate it:
Drag the duplicate background layer on top of the other layers.
Step 4
Automate processing of multiple photos in Photoshop
Turn off the visibility of the “Color Contrast” layer. Hold down the Alt or Option key and click on the Add Layer Mask icon in the Layers palette. Make sure the layer mask is active and then go to Filter - Blur - Gaussian Blur. Apply a radius of 1.5 px and a blue color for the mask:
Turn off the visibility of the High Contrast layer and add a layer mask:
Apply a radius of 1.5 px and a blue color for the mask.
Step 5
Now click on the duplicate background layer icon. Make sure the image is enlarged to 100% of the original size for small photos or 50% for print size photos (200ppi - 300ppi). Go to Filter > Sharpness > Smart Sharpen or Unsharp Mask. Set the “Quantity” slider to a value of about 80-150%.
This setting determines how dark or light pixels in color transitions will be output. If the image is intended to be printed on paper, set the Amount to a value slightly higher than it is set to.
Note: Review the basic Unsharp Mask, Capture, and Enhance filter settings. Absolutely precise Threshold and Radius values are not critical for this post-processing technique:
Adjust the values in the Unsharp Mask dialog box.
Let's Enhance: enlarge photos without losing quality
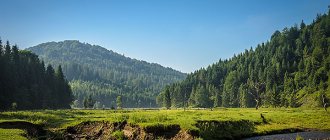
The Let's Enhance service can work real miracles. If you have a small photo and want to enlarge it, it can do so without any noise or pixelation. In the free version, the resolution can be increased by 4 times, for example, from 640x480 to 2560x1920 pixels, and in the paid version by 16 times without loss of quality.
The magic happens with Let's Enhance artificial intelligence. The application analyzes the photo and determines what is shown in it, and then increases the size and resolution without loss. The secret is that it adds the necessary pixels to the details of the image so that it becomes clear.
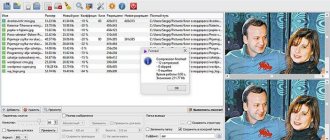
Let's Enhance has a limit on the number of photos you can upload (up to 4), as the server can only process a certain number of photos. To receive the modified images, you need to wait a couple of minutes.
Faces are an extremely important part of any image and are difficult to recreate, but the service has its own facial reconstruction AI that does a great job.
Enlarge the image without losing quality
How often, while looking through photos on the computer, we have thrown away great shots because they turned out to be too small in size and of poor quality. But with the help of special programs you can save almost any image!
Improving image quality is a very voluminous topic. To improve the quality of photos in Photoshop, color correction, sharpening, retouching and many other operations can be used. All of them require certain skills and mastery of special techniques.
But there are also less complex methods when you simply need to enlarge the image without losing quality. Below we will look at an example of how to improve the quality of a photo if you need to enlarge the photo without losing quality.
How to enlarge a photo without losing quality
We've all had to deal with small, low-quality images. In such photographs, when enlarged, the pixels, the points from which the raster image is constructed, are clearly visible.
Enlarging the image by stretching it and freely transforming it will only make the situation worse.
In this tutorial, the work will be done in Photoshop CC 2020. But first we will look at the method for other, older versions of Photoshop. And then we'll show you how Photoshop CC 2020 can do the whole procedure automatically.
Open the image in Photoshop. Now we will gradually increase it in several passes. It’s worth noting right away that you can enlarge a photo and improve the quality, but with a size limitation.
Press the key combination Alt + Ctrl + I. “Image Size” window will open . It is necessary that a paperclip be pressed the “Width”/Width and “Height”/Height Then the width and height will change proportionally.
Let's enlarge the image twice, each time by 20%. To do this, in the drop-down list opposite “Width”, change the pixels to percentages (Pixel/Percent), and the numerical value from 100% to 120% and click Ok . Then open the image size window again ( Alt + Ctrl + I ) and increase it by 20%.
We increased the image size from 950x632 pixels to 1368x910 pixels.
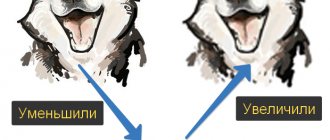
For a visual comparison, let’s zoom in on the original image (950x632 pixels) and the resulting one (1368x910 pixels).
We enlarged the image by almost one and a half times and even improved the quality. As you can see, the pixelation is less noticeable if you zoom in on the image.
You can learn even more about Photoshop in the course at Fotoshkola.net “Photoshop. Basic tools."
It remains to finalize the result. Apply the Smart Sharpen to the resulting image.
Go to: “Filters” / “Sharpening” / “Smart Sharpening” / Filter / Sharpen / Smart Sharpen . Move the sliders to select the appropriate sharpness. If you left-click and hold on the image in the small preview window, you can see the image before the effect is applied. The difference is noticeable. The smooth transition of color (without cubes) on the lenses of the glasses is especially noticeable. We removed the noise completely by moving the slider all the way to the right. The sharpness radius was taken at 0.3 pixels, the effect was applied at 79%.
Let's compare the results again.
On the left is the original image, in the center - after resizing, on the right - with Smart Sharpening .
After applying Smart Sharpening, the noise in the photo was gone and the image became clearer.
Here is our result.
Now let’s enlarge the photo and improve its quality using automatic tools in Photoshop 2020.
Open the image in Photoshop, press the key combination Alt + Ctrl + I. “Image Size” window will open . Pay attention to the item “Fit to”/Dimensions . Expand this list. In it you will see blank options for enlarging/reducing the image without losing quality. Let's use automatic selection (second item in the list). In the window that opens, select “Good” and click Ok . There is no point in choosing the best one, since the original image is of too low quality, and there is no point in enlarging it that much.
Please note that if we managed to enlarge the image from 950x632 pixels and a resolution of 96 pixels/inch to 1368x910 pixels with the same resolution, then the program increased it to 1969x1310 pixels with a resolution of 199 pixels/inch.
Let's apply Smart Sharpening.
Original image and result
Now you have seen for yourself that you can enlarge a picture without losing quality, and at the same time even improve the quality of the photo.
It is worth noting that this method can be useful not only for enlarging and improving small photos. For example, you need to provide a photo for an online resource or for printing in a publishing house. Your photo is of excellent quality and large size, but the publishing house needs an even larger size. By applying the described method of enlarging a photo and improving its quality, you will get an excellent result. After all, large photos with good quality will go through this procedure much easier.
The procedure is extremely simple. Don't give up on small pictures. Give them a second chance.
You can learn even more about Photoshop in the course at Fotoshkola.net “Photoshop. Basic tools."
Fotor: do makeup
Fotor is known as one of the editors for applying Instagram-style filters, but there's a lot more to be found in it. This online photo editing app now has a convenient "One Tap Enhance" button that allows you to quickly enhance your photos.
You can upload pictures from your hard drive, or via Dropbox, Facebook, or by providing a link to the image online. Once the photo has been enhanced in one click, press and hold the Compare button to see the before and after image. This is a good way to figure out which of the two photos you like better.
Fotor offers many other tools to bring your photos to life. So, in the Beauty section you can remove wrinkles, add blush, whiten teeth or use cosmetic pencil for eyes and eyebrows. Experiment with the options in the Basic and Fine-Tune sections with settings such as brightness and exposure. After that, you can try other functions, but in most cases the “One Tap Enhance” button will suffice.
Enhance Pho.to: increase brightness
Like other one-click editors, Enhance Pho.to does its job well. But, unlike the others, it offers something that others do not - self-customization. Options include removing defects most common in bad photos:
- lighting correction,
- blur,
- Colorful temperature,
- saturation adjustment,
- eliminating "noise"
- removing the red eye effect.
That is, before applying one-click editing, you can select or deselect any of these options. By default, Pho.to analyzes images and suggests the best filters, but even then you have a choice. For example, red-eye removal sometimes changes the appearance of red-eye too much, so you may want to omit this filter.
Again, you can compare the images before and after editing, and download it when you're done.
Filter "Sharpening"
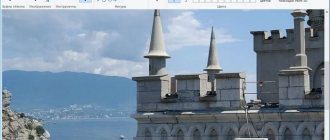
In addition to the usual tools, there is a whole group of filters, specially tailored to our today's needs. To do this, select “Filters” in the top menu and select “Sharpening”. There you will see another submenu with several items. Let's look at a few of them.
- Smart Sharpen. By selecting this item, a window with some parameters will open. If you don’t like what you get when you open this filter, then you can move the sliders yourself and do it as you see fit. Personally, that's what I did. It turned out quite well.
- Contour sharpness. Here, too, a window opens with parameters that are regulated by moving sliders. Move and adjust to suit yourself. But I don't particularly like this look.
- Sharpness +. There is no need to configure anything here. By selecting this item, the program itself makes the photo sharper. It turns out pretty good too.
- Image stabilization. A great tool for improving sharpness. When you select it, a separate window will open in full screen mode. The filter itself will do everything as it should, but if you have any comments, then controlling the sliders will help you! But in my case, I didn't even have to configure anything. The program did a great job on its own.
- Sharpening. This filter is somewhat similar to “Sharpness+”. There are no settings here either, the program does everything itself. Your task is simply to choose it. But by itself it is weaker and to get the desired result, I had to select it three times. But after that, the background display deteriorated a little. Of course, it can be corrected with an archive brush, but in my opinion it’s not worth it.
Well, no matter which filter you use, the image still becomes clearly better and much more pleasant to look at.
In principle, such tricks can be used to make your image clearer and better. Which method do you prefer? Or maybe you are using something else altogether? Please write in the comments.
Well, if you want to master all the tools of Photoshop, know what to use for what and how to use it, and learn to swim in it like a fish in water, then I recommend that you check out one great course. These video lessons are designed for absolutely any level. The main thing is that after watching you will not have a mess in your head, since everything goes from beginning to end, from simple to complex. And the presentation of the lessons is simply excellent, so be sure to check it out.
Well, this is where I end my article for today. I really hope you like it. And by the way, I recommend that you subscribe to my blog updates. Then you will always be aware of everything important and interesting. You can also look at other articles on my blog. I'm sure there will be something interesting for you there. Good luck to you. Bye bye!
Best regards, Dmitry Kostin.