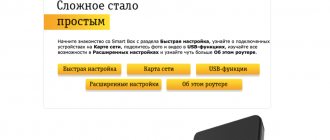
How to go to Netgear settings
The router is managed and configured using the classic method - in the web shell. This is a local page that can be opened in any browser on your PC after connecting your router to it using an Ethernet cable (which we did in the previous section of this article):
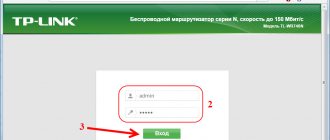
- In the navigation bar of the browser, for example, in Yandex.Browser, write manually or paste the previously copied address using Ctrl + V: 192.168.1.1. We click on “Enter” - we get to a page on which we are asked to enter authorization data.
- The standard login information is one word admin. If it doesn’t work, it means that you have new router firmware - you need to enter the same word admin in the login, and password in the password.
- If you have new firmware, you will immediately find yourself in a menu with sections - in the “Basic Mode” tab.
After authorization, you will find yourself in the “Basic mode” section
- If you have outdated firmware, a quick setup wizard will open in front of you - and click on “Next” to go to the sections for fine-tuning yourself.
If you are a beginner, you can run the Quick Internet Setup Wizard, or immediately move on to more detailed settings in the sections
Set a new password to log into the Netgear web platform
You need to change the security key so that no one else gets into the web shell and changes your settings (for example, the password for the access point). If you have a new firmware version, go to the “Advanced” block, expand the administration menu and select the link to set a password. Enter the required combinations and apply the changes.
Write your new password twice
If you have an older version of the Netgear operating system, go to the “Saving” section, and in it click on the “Set password” link. Write the old and new keys and click on “Apply”.
Set a new security key in the Set Password menu
Connection settings procedure
Place the agreement with the provider (DP) in front of you and in the configurator that appears you need to perform the steps described below.
If your ISP provides a static IP, then follow these steps:
- Open the “Internet” tab;
- Do as shown in the screenshot above;
- Next, check the line for using permanent IP and enter the addresses in the appropriate columns (written out from the DP);
- Activate the line “Use these DNS servers”; similarly, the information to be entered into these items is carefully written out from the DP;
- Click “Apply”.
If the DP specifies a dynamic IP connection, then the following steps must be taken:
- Follow steps numbered “1” and “2” from the above instructions;
- Check the box for assigning IP and DNS automatically;
- If binding to MAC is applied, then check the appropriate line and click “Apply”.
For subscribers of TTK, Dom.Ru or Rostelecom providers, it is necessary to use a PPPoE connection. The sequence of steps in the interface for them will be as follows:
- Go to the “Internet” tab;
- ABOUT;
- In the communication service provider field, indicate: PPPoE;
- Set authorization parameters by copying them from the DP;
- In the “Connection Mode” section, experienced users can specify “Connection on demand”, and for beginners it is recommended to set it to “Always on”;
- In accordance with the DP, enter the parameters in the IP section;
Note: For Dom.Ru subscribers, in addition to the listed points, it is necessary to mark the use of MAC computer.
Click "Accept".
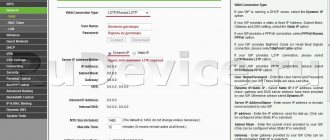
It will also not be difficult for Beeline subscribers to specify the parameters for connecting to the network:
- Follow the first two points from the previous instructions described above;
- In the connection type field, specify: L2TP;
- Enter authorization parameters by copying them from the DP;
- Specify the server address: tp.internet.beeline.ru;
- In the “Connection Mode” section, experienced users can specify “Connection on demand”, and for beginners it is recommended to set it to “Always on”;
- Activate the IP assignment position in automatic mode;
- Click "Apply".
For subscribers connecting to providers using the PPTP connection type, the instructions contain the following sequential steps:
- Ask about;
- Select PPTP;
- Set the parameters specified in the DP;
- Click "Apply".
Setting up a Netgear router: for old firmware
Old firmware differs from new ones only in the names of the sections - all parameter items in the blocks remain the same, so we will only consider how to get into certain blocks with settings.
Selecting a connection type and binding by MAC address
In the left menu we need the first main section “Settings”, and in it - the “Basic settings” block.
Click on the “Basic settings” link to proceed to creating a connection
Now configure your connection type using one of the instructions above (static or dynamic IP, PPPoE, L2TP, PPTP). After changing all the parameters, click on the “Apply” button (it will already be at the bottom).
Select the connection type and provide all the necessary data from the contract
Wi-Fi setup
In the same first section “Settings” at the top left, click on the link “Wireless network settings” or “Wi-Fi settings”. Change the parameter values using the instructions above for setting up Wi-Fi (for new firmware). The only thing that has changed is the “Apply” button (it’s already at the bottom) and the menu for the region (it’s moved a little lower).
When setting up Wi-Fi, the main thing is to specify the password for the access point
Setting up IPTV
To set up digital TV, switch to the “Advanced” section block - open the “Internet port settings” tab. All settings are the same as with the new Netgear firmware - use the instructions above.
Specify the port for the set-top box - tick it
DHCP server and LAN
In the same last block of “Advanced” sections, click on the “Local network settings” item - you will be taken to the “local area” settings. Change the settings if necessary using the appropriate instructions above.
Configure the range of IP addresses if necessary and change the local address of the router
Wi-Fi setup
In order to connect a wifi network on the n300 model, follow these steps:
- Open the item from the menu on the left “Wi-Fi network”;
- A new window opens: in the line with the name, set the name for your wireless connection;
- Channel selection can be left automatic, or you can set your own value if there are many other wireless networks around;
- The connection mode should pass up to 300 Mbit/s;
- In the security settings, select the last selector (the most advanced encryption type);
- In the area for specifying the password, enter our key, which should contain numbers and letters (preferably in different case);
- We apply the changes and try to log into a website via wifi.
Factory reset
You can restore the router to its factory state using the Reset key - it is usually located on the back of all routers, next to the LAN and WAN ports. The key is internal, so to reach it, use some kind of sharp and oblong object, for example, a pen or a needle.
To start the reset, the Reset button must be held for 7 seconds
Press this button for just 7 seconds. The power LED on the router will then blink. This will indicate the reset is complete. After that, log into the web shell and configure the device again.
If it turns out that your Netgear router does not have a Reset button, use the WPS and Wi-Fi keys to reset. Press them simultaneously for 6 seconds and release - the Power indicator will also blink - the router has returned to factory settings.
If there is no Reset button on the device, press WPS and Wi-Fi together, but for 6 seconds
Connecting a NetGear router to a computer
So, before you start setting up your Netgear router, you need to connect it to your computer and the Internet. For this:
- Connect the power supply to the router and to the outlet
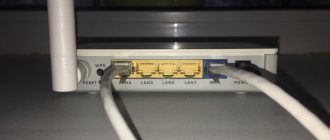
- We insert the cable from the Internet provider into the only “WAN” connector on the rear panel. At Netgear, it is most often highlighted in blue from others
- We connect a separate network cable from the box to the “LAN” port (any yellow color). And the other end goes into the computer, where the wire from the provider used to go
Firmware update
Despite the apparent complexity of the process, you can completely do the router firmware yourself. To do this, you will need two files - firmware, necessary for direct updating and configuration - for subsequent configuration of the device.
Where to find them and step-by-step instructions below:
- remove the WAN cable from the corresponding connector of the router;
- connect the computer to one of the LAN ports of the device;
- go to any installed browser and indicate “https://192.168.1.1” ;
- a user interface will appear, which you can enter using your login and password (the default value is “admin” for login and “password” for password);
- at the top of the page we find a line containing the number of the current firmware;
- click on "Choose File" and specify the folder on the computer where the firmware file will be saved;
Photo: installing new firmware
- select “Submit” , after which the installation process will begin;
- We wait for it to complete without turning off the power to the device or removing the cables.
Photo: firmware update
If you cannot go to the web page with the settings (a prerequisite for point No. 4), then you first need to return the device to its factory configuration.
You can do this as follows:
- We find the reset button on the back panel of the router, located in a small recess;
- press it with a pen or paper clip for about 10 seconds;
- after the indicator starts flashing, release the button and wait for the reboot;
- enter the device menu using the default password.
Wireless Settings
Now the user needs to go to the “Wireless Connection Settings” item. Here you can change the settings of your Netgear N300. When creating a network, you need to come up with a name for it, and it can be anything. For the router to work correctly, the region must be specified. Domestic users must select Russia from the drop-down list. Next, in the “Channel” column, set “Auto” (automatic selection). Changes can also be made to the speed mode by setting the maximum value.
Next we move on to the security settings. The user is offered a choice of four encryption methods. It is recommended to choose the WPA2-PSK algorithm. Then come up with a password key that will need to be entered when connecting to Wi-Fi. By clicking on the “Apply” button, the entered parameters will take effect. To check the wireless network signal, just connect any device equipped with a Wi-Fi module.
IPTV
Before you start setting up IPTV for Netgir N300, you should consider one point: in the case when using IPTV requires specifying a Vlan ID, it will not work, since it can only allocate a separate port and direct the incoming stream to it.
If this is not required, then we just need to indicate the port to which the STB set-top box is connected:
- go to the router settings and select “Advanced mode” ;
- go to “Settings” and then “Internet port settings” ;
- check that there is no checkmark “Disable IGMP proxy”
- find “Redirect IPTV stream
for set-top box” and indicate the port to which the STB set-top box is connected or planned to be connected; - Save the changes with the “Apply” button.
Configuring N300 family routers
To open the settings interface, launch any modern Internet browser, enter the address 192.168.1.1 and go to it. If the address you entered is not correct, try routerlogin.com or routerlogin.net. The login combination will be admin as the login and password as the password. You can find the exact information for your model on the back of the case.
You will see the main page of the router’s web interface - you can start configuring.
Internet setup
Routers of this model range support the entire main range of connections - from PPPoE to PPTP. We'll show you the settings for each option. The settings are located in “Settings” - “Basic settings”.
On the latest firmware versions, known as NetGear genie, these parameters are located in the “Advanced” section. settings", tab "Settings" - "Internet settings".
The location and name of the required options are identical on both firmwares.
The PPPoE connection on the NetGear N300 is configured as follows:
- In the upper block, since the PPPoE connection requires entering data for authorization.
Enter the authorization name and code word - the operator must provide this data to you - in the “Username” and “Password” columns.
Select to dynamically obtain computer and domain name server addresses.
- Click “Apply” and wait for the router to save the settings.
- Use "Apply" to complete the setup.
The PPPoE connection is configured.
A connection using the specified protocol is a VPN connection, so the procedure is slightly different from PPPoE.
Note! Some older NetGear N300 variants do not support L2TP connection, a firmware update may be required!
Activate the “L2TP” option in the connection type selection block.
Enter the authorization data received from the operator.
Next, in the “Server Address” field, indicate the VPN server of your Internet service provider - the value can be in digital format or in the form of a web address.
Set DNS acquisition to “Obtain automatically from your ISP.”
PPTP, the second VPN connection option, is configured as follows:
- As for other types of connection, on the upper block.
The Internet provider in our case is PPTP - check this option in the appropriate menu.
Further steps differ for options with external or built-in IP. In the first, indicate the desired IP and subnet in the marked fields. Also select the option of manually entering DNS servers, then enter their addresses in the “Main” and “Secondary” fields.
When connecting with a dynamic address, no other changes are required - just make sure that you have entered the login, password and virtual server correctly.
Dynamic IP
In the CIS countries, the type of connection using a dynamic address is gaining popularity. On Netgear N300 routers it is configured like this:
- When entering connection information, select “No.”
With this type of retrieval, all the necessary data comes from the operator, so make sure that the address options are set to “Receive dynamically/automatically”.
Authentication for a DHCP connection often occurs by checking the MAC address of the equipment. For this option to work correctly, you need to select the options “Use the computer’s MAC address” or “Use this MAC address” in the “Router MAC address” block. If you select the last option, you will need to manually enter the required address.
Static IP
The procedure for configuring a router for connecting via a static IP is almost the same as the procedure for a dynamic address.
- In the top block of options o.
Next, select “Use a static IP address” and enter the required values in the marked fields.
In the domain name server block, specify “Use these DNS servers” and enter the addresses provided by the operator.
As you can see, setting up both static and dynamic addresses is incredibly simple.
Connection setup (DHCP option)
If the provider “distributes” the Internet using the DHCP protocol, setting up a connection in the router will be easy. In the web interface you need to go to the “Network” -> “Connections” tab:
Router connections tab
Where you need to left-click once on the line that says WAN. A page will open where you can set connection parameters:
Setting up a DHCP connection
There is no need to configure anything additional for DHCP connections. If you plan to watch IPTV, check the “Enable IGMP” checkbox. If you need to change the MAC address, the new value must be set in the corresponding field (MAC). In the “Connection Type” list, in addition to “IPoE” (for us this is “DHCP connection”), there are three more options that must be considered separately. These are L2TP, PPTP and PPPoE.
Having completed the necessary settings, click “Save” in the lower right corner of the page. The interface will return to the Connections tab. Check that the “Default Gateway” point remains on the connection that we configured (if there are several of them). Then you need to click “Save” in the upper right corner of the tab.
A few seconds after saving the settings, the Internet connection will appear automatically. You can verify its presence on the “Status” -> “Network Statistics” tab:
Device status tab
Additionally, let's talk about setting up connections of other types (for example, PPTP). In this case, the IPoE connection should remain (you need to click the “Add” button and set the PPTP parameters). At the same time, even if the IGMP service is used, the IGMP checkbox is set only (!) in the IPoE settings, if necessary.
Connections tab after PPTP setup
Happy setup!
Router equipment
Netgear N150 comes in a lime-white box containing:
- the router itself;
- network cable;
- power unit;
- warranty card;
- installation and use instructions;
- disk with software for setting up the device.
Note! You will not find an antenna in the kit, since this model has a built-in one.
On the front panel of the router there are LED indicators that reflect:
- connecting the device to power;
- Wi-Fi module activity;
- Internet connection;
- connection to a WPS network;
- active LAN ports.
Important! This model is cooled thanks to the grilles located on the body, so when installing it, it is necessary to choose such an arrangement so that they are not covered by other equipment and household items.
The rear panel of the router is equipped with:
- interfaces for connecting to the network;
- power on/off switch;
- four LAN ports for connecting additional devices to the local network;
- WAN port to connect the device to an Internet service provider.