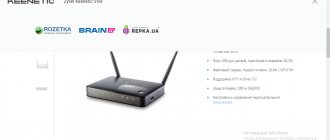
Zyxel Keenetic Start: about the appearance of the model, cost and other features
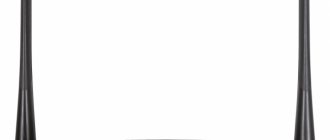
Zyxel Keenetic Start is the first option in the Start line of routers from this company. There are also second and third versions - more advanced. Let's look at the router from all sides. The first thing that catches your eye is the large button with the image of “Wi-Fi” on the top panel of the case. It performs the WPS function - a simple and quick connection of devices to an access point if, for example, you have forgotten the password for it.
There is a round button on the top of the device that helps connect devices to the network without entering a password
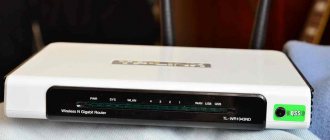
There are several light bulbs (LEDs) along the front edge. From them you can determine the status of a particular router function, keys or outputs (ports). Speaking of ports, they are all located at the back: 4 local yellow ones for connecting computers and other devices and 1 for the Internet. There is also a power button and a key to reset the device to factory settings.
On the back panel of the router there are 4 local outputs and 1 for the provider cable
The model has only one antenna. From here the immediate conclusion is that it is enough to cover only a small room, for example, a one-room apartment. But the device is budget-friendly - 1,650 rubles according to Yandex.Market.
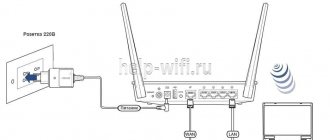
In addition to the device itself, the manufacturer puts an Ethernet cord in the box - with the help of it we will connect the router to your computer for setup. The kit also includes a charging device and instructions for use.
Table: main characteristics of the Start model
| Parameter | Meaning |
| CPU | RT5350 350 MHz |
| RAM | 32 MB SDRAM |
| Flash memory | 4 MB |
| Antenna | 2 dBi |
| Ethernet ports | 5 x 100 Mbit/s |
| Access point, amplifier, adapter modes | Yes |
| Wi-Fi network speed 2.4 GHz, Mbit/s | 150 |
| IPoE/PPPoE routing, Mbit/s | 90 |
| Routing L2TP/PPTP, Mbit/s | 60 |
Connecting to Wi-Fi
When a connection is established on the Zyxel Keenetic Start router, Wi-Fi distribution is immediately activated, but many people ask the question: “If we did not enter the network name or password, how can we establish a connection from the rest of the equipment to the Internet via Wi-Fi?”
The answer is that the network receives a name and password automatically when installing the equipment, and to find out this data, look at the back of the router.
It is noteworthy that each router of this brand is assigned its own combination, which is more secure than in the case when at first there is no password and login for Wi-Fi, and the network is open to all users.
If you want to change the default network name and password, follow these instructions:
- Go to the router settings and select the Wi-Fi network section.
- Open the Access Points tab and set a new network name, key combination, select the WPA2-PSK encryption type (it is the most reliable for protection against hacking).
Note. When changing the SSID in Zyxel Keenetic Start, there is a “Hide Network” function at the bottom, with which you can make the access point invisible. In this case, other users will need to manually add a network, enter its name and password in order to receive an Internet connection, which will additionally protect you from interference by third-party equipment.
We connect two devices: a computer and Zyxel Keenetic Start
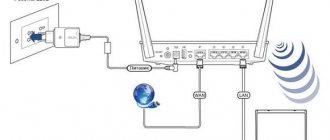
To configure, you can use a desktop computer or laptop (notebook). First of all, create a communication channel between the Zyxel router and the laptop - use the cord from the kit. Connect the two ends to the network connectors of the PC (connector on the side panels of the case or the back) and the router (any yellow output).
Fully insert the provider cord that comes from the entrance or the modem in the hallway into the Internet socket. And of course, turn on the gadget itself to distribute Wi-Fi.
Connect your PC and router using the included power cord
Let’s move on to the computer: after connecting the router, we’ll configure the PC’s network card
The computer itself should recognize that you connected it to the router via a cord. In rare cases, this does not happen if the laptop’s network card is not configured as needed. To enable automatic recognition, follow these short instructions:
- Expand “Start”, find the “System” folder, and in it “Control Panel”. If you have Windows 7, look for the panel immediately in the right list of sections.
- On the panel, go to the “Network Center” block.
- Click on “Change adapter settings”.
- Call the context menu of the Ethernet adapter or “Local connection”. Click on "Properties".
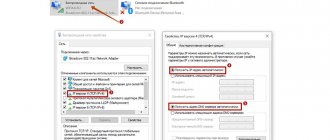
- Select IPv4 protocol. Go to its properties. Set automatic retrieval of DNS and IP. Save your changes.
Set the value to “Receive data automatically”
We launch the web platform with the router settings: address and login information
Where are the network gadget settings located? Usually on a local page that opens through any browser on a PC. The main thing is to know her address. There may be one of the options: 192.168.1.1 or 192.168.0.1. If the first one didn't open anything, try the second one.
Paste 192.168.1.1 or 192.168.0.1 into the address bar
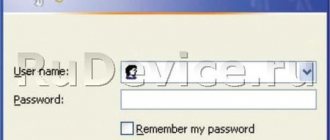
Most likely, you will need to enter data in order to be allowed on this platform. What should I write to log in? The standard word admin for login and 1234 for password. Complete the login procedure by clicking on the OK button.
If you have never visited this platform before, a window will open in front of you in which you will be offered two options: start quick setup or visit the sections themselves for fine-tuning (“Web Configurator”). We will select sections to show everything more clearly.
On the start page, click on “Web Configurator”
Is it possible to set a different login and password for the configurator?
It is possible and, by the way, necessary. If the password is standard, anyone can visit the platform with the settings and change them as they please. To prevent this from happening, set complex code. Immediately after going to the sections with parameters, an additional window will appear asking you to write a new password. We write it twice, remember it and save it.
Immediately set a new password for the admin panel
Let's start with the appearance of the router - it doesn't really stand out among a number of others, black in color, glossy with a ribbed surface.
Zyxel Keenetic Start is not large in size, 140 x 110 x 30 mm, excluding antennas. There is a button on top of the case; it allows you to quickly and safely connect Wi-Fi 802.11g/n wireless devices that support the WPS standard, such as computers and laptops with the Microsoft Windows operating system, to the secure Wi-Fi network of the Internet center. Short press - Launches the quick connection function (WPS). Press for more than 3 seconds - Turns the wireless network on or off.
At the back there are traditionally 5 ports (100 Mbit): 4 ports for local network + 1 port for the Internet. What surprised me a little is that the ports are signed in Russian letters (Home Network, Internet, etc.) is not fundamental, of course, but it’s not common to see this. There is also a button to turn the router on/off.
There are 8 indicators on the front panel:
Indicator - Status Off Zyxel Keenetic Start is turned off. Flashes rarely The router is loading. If the indicator blinks for more than two minutes, the Internet center may be faulty. Flashing rapidly Firmware update. is on - the center is turned on and functioning normally.
Indicators 0-4 Connection to network connectors Off The cable is not connected to the corresponding connector of the Internet center, or the network connection is not established. Lit or flashing The network connection has been established and information is being transferred.
Indicator - Wireless network Wi-Fi Off The Wi-Fi network is turned off. On The Wi-Fi network is on. Blinking, fast Data is being transmitted over the wireless network. Blinking, rarely A quick wireless connection setup session using WPS technology has been launched.
Indicator - Internet Off Zyxel Keenetic Start did not receive IP parameters from the provider to connect to the Internet or did not pass authorization. On The IP settings for connecting to the Internet have been set. In order to set up the router, you need to connect it to your computer/laptop using an Ethernet cable. Don't forget to connect power to the Zyxel Keenetic Start and press the power button on the case. In the computer/laptop settings, set to automatically receive network settings . After this, open any browser (IE, Chrome, Opera), the web interface of the router will open, if this does not happen, enter 192.168.1.1 or my.keenetik.net in the address bar, a web interface window will open offering a choice - go to the web interface or run quick setup . I suggest starting with a quick setup.
The first step will be setting up the Internet; the router supports various types of VPN connections (PPTP and L2TP), PPPoE, 802.1X, VLAN 802.1Q, IPv4/IPv6. In order to properly configure the Internet, I recommend contacting your provider. After the global network is configured, Zyxel Keenetic Start will offer to update its firmware, we agree and click “ Update ”.
After installing the updates and rebooting the router (this will take no more than 5 minutes), you will see a window stating that the Internet Center components are updated and you can proceed to the next step, click “ Next ”.
The next step is to suggest enabling the Yandex.DNS Internet Filter application; I recommend turning it on to make browsing the global network safer; if this function turns out to be unnecessary for you, you can always turn it off.
This completes the quick setup and you will be asked to go online or continue settings using the web interface.
Many may notice that in the quick setup there was nothing about Wi-Fi network settings, the whole point is that the router already has a secure Wi-Fi network configured, in order to find out the SSID and password, just turn the device over and on the sticker you You will see the name of the Wi-Fi network and its password. In my opinion, a reasonable solution, since many routers from other manufacturers have a default Wi-Fi network open to everyone, and this is not safe, and those who change the Wi-Fi network settings very often forget the password, in the same router everything can be seen on a sticker .
We return to the web interface, I suggest you look at the basic settings of Zyxel Keenetic Start; for this, click the “ Web Configurator ” button.
The first thing you will be asked to do is enter a password to connect via the web interface; I recommend using a complex password consisting of at least 6 characters with numbers, large and small letters, and special ones. signs ( [email protected] #$), just don’t forget it later, otherwise you’ll have to press the Reset button and return the router settings to factory settings and then configure everything again.
After entering the password, you need to log in (enter your login and password), login - admin , the password is the one you just set.
After connecting to the web interface, you will see System Monitor, it shows information about the system, the status of the router, and network interfaces.
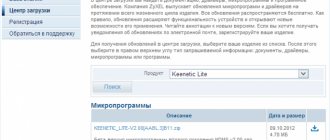
Video review of the Zyxel firmware update.
If you want to change the Wi-Fi network settings, you need to click the “ Wi-Fi network ” button and on the “ Access Point ” tab, make the necessary changes.
If you select the Guest Network , we can enable and configure another Wi-Fi network without access to the local network. Typically, the Guest Network is used in the office so that non-employees of the enterprise can connect to the Internet without access to the local network.
In order to manually update the firmware and components of Zyxel Keenetic Start, you need to go to the “ System ” tab, check the boxes for which components need to be updated and click the “ Update ” button, after which the router will download, install the updates and reboot.
In order to set up IPTV, you need to click the “ Applications ” button and specify the settings for IPTV; these can be obtained from your digital television provider.
In my opinion, the Zyxel Keenetic Start router is a very high-quality device that will take its rightful place in the wireless device market.
After configuring the router, you can begin setting up a local network on Windows XP or Windows 7 , making a network folder or setting up a network printer .
I really hope my article helped you! Please share the link with your friends:
Setting up “Internet” - the connection itself
Each company delivers Internet to its customers' homes using a specific protocol. Your task is to find out what this protocol is. It is not necessary to immediately call the company’s support. Most often, it is enough to open the agreement that you entered into with the operator when connecting to the Internet. Not only the protocol should be marked there, but also the information that needs to be entered in certain fields when setting up the router.
We will describe in detail how to create a connection on Zyxel Keenetic Start for each protocol (L2TP, PPTP, PPPoE, unique or automatic IP).
PPPoE protocol
Let's start analyzing the settings with one of the most popular standards:
- You need a block with Internet parameters - it is indicated by an icon in the form of a planet in the bottom row of icons. Switch directly to the PPPoE/VPN category. Let's move on to creating the future connection.
Click on the PPPoE tab and click on “Add”
- Let's immediately include the first two points. The description can be left untouched. We set the protocol, of course, to PPPoE.
- We rewrite the user name on the network from the agreement with the operator. After this we indicate the password. You can save immediately - you don’t have to change other parameters.
Enter your operator's network name and password in the appropriate fields
L2TP and PPTP protocols
Next up are the protocols that relate to encrypted private networks (VPN):
- In the same PPPoE/VPN category, click on the gray button to add a connection.
- For the protocol, set either PPTP or L2TP - whichever your operator supports.
- Now we carefully rewrite the name and security key, and then set the server address of the provider’s private network.
- We do not touch the remaining parameters. The only thing is that you can set the IP manually if you took a separate service from the operator with a unique IP on the Internet.
- Be sure to save.
Set PPTP or L2TP in protocol
Unique IP (static) or automatic
This pair of standards needs to be configured in another category in the “Internet” block - in IPoE. Also click on “Add”. In the “IP Settings” menu, set either “Auto” or “Manual input”. In the first case, you just need to save the changes, and in the second, you need to additionally rewrite all the data from the contract (gateway, IP itself, subnet mask, a couple of DNS addresses).
Mark the port to which you connected the provider cord
Settings
Keenetic 4G generation III - multifunctional Internet center
As already mentioned, to configure “Kinetic Start” you need to log in through a browser on any device connected to the router. To do this you do not need to have access to the Internet. Having opened any browser, you will need to enter the modem’s IP in the line to enter the address. It is indicated on the box with the device. But if there is no such data, the standard address for Zyxel Keenetic Start 2 and the first model is 192.168.1.1. If the connection fails, you need to change the line to 192.168.0.1.
When several devices are connected to a computer, the Start Keenetic router is assigned a completely different address. To find out the exact IP on Windows 7 and older, go to the “Manage networks and sharing” section, and then go to the “Change adapter settings” menu. All devices - local and virtual - connected to the network card are displayed here. They are all signed, so the modem can be found right away.
Then you need to double-click on the Start Keenetic connection icon and then click the “Details” button. Find the line “Default gateway IP”. Enter the information of this particular line in the browser.
If everything is done correctly, a window will open where you can quickly configure the system in two modes: manual and automatic. Let's take a closer look at each of them.
Automatic setup
To start installing Start Keenetic automatically, click the “Quick setup” button. A window will appear where the connection will be checked offline, and a menu will open with fields for authorization. Here you need to enter the login and password received from the service provider. If the provider uses a PPPoE connection, you need to check the box in the “Provider provided...” column and select the server. After all authorization data has been entered, click the “Next” button.
The Start Keenetic modem will automatically check for updates on its server. If there are any, you need to click “Update”. This will be followed by installation of the components. During installation, you cannot turn off the PC and the router itself; you must wait until the procedure is completed. Once the update is complete, the device will reboot automatically and all configurations will be saved.
After the update, a window will appear with a message containing a proposal to enable the Safe Internet function provided by Yandex.DNS. The service is useful, but not required. If the Internet is weak, it is better to disable it by unchecking the corresponding box. Now click the “Next” button and enjoy browsing the Internet.
Connecting to the Internet manually using the example of some providers
Connecting Start Keenetic manually depends on the type of connection used by the Internet provider and Rostelecom
First, let's figure out how to establish a connection with the provider using the PPPoE protocol, used by most providers. The first thing you need to do is go to the Start settings if this is the first time you start the router. Then, when choosing the type of setting, select not quick, but “Web Configurator”. If this is not the first launch, you need to go to the “Internet” section located in the bottom panel and then go to the PPPoE/VPN tab. After that, click on the “Add new connection” button.
The “Connection Settings” submenu will open; you need to check the boxes in the first two fields. The tags will be responsible for the fact that Keenetic uses this particular protocol to access the Internet. In the “Description” line, you must enter the future name of the connection, and use any name. Protocol type: PPPoE. Next in the “Connect via...” drop-down list, you must select Broadband connection.
The following: “Username” and “Password” are provided by the provider in the contract. The specified data must be entered in these two fields. The rest should be left as default. The last step is to click the “Apply” button. To check if the connection is working, go to the Start “Connections” section of the router. Opposite the new line with the description that was invented, a label with a green checkmark should appear.
"Beeline"
To create a connection to the Beeline provider, you will need to go to the Keenetic settings again, the “Internet” section and select the L2TP connection. This type of manual setup is suitable for both Zyxel Keenetic Start ii and the first version. In the first paragraph, check the box next to “Enable interface”. Next, come up with a name for the future connection. The name appears in the connection bar. The “Connect via...” line requires selecting Broadband connection.
For the main section: “Use to access...” is checked. In the “Server Address” line, enter tp.internet.beeline.ru. The login and password fields are filled in with the data provided by the Beeline operator. The very last TCP-MSS section also has a checkbox.
That's it, Start Keenetic is now connected to your Internet service provider.
NetByNet
The NetByNet operator uses several connection types, including PPPoE or l2tp. But most often it is DHCP and binding by MAC address, as well as through a static IP address. The Keenetic modem can be connected in any way. The first two types of connection were described for the Beeline and Rostelecom operators, so we will analyze the latter methods in detail.
To connect via IP, in the “Internet” section, you need to select IPoE from the list of available protocols.
First of all, you need to select the connector through which Start Keenetic will connect to the Internet. Therefore, under the rightmost WAN connector, you need to check two checkboxes. Opposite the “Enable interface” line, check the box, and in the “Description” section add any connection name, relying on your own choice.
The following VLAN ID field is left as default. The number 8 should be entered here. To obtain an IP address and subnet mask, you can contact your provider, but the data must be specified in the contract. Next, uncheck the box next to DHCP and put it in the very last section: “This is a direct connection...”.
All that remains is to configure the DNS servers for the Start router. To do this, go to the appropriate section, located in the same place as IPoE. Servers are provided by the provider, but if they are not available, third-party resources are used. For example, the value 212.1.224.6 is entered in both lines, the configuration is saved.
To organize a Keenetic connection via MAC address, you need to contact NetByNet technical support. The MAC is located on the bottom of the router. The employees will link the Keenetic router themselves. After which the user will need to make a connection similar to the previous IPoE. Leave the IP address and subnet mask fields blank, and check the boxes in all other sections.
Wireless network
To configure Wi-Fi, you need to go to Keenetic configurations.
Then find the icon of the corresponding wireless network in the lower menu. The “Access Point” submenu will open. To turn it on or off, you need to check/uncheck the box next to the “Enable access point” line. Now directly about the Wi-Fi settings on Keenetic. The second field is the SSID network name; by default, the factory name is Keenetic-****. It is easy to change it to any other if necessary. There is also a setting at the bottom that allows you to hide your personal network from strangers - the “Hide SSID” submenu. In this case, only authorized devices will be able to connect to Wi-Fi.
If you want to connect a laptop or smartphone to hidden Wi-Fi, you will have to enter your username and password in the “Wireless Network Connections” menu on the Start device. In this case, the gadget will start searching for the network, find it and log in. But only if the login is entered correctly, otherwise the connection will not occur.
Network protection
The next field after the SSID is “Network Security”. Here you need to select a security protocol. The most reliable protocol at the moment is WPA2, but a new one will soon be introduced - WPA3, which provides a number of additional protections for devices operating via Wi-Fi.
If you are not using a password and the network is public, an empty encryption field is selected. After selecting the protocol, you will need to enter a password in the bottom line; one of 8 characters is enough. The code consists of any characters of the selected register (upper case, capital letters) and special characters with numbers.
These were the basic security settings on Keenetic. Now you need to specify the region. The default is Russian Federation, which is the correct setting. After that comes the latest version standard, 802.11bgn is automatically installed. Thanks to it, the router, in offline mode, selects the maximum data transfer speed for the connected device, from 10 to 150 Mbit/s.
Channel selection
The choice of channel affects the data transfer speed, as well as the correct operation. The more devices on the same channel, the longer the delay will be when sending data. The number of “broken” packets when sending will increase, which reduces the transmission speed. The main problem is that the channels are used by all routers within the same range. Therefore, it is quite difficult to find an empty one. As a rule, channels 3-8 are least used. Smartphone applications are used to determine the channel cleanliness.
Signal strength
The next field - “Signal strength” - is responsible for the area over which the wireless network will spread. The parameter is adjusted independently for the specific needs of the user. You need to know that concrete walls and the presence of wiring greatly reduce the range. To improve the signal, the antenna should be in a vertical position, and the router itself should be at a height of 1-1.5 meters from the floor level.
WPS
The last section is the WPS function. It is used for simplified connection to Keenetic devices that have a similar capability. WPS is activated both in setup mode and when you press the Wi-Fi power button on the router itself. The main thing you need to remember is that on the Start model, a quick press of the button is responsible for turning WPS on/off. But if you press the key for a few seconds, the network settings will be reset, and you will have to do everything all over again. To connect any device via a wireless network using WPS with a Keenetic router, you must enable this function on both gadgets. After this, during verification on your smartphone or laptop, a button for normal connection and connection using WPS will appear. Clicking the latter will authorize the network without entering a password.
Configuration in repeater (repeater), amplifier, adapter or access point mode
The Start router can be configured in any of the above modes. To do this, in the configurations you need to go to the settings tab and the “Modes” section:
After selecting the mode, you will need to restart the modem. If Keenetic is used as an amplifier, it does not need Internet access. The main thing is that the first router whose signal needs to be strengthened has such access, and both of them work in Wi-Fi mode. The Start router will automatically “catch” the signal and amplify it.
IPTV
To connect the set-top box, the Keenetic router must have the latest firmware installed. How this is done will be discussed later in the article. After updating the firmware, you should connect the receiver to one of the four LAN ports. But not to the WAN port used to access the Internet. Then go to the Start modem configurations, the WAN section and in the “Select ports” line, indicate the connector to which the receiver is connected. You also need to enter the IP and password information issued by your provider.
IPv6 protocol
To set up a connection via an IPv6 tunnel, you need to go to the Start setting and select the required connection protocol in the “Internet” tab. Next, click the “Add connection” button. A window with settings will open; in the first two lines you need to check the boxes. The “Description” section must be filled out; here you need to enter the invented name of the future network.
The IPv6 protocol in the Keenetic router works by creating a tunnel between IPv4 and the new version. Therefore, to create it you will need data provided by the provider. If there are any, they fill in the “Server Address” and “IPv6 Address” columns. In the “IPv6 Prefix” line, you need to enter the previous line without the “mask”, that is, without the “/64” characters and click “Apply”. That's it, now Start works according to the new protocol.
Dynamic DNS
Connecting this function in the Keenetic model is carried out through external services. If you already have a ready-made subdomain registered on one of the third-party resources, you need to go to the DyDNS tab. In the “Service Used” section, select “Other”. The URL that was issued earlier and copied from a third-party site is inserted into the “Server Address”. Then the correct domain name is entered. The “Name” and “Password” fields must be left blank. In the last line “Use DDNS” check the box and click “Update”.
Security settings (antivirus, firewall)
To go to the security settings on the Start router, you need to go to the “Security -> Firewall” section. Rules are set here that restrict access to certain sites.
Going to the configurations, you need to click the “Add rule” button, after which the necessary window will open. Here you can choose whether the rule will prohibit something or, conversely, allow it. Zixel Kinetic Start also selects in what order the filter will be applied: for the home network or external addresses. To install filtering on visited resources, you need to create rules for the TCP, UDP and ICMP protocols and leave the “Ports” line in the “Any” position.
Parental control
To set restrictions on children's time on the Internet, Keenetic modems have a schedule function. It is located in “Settings”, section “System -> Schedule”.
Clicking the button adds a new schedule. The menu has a convenient system for regulating broadcasting. It is possible to restrict multiple networks:
- The entire Internet.
- Wi-Fi.
- Guest Wi-Fi.
In the menu there is a choice of which specific device is restricted. After all configurations have been set, click the “Apply” button, the filter will start working.
Setting up the printer
Unfortunately, due to the lack of a USB connector on the Start model, the printer cannot be connected directly to the Internet center.
Setting up a VPN server
To connect a VPN server on Keenetic, go to the network settings and select the PPPoE/VPN protocol. Fill in the “Description” column, for example, enter VPN. Protocol type - L2TP. In the “Connect via...” submenu, you must leave the setting defined by the Start Keenetic router. In the next two fields - “Login” / “Password” - enter the data provided by the provider. In the “Server Address” column, indicate the server provided by the Internet provider. Save the configuration.
How to make an access point and put a new password on it
The Wi-Fi network (access point) is created automatically in the settings. Its name is standard - with the name of the manufacturer. Not everyone likes it. In addition, there is not always a password on the network, and even if there is, it is a weak one. How to set new, unique data for your network:
- We open the central section at the bottom for Wi-Fi. In the first menu, we first activate the network (check the box).
- We set a suitable name in English (you can write Russian words, but also only in English letters, insert numbers and dashes with underlining).
- The most important thing is to install WPA2 PSK protection. Below in the key field we enter the most complex password. Write it down separately in your notebook.
- What else can be changed is to indicate the country and the combined bgn network standard. Save everything at the end.
In the access point, enter the network name and password
How to use Zyxel Keenetic Start as a Wi-Fi signal repeater
This model can take on a secondary role - being only a repeater of the Wi-Fi signal that you have already configured on another router (we will call it the main device). If this is your case, follow these instructions:
- Open the panel with the gear at the bottom. In the section with modes, mark the amplifier and click on the “Apply” button to proceed to the settings.
Set Amplifier as Mode
- Confirm mode switching.
- The device will restart - on the platform you will see short instructions for connecting the main router and Keenetic Start. According to it, you need to press the Wi-Fi button on the top panel of the repeater, and then press WPS on the main device. The gadgets themselves will communicate with each other. Keenetic Start will copy the network information. His IP address will change - the main router will come up with a new one for him. You will need to log into the web platform at a new address.
Follow the instructions described in the web shell to connect the main router to the repeater
Firmware update
There are several ways to install the latest version of software on your router:
- Automatic - you need to go to the “About the system” tab and click on the “Update available” link:
- Manual – download the firmware from the website, enter the “Configuration” section, click on the gear and point to the firmware file. After the update, the router will reboot automatically.
- Through the mobile application, you need to go to the “System” tab and tap on the “Firmware” button, and then just follow the instructions.
Users should be warned: during an update using any of the above methods, under no circumstances should you reboot or turn off the power to the device. It may fail.
Port forwarding
This procedure on Zyxel Keenetic Start will look like this:
- Select the “Security” section (shield icon).
- On the “Network Address Translation (NAT)” tab, click on the “Add Rule” button. An additional window for setting up the rule will open: pay attention to the “Interface” parameter. The default is Broadband Connection. If your provider uses the connection type “Dynamic IP” or “Static IP”, then leave this value.
- If your provider uses the PPPoE protocol (for example, Rostelecom, TTK or Dom.ru), or a VPN tunnel (L2TP in the case of Beeline), then you need to select this external connection from the list.
Specify your connection type in the “Protocol” menu
- For example, let's create a rule for the game Counter Strike. To do this, select the TCP value, and in the “TCP/UDP Ports” list select the “Single port” value. If you need to open several ports on Keenetic, you need to select the “Range” value.
- Below we indicate the port number - in our case it is 27015. In the “Redirect to address” field we enter the IP address of the computer for which we are doing Port Forwarding. Click on the “Save” button. The rule has been successfully created and will now appear in the NAT table. Now you can check access to the service from the external network.