What is WPS?
So, what is the WPS button on a router? WPS (an abbreviation for Wi-Fi Protected Setup) is a technology created to simplify the connection of various devices to a Wi-Fi network. With its help, you can connect other gadgets (printer, amplifier, etc.) to your router even without entering a password, and most importantly, with just one keystroke. After all, to activate it, almost every router has a special button - it is used to enable WPS. But most users do not pay attention to it and do not know about its purpose. You can most often find the button on the back panel of the device, next to the LAN ports.
Check out how convenient it is! To do this, look at your modem or router and try to find the VPS button yourself. Found it? Please note that it may look different.
- The simplest option is when the WPS button on the router is labeled with the appropriate inscription;
- Sometimes there is no signature and various icons (Wi-Fi icon) or two arrows are applied to the key;
- On ZyXEL modems, the VPS button is not hidden at the end of the device, but is placed directly on the cover.
In general, in order to find the WPS enable button on your router, carefully inspect every area of your device. If you don’t find it, don’t be upset; for some models it is possible to connect via VPN through the router settings.
Please note that on some routers this is the WPS/RESET button; don’t be alarmed, because in fact it’s the same thing. The main thing is to use it correctly.
- The user can press once to use the function;
- If you hold down the icon, the device will reset the installed settings and go to factory settings.
Once again, let’s summarize the information about the WPS mode on the router: what is it and how does it work? This is a technology designed to make it easier to connect devices to a wireless network. If you translate the name into Russian, then this is a secure wireless network setup. The technology is ideal for those who often forget their password or want to control who exactly connects to their wireless network. Do you personally need it? Let's figure it out.
- The technology allows you to connect equipment and the network in a secure way without establishing specific settings;
- There is no need to enter a password, since the access key is transmitted in encrypted form.
In addition, even those who are far from wireless technologies can use this option.
Setting up Wi-Fi on Android
The principle of setting up Wi-Fi in the Android operating system is almost identical for most versions, so these instructions will be universal for all users. There are two types of settings: automatic and manual.
Automatic Wi-Fi setup
All the user needs in this case is to detect the access point and connect to it. If required, enter a password to connect and start using the Internet. You can do this in several ways:
Via "Settings"
- On your device, go to Settings and go to the Wireless & Networks section. Some versions of Android have a Wi-Fi option, for example, as in our case, since we are looking at the example of the Xiaomi Mi 8 Lite smartphone;
- At the “Enable Wi-Fi” item, set the slider to “On” so that it is turned on;
- Wait until the device detects all available access points within a certain radius;
- After about 30 seconds, the search will be completed and in the “Available networks” field you will be shown all the access points to which you can connect;
- Select the required option and click on it. If the system requires you to enter a password, you will need to provide it. You can check this information with the owner of the router;
- As soon as the password is specified, the system will connect to this Wi-Fi, and you will be able to access the Internet and use any services and social networks.
Attention! Entering a password is not always required. It all depends on the owner of the Wi-Fi. If in the router settings he indicated that connecting without a password is impossible, then everyone will need to enter it. But in many public places, hotspots are provided free of charge and there is no need to provide a password. The only point is the possible display of advertising, but, as a rule, it appears only a few times when connecting.
Via "Control Panel"
It is not necessary to immediately go to the settings of your smartphone and look for Wi-Fi in the items. The Android operating system has a “Control Panel”, from where you can quickly manage the most common actions, including wireless networks:
- Swipe down on your device to bring up the Control Panel;
- A list with various icons will appear in front of you. You need to find the Wi-Fi icon and activate it;
- As soon as the wireless network is turned on, the device will automatically begin to detect all available Wi-Fi points within an accessible radius. If there is Wi-Fi to which you have previously connected and specified a password, the system will automatically connect to them again;
- If the wireless network is active, but there is no connection, you need to look at the list of available points. To do this, press and hold the Wi-Fi icon for a few seconds, after which you will be redirected to a menu with a complete list of networks;
- Also, as in the previous paragraph, select the required Wi-Fi point, specify the password, if required, and connect to it, after which you can use any application to access the Internet.
Via "Notifications"
If you have previously connected to Wi-Fi and saved a specific access point, you can simply activate the wireless connection and the system will automatically reconnect to this network, provided that you are in range. In the Android operating system, all connections are saved, so the connection will occur automatically, but if the owner has changed the password, a notification will appear asking you to enter it again.
You can also go to the section with wireless networks through the “Control Panel” or settings and see which of them are connected and which are not. If, when you activate Wi-Fi, you see a connection icon, it means that Wi-Fi is currently connected to some network. This notification will allow you to always see the current connection on your smartphone screen.
Connection via WPS
WPS is a separate technology in Wi-Fi that allows you to connect to a router without entering a password. Most modern smartphones currently support this function, but this method is not considered reliable from a security point of view. It is mainly used for a quick connection between two devices when you need to quickly connect to an access point and access the Internet. In any case, this will also be useful for you, so we have described step-by-step instructions for Android:
- It is important that this option is active on the router. If WPS is deactivated, connection via this technology will be impossible. You can check and configure this in the settings of the router itself;
- Go to the “Settings” of your smartphone and go to the “Wireless Connections” tab and find Wi-Fi there;
- Next, activate your wireless connection and scroll down until you find “Advanced Settings”;
- Here you need to find the “WPS Connection” item, then click on the WPS button on your router to connect;
- If the technology has been activated on the router and the connection is established, a “No errors” notification will appear on your smartphone, after which Android will be connected to this access point and you will be able to access the Internet.
Attention! Most routers have a special button, when pressed, a connection via WPS occurs. Carefully read the instructions for your network equipment to understand exactly how to use this option.
Manual Wi-Fi setup
Sometimes the automatic connection between your device and Wi-Fi does not occur, so you have to resort to manual setup, where the user is required to enter certain data. If you are absolutely sure that the access point is working and configured correctly, but automatic connection does not occur, try in manual mode.
- Also go to the “Settings” of your smartphone and click on the “Wireless Networks” item, then go to Wi-Fi;
- Scroll down the list of available networks until you find the “Add new network” tab (this item may differ slightly in different versions of Android);
- Here you need to specify the SSID of the access point, and also select what type of protection it has. If a password is not required for connection, then leave the “Without protection” option. If it does exist, then you need to choose a type;
- You can see the SSID in the router settings. For most models it is written on the back of the device. For those who don’t know, SSID is essentially the name of the access point, so if you know its name, you can specify it from memory, but everything should be exactly as in the router settings;
- If all the data is entered correctly, you will be connected to this network immediately after saving the information.
Attention! In the Android settings there is also an “Advanced settings” item for each Wi-Fi network, where you can specify the IP address, proxy server and much more. In most cases, this is not required for the average user who just wants to connect to Wi-Fi, but you should be aware that in some cases you still need to enter additional information.
To access this tab, simply select any access point you need, long-press on it, and then go to advanced settings.
Technology activation
As you already understood, there are no particular difficulties in figuring out what the VPS button on the router/modem means and what it is needed for. Therefore, it’s time to move on to the question of how to activate the option using the key:
- Just press once;
- For some models, you need to hold your finger for 1-2 seconds;
- A flashing indicator will serve as a signal for activation.
The function is activated for a certain time (on average 2 minutes), but if the WPS light on the router does not light up, then you need to click again.
Did you manage to activate the option? If yes, then let's move on. And we will figure out how to connect to other devices to the router via WPN.
What is the WPS button on the router for and how to use it?
The button is needed to activate WPS technology. There is such a button on almost all routers. It is usually signed by WPS. It looks something like this on a D-Link router.
Not infrequently, the button is combined with the function of resetting the router settings. This happens very often on routers from TP-LINK.
Be careful not to press the WPS/RESET button for a long time . After holding it for about 5 seconds, your router's settings will be reset to factory settings.
And on new routers from ZyXel , the button to enable the WPS function looks like this.
Connection
As you understand, the connection process depends on what devices it will be used on. So, let's start in order.
On the computer
Let's start with instructions on how to connect via WPS to a router on a computer. In fact, it is very easy, and even a novice user can handle this task:
- Find the icon with available connections on the bottom right panel;
- Select the one you need and click “Connect”;
- A window will open asking you to enter a password;
- Below there will be a block that says “You can also connect by pressing the button on the router”;
- Now click the icon on the router;
- Ready!
In some cases, you will need to enter the PIN code indicated on the box. Agree, it’s not difficult at all?
On your phone or tablet
So let's move on to how to activate the feature on tablets and phones:
- Open your smartphone settings;
- Go to manage wireless networks;
- Open advanced settings;
- Find the “Connect using technology” button;
- Click the icon on the router. That's all!
The instructions are only suitable for devices running Android; unfortunately, iPhones do not support this option.
Turning on and off on routers
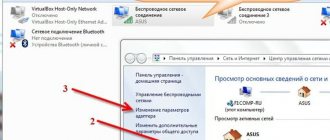
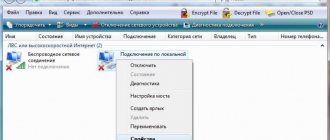
Sometimes you need to enable or disable the VPS function on your router. To do this, we need to go to the router settings.
Any browser will do this. You need to enter the router address in the address bar, then your login and password. The router address is usually written on the label . However, if you don't have a label, you can find the address in the network card settings or connection information.
After you have found out the address of your device and entered your login and password, the authorization window opens. All you need to do is enter your username and password. Sometimes the default login and password is admin. When you have entered all the necessary data, press enter and enter the settings of your router.
- Setting up VPS on D Link. So, after you have gone into the router settings, we need to go to the “advanced settings”. Then we find the WiFi section and click on the arrow and select WPS from the list. In the window that opens, you can freely turn on and off the VPS function using the checkbox.
- Asus VPS management. You need to open the settings again and select the “wireless network” section in the menu. Then from the menu at the top we go to the VPS tab, and the possible settings for this function open to us. Now it won’t be difficult to find the wps switch and turn it on/off.
- TP-Link QSS settings. As mentioned above, QSS is the same as WPS, it has the same configuration methods. We look for the VPS section in the menu on the left, and we can easily turn this function on and off.
- ZyXel. In conclusion, I would like to say that, unfortunately, you can calculate the VPS PIN code in just a couple of hours, so if you do not use this function, it is better to disable it for security reasons.
Advantages and disadvantages of technology
Main advantages of use:
- No need to connect new devices frequently;
- No problem entering the password;
- You can manage the connection of gadgets.
There is also a small drawback - experts believe that the technology makes the devices vulnerable, and the access code is easy to guess. This can be avoided - if you don't use the feature, just disable it. Therefore, carefully weigh the pros and cons before using the technology. Yes, it’s simple and convenient, but might it be easier to connect the old fashioned way (with entering a password)?
What to do if there is no WPS button on the router: examples of activation
Many models do not provide hardware enablement of the Wi-Fi Protected Setup protocol. This means that the connection occurs through the WEB interface. To do this you need to do the following:
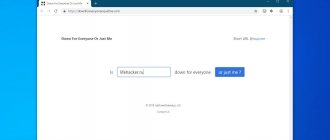
- Go to your router settings. In the search bar of any browser, enter the address 192.168.0.1. If you do everything correctly, you will be redirected to the router setup page.
- Enter your login/password – admin/admin (if you did not change it manually).
- Go to the WPS or Security section (depending on the router model).
- In the window you will see an eight-digit PIN, which you will need to enter in the password field.
After completing these manipulations, you will be able to use Wi-Fi without any problems. Often the eight-digit PIN combination is indicated on a sticker that is attached to the modem case.
There is an alternative option for connecting mobile devices:
- In the list of active networks on your smartphone, select “Login by PIN WPS” (may not be available on all models).
- You will see the connection code. Write it down. Don't turn off search.
- In the router settings, click “Add device”.
- Enter the code you wrote down earlier in the field and click “Add”.
When you enter the correct combination, your mobile phone or tablet will be connected to the network. This function allows you to connect any devices that support this protocol to Wi-Fi.
How to disable WPS through settings
To deactivate, you need to click the “Disable” button in the corresponding section of the router or select the Disabled item.