Where to put a router in an apartment: placement tips
Follow these rules when choosing a location for the device in your home:
- Do not place the router near metal structures, mirrors, heating pipes (so that the device does not overheat), water tanks, or near household appliances (refrigerator, microwave, etc.). All this will block the signal from the router to one degree or another.
- Choose a place in the center of the apartment: so that the distance from the router to all rooms of the apartment is equal. For example, this could be a hallway. In this case, there will be no “dead” zones (where Wi-Fi does not receive). If you can’t place it closer to the center, choose the room in which you most often “surf” the Internet.
Place the router in the room where you work on the computer
- Place the device as high as possible. For example, hang it on the wall or place it on a tall cabinet. But just don't put it in the closet. The walls of the furniture will already interfere with the signal - the overall coverage area will decrease.
Hang the router on the wall - as high as possible so that the signal from it spreads as far as possible
If you have a large house or apartment and after setting up the router it turns out that it does not reach all rooms, purchase an additional Wi-Fi repeater. This is a small adapter that plugs into a power outlet. It picks up the router’s network and transmits it to “dead” zones - the coverage area increases significantly.
A repeater will help increase the coverage area of your router
To search for a place, you can use special programs. For example, the free NetSpot application. How does it work? You load a diagram of your apartment into the program, indicate where you are now, and select your Wi-Fi network from the list, and it builds a coverage map for you.
Special programs will help you visualize the current coverage area of your router and understand where there are “dead” spots in the apartment
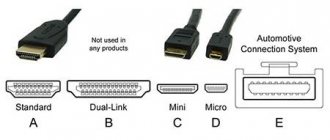
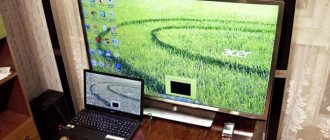
Features of connection via HDMI or Displayport
In order for the TV to work as a monitor for a computer, it must be connected correctly. For these purposes, the HDMI interface was created, which is found in most consumer electronics. It is used to connect game consoles, projectors, players, various equipment and a computer. Feature and advantage - high quality video transmission with simultaneous broadcast of clear sound.
Displayport is a development by VESA for connecting equipment to a personal computer. Essentially, it is an improved version of HDMI, but not an analogue. The quality and speed of file transfer using this method is much faster and better.
But not all manufacturers equip PCs with a DP input. They give preference to HDMI only, which reduces the ability to play 4K and higher resolutions.
Advice. If you plan to use a laptop with a separate screen, it is better to pay a little extra and immediately buy the option with a Displayport connector. This gives you greater user flexibility than with HDMI.
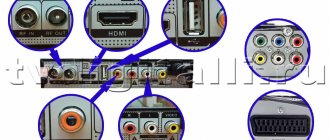
Plan for connecting a TV to a PC via HDMI
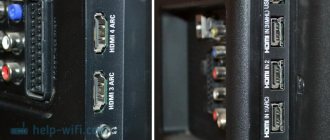
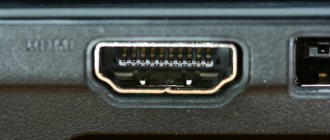
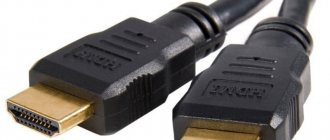
The easiest way to connect a TV instead of a monitor is via HDMI. This connector is found in most modern technology. And it’s not difficult to look for it - it’s signed with the appropriate letters.
The connection steps are as follows:
- Check the presence of appropriate connectors in the laptop or PC and on the TV.
- Purchase a cable of the required length so that the plugs fit freely into the connectors without stretching the wire.
- Connect one end to the PC, the other to the TV.
- Take the TV remote control. Find the Input key or in the menu and go to the “Signal Source” section and change it to HDMI. Some TVs offer HDMI 1 and 2. You need to switch to the one in which the plug is inserted.
- The TV screen may begin to flicker slightly, and then the correct signal will appear and display the computer desktop.
When connecting the equipment for the first time, problems may arise with incorrect screen display. You can correct the error through the appropriate PC settings. To do this you need:
- Right-click on an empty space on the screen.
- Select “Properties” in the drop-down window.
- Find the "Options" tab.
- In them, find the “Advanced” button and select the desired option in the drop-down menu to customize the screen.
- Click save via the OK key.
There it is advisable to set the maximum resolution of the selected screen. The subsequent connection should occur automatically.
Additional connection settings
Sometimes, setting up your TV as a monitor requires additional settings. They are needed if the computer does not find the TV automatically. To search you need:
- Right-click on an empty space on the screen. Select Properties – Options from the menu that opens.
- There in the center where the monitors are drawn, press the “Find” key.
- Upon completion of the search, select the maximum screen scan value.
- Go to the “Monitor” tab and select “Frequent Updates”.
- Then, go back to the settings and assign a number to each display, where 1 is the main one, and 2 is the additional one.
- Click on “define”. The number 2 will appear on the TV.
- Save all changes.
Important! To make the most flexible settings, you should take into account the characteristics of the video card. And only then set the resolution and color palette. After making all changes, the PC must be restarted.
Troubleshooting audio transmission errors
Sometimes, after connecting the TV as a monitor, no sound is produced. In this case, the HDMI or DP cable itself transmits audio and video tracks simultaneously. To correct this parameter you need to:
- Right-click on an empty space on the screen.
- Find the “Playback Devices” item.
- In the open menu, select “Speakers” and “LG TV” or another connected equipment model from the list of connected devices.
- Click on the name of the TV. And set "Use as default".
- Click save changes using the “OK” button.
After these simple settings, you can use your TV instead of a monitor.
Benefits of a wired Internet connection
Over the past 15 years, the Internet has rapidly penetrated into all areas of our lives. It is necessary in banking, trade, manufacturing, and is also indispensable for the exchange of information and personal communication. The most common methods of connecting to the global network today are a wired connection and a Wi-Fi connection.
For a wired connection, an optical cable or twisted pair is used. The first type of cable has a significant advantage, as it provides information transmission speeds of up to 1 GB per second. Over twisted pair cable the maximum speed reaches 100 MB per second.
The speed of information transfer through the cable depends on its type and on the network card that receives the signal. This affects the operation of desktop computers, game consoles, televisions and other devices connected to the same network. Streaming information does not require constant exchange between devices, which significantly increases processing speed. The speed of the local connection between workstations is of great importance when working on a corporate network. This is taken into account if there is a need to quickly transfer a large amount of information.
With a Wi-Fi connection, the connection to the Internet is made using radio waves operating in a certain range. Therefore, Wi-Fi is more in demand at the household level. It is convenient because it allows you to immediately connect to the Internet from a smartphone, tablet or laptop anywhere there is an access point. However, signal reception is affected by neighboring devices operating in the Wi-Fi connection frequency band, and by objects in the path of radio waves.
A Wi-Fi connection does not require cables, but it is highly susceptible to radio interference, and the further you are from the access point, the worse the signal reception
A wired connection has a number of advantages over a wireless one:
- the speed of receiving and sending information with a wired connection is approximately 2 times higher than that of Wi-Fi;
- when exchanging files with the server, the delay is minimal, which is important in online games that require maximum speed of action from the user;
- a wired connection is more resistant to network interference; it is not affected by gadgets operating on the Wi-Fi frequency band or nearby sources of electromagnetic radiation;
- The signal strength during a wired connection does not depend on obstacles in the path and the influence of external factors.
Errors that occur when connecting a wired connection may be indicated by codes that indicate the cause of the problem.
Video: why a wired Internet connection is better than Wi-Fi
Setting up a home wireless network
Now you need to protect your home network, for this you need to choose the right security criteria. In the menu, find the section that is responsible for Wi-Fi. Choose security password. Remember or write it down; when connecting new devices to your home network, you will be required to enter this password. Specify WPA2-PSK as a security measure in the settings. All that remains is to save the changes made.
How to connect TV to PC via DVI or VGA connectors
An HDMI cable is the best option for using a TV instead of a monitor. Version 2.0 and higher even transmits 4K format. But not all equipment is equipped with this modern connector. Or you may not have a suitable adapter at home.
In these situations, you can use one of the interfaces: DVI or VGA. In practice, a desktop computer or laptop must be equipped with one of them. The wire is connected to the corresponding connector on the TV.
Most often, the adapter will have a standard connector with a 3.5 plug. This is a classic input for a computer audio system. Cords of this type are sold in almost all household and computer equipment stores.
Connection step by step
You can turn a TV into a computer monitor using DVI-DVI or VGA-VGA cables. To do this, you must follow the following connection diagram:
- Insert the cables into the appropriate connectors on the TV and PC.
- Insert the plug into the audio input on the TV. It is designated Audio-In.
- Turn on the computer and TV. Go to the parameters (settings) of the TV and select the signal source - VGA, DVI, depending on the selected method. You can quickly navigate through the Input button.
Important! To use the TV screen as a computer monitor, it is important to expand the desktop. The expansion algorithm depends on the type of operating system.
Setting up desktop extension for different OS
To use your TV as a monitor, you must complete all settings. These include correct connection, screen settings described above, and setting desktop extension parameters. It is carried out depending on the operating system as follows:
- Windows XP. You need to right-click on the free space on your desktop. Select “Properties” in the window that opens. Find the "Options" tab. And set the highest resolution.
- Windows 7. Also right-click on the desktop and select “Screen extension” from the open menu. Set the parameter to maximum.
In a number of operating systems, you can go to the control panel and find screen controls. And put all the necessary data there.
Wi-Fi connection and settings
Creating a wireless network on TP-Link routers is performed during the quick setup process, but if the user has not done so, he can configure the Wi-Fi network later in the WEB interface of the router.
TP-Link routers can operate in one or two bands, which means you can create one or two Wi-Fi networks on them.
Guide using the Archer C20 dual-band router as an example:
- Click “Select operating frequency”, specify both frequencies or select one.
- Click "2.4 GHz Wireless Mode". Check the “Enable” field, enter the name of the network, enable SSID broadcasting so that the created Wi-Fi network is visible in searches on connected devices. If you remove the label, the network will not be visible to others, but you will need to enter its name and password manually on your equipment.
- Click "Wireless Security". Select the “WPA/WPA2-Personal” type, create and enter a password.
- Select 5 GHz wireless mode, repeat the steps to create and protect the network described in steps 2-3.
For single-band routers, you do not need to select an operating frequency. In their web interface, you need to click “Wireless Mode”, turn on the network, enter your name and password, and choose whether to hide the SSID or not.