Let's imagine this situation: you stored all important documents, photographs, recordings and other files on your favorite laptop, while all the objects were located only on the hard drive - you did not “upload” them to cloud services. One day the device suddenly stopped responding to the power button. It would seem that you can give the device to the service and wait a few days, but you urgently need a document that is stored on the HDD. In such a situation, a regular desktop PC and a pair of screwdrivers will help you cope with the problem - you need to connect the hard drive from the laptop to the computer.
Scheme for disconnecting the hard drive from the PC
Laptops usually use 2.5-inch hard drives because... they are smaller and consume less power than 3.5-inch drives found in desktop PCs. However, a 3.5-inch drive removed from an old PC can be successfully used as an external drive.
Step 1. Turn off the computer and disconnect it from the 220 Volt power supply so as not to accidentally turn on the PC when removing the hard drive.
Turn off the computer and disconnect it from the 220 Volt power supply
Step 2. Open the computer case, most often by removing the right side panel (viewed from the side of the PC connectors) after unscrewing the mounting screws or pressing a button and removing the panel along the case to the back and to the side.
Unscrew the fixing screws of the side cover
We move the panel back and to the side, take it out
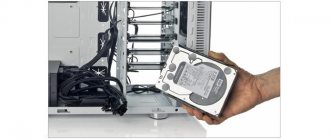
Step 3. Find the hard drive inside the PC case. The hard drive is a rectangular metal box the size of a small book and is usually located in a special compartment of the PC case.
Finding the hard drive inside the computer case
Step 4. The hard drive is usually connected to the PC with two cables. Carefully inspect the cables and carefully pull them out of the connectors.
We study the location and connection of cables to the drive and carefully pull them out of the connectors
Important! Dismantling actions are carried out with some, but not extremely significant, effort. Before removal, it is necessary to carefully inspect the part and make an appropriate decision on the method of its dismantling.
Step 5. Consider the method of attaching the hard drive, and, having chosen the appropriate method, remove it. The disk can be secured with screws or placed in the case on special “slides” with latches on the sides, sliding out through the removed front panel of the case.
We consider the method of attaching the hard drive, select the appropriate method for removing it
Unscrew the screws that secure the disk to the system unit
Carefully remove the hard drive
Connecting an external drive to a laptop
To connect an external hard drive, the first thing you need to do is determine its size.
Step 1: If you don't know the size of your drive, you can measure its width. Hard drives are rectangular in shape, and its width determines its size (form factor) in the name. The width of a 3.5-inch drive is 10.2 cm, and the width of a 2.5-inch drive is 7 cm.
We measure the width of the hard drive, the width of a 2.5-inch drive is 7 cm, a 3.5-inch drive is 10.2 cm
Step 2. Next, you need to determine the type of connection of the hard drive in order to select a case compatible with it, which serves as an “adapter” for connecting the drive to the laptop. Older computers used hard drives with an IDE connection; today, drives with a SATA connection are used.
Consider the type of HDD contacts. The IDE connector consists of two rows of metal pins for data transfer, as well as a separate hard drive power connector. The SATA connector includes two small pads with flat contacts for data transfer and power supply to the drive.
Determine the connection type of your hard drive in order to select a case compatible with it
Step 3. Purchase a case that matches the size and type of HDD connection, as well as the type of connection to the laptop. For example, purchase a 2.5-inch case with a SATA connection for a 2.5-inch SATA drive.
We purchase a case that matches the size and type of connection of our hard drive
Most hard drive enclosures have a computer connection type with a USB 2.0 interface, as well as FireWire, since they are the most popular today. Some universal enclosures have a combination of both interface options.
Most USB 2.0 enclosures are compatible with any USB port on a laptop or netbook. However, USB 3.0 enclosures provide better performance when connected to a USB 3.0 port.
Reference! All personal computers sold today are equipped with USB 3.0 ports, so you can purchase a hard drive enclosure with a USB 3.0 interface, making sure that this type of connector is available on your laptop.
It's also important to consider that 2.5-inch cases typically draw power from the PC's USB plug-in port and do not have their own power adapter, making them completely portable.
2.5-inch cases are completely portable, as they do not have their own power adapter and are powered by a plug-in USB connector on the PC
That said, 3.5-inch hard drives require more power, so their cases usually come with an AC power adapter, which means they won't work in areas where there isn't a power outlet.
3.5" HDDs come with an AC adapter as they require more power
Step 4: Installing the hard drive into the external enclosure is very easy. Usually the most that is required in this case is a screwdriver. Most often, you need to remove the top cover of the case, position the hard drive being inserted into it parallel to its base, and carefully slide the drive onto the contact pad to connect it. Close the hard drive housing cover (see photo).
The process of installing a hard drive in a suitable external enclosure
Reference! To connect the hard drive to the enclosure, please refer to the instructions supplied with the HDD enclosure.
In some cases, on older 3.5-inch drives, you may need to move or remove the jumper that sets the hard drive as a Master or Slave device in accordance with the enclosure instructions.
We rearrange the jumper that sets the hard drive as a master (Master) or a slave (Slave), according to the instructions of the case
It is also possible to connect 3.5 and 2.5-inch hard drives to a special docking station. In this case, you need to carefully insert the disk into a suitable size connector, pressing slightly on it from above in order to securely connect the contacts of the disk to the station.
Connected 3.5 and 2.5-inch hard drives to a special docking station
Step 5. After connecting the hard drive to the case, you need to connect the case to the laptop connector using the special cable included in the kit.
For this:
- insert one cable connector into the socket on the hard drive housing;
Insert one cable connector into the socket on the hard drive case
- and insert the second connector of the cable into the USB connector on the laptop.
We insert the second connector of the cable into the USB connector on the laptop
On a note! To supply enhanced power to a 2.5-inch hard drive, it is also possible to connect a second USB connector located on the cable included with the case.
Option for connecting a second USB connector located on the cable included with the case
In addition to special cases for connecting a hard drive, an open option for connecting the HDD through a special adapter that fits onto its connector is also possible.
Connecting a HDD from a laptop to the same type of interface on a PC
Everything is simpler here. To connect a SATA drive from a laptop to a similar interface on the motherboard of a desktop PC, you will need a SATA data cable (in the picture on the right) and a suitable connector on the power supply cable. If the latter is not available, buy a Molex-SATA adapter at a computer store (in the picture on the left).
The other end of the SATA cable is connected to the port on the motherboard. The port speed (3 Gb/s, 6 Gb/s) does not matter in terms of compatibility.
To connect an IDE(PATA) drive to the IDE port on the motherboard you will need a wide 40-pin cable, a Molex power cable + an IDE 3.5-2.5 adapter.
To prevent the computer from trying to boot from a “non-native” drive, the latter must be switched to the “slave” position. This is done using jumpers (jammers) on the IDE drive contacts, which are located next to the power port. Information about the location of the jumper in the “slave” position can be found on the disk itself or in its manual on the manufacturer’s website.
This is interesting: Where should you not buy computers?
When the jumper is set to the “cable select” position, the master and slave media are determined by the cable. In this case, the “slave” disk must be connected to the block in the middle of the cable (it is white in the picture).
mSATA and M.2 drives can simply be inserted into the appropriate slot on the motherboard.
Connecting an “old” drive in Windows
If the hard drive has already been used in Windows before connecting it, then it has already been formatted. In this case, when connected, it will automatically be assigned a letter in the system, and it will appear in Windows Explorer, ready for use.
When connected, the old formatted hard drive will automatically appear in Windows Explorer with an assigned letter and ready for use
If the disk does not appear in the system, you may need to install a driver for the hard disk enclosure.
Step 1. Press the “Win + R” keys on the keyboard. In the “Run” window that opens, type “devmgmt.msc” and click “OK”.
Press the “Win+R” keys simultaneously, enter the command “devmgmt.msc” in the “Open” field, click “OK”
Step 2: Device Manager will launch. View the dispatcher for the presence of devices with exclamation marks. If there is such a device, right-click on it and select “Update drivers” from the menu with the left button.
Right-click on the device with the yellow exclamation mark and left-click on “Update drivers”
Step 3. In the window that opens, click on “Automatically search for updated drivers.”
Click on “Automatically search for updated drivers”
After the system finds the required driver, the exclamation mark from the device in the “Dispatcher” will disappear. You may need to restart your PC.
If the hard drive does not appear in the system, and a CD with drivers is included with the HDD enclosure, then you need to:
Step 1: Insert this disc into your laptop's optical drive by pressing the button to open it and snapping it back in after inserting the CD.
We insert the driver disk into the laptop's optical drive, opening it by pressing the button and snapping it back after installing the CD
Step 2. On the desktop, double-click on the “This PC” icon with the left mouse button.
Double-click on the “This PC” icon with the left mouse button
Step 3. A list of Windows OS drives and devices will open. Double-click to open the CD drive.
Double-click to open the CD drive
Step 4. Find the “Run” or “Setup” file to be launched in the folders by double-clicking on it with the left mouse button.
Find the file “Setup.exe” or “Run”, double-click on it with the left mouse button
Step 5. Install the required software in accordance with the suggested procedure. The HDD will appear in the system.
Left-click on the “Virtual HDD” icon and follow the installer’s instructions
We take out the disk from the laptop
Well, first we’ll disassemble the laptop and take out a disk that needs to be connected to another computer.
Depending on the model, the procedure may differ. Not all laptops have the same number of screws. The HDD drive is not located in the same place everywhere. Further instructions are for informational purposes only and do not show how to work with a specific computer model.
- First, turn off the laptop and wait until all its components “calm down.”
- Then carefully turn the computer upside down.
- Now you need to find the cover under which the hard drive is hidden. In most modern models, not the entire bottom of the laptop is removed, but only a part with replaceable components.
- In any case, you will have to unscrew it by selecting suitable bolts.
This is what the cover looks like, hiding only replaceable components
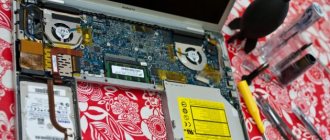
- Having removed the cover, we look for the hard drive underneath. Usually this is a fairly massive plate with a microcircuit at the top and a magnetic mechanism inside.
This is how the insides of a computer work
- The disk is probably held in the case using mounting bolts or special latches. In the first case, you need to inspect the perimeter around the HDD drive and unscrew all the bolts. In the second, just pull the latches.
- Then you need to carefully pull the disk away from the connection interface to remove it without damaging anything.
Make sure that the connector is not damaged or bent.
Actually, this is enough to know. It’s unlikely that you will come across some fancy laptop that you can’t handle disassembling.
Connecting a new drive to the OS
If the connected hard drive has not yet been used in Windows, it will not appear in Explorer because it has not yet been initialized and formatted.
Step 1. Press the “Win+R” key combination on your keyboard. The Run window will open. Type “diskmgmt.msc” in the line and click “OK”.
Type “diskmgmt.msc” in the line and click “OK”
Step 2: The Windows Disk Management utility will launch. Find the disk labeled “Not initialized” in the left column and right-click on it, selecting “Initialize disk” in the drop-down menu with the left button.
Right-click on the disk that says “Not initialized” and select “Initialize disk” from the menu that opens with the left button.
Step 3. Check the box for the HDD you want to initialize. Check “MBR” if the HDD has a capacity of less than 2 TB, and “GPT” if more, and click “OK”.
Check the box for “Disk 1”, check the box for “MBR”, click “OK”
Step 4: Once the disk is initialized, it will be placed in the Unallocated state. Right-click on the unallocated HDD space and left-click on “Create simple volume”.
Right-click on the unallocated space of the HDD, left-click on “Create a simple volume”
Step 5. In the wizard that appears, click “Next”.
Click “Next”
Step 6. Leave the default settings and click “Next”.
We don’t change anything, click “Next”
Step 7. Select in the drop-down list the letter by which the drive will be identified in the system, click “Next”.
Select a letter from the drop-down list and click “Next”
Step 8. Select the file system type (usually NTFS) and volume label (any HDD name in the system), check the “Quick format” box and click “Next”.
Select the file system, name the volume label, check the “Quick Format” option, click “Next”
Step 9. Check the entered information and click “Finish”.
Check the information and click “Finish”
The disk will be formatted and ready to use.
As soon as the connected external drive is working, you can exchange any files with it.
Find out detailed information on how to install a hard drive instead of a disk drive in a laptop in our new article.