What is a screenshot
A screenshot is a photograph of the screen at a specific point in time. Such a snapshot can be either the entire screen or a separate part of it. For example, a snapshot of only one window.
To take screenshots, there is a special Print Screen key on your computer keyboard. It may also be called PrtScr, Prt Sc, PrtScn or PrntScrn.
By clicking on the Print Screen button, the computer screen will be photographed. But there will be no clicks or flashes - the picture will simply be recorded in the computer’s memory (clipboard).
Then this photo needs to be pulled out, and for this to be inserted into some program. The easiest way is in Paint, since it is a standard Windows program, and almost every computer has it.
Important! Once you press the Print Screen key, you cannot copy anything until you paste the photo into the program. Otherwise, it will be replaced by the copied information.
Monosnap
Another free screenshot program. The advantages of the application are that it is connected to its own cloud storage, which allows you to download a screenshot, and is also equipped with a simple editor. It doesn't have a lot of tools, but it works quickly and efficiently.
The computer screen can be removed using hot keys. There are minimal tools - blurring, changing file size, cropping, adding a frame or shapes, arrows. You can take a screenshot of part or the entire screen. The tools are located as conveniently as possible and are at hand. The finished photo can be uploaded to the system server. The user will only have to copy the link and send it to other people.
The main advantages of the application are:
- Ability to capture both part and the entire screen/window.
- Through the application, you can record what is happening on the screen, or make a recording from the camera.
- Only basic tools are available.
- Screenshots can be placed on cloud storage or on a local computer.
- To upload a file to the cloud, the program is integrated into the context menu.
Some of the programs listed work not only on computers, but also on smartphones. Don't forget about an easier way to take a screenshot - using a standard function key. For example, if you do not need an editor and the ability to upload a picture to the server, then you can use the Print Screen key. It will allow you to take a screenshot and save it to the clipboard.
How to take a screenshot
Via Paint
1. Press the Print Screen key on the keyboard once.
If you have a laptop, then you need to press the Fn and Print Screen key combination - first one key, then, without releasing it, the other.
2. Click on the Start button and select Accessories – Paint from the list.
Or type “paint” without quotes in the search bar and open the program.
3. In the program window, click the “Insert” button.
Immediately after this, a photo of the screen will be added inside. The photo will be taken at the moment when you pressed the Print Screen key.
4. Cut off the excess using “Select” and “Crop” at the top.
First, click on “Select”.
Then press the left mouse button and, without releasing it, circle the part that needs to be left. After that, click on “Crop”.
If you didn’t succeed in tracing the first time, click outside the selected area once with the left mouse button - the selection will be reset.
5. Save the picture to your computer. To do this, click on the save icon at the top of the program () or File - Save.
A file save window appears. First, you need to select the location on the computer where we want to record the screenshot.
Then you need to change the name of the photo and select the format. To do this, click on the “File name” field at the bottom and type a new name for the screenshot there. In the format field, select PNG or JPG. Then click “Save”.
That's all! The resulting image is now recorded in the specified location (step 5). If you selected the Desktop, then you need to look for it on the computer screen.
On a note. This way we photograph the entire computer screen. But if you need to take a picture of only one window, then you need to press not Print Screen, but the Alt + Print Screen key combination. On a laptop: Fn + Alt + Print Screen.
Via Scissors
Scissors is a separate program for creating screenshots. It's more convenient than Paint.
Windows either has Scissors or it doesn't. This depends on the system version. So if you cannot find this program through Start, it means that it simply is not on the computer.
1. In the search bar on the taskbar or in Start, type Snipping Tool and launch the application.
A program window will appear.
2. Click on the “Create” button and select the part you want to screenshot. To do this, simply click on the left mouse button and, while holding it, circle the desired part.
If the window overlaps what you want to remove, move it with the left mouse button behind the header - where it says “Scissors”.
3. As soon as you release the left mouse button, the selected area will be photographed and added to a small program.
There are a couple of editing tools here. The pen is something like a pencil for underlining. Marker - for outlining.
4. Save the image to your computer using the button. This is done in the same way as in Paint.
Win + Print Screen
In Windows 8 and 10, you can take a screenshot automatically – without pasting it into the program and saving it. To do this, just press the key combination Win + Print Screen.
Immediately after this, the screenshot will be recorded in the folder. To find it, go to This PC, open Pictures and Screenshots.
Screenshot on Windows
A photograph of a computer screen in graphic image format is called a screenshot. You can get such a picture in different ways. The fastest of them involves the use of a scheme built into the OS.
How to take a photo
The Windows operating system provides a simple algorithm for creating a snapshot. To use it, you should find the PrintScreen button in the upper right corner of the keyboard. A single press of this key saves everything that happens on the monitor.
PrintScreen button on the keyboard
If you want to freeze only the active window, you must use the Alt+PrintScreen combination. Pressing these keys simultaneously will allow you to “cut off” the background, placing only the top window in the picture.
Now all that remains is to “extract” the snapshot from the computer’s memory.
How to save a picture
In new versions of Windows, it is not difficult to find a screenshot. Immediately after pressing the “removing” key combination, a simple image editor appears on the screen. The taken picture is saved in a special folder, which can be found through Explorer.
- In the Start menu, find Explorer.
In the "Start" menu, find "Explorer"
- A quick access list appears, where we select the “Images” section.
- The folder you are looking for is in the folder you are looking for. It is often called “Screenshots” or “ScreenShots”. It contains screenshots saved in Windows 10. They are saved in image format, so they are subject to editing, copying and other manipulations.
Windows 7 and its predecessors do not have such a function.
Note! The screen image is not saved as a graphic file, but directly to the clipboard. In simple words, the computer “remembers” the picture taken and stores it that way.
However, RAM is not the place for important documents. As soon as new information is placed on the clipboard, for example, text is copied, the screenshot will immediately disappear. The recorded information is also erased when the OS is restarted or the computer is turned off.
Thus, a snapshot saved using the standard scheme must be immediately retrieved from the RAM. The easiest way is to use a graphic editor. For example, the same standard Paint. Depending on the specific software, a special algorithm may be used, but in most cases it is enough to use the standard Ctrl+V key combination.
Using the Ctrl+V key combination, paste the screenshot into the Paint program
After the screenshot appears on the screen, it is edited or immediately saved to the hard drive. You can select any of the available extensions, and also specify the desired folder for saving.
Scissors
Windows 7 has another function for saving an image. To find it, go to the Start menu and go to the Accessories tab. Find the item “Scissors” and select it.
In the "Start" menu, select the "Accessories" tab and find the "Snivers" item
Once the required area of the screen is selected, the image opens in a small editor. It can be changed and saved. By default, the program saves the picture in the “Pictures” folder in the user’s documents. You can choose a different path for the file.
Free programs for creating screenshots
LightShot
You can download and install LightShot from the official website app.prntscr.com.
How to use. After launch, the program will be located in the system tray.
Press the Print Screen key. The program automatically activates a window for selecting an area and taking a photo.
Toolbar:
- Pencil – allows you to draw on the photo.
- Line – draws lines.
- Arrow – draws arrows.
- Rectangle – allows you to draw a rectangular frame.
- Marker – used for highlighting.
- Text – adds text to the photo.
- Color – allows you to set the color for drawing and text.
- Undo – cancels the last action.
- Upload to prntscrn.com – uploads the image to the server and publishes a link to open it.
- Share on social networks – allows you to share the photo on social networks.
- Search – searches for similar images on the Internet.
- Print – prints the image on a printer.
- Save – saves the image to your computer.
Pros:
- Small size.
- Having your own server for uploading screenshots.
Cons: no latest software updates from the official website.
Joxi
You can download and install the program from the official website joxi.ru.
How to use. After installation, the program will be located in the tray. Click on it, and Joxi will ask you to enter your email to get started, that is, register.
Here's what the program itself looks like:
Tool overview:
- Fragment – selecting an area to save.
- Move and transform - move lines, text and other elements drawn on the photo.
- Pencil - drawing.
- Line and Arrow – drawing lines and arrows.
- Text – print text.
- Circle and Rectangle - Drawing a circle and a rectangle.
- Numbering – adding numbering to the photo.
- Blurring is blurring of information.
- Dimming – will leave only the selected area in the field of view, and will darken everything else.
- Color palette – select the drawing color and text color.
- Screen – Capture the entire screen.
- History – will open a browser window with your photos.
- Settings – program parameters.
To save the document, click on the arrow next to the blue check mark.
Pros: availability of a large number of tools.
Minuses:
- To work you need to register.
- Sometimes it crashes with an error message.
Yandex.Screenshots
The program is part of the Yandex.Disk package. You can download and install from the official website disk.yandex.ru.
How to use. Launch the program, a window will open asking you to select the area to capture.
The application interface will then open.
Tool overview:
- Arrows – drawing arrows.
- Text – adding text. You can change the font and color on the panel.
- Shapes – Drawing lines, rectangles, circles and stars.
- Marker – used for highlighting.
- Blur – blurs the selected area.
- Crop – cuts out an area.
To save, click on the “Save” button below.
The image will be saved to Yandex.Disk. You can find it through This Computer – Yandex.Disk – Screenshots.
To send a photo over the Internet, click on the “Share” button.
Yandex will download the link to the clipboard, which you can paste on the site: on a social network, on a forum, in an email.
Pros:
- Convenient screenshot editor.
- Synchronization with Yandex.Disk.
Cons: you need to install the Yandex.Disk application.
"Fragment and Sketch"
Windows 10 has another tool for working with screenshots - “Fragment and Sketch”. To take a screenshot using this program, do the following:
- Open the Start menu.
- Find “Fragment and Sketch” in the list of programs and open it.
- In the window, click on the “Create” button.
- Select the type of screenshot you want to take: rectangular cutout, free-form cutout, or full-screen snapshot.
- Select an area of the screen and take a screenshot.
The program is easy to use, but its functionality is much richer than that of Scissors. For example, screenshots can be edited and uploaded to the cloud. In addition, in the “Fragment and Sketch” application, you can take a screenshot with a delay by setting a timer.
Paid programs
Movavi Screen Recorder
You can download the program from the link.
Possibilities:
- Record video from the screen.
- Editing in recording mode.
- Adjusting sound levels.
- Split video into parts.
- Adding additional audio tracks.
- Adding subtitles.
- Saving files in formats: AVI, WMV, MOV, MP4, etc.
- Burn to DVD.
- Export to cloud services.
Pros:
- Recording up to 60 FPS - convenient for games.
- Simultaneous recording from several sound sources (music, microphone).
- Hotkey support.
- Small distribution size.
- Uploading videos to social networks and Youtube.
Minuses:
- The program puts watermarks on videos in the free version.
- To record video, you need a video card that supports OpenGl.
Snagit
You can download the program from the link.
Possibilities:
- Record photos and videos from the screen.
- Large set of tools and settings.
- Support for photo and video cameras.
- Possibility to print and scan the image.
- Conversion support.
Pros:
- Record everything that happens on the screen.
- An excellent graphic editor with filter support.
- Hotkey support for capturing.
- Support for multimedia equipment.
Cons: large volume of distribution.
FastStone Capture
You can download the program from faststone.org.
Possibilities:
- Record photos and videos from the screen.
- Change color depth.
- Ability to add watermarks.
- Resize the image.
Pros:
- Good set of editing tools.
- Ability to send a photo to office applications, email and save to a computer.
- Possibility of adding a signature.
- Convenient video capture.
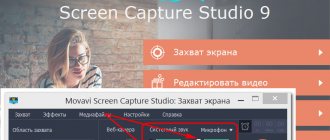
Movavi Screen Capture
This program has gained popularity due to its ability to take pictures not only of photos, but also of video from the screen.
Note! You can get a snapshot of the monitor, the active area, as well as a specific part of the screen. Despite the large number of functions, sharing screenshots using this application is not always convenient.
The main advantages include:
- Possibility of using a seven-day trial period.
- Quite simple and intuitive interface.
- If desired, you can configure hot keys in the system.
- The application works in Russian.
- Great possibilities for editing pictures.
- In the history you can find the steps to edit the screen.
- Using the service, you can record a video file from your camera or desktop.
- There are tools for video editing.
How to take a screenshot of a website page
Service snapito.com
1. Go to snapito.com
2. In the Snapito field, enter the address of the site you want to screenshot. Click on the "Snap" button.
3. Save the screenshot by right-clicking on the image and selecting “Save picture as”.
You can share a link to the image. To do this, click on the “Copy” button and the address will be copied to the clipboard.
Service s-shot.ru
1. Go to the website s-shot.ru
2. In the “Create” field, enter the address of the site from which you want to take a photo. Click on the “Create” button.
3. Click on the thumbnail and a larger image will open. Right-click on it and select “Save Picture As.”
You can share the resulting photo. To do this, copy the link to it from the “Screenshot Address” field.
Joxi extension
1. Install the extension in your browser:
- Google Chrome
- Yandex
- Opera
2. Click on the extension icon in the right corner of the screen.
3. Select whether you want to save an area or an entire page. A panel for editing the image will open.
4. Click on the checkmark to save. Choose where to record the photo: to a computer or a cloud service.
"Scissors"
When taking a screenshot, you can do without Paint and the Print Screen key. Among the standard Windows applications is the Snipping Tool, which can be used to take a screenshot of the entire screen or a specific area.
- Press the “Start” key, then go to the “All applications” tab, and select “Standard” from the drop-down menu. Now open Scissors.
- In the upper right corner of the window that opens, click the “Create” button.
- Use your mouse to select the required area on the screen.
- Click on the “Save fragment” button, which is also shown as a floppy disk.
- Select a folder and click “Save”.