What it is
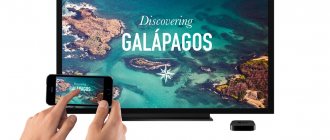
Miracast is a virtual HDMI cable that wirelessly transfers images from one device (laptop, tablet, phone) to another. Usually this is just a large screen (a large TV on the wall or a projector in the room), the so-called Wi-Fi display for Windows. Viewing images from your laptop on a large TV screen with friends, giving a presentation at work or at a lecture, watching a movie on your laptop through a projector or large TV - all this can be done using Miracast. Miracast supports modes for sending images from a laptop in screen mirroring mode (the same thing is displayed on the TV screen as on the computer or laptop monitor), as well as screen extension (viewing the same presentation on a TV or projector and parallel work on the computer).
The image is transmitted between devices in 1080p (Full HD) format with 5.1 surround sound, which is very good image and sound quality. Miracast cannot completely compensate for or replace a monitor where fast user interaction is important - image and sound are transmitted with minimal, but still latency. For many applications this doesn't matter (even for HD movies), but in games it can cause some problems.
How to set up on laptop and PC
The function is present in most modern laptops and computers. The main thing is to figure out how to configure it and connect the PC to another screen.
Settings
There are many ways to customize Miracraft. The user can choose the most convenient option for him. Regardless of the method used, the result will be the same.
Keyboard shortcut
Enabling and configuring Miracast using a keyboard shortcut takes literally a few minutes. How to enable Miracast on a laptop with Windows 10 is shown in the instructions:
- Activate the wireless network on your PC. You should also enable this feature on your TV or connected device.
- Press the Win+P on your laptop or computer keyboard (works on the on-screen keyboard as well).
- This will bring up the Projection . At the very bottom of the panel that pops up, you need to click on “Connect to a wireless screen” .
- After which the display will show that a search is in progress for devices available for connection. When it ends, select the required display from the displayed list.
- As soon as the connection is made, the computer desktop image will be displayed on the second screen.
Advice! It is recommended to find out in advance how exactly the name of the TV is displayed when searching for devices available for connection.
System parameters
To set up a wireless connection between two displays, you need to do the following:
- Go to the Start and go to Settings . This can also be done using the key combination VIN+I .
- Go to the Devices .
- Through the side menu, go to the “Connected devices” . Here it is possible to connect a PC to a new one by clicking on “Add device” .
- After this, the system will search for available gadgets. You must select the one you need from the list that appears.
Via WiDi
There are other technologies similar to Miracast. One of them is WIDI. It is also supported by modern TVs and screens. But unlike Miracast, it requires installing additional “Intel Wireless Display” software to work.
Widi is good because it can be used to connect to a laptop even a TV that does not have a Wi-Fi adapter. The connection in this case goes to the receiver, which in turn has a direct connection to the screen.
Advantages:
- The source screen content is identically duplicated without the need for an HDMI cable.
- Miracast for Windows 10 uses Wi-Fi Direct technology, which provides a seamless connection between devices.
- Miracast support in Windows 10 is ideal for connecting your PC, laptop or tablet to a projection screen for easy business presentations.
Setting up a Miracast wireless display
You can connect image playback to a TV or other monitor by following clear instructions. But, in addition to video, the service also allows you to broadcast sound. It is usually output to the speakers of the connected device. If you need to send it through your computer speakers or other acoustic system, then you should specify in the settings where to output it.
Miracast technology allows you to organize a wireless connection between your computer and another device to broadcast audio and video. You can take advantage of all the benefits of the option quite easily (all instructions and menus are in Russian, the interface is intuitive). However, difficulties may arise during operation. Their cause is incorrect operation of drivers or hardware. If you download Miracast again to a Windows 10 computer, you will not be able to solve the problem; you will either need to reinstall the drivers or purchase more modern equipment.
Connection
To enable Miracast on Windows 10, you need two things: a transmitter and a receiver. If both natively support Miracast, their configuration will be simple and fast. If you have a Windows 8.1 computer (transmitter) and, for example, a Miracast-enabled TV (receiver), then you will have a perfect pair. But what steps should you take if your receiver does not support this standard?
Transmitter – Windows computer
And now when it comes to hardware, Miracast is on the transmitter side. In fact, all new computers with Intel processors (including 3rd generation Intel Atom, Bay Trail, or 4th generation Intel Core Haswell) support the technology by default, because it's the processor. If your processor is an older one, then it is important to have the latest device drivers on your computer (sometimes referred to as "optional"!). And if you have Windows 8.1, you don't need to do anything - you can just point to a specific receiver in the system interface. If you have a previous version of Windows 7, then you can set up Miracast on it too. If you have Windows 8 installed, it is recommended to upgrade to version 8.1 for free.
On Windows 8 or Windows 7, you can install and configure the service, but you will have to install Intel WiDi software. Windows RT 8.1 also, of course, supports this technology (as long as the video card processor also supports it - NVIDIA releases its ARM processors with Miracast support).
IMPORTANT. Windows computers are covered here, but there are other systems that support Miracast (such as Android). Android version 4.2 and up should also have built-in support for Miracast.
Receiver – TV or projector
More and more equipment is starting to use built-in and standard Miracast to receive signals. You can check this on the manufacturer's website or hotline (some manufacturers, such as LG, have a dedicated website), or directly on the Wi-Fi Alliance website, which publishes lists of certified receiving devices. Technological progress allows us to produce more and more such devices. So, all new generation Samsung TVs support the technology, just run Miracast on your PC.
Using Miracast is a two-part process. First of all, you need to connect the two devices, but luckily you only need to do this once - it will take about 3 minutes. Next time you just need to select the target device (receiver) and nothing else needs to be done. Access to device pairing in Windows 8.1 is available after pressing Win + C and selecting “Add a wireless device”.
IMPORTANT. If you don't see this line, it may mean that your hardware (transmitter) does not support Miracast or you do not have the latest hardware drivers. In the latter case, it is worth checking Windows Update and the equipment manufacturer's website (WDDM 1.3 and NDIS 6.4 WiFi drivers are required). It's also worth updating the firmware.
At this point, devices that support Miracast will be checked, and if you select your device, the pairing process will begin. On the TV screen (receiver) you will see information about the connection attempt and a security code that you must enter in the Windows 8.1 interface (transmitter). At this point, the devices should be paired. And from now on you will be able to use the second “display”.
Image projection
Once paired, this process will be performed every time you want to connect to an external screen. Press the Win + C key combination, then go to “Devices” - “Project”. And your paired devices will already be in the list. Next, you only need to select the image transmission method - duplicated, extended, only the second screen.
If you want to turn off the screen, simply close the application or select the project again and click "Disable". To open the quick menu, press the Win + P key combination. In this menu, you can select the projection mode.
Technical aspects
When two devices supporting the technology search for each other, a point-to-point connection is established between them via Wi-Fi Direct. Security is established using Wi-Fi Protected Setup (WPS), and all communication between devices is provided by WPA2-AES. Once the connection is established (2.4 GHz by default), the devices synchronize their capabilities (such as resolution or screen refresh rate), local image and audio encoding, and then send the signal to the receiver. This decodes the signal and displays it. So in reality, everything you see on the screen can be sent to the receiver - so you're not limited to any application or part of the monitor, projector or TV screen.
In previous articles, I described how to connect a computer/laptop using a cable .
But it is not always convenient to lay the cable; thanks to the cable, you are “tied” to a place and cannot move freely. There are technologies that will allow you to wirelessly display the screen of a laptop, netbook or tablet on a TV, one of these technologies is WiDi.
WiDi (Intel Wireless Display) is a wireless transmission of content from a mobile device (laptop, ultrabook, tablet) to a TV (Smart TV), developed by Intel. The technology is based on the Wi-Fi standard. (Wikipedia).
In order to be able to connect your TV to a laptop/ultrabook/tablet using WiDi, it is necessary that each device supports this technology. No additional equipment (routers, routers, access points, etc.) is needed.
In order to understand whether your TV supports WiDi or not, you need to read its technical capabilities; it’s easier to do all this by going to the TV manufacturer’s website, find your model and get acquainted with the technical characteristics.
To understand whether your laptop/ultrabook or tablet supports WiDi technology, it must meet the requirements for WiDi , namely:
| Conditions | Intel® WiDi | Intel® Pro WiDi |
| operating system | Windows 7, Windows 8/ 8.1 (Windows 10) | Windows 7, Windows 8/ 8.1 (Windows 10) |
| CPU | — 2,3,4,5 generation Intel® Core™ i3/i5/i7 | — 4th generation Intel® Core™ Mobile and Desktop Processors with Intel® vPro Technology — 5th generation Intel® Core™ Mobile and Desktop Processors with Intel® vPro Technology — Intel® Core™ M-5Y7x processors with Intel® vPro Technology |
| Graphic arts | Intel® Iris™ Pro Graphics 5200 Intel® Iris™ Graphics 5100 Intel® HD Graphics 5000, 4600, 4400, 4200, 4000, 3000 (mobile), 2500, 2000 (mobile) | Intel® Iris™ Pro Graphics 5200 Intel® Iris™ Graphics 5100 Intel® HD Graphics 5500, 5000, 4600, 4400 |
| Wi-Fi cards | Intel®: Centrino® Wireless-N 1000, 1030, 2200,2230 Centrino® Wireless-N 2200 for Desktop Centrino® Advanced-N 6200, 6205, 6230, 6235 Centrino® Advanced-N 6205 for Desktop Centrino® Wireless-N + WiMAX 6150 Centrino® Advanced-N + WiMAX 6250 Centrino® Ultimate-N 6300 Dual Band Wireless-N 7260 Dual Band Wireless-AC 7260 Dual Band Wireless-AC 7260 for Desktop Dual Band Wireless-AC 3160 Wireless-N 7260 Dual Band Wireless-AC 7265 Dual Band Wireless-N 7265 Wireless-N 7265 Broadcom: BCM43228 BCM43241 BCM4352 | Intel® Dual Band Wireless-AC 3160 Intel® Dual Band Wireless-AC 7260 Intel® Dual Band Wireless-N 7260 Intel® Dual Band Wireless-AC 7265 Intel® Dual Band Wireless-N 7265 |
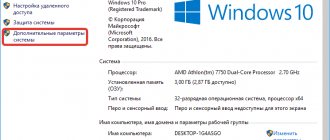
In order to see what processor, wireless adapter and graphics you use, I recommend reading the article - How to find out the characteristics of the hardware of a computer or laptop without disassembling it .
If your mobile device meets the requirements and your TV supports WiDi, you can set up a WiDi connection.
Enable WiDi on the TV.
In this example LG with WebOs will be used; enabling this function on other TVs ( Samsung, Philips, Sony, Toshiba, etc.) will be done in a similar way.
Open the Smart Applications menu, to do this:
— on the standard remote control, press the “Smart” button.
- on the Magic Remote, press the “Home” button
Then open the full application menu.
Select Screen Share.
Thus, you have enabled the WiDi function on your TV.
Enabling WiDi on a laptop, ultrabook, tablet.
In order to use WiDi technology on a laptop, ultrabook, tablet, you need to install the appropriate software. For this it is necessary.
For Intel WiDi, download Intel® Wireless Display Software for Windows , for Intel Pro WiDi, download Intel® Pro WiDi Software for Windows .
Installing the program for WiDi is extremely simple and boils down to clicking the “Next” button and agreeing to the license agreement.
Intel(R) WiDi shortcut will appear on your desktop .
Launch the Intel(R) WiDi application. When turned on, it automatically scans for the presence of wireless displays and, having found it, will offer to connect.
After agreeing to connect, numbers will appear on the TV that must be entered on the laptop, ultrabook, tablet in the Intel WiDi program. Then the connection will occur within a few seconds. As a result, everything you see on the screen of your mobile device will be displayed on your TV.
In addition to duplicating the image, the TV can be used as a second screen. To do this, press the “Win” + “P” key and select “Extend” (suitable for Windows 8/8.1, for Windows 7 follow the steps described below). Thanks to WiDi technology, your TV becomes a full-fledged monitor; you can change the resolution, screen orientation, etc. To do this, right-click on the desktop, select “ Screen resolution ” or go to “Control Panel” - “Display” - “Setting screen resolution” .
In the window that opens, you can change the screen resolution, both on a laptop, ultrabook and on a TV, choose to expand or duplicate the image, and change the screen orientation.
To disable the WiDi connection, in the Intel WiDi application, on the corresponding wireless display, click “Disconnect”.
General impression of WiDi.
WiDi is a great way to get rid of some wires in an apartment/house; in addition to a wireless connection that displays the screen from a laptop, ultrabook, tablet on a TV, it can act as a second monitor, which allows you to use one laptop or ultrabook by several people at once. For example, by expanding the screen, you can turn on a movie/presentation/photo on the TV, and at the same time surf the Internet, play a game, etc. on your laptop, ultrabook.
But this method of wireless connection has disadvantages, since this development by Intel has tightly linked this technology to its products and this technology can only be used on a limited number of laptops, ultrabooks and tablets. WiDi is also not suitable for demanding games, since processor graphics power is relatively scarce, plus there is a noticeable delay in video display on a mobile device and TV. It is a fraction of a second and will not prevent you from viewing videos, photos, presentations, but is critical for action games where instant reactions are required.
In my opinion, WiDi technology is a very good solution for wireless connection, and it is ideal for most tasks.
Pros of using WiDi:
1 Allows you to wirelessly connect mobile devices to your TV;
2 Supports high resolution FullHD (4K support will be available soon) + 5.1 sound;
3 It is possible to expand the screen (use the TV as a second monitor).
Disadvantages of using WiDi:
1 Not every device supports WiDi technology (this applies to laptops, ultrabooks, tablets and TVs);
2 Delay of a fraction of a second on the TV screen.
Video of connecting a laptop to a TV using WiDi.
I really hope my article helped you! Please share the link with your friends:
What to do if Miracast on Windows 10 does not work
Many users are faced with potential problems that may arise when using the technology.
The sound is played on the computer, not on the TV
It may happen that the sound is played on the computer. To solve the problem, you need to change the sound and playback settings - right-click on the speaker in the system tray and select “Playback devices”. There you need to select the required receiver.
No connection
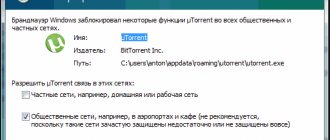
It turns out that Miracast does not always work in the Windows 10 Firewall network - the Wireless Display network is blocked. Because of this, unfortunately, the transmitter cannot always connect to the receiver, because all traffic is limited here. If you use the Miracast service, for example, in your office, then the only solution to the problem when there is no firewall on the corporate network is to simply remove the computer from the corporate network.
Noise or black screen
Unfortunately, because the image sent through the technology is encoded, it may happen that when you use a device like Netgear and connect a projector, the image will appear as noise. This doesn't mean your PC doesn't support Miracast. The problem is related to the HDCP function in HDMI. Its purpose is to protect content from unauthorized use. Unfortunately, if you connect such a device to an HDMI cable that later goes through some kind of splitter (a common situation in conferences and meeting rooms), then HDMI detects an attempt to send a signal to other devices and begins to encode the image. The problem can only be solved if additional devices are removed from the communication queue.
Poor quality image
If the image is transferred, but it is of poor quality, you should change the resolution on your computer to a lower one. Another common problem is that the device simply does not support Miracast technology. In this case, contact your equipment supplier for advice on what equipment needs to be replaced. Miracast, and wireless communications in general, have a guaranteed future. The main advantage of this technology is the absence of “cables” and, therefore, the ease of use of devices and the implementation of all their capabilities. The big plus is the unification of the technology, so whether we have devices A and B, or A and Z, Miracast will work.
There are already many devices on the market that allow you to use the technology. Among them are tablets and televisions, the number of which is constantly growing. If you don't have a TV that supports the technology, you just need to buy a suitable adapter that connects via USB or HDMI.
Connecting smartphones and tablets
In the case of mobile devices, the connection to the wireless display will have to be made exclusively using DLNA. There is simply no other option. Although the iPhone has a proprietary AirPort option, it requires Apple's proprietary display. As usual with Yabloko. So, we will not consider this possibility. Connecting your Android or iOS smartphone to your TV using DLNA is very simple. Just launch the appropriate application on the device and select a connection using DLNA in the TV settings. Then everything will happen by itself.
It is worth noting that the possibility of such a connection is available on almost all devices. Unless you have some ancient Android 2.3. “Wireless display” with “Android” works quite adequately. However, surfing the Internet is inconvenient due to the presence of a touch screen. But you can view photos and videos as much as you like. Playing with this connection won't work either. But you can communicate via Skype or some other VOIP application. There are no restrictions on this.