In this article we will look at error 0x80070570. In the Windows operating system, you may encounter a huge variety of errors. When faced with them, you won’t immediately understand where they come from or how to remove them. The good news is that each of the problems is assigned a special number by which you can search and find a method on how to fix this or that problem. Now closer to the topic.
Error 0x80070570 appears in two cases:
- When copying or moving files to a Flash disk (the file or folder is damaged). Information on this case is at the end of the article.
- When installing Windows.
In this article we will look at both cases and how to fix this problem.
Fixing error 0x80070570 when installing Windows
I’ll say right away that there are a lot of reasons why this error occurs. I will list the main ones:
- Malfunction of computer components (Hard drive (often), RAM, motherboard (rarely), cables).
- The ISO image checksum is broken.
- Faulty flash drive.
- Software glitches.
And now in more detail on each point.
Error code 0x80070570 - What is this?
Error code 0x80070570 is a common Windows 10 error code that is commonly seen by users trying to install a new version of the operating system. Although it is most often associated with Windows 10, variations of this same error code were present in previous versions of the operating system, all the way up to Windows 7.
Common symptoms include:
- Inability to complete the installation process when trying to install a new version of the operating system
- Error message regarding damaged or missing files
Although you encounter an error such as error code 0x80070570 when you try to install a new version of the operating system on your device, there are several methods that you can use to resolve this issue. If you do not feel that you have the skills or knowledge required to successfully implement the steps below, be sure to contact a reliable computer repair technician who is competent in resolving Windows 10 errors.
Checking RAM
Very often this problem manifests itself due to a malfunction of the RAM sticks. It is recommended to remove the RAM modules or swap them. Sometimes such manipulations help solve the problem of error 0x80070570. Here are comments from people who have been helped by this method:
You can also check the memory sticks with Memtest. The program will check your RAM and report if any of the dies are producing errors.
Damage to installation files
Most often, this error can occur when installing Windows - versions XP, Vista, 7, 8.1 or 10, it doesn’t matter. It occurs at the stage of copying files or preparing for installation. To solve this problem, use a few tips:
- Recreate the installation media. If it is Windows 10 or 8.1, then recreate the drive using the Media Creation Tools utility. If Windows 7 or older versions (XP, Vista) then burn a new disk or USB using the system image
- Use a different storage device (another USB flash drive or DVD)
If the suggested options do not help, move on to the next point.
Check the disk image checksum
When downloading a Windows installation image, you need to check its integrity. In the vast majority of cases, files are downloaded correctly, but sometimes there are glitches. If the source website from which you download the image indicates SHA-1 hash checksums, then you can compare them with your downloaded image. To do this, you need to download and install the HashTab program. It adds a new tab to the File Properties window with hash checksum information. Copy the SHA-1 value from the source website and paste it into the “Hash Comparison” field. If a red cross is displayed, the files do not match; if there is a green checkmark, then the files are the same.
Checking RAM memory (RAM)
In most cases, you can fix the error message that appears when installing Windows with number 0x80070570 by reinstalling the memory modules or completely removing one of them.
Therefore, open the computer case, remove all memory modules, and carefully inspect them for damage (scratches or darkening). Install all working modules back into the motherboard.
Even if all modules seem to be working fine at first glance, remove all but one and check the result. If only one stick of RAM is installed, then as an option you can try installing it in another slot, this may be the problem.
After a visual inspection, proceed to software memory testing using the MEMTEST utility. By default, it is present in almost any Live CD/USB collection, and it can also be downloaded from the official website. Read here how to use Memtest.
I recommend checking one bar at a time. If the scan results contain red addresses with a set of incomprehensible symbols and numbers, then your plank is faulty. But even a successfully passed test without errors does not exclude the possibility of a malfunction or incompatibility of the RAM.
In rare cases, memory modules may not be compatible with the system board or with each other. This is easy to check; just remove one module and check the result.
If, when reinstalling Windows 7, 10, error code 0x80070570 does not appear, and the memory stick has successfully passed the MEMTEST test, then the problem is obviously incompatibility. Then it should be replaced. That is why it is recommended to always buy planks from one manufacturer and preferably one model.
Even less often, ordinary dust becomes the culprit of a malfunction. Carefully remove and wipe the modules from dust, if necessary, blow out the slot on the motherboard, then install the RAM back into the board.
Using the Up and Down Keys
I also took this method from an English-language site. Perhaps it will be useful for someone.
A quick solution is to use the up and down keys.
When you see the first black screen while restarting your computer, start pressing the up and down arrow keys on your keyboard.
This doesn't always work, but has been known to solve the problem for a significant number of users, so it's worth a try. The decision is dubious, I would say, but maybe it will help.
Trying to boot a damaged hard drive
First check the disk for errors (follow the steps described above). If this method does not help, then use the following tips.
- Call the conductor "Run". Press Win+R on your keyboard (flag icon). In the column that appears, enter chkdsk and the name of the hard drive, close with the /f symbol (example chkdsk c: /f). After checking, it is advisable to reboot.
We use the command chkdsk c: /f for drive C:
- Check your hard drive for bad sectors using Victoria and HDD Regenerator . They are easy to use, and their instructions can be easily found on the Internet. Here is one of them.
And at the end, a short video instruction with an overview of these methods for hard drive reading errors in Windows.
Fixing error 0x80070570 when copying or moving files to a Flash disk
In this case, the error appears when working with files on the media, for example, copying, deleting, moving, pasting, renaming files. At this point, the following notification may appear: “Error 0x80070570: The file or folder is damaged. Reading is impossible."
What to do:
Open “My Computer”, find our flash drive there and right-click on it to open the context menu. And click on the last item “Properties”.
After that, switch to the “Service” tab and click on the “Run check” button. An error checking window will appear, in it you need to check the box next to “automatic error correction” and click “Run”.
The program will check the flash drive and, if there are any problems, fix them. After this, error 0x80070570 will no longer appear.
I hope the methods described above will help you to resolve this problem. That's all, good luck everyone!
0x80070570 during system restore
As I wrote earlier, my friend’s computer was unable to boot and went into an eternal series of system restores, where after trying to recover, I received this banner with an error.
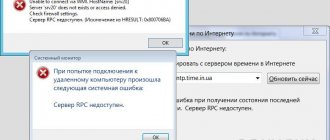
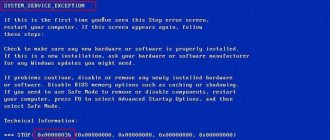
System Restore was unable to replace the file (C:\Program Files (86)\Kaspersky Total Security 16.0.0\avp.com) with its original copy from the restore point. Unexpected error during system restore 0x80070570
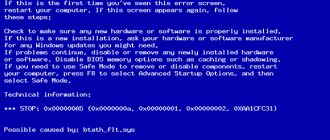
If you cannot roll back to a restore point, you need to try booting into safe mode; I described the methods for doing this in the note (how to enable safe mode on Windows 8.1). When choosing a mode, install without network driver support. I would like to note right away that in safe mode in Windows 8.1, the installation and removal service will not work, you will receive an error when you try to remove something, in my case Kaspersky Total Security.
The Windows Installer service is not available in Safe Mode. Try again after finishing in Safe Mode, or use System Restore to return to a previous working state
But don’t rush to get upset, this can be fixed, read the note on how to fix the Windows Installer service being unavailable in safe mode.
Now try to remove everything that interferes with the system boot. You can uninstall using built-in tools via Control Panel > Programs and Features
Or use third-party utilities, such as CCleaner or its analogs, or alternatively, you can slip in a portable version, reboot after uninstallation and check if error 0x80070570 is gone when restoring the system.
Using Live CD
In most cases, this helps, but if this does not apply to you, try this option, download any Live CD or DVD, for example SonyaPE. We boot from under it and also remove unnecessary programs and utilities. The advantage of all such assemblies is that they do not require installation and allow everything to be quickly repaired.
HDD starts to break down
Oddly enough, wild hard drive brakes during system recovery or Windows boot can be caused by the poor condition of the physical hard drive. How to check this, boot in safe mode or using a live cd, whichever you prefer. Right-click on the start area and select Task Manager.
Or you can press three keys at the same time
CRTL+SHIFT+ESC
The Task Manager will also open. At the very bottom, open Resource Monitoring, see the link for other Windows 8.1 hotkeys.
In the Resource Monitoring snap-in, we need to check if everything is fine with the HDD, for this, on the Disk tab, look at two values
- Response time > if you have an ssd drive, then during normal operation this parameter will not exceed 15-20 miles of seconds, if this parameter is from 150 to many thousands, you know you have a problem with the screw, and it will die soon, it will not copes with the load.
- Queue length > if it is more than 1, then this is also a bad sign, it is worth diagnosing it.
The Victoria program can also help you understand whether your hdd is dying or not, it is completely free and comes with a live cd. Its meaning is to check all sectors of the disk and see at what speed each of them reacts to writing and reading; the longer the time, the worse. If the screw crumbles, then the error is 0x80070570, one hundred percent because of it.
Also, the error code 0x80070570 can be corrected by simply checking the hard drive, if of course they are software (if there are physical problems, then quickly transfer important data and change it; by the way, you can check the health of your disk and carry out detailed diagnostics of all parameters using the special Cristal Disk utility Info, I talked about it, here in the article)
To diagnose hard drive software errors, you must open a command prompt as an administrator and enter the command:
chkdsk c: /r
After you press Y, you will be told that the next time you restart or turn on the computer, your hard drive will be checked for errors and, if possible, they will try to repair them.
The same can be done through the graphical interface, go to the properties of the desired local disk, go to the service tab and in the Check disk for file system errors item, click check.
Error 0x80070570 when installing windows 7
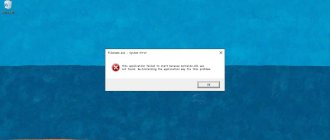
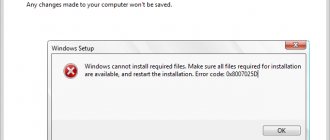
Oddly enough, error 0x80070570 can also appear while trying to install a Windows system. Windows was unable to install required files. The file may be damaged or missing. error code 0x80070570
- Here, too, you don’t need to be a prophet or Nostradamus, 99.9 percent you made a bootable flash drive clumsily or you have a crooked Windows image, what to do, just check that the bootable flash drive was created without errors and from a normal image. I can recommend you one hundred percent working methods for preparing bootable media for further installation of the system, you can find them here.
- When downloading the image, look and check the hash of the sum, I told you about the HashTab utility, which adds Hash sums in the file properties, I personally always specify it for all my assemblies and error 0x80070570 can easily appear if you did not download or download clumsy Windows ISO. So, always check.
- If you have several sticks of RAM on your computer, and all other points do not give you error 0x80070570, then you need to test the memory. To do this, download the free MemTest utility, run it and run the test.
- Update BIOS > yes BIOS firmware can also interfere with the correct installation of Windows 8.1 and cause 0x80070570 during installation. What we do is find out the name of your motherboard, go to the manufacturer’s website, download the latest BIOS version, make a backup copy of the previous one and update. For example, I showed how to do this Updates for ASUS
Debugg
- The installation disk image must be correctly burned onto the media. To create a bootable USB flash drive, it is recommended to use the WinSetupFromUSB , which has the status of free software. To burn to CD/DVD, use Astoburn Lite, AnyBurn or UltraISO. To download from torrents, it is recommended to use uTorrent, which itself verifies the checksums of downloaded files. Try installing Windows from the same flash drive on another machine; if an error appears, then the problem in the flash drive. In this case, download the image, rewrite it to media and start the installation process again.
- Errors in RAM cannot be determined by eye; you need to download the free Memtest program and burn it to disk, boot from it when you start the computer, and analyze the broken cells. Scanning takes a long time, there is no need to sit at the monitor all this time, the program will show all detected faults statistics The problem is solved by replacing the modules.
- Errors in the hard drive are checked with the command “ chkdsk c: /r ”, which is entered into the command line, then in the same command line enter the Y and press Enter . The computer itself will check and fix damaged sectors of the hard drive the next time it starts.
- The motherboard cannot be fixed by software , so if it is the problem, all that remains is to replace it. Try to pull out the buses, SATA cables connecting the board and the hard drive and plug them back in (perform all manipulations with power turned off !).
- Rarely, the problem may occur due to an outdated BIOS version . In this case, all that remains is to update it, which in turn can cause the entire PC to break down, or to be content with an old but functional computer with an old BIOS version, but without Windows 7.
Ways to get rid of noise and hum in a microphone when recording