Some users ask the question: How to set the weather on iPhone? Actually, for them, I have prepared a complete guide “How to set up the Weather application on iPhone”
Weather app on iPhone will help you always be aware of the outside temperature and precipitation. In addition to the current location, you can add weather forecasts for other cities to the application; to do this, you need to specify its name or zip code. All this can be easily added and removed, and how to set up the weather on iPhone read below.
- How to add a city to Weather on iPhone
- How to remove a city from Weather on iPhone
- How to change the city in Weather on iPhone
- How to change degrees from Fahrenheit to Celsius in Weather on iPhone
- Commands for Siri
- What do the weather icons mean?
How to add a city to Weather on iPhone
The Weather app on iPhone automatically tracks precipitation and temperature in your location (if you allow it). However, you can add any cities and see what the weather is like there.
- Launch the Weather app from your iPhone's home screen.
- Click on the List button in the lower right corner.
- Click on the + button in the lower right corner.
- Enter name or postal code.
- Click on the desired city from the search results.
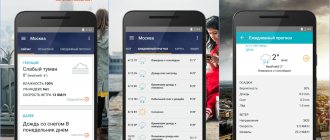
Yandex.Weather
The iPhone application is the crown of creation, a legend of the genre and a domestic development that has long since reached perfection. One of the advantages is the presence of Meteum technology, which calculates a local forecast depending on the current location with an accuracy of the building on the map. As soon as you change the angle, the service will automatically recalculate the results, and at the same time display an additional summary - about precipitation and the chances of a thunderstorm.
A new product from Yandex deserves additional attention - an assistant designed for allergy sufferers. It’s worth turning to the search, entering a city or region, and Yandex.Weather will immediately tell you where the birch flowers have bloomed, in which places the poplar fluff is raging, and where the gardens have bloomed. The information is structured in detail and presented not in the form of boring tables, but in the form of impending cyclones - at least approximately, but you can find out in how many days the epidemic will reach neighboring cities.
If the above set is not enough, why not remind us of support for Apple Watch, the presence of notifications, a daily weather report informing about tomorrow, and even messages from the Ministry of Emergency Situations warning of impending storms, rain and thunderstorms. Staying on vacation in the rain or seeing the sunrise later than expected with such an assistant from Yandex will not work, even if you really want to.
How to change the order of cities in Weather on iPhone
- Launch the Weather app from your iPhone's home screen.
- Click on the List button in the lower right corner.
- Tap and hold the city you want to move up or down.
- Drag the city weather to the position that suits you.
- Remove your finger to change the order of cities.
Repeat this process for each item you want to move up or down in the list.
Option 1: Apple Weather
The iPhone has a standard Weather application, and it can safely be called the optimal solution to our problem. Of course, with the right setup.
If you accidentally or, conversely, deliberately deleted this application, install it using the link below.
- Launch the application and allow it to use your location. It is best to select the "When in use" option.
- Immediately after this, the location will be determined and you will see the weather corresponding to it. In the horizontal list it is presented by hour, in the vertical list - by day.
Note: If the Weather application was installed previously and now it has incorrectly determined your geolocation or has not requested the appropriate permission, read the article provided at the link below and follow the recommendations therein.
Read more: How to enable geolocation on iPhone
Important information such as sunrise and sunset times, probability of precipitation, air humidity, wind speed, pressure, etc. are indicated below.
- If the location was determined incorrectly, you want to specify it yourself or simply add another locality to the list displayed by the application, do the following:
- Tap on the list button located in the lower right corner.
Then tap the icon marked in the image below.
- Use the search and find the locality for which you want to see the weather in the application interface. Start typing its name, and then select the appropriate option from the prompts,
after which it will immediately be added to the general list and available for viewing.
- If necessary, add one or more places in the same way. Direct switching between them is carried out by horizontal swipes on the main screen
- If necessary, the order of their arrangement in the list, and therefore on the main screen of the application, can be changed by simple dragging (press and drag).
- In order not to launch the application every time you need to look at the weather, you can add its widget. This is done as follows:
- From the Home screen (the first screen), swipe from left to right to open the widgets page.
Scroll down the list of elements presented on it and tap “Edit”.
- Now scroll down the list of applications that have widgets and find Weather among them. Tap the plus sign located to the left of the name.
- The widget will be added to the end of the list, but if necessary, it can be moved to any convenient place - to do this, just hold down the right edge and pull in the desired direction. To save your changes, click Done.
Note! Here, under the list, you can select temperature measurement units – C° or F°. By default, they are determined in accordance with those generally accepted for the region.
Now the weather for the main settlement (the first in the list added to the application) will be displayed on the screen with widgets. It can be collapsed and expanded, and when touched, it opens the main application.
Weather Timeline (Android)
The wealth of weather data that Weather Timeline can provide is impressive. This is not noticeable at first glance, since a well-designed interface does not provide all the information at once. When you open the app, you'll first see a list of cities whose weather you're monitoring. After clicking on the city name, a timeline appears. You can now scroll vertically to view a seven-day weather summary. To find out more detailed information about weather conditions, you need to click on the name of the day.
Weather Timeline has a gorgeous animated weather map with radar, cloud, and temperature overlay modes. An element such as “Graph” will help visualize weather data. But it seems that the most interesting feature of the application is the “Time Machine”, with which you can be curious about the weather conditions for an unlimited time in the future.
Key facts about Weather Timeline:
- Weather service used : Forecast.io, Weather Underground, YR.no, OpenWeatherMap, World Weather Online (user selectable)
- Weather maps : overlays with animated radar information, cloud cover and temperature
- Forecast duration : 7 days (forecast for 2 years based on astronomical data)
- Dew point : yes
- Heat index : yes (feels like)
- Wind speed : yes
- Barometric pressure : yes
- Visibility : yes
- Sunrise/sunset times : sunset only
- Moon phases : yes (interactive Moon View)
- Widgets : current conditions, forecast, clock + weather, hourly forecast, multi-city forecast
- Interface : vertical scrolling, zoom by touching an element
- Feature : thanks to the intuitive design, the user receives up-to-date information in a concise form
- Cost to remove ads : $0.99 (Pro version is the only version available)
Yahoo Weather (Android & iOS)
Yahoo Weather is perhaps the most attractive app in terms of both features and design. As the owners of the photo hosting site Flickr, Yahoo provides beautiful photographs of cities against which the user views weather data.
Read also: 3 reasons to switch from iPhone to Galaxy S9
At first glance, it might seem that beautiful views are all this app has to offer. But if you scroll down a little, it quickly becomes clear that Yahoo Weather can provide mountains of information about weather conditions. All frequently requested weather information is included here: static overlays with radar, cloud and temperature information. Basic facts about Yahoo Weather:
- Weather service used : Weather Underground
- Weather maps : overlays with static radar information, cloud cover, temperature and wind speed information
- Forecast duration : 10 days
- Dew point : no
- Heat index : yes (feels like)
- Wind speed : yes
- Barometric pressure : yes
- Visibility : yes
- Sunrise/sunset time : yes
- Moon phases : yes
- Widgets : current conditions, clock + weather, hourly forecast
- Interface : vertical scroll for details, swipe right or left for other cities
- Feature : weather data against the background of a photo of your city from the Flickr photo hosting site
- Cost to remove ads : no ad version available
Displaying weather on the lock screen
This action can only be performed using the WeatherPro application. In order to set everything up properly, you will have to carry out preliminary preparation of the gadget. You need to do the following:
- Go to “Settings”.
- In the "Privacy" section, select "Location Services".
- Click on the “Weather” button.
- Enable the "Always" condition.
In addition, the function of the modes needs to be adjusted. It is also located in “Settings”. Of all the modes, you only need to select one - “Do not disturb”. Having entered it, the user needs to indicate the time he needs at which he plans to receive a weather alert.
After all these preparations, an iPhone user with a configured application and displaying weather alerts on the lock screen will be ready for any atmospheric surprises.
Working with the built-in application
The Weather program on iPhone and iPad is a standard application built into iOS. If necessary, the user can track the weather not only in his area, but also in any corner of the world. Of course, this is useful, especially for those who travel frequently.
Weather app for iPhone
Working with the Weather application on both iPhone and iPad is quite simple. By opening the program, you can see the hourly forecast for the next day. Below is information for the week. If necessary, you can find data about other cities in the settings.
Important! Temperature information can be viewed in both Fahrenheit and Celsius, switchable manually.
The information displayed in the application comes from the official weather service The Weather Channel. If suddenly your iPhone shows an incorrect forecast, you can go to the official website and clarify the information.
Dark Sky (Android and iOS)
Dark Sky is gaining more and more adherents and for good reason - the application is easy to use and provides very accurate data. Billed as the best source of hyperlocal data, Dark Sky predicts the weather down to the minute, no matter where you are. The app has an intuitive design: you can access information you need, such as an interactive weather map, by swiping right and left. In addition to its wonderful user interface and accurate forecast, Dark Sky has a great feature called “Take My Phone.” With this option, you can periodically send atmospheric pressure data to the data processing center and thus guarantee a more detailed and accurate weather forecast. If you're looking for an app that provides accurate weather forecasts without any bells and whistles, Dark Sky is worth a look. Basic facts about Dark Sky :
- Weather service used : Forecast.io, Dark Sky
- Weather maps : Animated radar information with temperature and precipitation data overlay
- Forecast duration : 7 days
- Dew point : yes
- Heat index : yes (feels like)
- Wind speed : yes
- Barometric pressure : no
- Visibility : no
- Sunrise/sunset time : yes
- Moon phases : no
- Widgets : current conditions, forecast, clock + weather, forecast for every 10 minutes
- Interface : swipe left or swipe right to switch between tabs
- Feature : Ability to provide your own forecast to help compile more accurate data
- Price for removing ads : N/A
Read also: How to install the new Galaxy S8 launcher on S7 or S7 Edge devices without rooting
About Weather and weather icons on iPhone and iPod touch
Here's how to check the weather where you live or in other cities using the Weather app on your iPhone.
With the Weather app in iOS, you can view the weather forecast by city name, zip code, or airport code. You can also make a list of the cities you need in the order you need.
Weather in Russia
This weather for iOS occupies a leading position in the list of thematic programs for Apple gadgets. Although the informer does not feature a long-term forecast, it has a very clear minimalist design and is perfect for those who need to know the forecast for the coming day. The program is detailed by time of day, providing a completely complete picture of the weather situation.
Download
RainAware (Android and iOS)
If you spend a lot of time outdoors - for leisure or for work - you simply need to know the exact information about the impending rainstorm. While other apps predict storms as they hit, RainAware uses its profile to accurately forecast storms.
RainAware has a fairly simple interface, allowing you to access various windows with satellite information and weather forecasts by clicking on the tabs at the bottom of the screen. The ease of use is especially useful when you need to quickly check if a storm is approaching. If cats could use smartphones, RainAware would be their favorite app!
Read also: 12 best Android widgets for planning and managing tasks
Key facts about RainAware:
- Weather service used : National Weather Service
- Weather maps : animated radar
- Forecast duration : 7 days
- Dew point : yes
- Heat index : no
- Wind speed : yes
- Barometric pressure : yes
- Visibility : yes
- Sunrise/sunset times : no
- Moon phases : no
- Widgets : no
- Interface : Vertical or horizontal scrolling depending on the open tab
- Feature : Full use of material design
- Price for removing ads: N/A
Gismeteo lite
Excellent weather on iOS, which offers the most comprehensive overview of weather conditions of any similar application. Despite the “lite” prefix, the application does not have a more complete version, and the prefix itself does not indicate a stripped-down version of the program, but its miniature size. The application is designed as an informer, takes up minimal space in the device's memory, providing the opportunity to get acquainted with the weather anywhere in the world for two weeks in advance.
Download
Setting the weather on iPhone
Using an Apple smartphone is always quite simple, because the developers try to simplify all the settings as much as possible.
Adding and removing new places.
To add a new city, just click
the List icon
and click
Plus
. Then enter the name of the desired city and add.
If you want to delete, just swipe your finger over the desired name from right to left and the
Delete
, which we press if necessary.
That's it, everything is done literally in a matter of seconds.
Temperature units.
If you suddenly want to know the temperature not in the usual degrees Celsius, but for example in degrees Fahrenheit, then this can be arranged.
Just go to the same list and press the letter F. You can immediately go back to the system we are familiar with.
How to display the weather on the iPhone screen?
Many iPhone owners have always wanted this opportunity, so that something like a weather widget would appear on the screen. Apple heard these people and partially fulfilled their wishes.
With the advent of iOS 10, so-called widgets appeared, which are available both on a locked smartphone and in normal use mode.
To add such a weather widget, just follow these steps:
- We go to the widgets page in an unlocked state. It is located on the left, that is, the desktop sheets are on the left side.
- Now we see the Edit
and see the entire list of widgets at the bottom.
Click on the green plus sign opposite Weather
.
That's all, now you can view the weather without even going into the application. Quite convenient and saves your time.
Weather Live
The source of detailed news about the weather in megacities, tiny towns and villages barely visible on the map. Among the advantages are beautiful images woven into statistics that tell about everything in the world - “feels like” weather, precipitation, humidity, position on the map, impending cyclones and precipitation.
If desired, the listed information can be easily displayed in the widget that appeared in version 11 of iOS. It’s both clear and convenient – you just have to choose your “hometown” and you can study every nuance.
You can also subscribe to daily push notifications on your iPhone. The information that appears will help you not to fall for the tricks of the weather and spend your free day in comfort, having planned every step in advance!
It has been snowing in Moscow and the Moscow region for several days now. Forecasters called it the “snowfall of the century.” Hundreds of flights have been postponed at airports, there are kilometer-long traffic jams on the roads, and snow removal equipment does not stop for a minute.
And as the snow continues to fall with no improvement in weather conditions on the horizon, we've rounded up the best weather tracking apps.
Setting the weather on iPhone or iPad
Understanding the importance of tracking weather conditions, Apple has included the Weather program in the list of standard iOS applications.
This application allows you to be aware of not only the local weather, but also track weather disturbances in other parts of the world, which is very useful if you lead an active lifestyle and travel often. However, as it turned out, only iPhone users can use the standard Weather application. But this does not mean that users of Apple tablets are left without weather reports: iOS for iPad has a special weather widget available in the Notification Center. Actually, these features lead to the fact that the weather settings on the two devices have some differences.
Setting the weather on iPhone
As already mentioned, the standard set of iOS for iPhone includes the Weather program, which is easy to set up and use. First, you need to go to Settings > Privacy > Location Services and check if the Weather app has access to your location. If it is not there, turn it on.
Then we go to the application itself. To add new cities whose weather conditions are of interest to you, you need to launch the application and tap on the button located in the lower right corner. In the settings that open, you can choose a convenient way to display the temperature, Celsius or Fahrenheit, and also add a city using the plus button.
If you need to change the list of cities whose weather conditions you are tracking, just open the settings again, select a no longer relevant city in the list and, using a swipe from right to left, call the “Delete” button.
Setting the weather on iPad
There is no Weather app on the iPad, but you can check the local weather conditions from the Notification Center. To do this, you need to go to Settings > Privacy > Location Services and allow Weather access to your location.
Weather apps from the App Store
The App Store offers a choice of a dozen different programs that provide information about weather conditions. So if you think that another program provides more accurate information, you can always notice Apple’s Weather as something else, and besides, setting up such applications is usually no more difficult than the native one on the iPhone.
Weather widgets
By default, you can find out about the state of the local weather from the Notification Center. However, if you have several weather applications on your iPhone or iPad, you can independently specify the information of which specific application should be broadcast to the control center.
To do this, call up the “Notification Center” by swiping from top to bottom and pulling the curtain on the screen. If your device is password protected, unlock it first. Then click on the “Edit” button, after which you will see a list for editing, in which you can activate the widgets you need and turn off those that are unnecessary.