Hello comrades! I'm glad that you were able to look at your favorite IT blog Pyatilistnik.org again. Last time we looked at the net framework removal mechanism so that there would be no unnecessary garbage left behind. In today's post, I would like to talk about this thing: recently, on one of the servers and a client workstation, I came across an inscription in the corner of the desktop that the operating system Windows 10 "test mode" enabled". Visually, all OS functions worked normally, but the inscription itself was a little annoying. Today I will show you how to remove this test mode in Windows 10 and any other Windows.
What is Test Mode?
What is the work of Windows 10 and others in test mode? As the name suggests, this is a special debugging mode that Microsoft introduced for developers who could install programs or drivers in Windows when, for some reason, they are not digitally signed, or self-signed certificates so to speak. The test mode is also called the operating system test signing mode (https://support.microsoft.com/ru-ru/help/2509241/how-to-disable-the-test-mode-message-that-is-displayed-in- windows)
This is not the only watermark that this OS has. So, if you install an application whose drivers are not digitally signed by Microsoft, and if they are still in the testing phase, then you may see Test Mode.
Remember, I told you how to disable digital signature verification in Windows 10, where we did this so that it would be possible to install an unsigned printer driver, after which a watermark could easily appear. Of the watermarks, the most popular is Windows Activation.
Test mode in Windows 10 - what is it?
A huge number of applications are being developed specifically for Windows OS, which must be compatible with various computers. However, everyone knows that computers differ not only in their “stuffing”, but in the versions of the programs that are installed on them. To test any application or driver, any user can install it and use it in test mode.
It is worth noting that when using such programs on versions of a 64-bit operating system, it is possible to remove some of the security restrictions.
How to check the current mode of operation with digital signatures
Before I show you methods that allow you to remove the test mode of Windows 10, Windows Server, I would like to show where it comes from. You need to open the command line and enter this command:
bcdedit /enum
You will see the output of the boot area “Boot Windows”, here you will find the testsigning mode, when you see the inscription “Windows 10 Test Mode”, then this parameter is set to Yes.
identifier {current} device partition=C: path \Windows\system32\winload.exe description Windows 10 locale ru-RU inherit {bootloadersettings} recoverysequence {805ad852-cd43-11e8-94bd-85d8fa04d907} displaymessageoverride Recovery recoveryenabled Yes testsigning Yes allowedinmemorysettings 0x15000075 osdevi ce partition=C: systemroot \Windows resumeobject {805ad850-cd43-11e8-94bd-85d8fa04d907} nx OptIn bootmenupolicy Standard
How to activate Test mode on Windows 10
Before you start working in Test Mode, you must disable the action lock in the BIOS. Step-by-step instruction:
- When the computer starts, press F8.
- Enter the Boot or Secure Boot section.
- Set the values to Disabled.
- Press F10 and restart your computer.
Note! The choice of option to switch the BIOS to advanced mode depends on the type of motherboard.
Next, you can switch the PC to Test Mode. This is done according to the following scheme:
- Run the cmd command with administrator rights.
- Enter the following lines in turn: bcdedit.exe -set loadoptions DISABLE_INTEGRITY_CHECKS and bcdedit.exe -set TESTSIGNING ON.
- To restart a computer.
The message “Windows 10 Test Mode” will appear on the screen, which will mean that the option has been activated.
How to remove Test Mode in Windows 10 in CMD
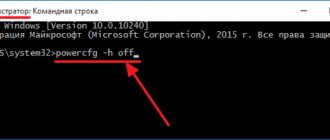
As they say, theory without practice is dead, open the command line as an administrator and write the command:
bcdedit.exe -set TESTSIGNING OFF
bcdedit.exe is a command line utility that allows you to interact with the Windows boot loader. The OFF key disables the TESTSIGNING mode. When the command is completed successfully, you need to restart your computer. This command helped you exit Windows 10 test mode. If there is an error when executing the command, then you most likely have Secure Boot enabled, which will need to be disabled.
In order to enable test mode in Windows 10, you need to run the command:
bcdedit.exe -set TESTSIGNING ON
After successful execution, you will also need to restart your computer.
How to disable Test Mode in Windows 10
To turn off the test mode and mandatory verification of the digital signature of drivers (this method is suitable for Windows 10, 8.1, 8, 7) you need:
- Run the command line as an administrator: right-click on the “Start” icon → select the appropriate item (shown in the screenshot);
- Enter the following lines:
bcdedit.exe /set TESTSIGNING OFF
bcdedit.exe /set loadoptions ENABLE_INTEGRITY_CHECKS
- Close the command prompt → restart the computer.
As a result, test mode and digital signature verification of Windows 10 drivers will be deactivated.
If, on the contrary, you want to enable test mode and enable driver signature verification, then similarly launch the command line as an administrator and run the following commands:
bcdedit.exe -set loadoptions DISABLE_INTEGRITY_CHECKS
bcdedit.exe -set TESTSIGNING ON
- Close Command Prompt → Restart your computer.
How to remove Test Mode using Universal Watermark Disabler
For those who for some reason cannot execute a command in cmd, there is a free utility called “Universal Watermark Disabler” for you. Universal Watermark Disabler removes the Windows 10 test mode inscription using the same method, but hidden to the user's eyes, veiling it all behind a regular button press.
After unpacking the archive, you run the uwd.exe file, you will see the interface of the Universal Watermark Disabler utility, you need to click the “Install” button
We agree with the implementation.
Everything is ready, now for the Windows test mode sign to disappear, you just need to reboot.
That’s all for me, I’m sure that you have mastered the skill of removing a watermark in the form of a test mode in operating systems of the Windows family, and Ivan Semin, the author and creator of the IT portal Pyatilistnik.org, was with you.
Putting Windows 10 into test mode using the command line
In order for the OS to enter this mode and function normally in it, the secure boot option must first be disabled in the BIOS. Today, many manufacturers install different methods for switching to such settings in motherboards. There are differences in the design of all these settings, but not significant. In general, user actions can be as follows:
- Launching BIOS or UEFI;
- Section "Download";
- "Secure Boot";
- “OS type” – “Other OS”.
After this, you need to save all the settings and reboot the device. If there is no safe boot option, we can talk about disabling it at the hardware level. Therefore, you do not need to perform all the above steps. Of course, for the system to offer you a secure boot, there must be several unsuccessful attempts to start the OS, which is not very correct to do on purpose.
Now it will be possible to run test mode in Windows 10, where certain restrictions on the installation of specific drivers are removed. To do this, you need to have administrator rights, with which the command line itself starts. Enter here:
- "bcdedit.exe -set loadoptions DISABLE_INTEGRITY_CHECKS";
- "bcdedit.exe -setTESTSIGNING ON."
For each command, you will have to wait for it to complete execution, and only then enter the second one. When the latter is completed, a corresponding notification will appear. Then you will need to reboot. A corresponding notification should appear in the lower right corner.
how to enable or disable test mode in Windows 7 8 10
In order to start (and subsequently turn off) test modes:
...you should, as mentioned, use the command line... (how to launch the command line) in the "lines..." window that opens, enter the following commands: (can be copied)
bcdedit -set TESTSIGNING ON - to enable test mode
bcdedit -set TESTSIGNING OFF - to turn off test mode
Do not forget:
reboot the operating system - only in this case the test mode will be turned off or on.
There might be a more accessible way for someone:
Putting Windows 7 into test mode
Enabling Windows test mode on the seven can be done in the same way - through the “Command Line”. To do this, you need to do several steps:
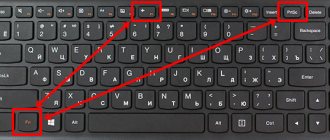
- Open the console command interpreter through the search menu or using the Win + R keys.
- Type the special statement bcdedit.exe -set TESTSIGNING ON, then press Enter.
- Reboot your personal computer.
After completing the indicated actions, a transition will be made from the standard mode to the test mode, as a result of which an alert will appear in the lower corner of the screen.
Important! It is recommended for experienced users to put the computer into testing mode - it increases the chance of infecting the PC with viruses.
How to enable test mode in Windows 10
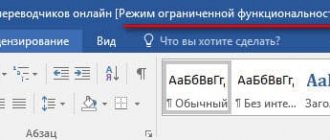
If you find that you cannot use certain software on your personal computer and download it from the Internet, it may be that your test mode is disabled. You can enable this Windows 10 feature with just one command. If you are wondering how to enter Windows 10 test mode, enter the command prompt, wait for the black window to appear and enter “bcdedit.exe -set TESTSIGNING ON”. After this, restart your computer and enjoy the results (Figure 3).
The corresponding inscription will again appear in the corner of the screen on the desktop, and you will be able to download any pirated programs from the Internet without fear that they will cause any harm to the system. In this case, if you don’t want to constantly watch the inscription, just install the program indicated above and forget that you have it at all.
Even an inexperienced user can implement the methods described above, but if you doubt your capabilities, it is better to seek the help of a professional. This way, you will avoid the possibility of errors and PC breakdown.
Now you know what to do if you need to enable or disable protection in the operating system. Use the recommendations presented and use the capabilities of your PC to the fullest!
Removing test mode
If you intend to use only licensed drivers, you need to find out how to remove Windows 10 test mode. There is a fairly simple way:
Run Command Prompt as an administrator using the Win+R . Or you can do it through " Start "
In the line that opens, enter cmd .
A window will open. In it, write “ bcdedit.exe -set TESTSIGNING OFF ”, removing the quotes before it, and click on the “ Enter ” button.
As soon as you see a notification about a successful operation, you can restart your computer. Once it turns on, you will no longer see the message at the bottom of the screen notifying you that your system is back in test mode.
Test mode is now disabled. If you want to turn it on, then you need to use the same algorithm, changing “ OFF ” to “ ON ” in the command. After restarting the PC, you will again see the inscription “ Test mode ”.
- Tweet
- Share 0
- +1
- VKontakte
Disabling driver signature and enabling test mode in Windows
In general, there are many ways to disable driver signatures, but most of them involve an absolutely hellish number of actions, ranging from reboots to other pandemonium. The same applies to the test mode for accessing the kernel.
Generally speaking, everything can be done 90 times faster and easier. First of all, we launch the command prompt as Administrator (there are also many ways to launch it, one of which is to find it, i.e. cmd.exe, in the Start button or the /windows/system32/ folder)
When you launch the command line, you should think about what you are doing and why you need it. The fact is that the test mode itself is not a very safe thing, and installing unsigned drivers, libraries and anything else in general can seriously harm the system, lead to blue screens, freezes and all sorts of glitches, not to mention the leakage of your data, viruses and all that stuff.
If the voice of reason says that you are doing everything right, then in the command line that appears you need to enter:
Bcdedit.exe -set TESTSIGNING ON
In rare cases (or depending on the type of operating system), -set can be used with the /set option, i.e. like this:
Bcdedit.exe /set TESTSIGNING ON
After entering the command, if everything went well, you will need to restart the computer. As a result, in the lower left corner you should see an inscription stating that you are in Windows test mode, as well as the build number, etc.
In principle, you could not use the console, but immediately click on Win+R and enter the command there, but it is far from a fact that without running as administrator, the command would have been successful for you.
So, having done everything necessary in the test mode of the system, I think that you will need (for the above reasons about security) to actually turn off the mode. This is done in a completely similar way, namely with the command:
Bcdedit.exe -set TESTSIGNING OFF
..or..
Bcdedit.exe /set TESTSIGNING OFF
And the subsequent reboot of the computer, after which, in fact, the inscription in the corner should disappear, and the system operation will return to standard mode.
The first method is to use the command line
- Launch the CMD console with administrator rights by pressing the Win + X key combination and clicking on the corresponding menu item:
- Copy the command:
bcdedit.exe -set TESTSIGNING OFF
- We paste it into the command line (by right-clicking the mouse) and confirm the operation by pressing Enter.
After the operation is successfully completed, you can close the window and restart the PC. This method of exiting Windows 10 test mode almost always works. But, there are exceptions. For such cases we use the second way.