Setting parameters for obtaining automatic IP and DNS addresses
Let's explore various options for checking these settings, and in addition, ways to activate automatic acquisition of an IP address and some other parameters. In principle, this kind of information has already been provided in previous publications, but in this case it would be advisable to carry out a more detailed review. This information will be very useful to many users, especially those who are new to network settings. After all, we will study settings for well-known operating systems: Windows XP, 7, 8, 10.
DNS – login to your personal account
https://accounts.dns-shop.ru/login – log in to the DNS store account.
There are two ways to visit your account.
The first method is by email address and password. After entering your username and password, check the box next to “I am not a robot” and click the “Login” button.
The second way is by phone and password. Open the authorization page, go to the “Phone” tab and enter your phone number. Also enter your password. Then click on the “Login” button.
Errors with incorrectly specified IP and DNS during wi-fi or network connection
As a rule, connecting to the Internet is carried out in one of two ways - using a local network or wireless . If the use of wireless Internet is not available due to the lack of a wi-fi adapter or router, then there is only one option left - connecting via a local network. In principle, this moment is not fundamentally important for work, you just need to know that in any case the IP and DNS must be set (or the option to automatically obtain them by default is set).
The most likely option is that problems arise after an initially incorrect IP has already been registered on the computer for a specific connection. It is possible that it will remain from the previous provider, or you may have to set other parameters yourself. That is, in fact, we have an Internet connection using an incorrect static IP via Wi-Fi, as a result, an undesirable result is guaranteed. It is for this reason that for a wireless router all these parameters will be incorrect and it will “with all its might” try to provide the necessary ones. However, this will not happen due to the fact that the ability to obtain network addresses by default is disabled in the settings (it is logical to assume that the computer will not accept the router settings).
This is how the connection error with the World Wide Web occurs. Moreover, this problem occurs not only with a Wi-Fi connection, but also often when trying to make a regular cable connection to the network for the same reasons. In this case, the smartest thing to do would be to configure the parameters of the automatic option for receiving settings, as already mentioned above.
Changing DNS server on Android
Go to Wi-Fi settings on your phone. Long press to select the desired connection and select “Change network” in the menu that appears.
Then click “Advanced” and in “IP Settings” select “Static”.
All that remains is to enter the addresses in the DNS1 and DNS2 fields. For Google Public DNS these are 8.8.8.8 and 8.8.4.4, for OpenDNS these are 208.67.222.222 and 208.67.220.220.
Cases of setting up a network according to specified static parameters
However, other situations also happen. For example, in the case when the router, or your network provider, is not able to automatically provide IP data and there is a need to enter it manually . And, when connected to the Internet, the computer is programmed to receive parameters automatically. In fact, he is waiting for the provider to provide IP and DNS data for the connection, but this wait will not be successful. This is why there is difficulty connecting to the network. The solution to the issue in this case will be to specify the parameters needed to connect to the network manually. You can find out this information from your chosen provider.
Changing the DNS server on iOS
Go to the Wi-Fi settings on your device and click on the blue circle with the letter i next to the desired connection.
Then enter the server address in the DNS line. Select one of the Google Public DNS addresses (8.8.8.8 or 8.8.4.4) or OpenDNS (208.67.222.222 or 208.67.220.220).
That's all! Changing DNS turned out to be quick and easy. You can enjoy a stable Internet connection.
Common mistakes when setting up network parameters
In contrast to the type of operating system installed and the criteria for connecting to the network, it is customary to distinguish several types of the most common errors. You may often encounter the “No Internet access” error. In Windows 8, a message appears indicating “Restricted”, that is, the Internet is unavailable (although there is a possibility of encountering other connection errors).
It may happen that the PC begins to endlessly receive the same IP address, which also leads to errors and makes it impossible to connect to the network.
In addition, if the DNS address is specified incorrectly, error 105 occurs when visiting some sites. The solution to this issue is similar: automatic detection of network addresses is set. Or you will need to specify a static address.
Setting up DNS over HTTPS (DoH) in Windows 10
Support for the DNS over HTTPS ( DoH ) protocol appeared in the latest build of Windows 10 2004 (May 2020 Update). Starting with this version, Windows 10 can perform name resolution over HTTPS using the built-in DoH client. In this article we will tell you why the DNS over HTTPS protocol is needed, how to enable and use it in Windows 10.
When your computer contacts a DNS server for name resolution, this communication occurs in the clear. An attacker can eavesdrop on your traffic, determine which resources you visited, or manipulate DNS traffic in a main-in-the-middle manner. The DNS over HTTPS protocol involves strengthening the protection of user data privacy by encrypting all DNS requests. The DoH protocol encapsulates DNS requests in HTTPS traffic and sends them from the DNS to the server (a special DNS server with DoH support is needed).
Windows 10 2004 does not yet have a Group Policy setting or GUI option to enable DNS-over-HTTPS. For now, you can only enable DoH through the registry:
- Run regedit.exe;
- Go to the registry key HKEY_LOCAL_MACHINE\SYSTEM\CurrentControlSet\Services\Dnscache\Parameter;
- Create a DWORD value named EnableAutoDoh and meaning 2;
You can also create this registry value using the New-ItemProperty cmdlet: $AutoDohPath = 'HKLM:\SYSTEM\CurrentControlSet\Services\Dnscache\Parameters' $AutoDohKey = 'EnableAutoDoh' New-ItemProperty -Path $AutoDohPath -Name $AutoDohKey -Value 2 -PropertyType DWord -Force
- Then you need to restart the DNS client service. To do this, you need to restart your computer, because... I won’t be able to restart the dnscase service normally (the Restart-Service -Name Dnscache –force cmdlet gives the error “Collection was modified; enumeration operation may not execute”).
Next, you need to change the DNS settings of your network connection. You need to specify a DNS server that supports DNS over HTTPS. Not all DNS servers support DoH yet. The table below lists the list of public DNSs that support DNS over HTTPS.
| Provider | IP addresses of DNS servers supporting DNS over HTTPS |
| Cloudflare | 1.1.1.1, 1.0.0.1 |
| 8.8.8.8, 8.8.4.4 | |
| Quad9 | 9.9.9.9, 149.112.112.112 |
Open the network settings panel - Control Panel -> Network and Internet -> Network and Sharing Center (or ncpa.cpl). Then, in the network adapter properties, change the current DNS server addresses to the addresses of DoH-enabled DNS servers.
You can change the DNS server addresses in the network adapter settings using PowerShell (see the article on setting up a network using PowerShell): $PhysAdapter = Get-NetAdapter -Physical $PhysAdapter | Get-DnsClientServerAddress -AddressFamily IPv4 | Set-DnsClientServerAddress -ServerAddresses '8.8.8.8', '1.1.1.1'
The DNS client now starts using HTTPS on port 443 instead of the usual port 53 for name resolution.
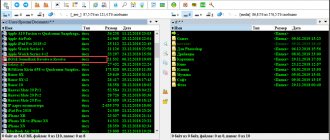
Using the network traffic capture utility PktMon.exe (which we talked about earlier), you can check that the computer is no longer sending DNS requests on port 53.
Remove all current Packet Monitor filters:
pktmon filter remove
Create a new filter for classic DNS port 53:
pktmon filter add -p 53
Start real-time traffic monitoring (traffic is output to the console):
pktmon start --etw -p 0 -l real-time
If you have correctly configured DNS over HTTPS, then there should be no traffic on port 53 (the screenshot below shows the console output with DoH disabled and enabled).
You can also check if DNS over HTTPS is working for you on the following service (DNSSEC check): https://www.cloudflare.com/ssl/encrypted-sni/
DNS over HTTPS has been implemented in all popular browsers (Google Chrome, Mozilla Firefox, Microsoft Edge, Opera) over the past year. In each of these browsers, you can enable DoH support. This way, all DNS requests from the browser will be encrypted (DNS traffic from other applications will still be in clear text).
The DNS over HTTPS and DNS over TLS technologies will create the most problems for corporate network administrators, who will find it more difficult to block access to external resources from internal networks. It is also not clear what Roskomnadzor is countering with, whose method of deep inspection and management of network traffic Deep Packet Inspection (DPI) will stop working when the DNS protocol transitions to encrypted https.
Setting up automatic IP and DNS on Windows xp/7/8/10
But now is the time to familiarize yourself with the process of setting up IP and DNS addresses. Let's start studying with the well-known Windows 10 operating system.
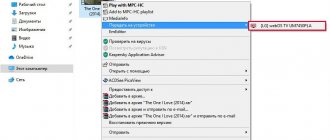
- To begin, you need to right-click on the network icon located in the system notification area. After this, you will need to go to the “Network Control Center”.
- Next, open the “Changes adapter settings” tab. After this, you will see a section containing all installed network adapters that you can access. Here we select the appropriate connection method - in this case, it is a connection to the Internet via a local network. Right-click on the “Ethernet” icon and in the proposed menu click on “Properties”.
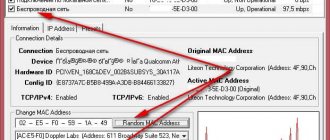
- We look for a line in the protocols field with the following inscription - “Internet Protocol version 4 (TCP/IPv4)” - mark this item and click on the “Properties” button below. Next, a menu appears through which it is possible to regulate the automatic determination of the IP/DNS address. In addition, it would be realistic to register all this and specify it manually. We fix all the necessary changes by clicking on the “OK” tab.
After the reboot we connect to the network.
Instructions for obtaining an automatic IP address and DNS in Windows 7, 8
For Windows 8/8.1, everything is done completely similarly to the above diagram.
- Click on the network icon from the notification panel, go to the “Network Control Center”, select “change settings for the adapter”. After selecting the appropriate connection option, go to “Properties” by clicking on the adapter being used.
- Click on the properties button in the line (TCP/IPv4), set the necessary parameters for IP and DNS or, if necessary, switch them to the default installation mode. Let's save.
Network access after reboot
Setting up automatic IP and DNS acquisition on Windows XP
Setting up on this OS is also carried out in a somewhat similar way.
- Through the “Start” menu, the “Control Panel” opens and in it you need to select “Network and Internet Connections”.
- From all available connections, select the one you need and right-click on it. Select the “Properties” tab from the proposed menu.
- Similar to the previous instructions, select “Internet Protocol (TCP/IP)” and below click on the “Properties” tab. After that, we do everything the same way as indicated in the two above methods. We record the data.
- Reboot and check connection to the World Wide Web. Agree, there is nothing complicated about this!
How to assemble a computer online
To collect a personal PC layout, you need to go to the DNS website in the “Configurator” section. Groups of parts will be available in it; opening each, the client selects a spare part. By clicking on the add button, the product is transferred to the created PC, while simultaneously observing the changing price.
Having completed the preparation of the PC project and not receiving notifications of incompatibility or other problems, you should pay for the goods. This can be done with assembly, when company employees themselves form the system unit, or without it. The last option is useful if the client is confident in his abilities, or if he invites a friend to professionally build a computer.
Not every seller provides online computer assembly service, which is why DNS is popular among customers. If a client needs a cheap office computer, a super-powerful PC that can run modern games without any problems, any option can be configured in DNS.
Configuring IP and DNS on Windows xp/7/8/10 manually
In the Internet settings properties “Ip version 4” (instructions for opening the section, described above), set the data as in the figure: IP address and default gateway are selected depending on the settings of the router or provider - 192.168.0(1).1 (but may be different), where the last digit (………1) must differ from the router address (………2-255).
- Preferred/alternative DNS use standard (Google): 8.8.8.8/8.8.4.4.
- After clicking the “OK” button, restart your PC and try to check the Internet.
How to change DNS settings in Control Panel
To change DNS settings on a Windows 10 device using Control Panel, follow these steps:
- Open Control Panel .
- Click on Network and Internet → Network and Sharing Center.
- In the left pane, click Change adapter settings.
- Right-click the network interface connected to the Internet and select Properties.
- In the properties window that opens, select IP version 4 (TCP/IPv4) from the list.
- Click Properties.
- Select the Use the following DNS server addresses .
- Enter your preferred and alternate DNS server addresses. Here you can enter any DNS servers, including free ones, such as Yandex.DNS, Google Public DNS or OpenDNS.
- Yandex.DNS : Basic: 77.88.8.8 and 77.88.8.1 - fast and reliable DNS
Safe: 77.88.8.88 and 77.88.8.2 – no fraudulent sites or viruses
- Family: 77.88.8.7 and 77.88.8.3 – no adult sites
- Google public DNS addresses : 8.8.8.8 and 8.8.4.4
- OpenDNS addresses : 208.67.222.222 and 208.67.220.220
- Click OK. and Close to apply the new DNS settings to the adapter.
After completing these steps, your computer will immediately start using the new DNS settings.
In the rare case that you need to use more than two DNS addresses, in step 8 you can click the Advanced button, and in the DNS tab you can add, edit and delete as many DNS IP addresses as you need.
You even have buttons on the side to set their priority.
Functionality of your personal DNS account
https://www.dns-shop.ru/ – official website of the DNS store.
The main purpose of your personal account is placing orders. After making a purchase, the user is able to find out the processing status of the application. Thanks to this feature, there is no need to constantly contact the hotline - you can check the location of the parcel in your account. An additional purpose of the account is to use the loyalty program. DNS store clients receive bonus cards. To do this, you need to give the store employee your phone number. The plastic product is issued completely free of charge and is valid for five years. The card must be activated on the official website in order to accumulate and view the number of bonuses. Also, visitors to your personal account can get acquainted with lucrative offers.
All current discounts are sent to your mobile phone or email linked to your account. Your personal account also helps you contact customer support. If you encounter any difficulties, contact the store staff using online chat.
Online PC Configurator
For those who decide to assemble a computer in the IRON.NET online store, there is a permanent offer - computer assembly for free!
The client receives a system unit fully prepared for further work, assembled from the components that you previously selected in our online PC configurator. If you additionally ordered a software package or operating system, they will also be installed and debugged. Each offered computer is thoroughly tested for performance under maximum load. If the customer wishes, we update the BIOS, change the standard thermal interface to a better one, check stability under overclocking and more. ATTENTION! We assemble computers only from our components. Assembly from your components is NOT carried out
Build the optimal PC build using the online configurator
An undeniable advantage of our PC configurator is the ability to select not only the main hardware components, but also peripheral devices. The online store "ZHELEZA.NET" presents both new and current models of monitors, speaker systems, keyboards and mice. Use your imagination by purchasing elements of your future computer in the same style. Our team of specialists will not allow you to get confused in the variety of products. Assembling a computer with compatibility testing will not be particularly difficult for the company’s specialists.
Select components? What could be simpler
The range of components offered on the market is growing and expanding every month. On the one hand, deciding on the choice of hardware becomes problematic. On the other hand, you have an excellent opportunity to find exactly the component that best suits the tasks assigned to the future system. Assembling a computer using an online PC configurator is the easiest and most affordable way to generate an individual model that fully meets specific requirements. Our service will allow you to find the optimal hardware without overpaying for unnecessary functionality and unclaimed options. At the same time, he will tell you how to avoid unnecessary expenses when choosing a motherboard or video card for a specific processor. If you want to purchase a gaming computer in a top-end configuration without overpaying, try replacing some components (GPU model, cooling system, case, disks) to avoid brand markup. Today there are no bad manufacturers, but there are extremely undervalued ones.
Discover the makings of a system administrator in yourself
Assembling a PC yourself will teach you to understand the components and their characteristics, which will greatly facilitate the task of subsequent upgrades. You will be able to filter out components that do not match your socket and chipset, find current product models, and build a springboard for further PC upgrades. Our compatibility-checked PC configurator will automatically remove unsuitable parts if you want to build a computer from scratch, but do not have enough experience for this purpose. Remember that each system requires a special approach: • Home (multimedia) - a good video card, a large amount of memory, high-quality acoustic component; • Office – fast processor for quick data processing, capacious HDD; • Gaming – powerful graphics subsystem, overclockable CPU (and corresponding motherboard for it), a large amount of RAM, fast SSD. • Workstation for graphics processing - everything is identical to a gaming PC, but with an even larger amount of RAM and impressive data storage (Raid array of several HDDs).
Advantages of the online configurator of the online store "ZHELEZA.NET"
Using the configurator on our website, you can assemble a PC for any need. The cost of the system unit is displayed automatically, and therefore you can always choose a cheaper or more expensive alternative, depending on the previously set budget. It is not necessary to add all the items presented in the categories to your cart. You may already have a HDD, motherboard or GPU. All that remains is to select the missing spare parts, focusing on those already available, and assemble a system that is optimal in all respects. Do you want to save your configuration? Nothing could be simpler. You will return to it as soon as you have time to finish or rework the assembly.
Expert help at the click of a finger
Having difficulties during the virtual assembly stage, or don’t know which processor is suitable for your tasks? Contact the team of specialists at the online store “IRON.NET” in any convenient way: mail, telephone, instant messengers, social networks. Ask a question and receive a comprehensive answer. By assembling a system using the PC configurator, you do not overpay additionally for assembling, diagnosing, configuring and testing your computer - we provide all these services free of charge. You always know what you spent your money on. Place your order now and become the owner of a brand new system unit, or maybe a fully assembled computer. We will always be happy to help.