Browse - Folder appears empty but memory is in use
"Very strange!
My folder appears as empty, but its memory is being used. The other day I transferred all my photos from my Canon camera to my PC and saved them in a folder on my D drive. Today I click on the folder, but it is empty! I'm sure I downloaded all the files to my computer, but now they just don't show up. In addition, I did not save copies of the photos on the camera. Can I recover my photos if the folder does not show the files? Do you see an empty folder that should contain files? The folder appears empty, as in the picture.
But you know, the folder has a size
Imagine creating a folder to store certain files, be it downloaded apps, photos, documents or videos, and one day when you try to open the folder to view the contents, it appears empty or unusable. A very unpleasant feeling! Especially if the folder contained files or documents related to work.
How to find and delete empty folders
For such purposes, I resort to the utility. It is easy to find and download on the Internet, and there are no particular difficulties in installing it.
After launch, the application's working window will open. The English-language interface should not scare you; in principle, everything is intuitive.
First of all, as shown in the figure above, go to the “Settings” tab, where we are interested in 3 points - I also noted them above.
- Move first to the “Trash”;
- Do not destroy file types. (if the folder contains only *.tmp, then it will be considered empty);
- Directories that will be ignored during scanning.
The last two points can be added manually.
Then go to the “Scan” tab, where we click on “Scan folders”. The scanning process will begin.
When the search is complete, empty folders will be indicated in red. Those that will not be deleted in the future are highlighted in gray because they contain any files.
All we have to do is click on the “Delete folders” button to complete the procedure.
Good day, dear friends, acquaintances and other personalities. Today we will learn how to delete empty folders
from computer based .
The fact is that during the use of a computer, many different empty folders are created (they are created both by the system itself and by the user). Actually, as you understand, this article will focus on a program that searches and deletes empty folders on the disk.
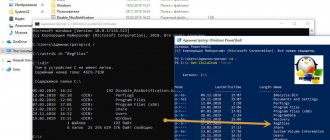
To be honest, I was quite surprised when I saw that she found order 6000
empty folders on only one disk with the system :)
As a rule, these folders are created during various installations, caching, etc., and, of course, they are created initially complete, and then the files from them (say, after installing something) are deleted, but the folders themselves remain hanging dead cargo
Not to say that this is bad, because... the weight of these folders is 0 bytes, but, purely theoretically, it would be better for the file system if there were fewer of these folders in the file table. And if anything happens, you won’t have to poke around in folders where there’s nothing :)
In general, to the point.
Reason - why the folder appears empty even though it still contains files
In most cases, files/folders are not shown due to hidden attribute. For example, you may have accidentally or intentionally hidden some data. As a result, the folder appears empty but takes up space on the device. As shown in the above pictures: the files on drive E occupy 200MB, but visually the folder is empty.
It is also possible that the file itself is damaged, which may prevent proper viewing. This problem is usually caused by a virus or improper use of an external device. If your media is damaged or inaccessible, first fix the damaged flash drive, SD card or external hard drive, and then try the three solutions below to recover your data in time.
- solve the empty folder problem and recover missing files
There are basically three options for solving the problem of a folder not showing files but taking up memory in Windows 10, 8 and 7. You can find and display your files using Windows Explorer, the command line, or third-party data recovery software.
1. Show hidden or lost files using File Explorer
Microsoft provides detailed guidance on how to unhide hidden files in all versions of Windows, including Windows 10, 8.1, and 7. Although the process is slightly different for each version, the final steps are basically the same - find the folder options. For example, on Windows 10, you can display all files using these two steps:
In the search box on the taskbar, enter the name of the folder, and then select Show hidden files and folders from search results. Under Advanced options, select Show hidden files, folders, and drives, and then click OK.
2. Show hidden files using command line
The most effective way to show hidden files. The execution process is universal for all versions of Windows:
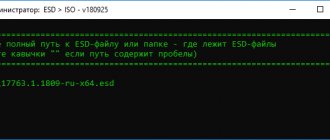
Step 1: Open Command Prompt as an administrator by pressing Windows + R keys simultaneously and type cmd in the search box.
Step 2: Check which drive the folder is showing as empty, such as drive G, then enter the command attrib-hrs /s /dg:\*.* and press Enter. (Replace the letter g with the appropriate one.)
3. Recover hidden files in an empty folder using data recovery software
The last but most common way to display lost files is by using data recovery software. For example, EaseUS File Recovery is a free, yet professional and user-friendly tool for recovering all kinds of files that have been deleted, hidden or lost. The program does not require any computer skills, moreover, the recovery procedure will take only a few minutes. Just follow these steps and find your lost files.
Step 1: Specify a location
Open a file recovery program and select a partition or location. If you can't find the partition, click Refresh.
Step 2. Scan hidden files
Once you have selected a location, click the "Scan" button to begin the scanning process.
Step 3. Show hidden files
Once the scanning process is complete, you will be able to check and view the found files.
In the “Deleted Files” tab you will find files deleted from the device. If you formatted the memory card, check the “Lost partition files” tab. And the filter will help you quickly find a specific type of file, be it photos, documents, video, audio, email, or others.
Double-clicking the file will open a preview with the ability to check the integrity of the data. After that, select the files you need and click “Recover”, saving them in a safe place on your PC or external storage device.
In conclusion, don't give up if a folder that should contain files appears empty. By applying the above quick recovery methods, you will definitely be able to get back all the missing files.
Ways to delete folders that don't want to disappear
Depending on the type of problem, choose one or more solutions to solve it, described in detail below.
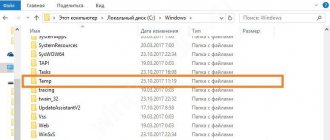
Removing Windows.old, temporary files folder and other system directories
If you want to clean the system partition from garbage, for example, remove old Windows installations from the Windows.old folder and temporary files from the Temp folder, but the system does not allow you to do this, use the Disk Cleanup tool:
- Open the “Control Panel” through “Windows Search”, the “Start” menu, or in any other way convenient for you. Click on the “Administration” section.
In the “Control Panel” window, find the “Administration” section and click on it once - Select Disk Cleanup.
In the list, click on “Disk Cleanup”
- Select your system drive.
Select the drive you want to clean from the drop-down menu
- Click on the “Clean up system files” button, because in the current window you can only get rid of some folders and their contents.
For deep cleaning, click on “Clean up system files”
- Wait a while so that the system can estimate the amount of memory that can be freed. A window will open with a list of possible partitions to clean. Select the desired directories using the checkboxes, for example, “Previous Windows installations”. Start the process of deleting files from folders using the “OK” button.
Select the necessary items for cleaning and click “OK”
- The system will ask if you are sure you want to remove all older versions of Windows. In this case, you will not be able to roll back to the previous update. If you really want to delete them and free up space on the system disk, click on “Yes”.
Click on “Yes” if we want to remove previous Windows installations
- Removal will take quite a long time, so be patient.
Waiting for the removal to complete
Restarting the computer as a method to solve the problem
Deleting a partition on a hard drive may become impossible due to a single failure in the system or because it is currently using this file. In this case, you can simply restart your PC and the problem will disappear. Never use the Power button on your PC to turn it off.
- Open the Start menu.
- Select the icon to turn off your PC.
- In the list, click on “Reboot”.
Click on the “Reboot” item in the “Start” system menu
Closing utilities associated with a folder in Task Manager
If you want to delete a folder with text documents that are currently open in Microsoft Office, the system will notify you that this action is impossible. She will ask you to close all utility windows and try again.
Close the window and try uninstalling again
But if the utility is closed and the folder is still not deleted, most likely the Microsoft Office Word process (or any other program through which the file was opened) is still hanging in the list of running processes. To stop the application completely, you can restart the computer or remove the task manually in the “Task Manager”:
- In Windows 10, right-click on the “Taskbar” and select “Task Manager” from the menu. The classic way to launch the same window is the key combination Ctrl + Alt + Delete.
Click on "Task Manager" in the panel context menu
- In the “Processes” tab, find the item corresponding to Microsoft Office.
In the manager window, find the process corresponding to the program and end it using the “End task” button
- Left-click on it and click on the “End task” button.
Video: How to end a process in Task Manager
Changing Attributes
Incorrectly set folder attributes may prevent users from deleting them. To correct the situation, do the following:
- In Windows Explorer, open the directory that contains the folder to be deleted. For example, this is the user's Photos folder. Right-click on it and click “Properties”.
In the folder context menu, click on “Properties”
- An additional window will appear on the display. In the “General” tab, find the “Attributes” section and uncheck all the boxes. Need to remove o.
Uncheck the attributes in the “General” folder
- Click the "Apply" button. A third window will appear, in which check the second item “To this folder and to all subfolders and files.” Click on "OK".
Apply changes to the folder and to all files and sections attached to it
- Try deleting the directory again.
Reconfiguring access rights
If the folder cannot be removed because the user does not have administrator rights, it is necessary to configure the system so that the user becomes the owner of the folder and has full access to actions with it.
- Find the folder in Windows Explorer and right-click on it. Select Properties.
- Go to the “Security” tab and click on “Advanced”.
In the “Security” tab, click on the “Advanced” button
- Click on the "Add" button.
Click on “Add” to go to the next window
- Click on the blue “Select Subject” link.
Click on the first link “Select subject”
- Click on the "Advanced" button.
Click on “Advanced” to see a list of accounts
- Click on “Search” and select yourself in the list below (usually this is the very first item). Click on "OK".
Click on the “Search” button and select your account from the list
- Confirm the subject by clicking on the “OK” button.
Click “OK” to save the selected account
- In the second part of the window there will be a list of permissions. Check the box to the left of “Full access.”
O in the list of general permissions
- Click on the "OK" button to make changes.
Click “OK” to save the permission values
- Using the “Apply” button, save the changes made. Set yourself as the owner by clicking on the “Edit” link.
Click on the “Change” link to change the owner of the folder
- Select the owner also using the “Advanced” and “Search” buttons.
- Check the box next to "Replace owner of subcontainers and objects."
To save all changes, click on “Apply”
- Click on "Apply" again and then on "OK" to close the window.
- Restart your PC and try deleting the folder.
Video: how to get full access to a specific folder
Using the Command Line
You can get rid of the folder through the “Command Line”:
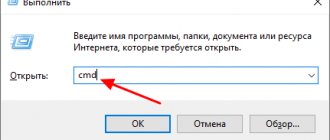
- Hold down the Win and R keys on your keyboard. In the Run window, enter the cmd code to open Command Prompt.
In the “Open” line, type the short command cmd
- In the editor on a black background, enter the following code: RMDIR [/S] [/Q] [path]. Copy the path from Windows Explorer. For example, we want to delete a folder with photos on the user's local drive: RMDIR /S /QD:\photos.
In the “Command Line” we print the code like RMDIR /S /QD:\photo, where D:\photo is the path to the folder that should be deleted
- Press Enter to execute the command. The folder should disappear.
Video: how to force delete folders using Command Line
Removing in "Safe Mode"
An unnecessary partition may be deleted if the computer runs in “Safe Mode,” in which the system starts only the most important components. The folder will not be locked, you will have access to it. This method may work if there are unsuccessfully written files in the folder. To activate Safe Mode on Windows 10:
- Press the Win + R combination on your keyboard to open the Run window. In the Open field, enter msconfig. It's best to copy and paste it to avoid mistakes. Click on "OK".
Enter the msconfig command in the “Open” field and click on “OK”
- The System Configuration window will appear on the screen. Go to the "Download" section.
In the “System Configuration” window, check the box next to “Safe Mode”
- Check the box to the left of “Safe Mode”. First click on “Apply” so that all changes are successfully saved, and then click on “OK” to close the window.
Click on “Apply” and “OK”, and then reboot the device
- Restart your PC. When you restart the OS, it will load in the installed mode. Try deleting the annoying folder.
- If you want the PC to boot later in normal mode, go to this window again, uncheck the box and save the changes.