Requirements for installing Windows from a phone
Before installing Windows OS via your phone, you should consider a lot of nuances.
- First, you need to make sure that the device has a high level of charge, as the procedure can take quite a long time. This is especially true for phones with low battery capacity.
- Secondly, you should purchase a sufficiently capacious flash drive that can be connected to the device. Instead, you can use a regular memory card, but it will need to be connected to a computer. In both cases, all information from portable storage devices will be erased.
- Thirdly, you need to download the image with the operating system onto your mobile device. To make the process take a little time, it is recommended to use a mobile torrent client. As for the images, they can be downloaded from the official Windows website or found on a reliable pirated resource. In this case, it is recommended to look for Windows with an integrated anti-virus database.
If all the described elements are present, then you can begin creating a bootable drive. However, it should be taken into account that successful booting of Windows 10/8/7 from an external drive will only be carried out using UEFI mode. If you are using a Windows 7 image, you will need to ensure that the EFI boot loader is present. Next, you need to go to the BIOS and change the settings - switch the mode from Legacy to UEFI.
How to install Windows from your phone to your computer
The process of installing Windows OS from your phone takes a little time. In many ways, this procedure is reminiscent of installation from a disk or bootable flash drive, only the described elements are a mobile device. Once the downloaded image is on your smartphone, you will need to install a reliable application that will unpack the downloaded archive onto a removable drive.
Installing the application
To begin with, it is recommended to choose a good program for unpacking the image. In this case, it is not necessary to use the paid option, since the official Play Market store has several effective and free utilities:
- EtchDroid. An excellent program that works without administrator rights. It can record two types of images – DMG and ISO. In addition to supporting Windows-based images, the application works stably with Linux OS files.
- ISO 2 USB. An excellent free program that also functions without ROOT rights. The application supports the vast majority of images - Linux, Ubuntu and Windows. It is worth noting that in this program any version of Windows is loaded exclusively through UEFI mode.
- Bootable SD Card. This program requires administrator rights in any case. There is a paid and free version, but the latter option will be sufficient to complete the task. Supports Windows and Linux.
I would like to pay special attention to the DriveDroid application. While using this program, you can make a real bootable USB flash drive from your phone with many tools and permissions. DriveDroid successfully handles images of any existing operating systems.
Even an inexperienced user can use the described program. The main advantage is that the smartphone owner does not need to independently search for OS boot files and download them to the device. The utility carries out all the tasks independently, the main thing is to install DriveDroid and make sure that the application is suitable for the smartphone and whether it will be possible to load the specific OS on the computer.
After completing the installation of the application, the user needs to select the appropriate installation mode. First, you need to install administrator rights on your mobile gadget, and then connect to your computer.
Settings
Next, we will look at the setup using the DriveDroid application as an example. To download, you can use the Play Market store. The instructions look like this:
- First you need to activate the application setup wizard. A button is displayed on the main page
- Wait until the system checks the integrity of the device and its absence from the blacklist. Then click on the continue button.
- Connect your computer and mobile phone using a USB cable.
- Next, you will need to decide on one of the USB systems that will appear in the window that appears. As a rule, many phones function with the first option they come across.
- In the next step, you will need to open the file manager on your computer and find the smartphone connected to the PC. It should appear as a disk or external drive. If everything is correct, then the device is fully compatible with the application.
Important! If the gadget does not appear in the task manager, then you will need to return to the previous menu and select another USB system.
Starting a new system from Windows Phone memory
The file that is installed in the smartphone’s memory is .nbh. For our case, it should be called polaimg-panel1-320-17-06-10.nbh, where each part has its own meaning. The first word is the type of smartphone (manufacturer), the second is the model, the first digit is the screen resolution, the last three digits are the release date of this file. We select the firmware version ourselves depending on personal preferences.
- Using special programs, we obtain root rights to the smartphone. This can be done using programs such as: Framaroot, Root Genius, iRoot, RomasterSy and others.
- Download the utility necessary for flashing the firmware. It is different for each phone and tablet model. If we take the most common ones, then for HTC these are Custom programs.
- We format the memory card using a program designed for this - Fat 32. It is better to take the memory card class 10, so that there are no problems in the future. We create a folder on it, which we call andboot. From the firmware, select the file androidinstall.tar and, if available, androidupdate.tar and place them in the folder created on the flash drive.
- Connect the device to the computer using a USB cable without a memory card! On the computer, create a folder with any name and transfer the Custom program and the .nbh file into it.
- We launch the program from the Custom RUU folder and follow the instructions that appear on the screen. The last thing you need to do is click the button labeled Update and wait for the progress to finish. Then it restarts and hangs.
- We insert the previously prepared memory card into the device and simultaneously press the volume “-” button and the power off button (turn it on in soft reboot mode). We wait until the message “Hold down Volume Up or DPad center to launch installer” appears on the smartphone screen. As soon as we see it on the screen, press the center of the joystick button (or the “+” button on the volume). The device will go to the installation menu for the new operating system.
- In the menu that appears, you need to select Sys on NAND/Data on NAND. Below you need to select Install System and wait until the system is installed. If the androidupdate.tar file was moved to the memory card, then select Install Update and wait to return to the main menu. Next you need to click on Fix Permissions and wait.
- Next, we reboot the device again in soft reboot mode. After this, the device can boot for quite a long time (from 5 to 20 minutes), everything is ready!
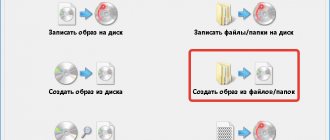
Image creation and installation using DriveDroid
After setting up the application, you can begin creating an image and installing the operating system on your computer. The subsequent steps will not take much time. What should be done:
- Make sure that the mobile phone remains connected to the PC.
- Download your favorite Windows smartphone image. You can place the archive anywhere - internal memory or external storage.
- Enable the DriveDroid application.
- Press the plus sign button on the bottom panel of the display.
- Next you need to select an image. To do this, click on the “Add” button.
- You can insert a file in several ways - enter the name in the search bar or click on the button with a magnifying glass.
- After successful selection, click on the checkmark at the top of the screen.
- Click on the name of the image again, and then click on the icon called “CD-ROM.
- In the next step, the Windows image will be mounted into the application. A corresponding notification should appear on the screen.
- When finished, you need to restart your computer and then boot from the drive on which the mounted Windows image is installed.
If everything was done correctly, then the user can begin installing the Windows OS. During the process, it is recommended to monitor the connection of the phone to the computer. Otherwise, the installation will be aborted.
First launch after flashing
After the smartphone starts, you need to select a language and continue setting up by accepting the terms of use.
In the next step, you can select the type of settings - recommended or custom. If the latter, then I advise you to uncheck all the boxes except the first two and last two points. After this, you need to configure the region and time: set the country, time zone, exact date and time.
This firmware method is suitable for all phones (for example, models 520, 535 Dual Sim, 800, 920, 710, 610, 925, 620, 914, 630, 510, 525, 1020, 620, 625, 635, 820, 900, 830 , 430, 435, 1520, 930, 640 XL, 550, 735, etc.).
This utility can also flash Windows phones from other manufacturers, such as LG, BLU, Alcatel, Acer, HTC (One M8 and 8X), VAIO, UniStrong, HP.
If you have Nokia and it does not work on Windows Phone, then for firmware there is a program called Nokia Software Recovery Tool, which you can download from
Flashing Windows Phone to Android, although fraught with certain difficulties, is still possible. To do this, you will need a ROM version of Android, a USB cable and Root rights to your device. Windows has also released a special emulator program that can easily open files with the “apk” extension. For fans of the design style of Android devices, there are launcher applications that completely copy the style of the desktop and icons.
So how can you flash your Windows Phone to an Android device? First of all, you should protect yourself by creating a backup copy. If you are not satisfied with the result obtained or you want to return the Windows system back, then all you have to do is start from a previously prepared backup file.
There are quite a few models of devices running Windows Phone, but the flashing process is no different for them. After downloading the file with the desired Android assembly, familiarize yourself with its contents. It must contain:
- Initrd.gz. – used to start the firmware process from an SD card;
- Haret.exe is a special script that is responsible for loading the OS;
- Zimage – Android platform;
- Default.txt – boot process;
- androidinstall.tar – file system;
- androidupdate.tar – update for Android OS.
Image creation and installation using IOS 2 USB
Using the following program is in many ways easier and faster than installing via DriveDroid. However, not all devices work reliably with ISO 2 USB. In any case, there are the following instructions for carrying out the procedure:
- First of all, connect the flash drive to the phone, and then activate the described application.
- Several options will appear on the main page of the program, among which you need to select “Pick USB Pen Drive”.
- Next, click on the “Pick” button and select the drive.
- Open the list of devices, select the desired flash drive and click on the confirm button.
- Next will be the “Pick ISO File” item, with which you will need to specify the path to the installation image. In the future, it will be recorded on removable media. The OS image will need to be downloaded in advance.
- Make sure that the “Format USB” section is active.
- Press the start button.
- Wait while the system creates a bootable USB media.
It is worth considering that during the creation of a drive with a bootable image, several problems may arise. For example, after the initial click on the start button, the application freezes and turns off. To solve the problem, just restart the program and repeat the procedure.
Also, sometimes a situation arises that after connecting an already created USB drive to a working Windows operating system, an error occurs that indicates a malfunction of the boot element. As a rule, the system automatically suggests fixing the problem. The user should ignore the error and continue to reinstall the operating system. Often, a similar incident occurs not only with the ISO 2 USB application, but with most of the similar ones.
How to create a bootable USB flash drive without a PC or laptop on an Android smartphone
If your Windows doesn't boot, it's always unexpected. Most often, in this case, reinstalling the OS helps. But how to make a bootable USB flash drive for installation? The computer doesn't boot.
If you have one computer (or laptop), then in order to burn a flash drive, you will have to look for another computer. Unless you have an Android phone. Let's create a flash drive directly on your phone, without using a computer.
We will need:
— A regular USB flash drive with a capacity of 8 GB. and more.
— The flash drive needs to be connected to the smartphone. Any adapter is suitable for this. If you have a micro USB connector on your phone, then you need a micro USB B (m) - USB A (f) OTG adapter. Link to the store.
— If your Android smartphone has a USB type-c connector, then you need another option. This is a USB Type-C USB OTG adapter.
We will create a bootable USB flash drive with Windows in two ways.
The first method is more universal. Without using special applications. True, we still have to download a free archiver. This method will work on any Android smartphone that supports OTG connection. We'll talk further about how to check whether your phone has such support.
Since we agreed to do everything without a computer, we will have to download the Windows image to our smartphone. If you are installing Windows 10, you can download the ISO image directly from the Microsoft website. The link to the site is, as always, under this video.
I'll open the video in the YouTube application. I open the full description, here is the link to download Windows 10. There are also links to all the Android applications that I use in this video.
But before clicking on the link, I advise you to install Download Manager. Still, the Windows ISO file is not small, and simply downloading it through a browser on your phone will not be very convenient.
I will use IDM manager. I just open the Play Market and type IDM. This is the manager I will install. If you want everything to be the same as in this video, then download this manager too. I click Install... The application is installed. I'm going back.
Let's immediately install the archiver to extract the ISO image from Windows. I'm printing RAR. Let's install this archiver. I click Install. That's it, now you can close the Play Market. Let me pull out application shortcuts to the home screen. Now it will be more convenient to work.
Now you can download the Windows image. I open this video on YouTube again and click on the link. The link opened in the browser. Here we need to select the Tens issue.
I click on this drop-down list, I will download the May 2020 version of the Ten. To select it, you need to tap here. I click Finish and Confirm. Now select the language, click on the drop-down list, and select Russian. Click Finish and Confirm.
Microsoft has created two link buttons. I'll download the x64 version. If you click on the button, the download will open in the browser. We have installed a download manager that will save time.
You need to copy the link into it. To do this, I make a long tap on the desired button. I clicked on it and held it until the context menu appeared. In the menu that appears, I tap on the Copy link item. I copied the Windows download link to the clipboard.
All that remains is to insert it into the manager. I open the IDM manager. First you need to select the application language. I select Russian, press Select. Here I click Allow. Here you need to indicate where to download the file. I recommend choosing what the app offers by default. Phone/emulated storage. I press Select.
Now I click on the plus. Several insert options have appeared. I have the link copied to the clipboard, so I choose this option. In this window, remember the folder into which the file will be downloaded. IDM/Others and click Launch. The download has started.
Let it swing. In the meantime, we will connect the flash drive to the phone. A flash drive is the most common, 8 GB or more. To connect it to your phone, you need an adapter. This phone has a micro USB connector.
There are many options for such adapters today. You can often find such a connector included with a smartphone. For example, this USB connector was in the box of a Samsung Galaxy smartphone. I’m connecting... The flash drive flashed and a notification appeared on the phone.
Even such a miniature insert will do. These are often sent along with flash drives purchased on AliExpress and other online stores. Today it is not at all uncommon for flash drives with a second such connector included. Does it plug directly into the USB port? contacts inward, to the plastic insulator. I connect it carefully. The notification has appeared.
This cable is an OTG adapter micro USB - USB, you can buy it in computer stores or on AliExpress. I also added purchase links to the video description.
From the OTG adapters that I showed you, I will use this one. I connect a flash drive to it. And now I connect the second connector to the phone. Notification in place.
We sorted out the connection, all we have to do is wait until Windows downloads, and we can continue. I open the download manager.
When the Windows image has downloaded, I close the application. I open the archiver. Here we allow the archiver access to the phone. For free use, click OK.
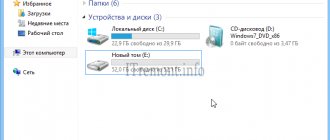
I press the Menu button. All phone storage devices are listed here. The USB disk is my flash drive, I choose it. We see what is on the flash drive.
In principle, in case of emergency, you don’t have to format the flash drive. At the same time, if you have the necessary files there, then create an empty folder directly on the flash drive and move your files there so as not to accidentally delete them. Attention, in this case you must have at least 5 Gigabytes free on the flash drive.
I don’t have the necessary files here, so I’ll just delete everything that’s here from the flash drive. In order to select all files and folders, I click on this button; the archiver marks all objects with a checkmark. I click on the cart.
RAR warns us about deletion, I click Yes. Here we confirm the application’s access to the flash drive. Deletion has begun. It will take some time.
After the removal was completed, the application wrote that it could not delete the autorun.inf file. There is nothing scary about this, I click Yes. I freed the flash drive.
Now I press Menu and go to Device Memory. We need to find here the very folder into which Windows was downloaded. Let me remind you that this folder is called IDM. Inside, as we remember, you need to select the Others folder. In your case, the file may be downloaded to another folder. Remember or write down its name when adding the download to the manager.
Inside is our ISO file with Windows. I mark it and click on the up arrow button to unpack the image. Here we can change the unpacking options. For example, you can try to unpack the image directly to the root of the flash drive. This might save you some time.
I'll show you the simplest option. We will first unpack the image into a separate folder next to it, and then copy the contents of the folder to a flash drive. To do this you just need to click on the OK button.
Unpacking has begun, it will take some time.
The image was unpacked and a folder with its contents opened in front of us. This folder lies next to the image itself. To verify this, you can click on this button One level up. Here is the image, and this is the folder where we unpacked it. I open it again.
Now you need to copy the entire contents of the folder to the root of the flash drive. To do this, I simply select all objects again using this button. Now, to copy everything, I do a long tap on any selected object. This will cause a context menu to appear.
Here I select Copy to clipboard. Now I need to paste what I copied onto the flash drive. To do this, I press Menu, select the USB drive... and here I click on this insert icon. The copying process has begun.
When the copying was completed, we were told that the autorun.inf file could not be copied. You can ignore this file; it is not needed to boot from a flash drive and install Windows. I click close.
The flash drive is ready. It has everything you need to download and install Windows. I go to the main screen. It is better to remove the flash drive before disconnecting it. On Android 8, which I have here, this is done like this: I click on the Android Platform and the Disable button.
On other versions, you can use the Storage item in the device settings to extract.
I unplug the flash drive. You can boot from it.
How to boot from a flash drive created on Android?
Once again, a flash drive recorded on an Android smartphone will allow you to install Windows only on a disk marked in GPT. To boot from it, you must have a UEFI hybrid BIOS with CSM support. This support must be enabled in the BIOS. For more information on how to do this, watch my video, you will find the link in the description. This BIOS is installed on most PCs and laptops starting around 2008. Since 2010, the vast majority of released desktop computers and laptops have such support.
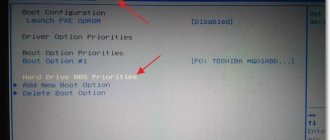
I connect the newly recorded flash drive to the laptop. I use the Boot menu to load. The Escape key is responsible for entering the BOOT menu on this laptop. I turn on the laptop with the button and press Escape until the Boot menu appears. Before us is the BOOT menu.
Here, pay attention, you need to select exactly this item, where it says UEFI (or as it is more often called, UEFI) and then comes the name of the flash drive manufacturer. In addition to the manufacturer's name, there may also be text containing the letters USB.
The point above is useless to choose. I selected the desired item and press Enter. The download from the flash drive has begun. And here everything is as usual, Next.. Install.. the Windows installation process has begun.
For more information on how to install any version of Windows, watch my videos, the link is in the description of this video.
If you select the option without UEFI, the computer simply will not boot.
If I have UEFI support in the BIOS on a disk marked in MBR, what should I do?
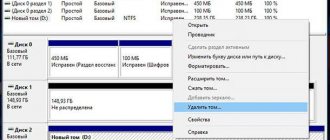
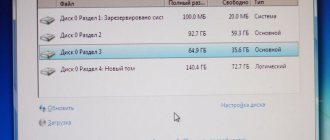
You can also install Windows 10 or 8.1 on such a computer. To do this, you will have to delete all partitions from your disk. If you have the necessary files and folders stored on it, then you can save them even if Windows does not load. See more details here.
After you have removed all partitions from your disk, simply start installing Windows. The installer will automatically repartition your disk to a more modern GPT partition.
In the future, you will be able to reinstall Windows on your laptop or computer using a flash drive recorded on an Android device. It is convenient and does not require a second computer.
We burn a flash drive using a special Android application ISO 2 USB
If you have a modern smartphone with a USB type-C connector, then you can burn a flash drive using a special application. To connect a flash drive to such a smartphone, you will need a similar adapter, only it will be a USB type-C to USB A adapter.
Store link: USB type-C to USB A adapter.
I have this adapter from a MacBook, it also fits perfectly. I connect a flash drive and phone. Look, a connection notification has appeared.
So, I have already downloaded the ISO image of Windows on this smartphone. Now let's install the application. To do this, I open the Play Market. I enter iso 2 usb in the search, there is a link in the description. I'm installing the application.
I click Open. I click on the first Pick button, that is, Select. Here you need to indicate the flash drive to the application. Here you can click Skip, skip. Here we allow the application to access the flash drive. I check the box and click OK. Here I press Menu and select the USB drive. I click Select.
Now let’s show the application where the Windows image is. Allow access to the device. I have Windows again in the IDM folder, inside it in the Others folder. I open the folder and check the ISO file box. I press OK.
I leave this checkbox and click Start.
The process of unpacking the image onto the flash drive has begun. There will be a lot of advertising here. I cut half of the video, you will have more. If the advertisement has a close cross, then we close it. If not, then we wait for it to appear.
At first the process goes quickly, but at 79 and 80 percent it is delayed because large install.wim and boot.wim files are copied. Just wait for it to finish. The whole process took about 15 minutes.
The program does the same thing that we did with you manually in the first part of the video.
The process is completed, close the application and remove the flash drive.
You can boot.
Does your Android support OTG function? How to check?
To quickly check whether your smartphone supports the OTG function, you can use a special application. Open the Play Market and enter otg ch - this will be enough.
Install this application, USB OTG Checker. We just open it. And we see that this smartphone has OTG support.
How much free space do you need?
Before you start doing anything, make sure you have enough free space on your smartphone.
Before downloading Windows, you should have approximately 10 Gigabytes free. This is the size of the Windows 10 image multiplied by two. We are unpacking the image, so we need twice as much space.
Please note that the second method has a strict limitation. All free space must be in the main memory of the device. Here, as you can see, I have 11 GB free, that is, that’s enough.
The application that we used will not start until you have free space in the phone’s main memory to unpack the image.
The second significant drawback of the application is that I tried it on several not very old smartphones with a micro USB connector. It was not possible to write to any flash drive.
Well, in this case, we considered the first method.
The first method does not have such strict restrictions. You can try to download Windows to a memory card, unpack it there, and only then copy it to a flash drive. Well, besides, this method works with both connectors, even on rather old and weak Android smartphones.
The Windows 10 ISO file weighs almost 5 GB. How can it download to Android, there is a maximum of 4 Giga?
Many modern Android smartphones today use the ext4 file system. But not all.
The ext4 file system has no file size limit. More precisely, of course there is a limitation, but it is equal to 16 Terabytes) That is, today we can not talk about it as a limitation.
There is one trick in the method of downloading the Windows image that we looked at. The trick is to use a download manager.
This manager creates so-called emulated storage in the internal memory of the smartphone. When downloading, the manager divides the file into parts. These parts are less than 4 Gigabytes and there are no conflicts with the file system. When other applications access a file, they “see” the entire file.
Thus, when downloading Windows 10 images larger than 4 GB, you must use exactly this emulated storage.
If you are downloading smaller images, for example Windows 8.1, then you can experiment here. For example, download it to an external memory card and unpack it there. This is in case there is not enough space in the main memory.
If something went wrong
In many cases, many problems arise when installing an OS from a phone. Now we will try to answer most of the questions that arise in such situations.
Janis
I have been repairing mobile equipment and reinstalling software since 2013. I am a fan of any Android devices. I constantly monitor all the latest news regarding mobile technology.
Ask a Question
Question to the expert
My disk is formatted in MBR format, but the BIOS is set to UEFI mode. What's the best thing to do?
Installing Windows 8/10 will be possible in any case. Just to get started, you will need to delete partitions on your hard drive. If there are important files on it, then it is better to transfer them to external media, as they will be permanently erased. After removing the partitions from the hard drive, you can begin reinstalling Windows. The installer will automatically reformat the hard drive not to MBR, but to GPT, which is a more modern option.
Why, when I connect a flash drive recorded via IOS 2 USB, do I get an error and an offer to fix the problem?
The situation is quite simple. The fact is that Windows OS easily accepts only those flash drives that were formatted on an identical operating system. As for your case, the formatting took place through an Android device, and that, as we know, is a completely different OS.
Which image creation program is better to use – DriveDroid or IOS 2 USB?
It is difficult to give a specific answer to your question. Firstly, a lot depends on your mobile device. If the phone is weak, then IOS 2 USB will be unstable or not function at all. Therefore, it is better to use DriveDroid. As for the speed of creating an image and the simplicity of the interface, it is better to give preference to IOS 2 USB.
I burned a bootable USB flash drive through the DriveDroid program, and during the process the installation aborts with unknown firmware. What to do?
In this case, there are several solution methods. Firstly, I recommend using not a removable flash drive, but a memory card for your phone (if you have one). If this option does not help, then the only way out is to download another operating system. Perhaps the original version simply does not fit your computer.
4.4 / 5 ( 27 votes)
Author
Janis
I have been repairing mobile equipment and reinstalling software since 2013. I am a fan of any Android devices. I constantly monitor all the latest news regarding mobile technology.