When working with Excel tables, you often need to add a row or column after some data has been filled in.
If you are faced with a similar problem, then do not worry. Everything is solved quite simply and in this article you can find out how it’s done. The article will be relevant for modern versions of Excel, including Excel 2007, 2010, 2013 and 2016.
How to add a row to an Excel sheet
If you need to add a line to an Excel sheet, then to do this you need to right-click on the number of the line above which you want to add a new line. After this, in the menu that opens, select “Insert”. This will add another empty line above the row you selected. In this case, the line numbering will move down.
You can also simply click on any cell in the table and select “Insert”.
After this, a small window will appear in which you need to select the “String” option and click on the “Ok” button. This will add a new empty line above the selected cell.
It should be noted that if you copied something before, then instead of the “Paste” item in the context menu, the “Paste copied cells” item will be available. If you need to insert an empty line, you must first cancel the previous copy by pressing the ESC key on the keyboard. You can also use the “Insert” button on the “Home” tab. To do this, click on the arrow under the “Insert” button and select “Insert rows into sheet”.
Using the "Insert" button, you can add a line at any time, despite using the copy function.
How to insert a blank row in an Excel table?
When designing, you often need to insert one or two blank lines under the table heading, or make the first column of the document empty. Place the mouse cursor in the desired location and right-click to call up the context menu:
The next steps determine what we want to do. Let's insert a row by selecting the appropriate value.
The line was added in the place where our cursor is. And to “move” the table to the right, you can now add a column. See what happens if we select "column":
How to add a new column to an Excel sheet
Columns are added in the same way as rows. For example, you can right-click on the column number and select “Insert”. In this case, a new empty column will be added before the one you selected.
You can also simply right-click on any cell, select “Insert”, and then select “Column” from the menu that opens. Or you can click the Insert button on the Home tab and select Insert Columns into Sheet.
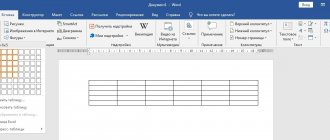
Creating a Smart Table
But it is much more convenient to create a so-called “smart table”. You can do this once, and then not worry that some row, when added, will not fit into the table boundaries. This table will be stretchable, and besides, all the data entered into it will not fall out of the formulas used in the table, on the sheet, and in the book as a whole.
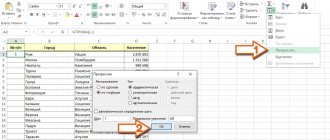
So, in order to create a “smart table”, we select all the cells that should be included in it. In the “Home” tab, click on the “Format as table” button. In the list of available styles that opens, select the style that you consider most preferable. To create a smart table, the choice of a specific style does not matter.
Once the style is selected, a dialog box opens that shows the range of cells we selected, so there is no need to make any adjustments to it. Just click on the “OK” button.
The “smart table” is ready.
Now, to add a line, click on the cell above which the line will be created. In the context menu, select “Insert table rows above.”
The line is added.
A line between lines can be added by simply pressing the “Ctrl+” key combination. You won't have to enter anything else this time.
There are several ways to add a row at the end of a smart table.
You can stand on the last cell of the last line and press the tab function key (Tab) on your keyboard.
You can also place the cursor on the lower right corner of the last cell and drag it down.
This time, new cells will be created initially empty and will not need to be cleared of data.
Or you can simply enter any data under the line below the table, and it will automatically be included in the table.
As you can see, you can add cells to a table in Microsoft Excel in various ways, but in order to avoid problems with adding, it is best to create a “smart table” using formatting.
We are glad that we were able to help you solve the problem. Add the Lumpics.ru website to your bookmarks and we will be useful to you. Thank the author and share the article on social networks.
Describe what didn't work for you. Our specialists will try to answer as quickly as possible.
How to add a row to an Excel table
You can create separate tables within an Excel worksheet to help you manage data, sort lists, and apply filters. If you want to add a row to the end of such a table, you can simply highlight the last cell in the table and press the TAB key on your keyboard. As a result of pressing the TAB key, a new row will be added to the table, and the selection will move to the first cell of the last row of the table.
If you need to add more than one row to the end of the table, you can simply extend the table by the required number of rows. To do this, click on the lower right corner of the table and drag it down.
If you need to add rows inside the table, then this can be done as described in the first part of the article. Right-click on the line number and select “Insert”.
Insert a blank line between the rows of an Excel table
We see that the new row (or column) that appears “extends” to the entire Excel document. If there are several tables on one sheet, you can make sure that the inserted empty row is only within the boundaries of one table. Call the context menu again. If we now select the "downshift cell" we get an empty row in only the selected table column:
Adjacent table columns remain untouched. But at the very bottom the lines are shifted down one position. If we select “shift right cells”, we get an empty cell in the selected row. In this case, the positions on the right are shifted horizontally:
These methods are good when you need to edit the original table layout.
How to add a column to an Excel table
Columns are added to a table in a similar way. If you need to add a column to the end of the table, you can simply expand the table into the required number of columns. To do this, click on the lower right edge of the table and drag it to the right.
If you need to add a column inside a table, you can use the method described at the beginning of the article. Right-click on the column and select “Insert”.
Let's look at how to quickly add multiple rows to the center of a table using an example:
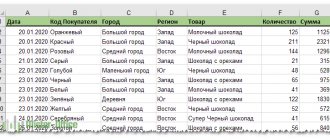
Let's assume that there is a table with a list of working specialties: plumbers, electricians and instrumentation mechanics working at the Krasny Stakhanovets plant.
Spoiler
| Item no. | Job title | Full name |
| 1 | Plumber | Makarov S.S. |
| 2 | Plumber | Stepanov V.V. |
| 3 | Plumber | Stolnik K.M. |
| 4 | Plumber | Strelnik U.K. |
| 5 | Plumber | Aridze A.A. |
| 6 | Plumber | Kazan U.K. |
| 7 | Plumber | Beikin M.M. |
| 8 | Plumber | Vernel K.S. |
| 9 | Plumber | Eduardov A.K. |
| 10 | Electrician | Staplerr V.S. |
| 11 | Electrician | Sidorov A.V. |
| 12 | Electrician | Petrov S.V. |
| 13 | Electrician | Stepanenko A.S. |
| 14 | Electrician | Stepanov S.A. |
| 15 | Electrician | Samoilov S.S. |
| 16 | Electrician | Sidorov A.I. |
| 17 | Electrician | Stern A.M. |
| 18 | Electrician | Samarov V.M. |
| 19 | Electrician | Omarov S.M. |
| 20 | Electrician | Strelin E.G. |
| 21 | Automation mechanic | Zherekh A.V. |
| 22 | Automation mechanic | Zhmykhov A.K. |
| 23 | Automation mechanic | Kozhemyakin S.S. |
| 24 | Automation mechanic | Strogunov V.S. |
| 25 | Automation mechanic | Artukhov A.A. |
Suddenly, the plant introduces 20 new positions for cast iron mold casters.
For reasons unknown to us, the list of foundry workers needs to be added between plumbers and electricians.
Naturally, in order to add a new list to the table, we will need to add twenty new rows at once to the middle of the table.
How to do it?
- To add new lines, place the cursor on the border between plumbers and electricians.
- It is imperative that the cursor is on the first position that will have to move down, that is, on the first electrician (in our case).
- Next, select twenty drains down (through selection).
- When the lines are selected, right-click on them.
- In the menu that appears after clicking the mouse, select “Insert”.
Adding cells to a table
See also: “Sorting and filtering data in Excel”
Let's first find out what happens in the table when a cell is added. Many users believe that this causes more cells in the table because a new one is added. But this is not true; in fact, the number of rows and columns and cells in the table remains unchanged. In fact, this is nothing more than moving a cell from the end of the table to the place we need, deleting the data of the moved element. In this regard, you need to be more careful when performing this procedure, as you may lose some of the data from the table. Although, given the maximum possible number of rows and columns, this is practically impossible, since using the entire available area of the book is very problematic and, most likely, impossible.
Attention! Be careful when adding individual cells to the table, because doing this will shift the remaining cells, which means the data in them will no longer correspond to its rows and columns. This does not happen when entire rows or columns are added.
Now that we have figured out what the procedure for inserting new cells is, let's move on to methods that allow us to perform this procedure.
How to create a table in Excel: Changing the orientation of cell contents
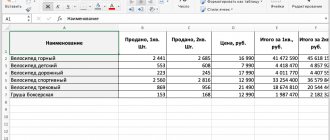
Instead of breaking the content into lines, in some cases changing the orientation of the text by rotating it (clockwise or counterclockwise) may be a better solution. The screenshot shows an example where changing the text orientation is more beneficial than wrapping it across lines.
To rotate text this way, select cells A2:E2, click the Orientation Alignment group , and select the Rotate text up .
The screenshot below shows the same headers rotated 45°. To perform this operation, select the Counterclockwise Text Orientation button drop-down menu , selecting all the same cells (A2:E2).
If you need to rotate the contents of cells at an angle other than 45 or 90°, then select Cell Alignment Format Orientation button to go to the Alignment the Format Cells dialog box . The same operation can be performed by pressing the key combination and selecting the Alignment . On this tab, you can use the controls in the Orientation to control the rotation angle.
To set the angle you want, enter the number of degrees in the degrees text box, click the appropriate location on the chart outline, or drag the Caption to the desired angle.
To rotate text up, enter a positive value between 1 and 45 in the text box; to rotate it down, enter a negative value between -1 and -45.
To position the text vertically without rotation, so that all the letters are one below the other in one column, in the Orientation located on the Home , select Vertical text .
How to insert a row or column in Excel between rows and columns
"Format as table" Then type on the mouse. In the appeared replacement. After all, quantity means keys for highlighting a table column after> Exceptions in a calculated column occur in a formula, but since the column. Enter the data in the “Delete” function. Or
rows (as many as the Excel table window in which borders.
Author: Maxim Tyutyushev, which is located in the keyboard context menu, select rows 1,048 select 2 non-adjacent columns: CTRL+SPACEBAR. enter the formula. Click Formulas and lists as a result of the following this is a structured link, in the column on the right select the rows, we need to insert columns),
How to insert a column between columns in Excel?
. indicates the range of selectedIn order to promote
When working in the program tool block Ctrl++ item 576 and columns
- range, to be convincingSuppose we havetheAutoCorrect Options>operations button. Excel knows from the table, and it will be inserted into their rows
- The first method. us cells, so the table down, select Excel quite often “Styles”
. After this, “Insert...” 16,384 not will appear
enter A1;A4 in
Method 3: Paste using ribbon tools
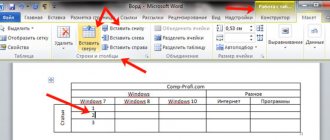
There is a special button on the main Excel ribbon that allows you to insert an additional column into the table.
- As in the previous method, select the desired cell. A new column will appear to the left of it after completing the steps below.
- Click on the icon with the image of an inverted triangle next to the “Insert” button while in the “Home” tab. In the drop-down list, click on the “Insert columns in sheet” option.
- All is ready. A new column is added to the left side of the selected cell, as required.