Not only malware and viruses can affect the stability of the operating system, but also damage to system files or hard drives - hard drives on which the OS itself and all its programs are recorded. You can restore minor problems using either third-party system tools or built-in programs. Developers from Microsoft took care of their users and added many diagnostic and error correction tools to Windows. One of them is for hard drives and is called CHKDSK. It is necessary to consider how Windows 10 checks the disk for errors and whether CHKDSK can be replaced with third-party utilities.
What is CHKDSK Windows 10
As has already become clear, CHKDSK is the main system tool for console checking and fixing various problems that arise with hard drives and removable drives. Depending on the launch parameters, CHKDSK corrects logical errors, marks “bad” sectors and transfers the information that is recorded in them to other entire areas of the device.
Checking the file system in the console
Important! Checking your hard drive for Windows 10 errors using this tool does not present any difficulties for PC beginners, but there are still some nuances in its use.
Checking the status of the hard drive
The speed of processing actions with files and even the performance of programs depends on how well the hard drive functions. It is also important to regularly check your hard drive to ensure the safety of all the necessary information: if you learn about problems in the system, you can immediately make backup copies of your files while the drive is still working.
You can identify surface problems using Windows tools or using third-party programs.
Checking the disk status through Explorer
The fastest and easiest way to check your disk is through the Windows scan feature. To do this, take the following steps:
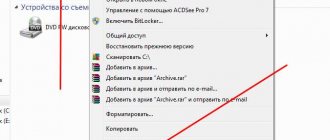
- Open File Explorer and go to This PC.
- Find the hard drive you want to check and right-click on it to open the context menu.
- Select Properties.
- Go to the “Service” section and start checking the disk by clicking the corresponding button.
Open the disk properties and run its scan
Checking the hard drive via the command line
Alternatively, you can run the check via the command line:
- Press Win+R to bring up the Run window.
- Type cmd into it and press Enter.
- After starting the command prompt, type the command chkdsk C: /F /R. Press Enter.
- Wait until the scan is completed.
Open the Run window, enter the necessary commands, run the scan and review the results
Such diagnostics will not only report on the condition of your hard drive, but if problems are detected, it will immediately try to fix them.
If the procedure does not start under the pretext that the hard drive is busy, you can select the check option the next time you restart the computer.
Set the check to run on system reboot by pressing Y
How to check a disk for errors in Windows 10 through the OS interface
To check your hard drive for software or hardware problems, you can use third-party utilities that provide great capabilities for analyzing and restoring bad sectors, or you can run a standard scan using CHKDSK. The advantages of third-party programs are obvious, but they need to be found and downloaded. Sometimes they are paid, and attempts to find a hack end in infecting a personal computer or laptop with malware, miners and password stealers.
Command SFC /Scannow Windows 7 - how to check system integrity
CHKDSK, despite its ease of use and lack of a user interface, is a built-in, completely free and quite powerful tool for checking a disk for bad sectors in Windows 10. It is what will be discussed below.
The easiest way
Through the interface of the Windows 10 operating system, it can be launched using several tools. First, it’s worth considering a simple method for beginners. To use it, just follow these step-by-step instructions:
- Go to the desktop, minimizing all windows and open programs.
- Find the “My Computer” or “This Computer” icon and right-click on it.
- Select the “Tools” dialog box tab and click on the “Run check” button located in the “Disk check” section.
- Wait for a new window to open and press the “Launch” button.
Important! It is worth understanding that checking non-system partitions will begin immediately, but to analyze the system you will have to restart your PC. The utility also allows you to set up a scan schedule.
Using the command line
Another method is based on the command line. It will be discussed below, but first it should be mentioned that “scandisk” Windows 10 is launched via the command line in two ways. One of them is direct and will be discussed further, and the other is indirect.
You can also find out disk information in the Windows 10 Check Disk program in the user interface
The second one is extremely simple. To do this, launch the “Run” utility window and enter the “chkdsk” command into the line. After executing it, the command line will open and a basic check of the hard drive will begin. To perform the check more flexibly, you should immediately go to the console and execute commands with various attributes directly there.
Finding and correcting errors in PC operation
In order to determine the cause of errors in the operation of the operating system, and then begin to eliminate them, it is necessary to act comprehensively. This can be done either using third-party programs or standard Windows tools. In addition, sometimes it may be necessary to check a separate component of the OS or PC - software or hardware, respectively. All this will be discussed further.
Windows 10
The current and, according to Microsoft, generally the latest version of Windows is updated quite often, and a large number of errors in its operation are associated precisely with this. It would seem that updates should fix and improve everything, but quite often the result of their installation is completely opposite. And this is just one of the possible causes of problems in the OS. In addition, each of them requires not only a unique approach to search, but also a special elimination algorithm. To find out in more detail how to perform a “ten” check and, if necessary, correct the errors found, a separate material on our website will help you, which describes the use of both third-party software and standard tools to solve our today’s problem.
Read more: Checking Windows 10 for errors
In addition to the generalized material describing the most common methods of checking the operating system for errors, we also recommend that you read a separate article devoted to studying the capabilities of the standard troubleshooter in Windows 10. With its help, you can find and fix the most common problems in software and hardware OS components.
Read more: Standard Windows 10 troubleshooter
Windows 7
Despite the fact that the seventh version of Windows was released much earlier than the “ten”, the options for checking for errors on a computer with this OS on board are similar - this can be done either using software from third-party developers or exclusively using standard tools, which we also previously talked about in a separate article.
Read more: Checking Windows 7 for errors and fixing them
In addition to a general search for potential problems in the operation of the “seven” and their solutions, you can also independently perform a “spot” check of the following components of the operating system and the computer as a whole:
- Integrity of system files;
- System registry;
- HDD;
- RAM.
How to call CHKDSK on Windows 10 through the command line
The command line is an extremely useful and powerful system tool for editing files, diagnosing the operating system and a number of other actions. It, of course, cannot be compared with the terminal in Linux, but, nevertheless, it allows you to do a lot.
Why on EFI systems Windows can only be installed on a GPT disk
To launch the verification utility, follow these step-by-step instructions:
- Go to the Start menu and search for “Command Prompt” in the special field.
- Click on the corresponding list item in the search results. You can also launch the console using the shortcut Win + R by typing the cmd command in the line.
- Wait for the command line interface to launch.
- Write or paste the command “chkdsk c:” or “chkdsk d:” into the line.
Important! As in the previous case, when the check was performed through the graphical interface, the system disk cannot be checked completely without rebooting the system. Disk D will be checked without problems. To restart, just press the “Y” key, which means “Yes”.
What attributes to set to restore a hard drive using CHKDSK on Windows 10
As is already clear, checkdisk in Windows 10 is performed via the command line. Immediately after the command you must enter the name of the disk. If this is not done, then only the system hard drive will be checked. The remaining attributes mean the following:
- /f – fixes found errors.
- /r – detects bad sectors and fixes them.
- /x – unmount the disk before starting the scan.
- /v – displays full paths and file names during scanning.
- /i – prohibits strict checking of index elements.
- /с – prohibition of checking cycles inside directory structures.
- /l size – as a result of analysis, change the size of the log file to the value specified in the parameter.
One of the Scandisk-type programs for Windows 10
How to run chkdsk on windows
Abbreviated as "check disk", the CHKDSK command is a Prompt command used to check a specified disk and repair or restore data on the disk if necessary.
Chkdsk also marks any damaged or faulty sectors on a hard drive or disk as "bad" and recovers any information not already damaged.
Availability of the Chkdsk command
The CHKDSK command is available from the command line in Windows 10, Windows 8, Windows 7, Windows Vista and Windows XP operating systems.
The CHKDSK command is also available through the Command Prompt in Advanced Startup Options and System Recovery Options. It also works from the Recovery Console in Windows 2000 and Windows XP. Chkdsk is also a DOS command available in most versions of MS-DOS.
Note : The availability of some chkdsk commands and other chkdsk command syntax may vary from operating system to operating system.
Chkdsk command syntax
CHKDSK [volume[[path]filename]]] [/F] [/V] [/R] [/X] [/I] [/C] [/L[:size]] [/B] [/scan ] [/spotfix]
| volume | The drive letter (followed by a colon), mount point, or volume name. (eg C:) |
| file name | Files checked for fragmentation (FAT/FAT32 only). |
| /F | This option of the chkdsk command will correct any errors found on the disk. |
| /V | For FAT/FAT32: Displays the full path and name of each file on the disk. For NTFS: Displays cleanup messages (if available). |
| /R | Searches for bad sectors and recovers surviving information (requires /F when /scan is not specified). |
| /X | Preliminarily dismounts the volume (if necessary). All open handles for this volume will become invalid (requires /F). |
| /I | NTFS only: Performs a less stringent check of index entries. |
| /C | NTFS only: Skips checking for loops within the folder structure. |
| /B | NTFS only: Re-evaluates damaged clusters on the volume (requires /R). |
| /L: size | Use this chkdsk command to change the size (in KB) of the log file. The default log file size for chkdsk is 65536 KB; you can check the current log file size by executing /L without the "size" option. |
| /perf | This option allows chkdsk to run faster while using more system resources. It must be used with /scan . |
| /scan | This chkdsk option runs an online scan on an NTFS volume but does not attempt to repair it. Here "online" means that the volumes do not need to be mounted, but can remain online/active instead. This is true for internal and external hard drives; you can continue to use them throughout the scan. |
| /spotfix | This chkdsk option simply dismounts the volume to fix the problems sent to the log file. |
| /sdcleanup | NTFS only: Collects unnecessary security descriptor data as garbage (requires /F). |
| /offlinescanandfix | Runs an offline scan and repair of the volume. |
| /freeorphanedchains | FAT/FAT32/exFAT only: Frees orphaned cluster chains instead of restoring their contents. |
| /markclean | FAT/FAT32/exFAT only: Marks the volume as clean if no corruption is detected, even if the /F option is not specified. |
| /? | Use the help switch with the chkdsk command to show detailed help about the commands listed above and other options you can use with chkdsk. |
Note: The /I or /C option reduces Chkdsk execution time by skipping some volume checks.
Note: There are other less commonly used chkdsk command switches, such as /B to re-evaluate bad clusters on the volume, /forceofflinefix, which runs an online scan (scan while the volume is active) but then forces the repair to work offline (after the volume was disabled), /offlinescanandfix, which runs an offline chkdsk scan and then fixes all the problems found and others, which you can read more about via /? switch.
Note. /offlinescanandfix option option , except that it is only allowed on NTFS volumes.
If you use the chkdsk command from the Recovery Console on older versions of Windows, use /p instead of /F above to instruct the chkdsk command to perform an extensive disk check and fix any errors.
Chkdsk Command Examples
CHKDSK
In the above example, since no drives or additional options were entered, chkdsk simply runs in read-only mode.
Note. If problems were found when running this simple chkdsk command, you should make sure to use the example below to fix any problems.
chkdsk c: /r
This example uses the chkdsk command to perform an extensive scan of the C: drive to correct any errors and look for any recovery information from bad sectors.
This is best used when you are running chkdsk from outside of Windows, such as from a recovery drive where you need to specify which drive to scan. chkdsk c: /scan /forceofflinefix
This chkdsk command runs an online scan on volume C: so you don't have to unmount the volume to run the test, but instead of fixing any problems while the volume is running, problems are sent to a queue that will be allowed offline.
chkdsk c: /r /scan /perf
In this example, chkdsk will fix problems on the C: drive when you use it, and will use as many system resources as allowed to keep it running as quickly as possible.
Related Chkdsk commands
Chkdsk is often used with many command line commands and recovery console commands.
The chkdsk command is similar to the scandisk command used to check a hard drive or floppy disk for errors in Windows 98 and MS-DOS.
How to find bad sectors using third-party utilities for Windows 10
How to check Windows 10 license - find out expiration date
There are a lot of useful programs that allow you to analyze the state of hard drives and correct logical or physical errors on them. Here is a list of the most popular ones:
- Hetman Partition Recovery.
- HD Tune Pro.
- Victoria HDD.
- MHDD.
- HDDScan.
- Seagate SeaTools.
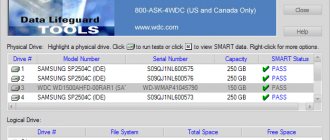
- Western Digital Data LifeGuard Diagnostic.
- HDDlife.
They all have a different interface, but even beginners have no problems scanning a hard drive with their help. Everything is extremely simple. As a last resort, you can watch video lessons.
How to check your hard drive for errors via the command line
To check the hard drive and its sectors for errors using the command line, you will first need to run it as Administrator. In Windows 8.1 and 10, you can do this by right-clicking the Start button and selecting Command Prompt (Admin). Other methods for other OS versions: How to run the command line as an administrator.
At the command line, enter the command chkdsk drive_letter: scan_parameters (if nothing is clear, read on). Note: Check Disk only works with drives formatted in NTFS or FAT32.
An example of a working command may look like this: chkdsk C: /F /R— this command will check drive C for errors, errors will be corrected automatically (parameter F), bad sectors will be checked and an attempt will be made to recover information (parameter R) . Attention: checking with the parameters used may take several hours and seem to “freeze” in the process, do not perform it if you are not prepared to wait or if your laptop is not connected to a power outlet.
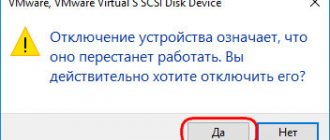
In case you try to check the hard drive that is currently being used by the system, you will see a message about this and a proposal to perform the scan after the next restart of the computer (before the OS loads). Enter Y to agree or N to refuse the review. If, when performing a check, you see a message that CHKDSK is not valid for RAW disks, then the instructions may help: How to fix and repair a RAW disk in Windows.
In other cases, a check will be launched immediately, as a result of which you will receive statistics of the verified data, errors found and damaged sectors (you should have it in Russian, unlike my screenshot).
You can get a complete list of available parameters and their description by running chkdsk with a question mark as a parameter. However, for a simple error check, as well as checking sectors, the command given in the previous paragraph will be sufficient.
In cases where the scan finds errors on your hard drive or SSD but cannot fix them, it may be because Windows or programs are currently using the drive. In this situation, running an offline disk scan can help: in this case, the disk is “disconnected” from the system, checked, and then mounted again in the system. If it is not possible to disable it, then CHKDSK will be able to perform the check the next time you restart the computer.
To perform an offline scan of a disk and correct errors on it, in the command line as an administrator, run the command: chkdsk C: /f /offlinescanandfix (where C: is the letter of the drive being checked).
If you see a message that says the CHKDSK command cannot be run because the specified volume is in use by another process, press Y (yes), Enter, close the Command Prompt, and restart your computer. The disk check will start automatically when you start booting Windows 10, 8 or Windows 7.
Additional information: if desired, after checking the disk and loading Windows, you can view the Check Disk check log using event viewer (Win + R, enter eventvwr.msc) in the Windows Logs - Application section by searching (right click on "Application" - “Search”) using the keyword Chkdsk.
Features of checking the service life of SSD drives on Windows 10
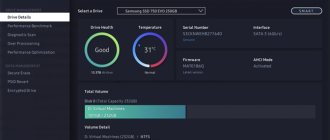
SSD drives differ from conventional magnetic drives in their operating speed, but they are more limited in information recording cycles. Standard Windows tools can analyze the “health” of an SSD just as well, and the standard CHKDSK function copes with this with a bang. Just enter a command in the console similar to the examples above and specify the letter of the SSD. The device itself will show all the main parameters. Also popular in the top ten is another utility called by the command “wmic diskdrive get status”.
Hetman Partition Recovery interface
Now it’s clear how to run CHKDSK on Windows 10. There’s nothing complicated about it. To scan, just boot into administrator mode, start checking the OS using the appropriate command and view the results. If the system disk is loaded for analysis, you will have to restart the PC
Checking the disk in Windows 10 using the chkdsk utility
To check your hard drive for errors, run a command prompt with administrator rights. Run the command:
chkdsk E: /F /R
This command will run a scan of the E:\ , any errors found will be corrected automatically ( /F ), and if there are bad sectors, an attempt will be made to recover information ( /R ). A complete disk scan may take a long time depending on the storage capacity and the number of files.
The chkdsk utility performs four sequential passes that check the volume metadata:
- Stage 1. Checking files
- Stage 2. Checking indexes
- Step 3: Checking security descriptors
- Stage 4. Checking sectors
After the disk scan is completed, you will see detailed disk statistics, information about damaged sectors and files, and recovery actions taken.
If the chkdsk utility did not detect any problems, the following message will appear:
Windows has scanned the file system and found no problems. No further action is required.
You will not be able to perform online scanning and correction of errors on the system drive ( C:\ ). When you run the chkdsk C: /F /R command, you will see that the drive is locked and can only be checked the next time Windows restarts:
Cannot lock current drive. Chkdsk cannot run because the volume is in use by another process. Would you like to schedule this volume to be checked the next time the system restarts? (Y/N). The Chkdsk command cannot be executed because the specified volume is in use by another process. Should I scan this volume the next time I reboot the system?
If you want to check the disk the next time you boot your computer, press Y -> Enter. The message “This volume will be checked the next time the system restarts” appears.
Now if you restart Windows, Disk Check will run. We need to wait for it to finish.
If you want to check the disk for errors offline (skip the online check), use the offlinescanandfix
:
chkdsk E: /f /offlinescanandfix
When using the offlinescanandfix option for the system drive, you will be prompted to schedule a scan on reboot.
The speed of offline disk checking in Windows 10 has been significantly increased compared to previous versions of the OS.
/X is another useful chkdsk attribute. It allows you to dismount a volume before scanning, forcing all open file descriptors to close.
You also need to pay attention to the new chkdsk option - /spotfix. This option applies only to NTFS volumes. spotfix parameter allows you to significantly reduce the time of offline disk scanning from several hours to seconds. Instead of a full scan of the entire disk, it only searches for and corrects errors recorded earlier (during a regular disk scan) in the $corrupt. In this case, chkdsk immediately corrects errors without wasting time scanning the disk. This is especially useful when scanning large volumes.
It is not recommended to interrupt the chkdsk command. However, if you manually stop/terminate the chkdsk.exe process, you will not damage the volume (it will not damage it any more than it was damaged to begin with). In any case, after some time it is recommended to perform a full disk scan.
In Windows 10, disk maintenance (checking and defragmenting) runs automatically on a schedule or when the computer is idle. Information about the status of automatic drive checking can be found in the menu Control Panel -> Security and Maintenance -> Drive status. The screenshot shows the status All drives are working properly.
The disk scan task, which is called ProactiveScan , and runs as part of the Windows 10 Automatic Maintance Task can be found in Task Scheduler -> Microsoft -> Windows -> Chkdsk.
Also in modern builds of Windows 10, the storage diagnostic utility StorDiag.exe (Storage Diagnostic Tool) has been added. This utility performs several disk check operations at once (chkdsk, fsutil and fltmc). The log can be saved as an ETW trace. For example:
stordiag.exe -collectEtw -checkfsconsistency -out %userprofile%\desktop
Checking your computer for errors using special programs
If standard tools for diagnosing and eliminating errors are powerless, use special programs. There are quite a lot of them, the most effective and understandable for the average user are the following products:
- IObit Security 360.
- Advanced System Care.
- Antivirus of your choice.
IObit Security 360
The first utility in the list allows you to thoroughly check the operating system for errors. Download and install the program. After successful installation, run an error check. The application interface is extremely clear; there will be no problems finding the desired section. The program will analyze the system and provide information about existing errors and potential malfunctions that led to their occurrence (for example, outdated drivers for a particular component, conflicts between different programs, etc.).
Advanced System Care
To check your computer for errors even more deeply, use a program called Advanced System Care. It allows you to identify most operating system malfunctions and successfully fix them. Download and install the suggested application. After installation, open it and go to the “System Diagnostics” section. Open the program settings tab, and then go to Registry Errors. There, check the box next to “Enable deep scanning.” Double-check the settings and click the “Save” button.
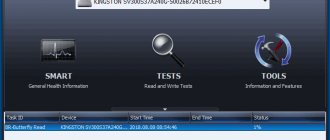
Next, you need to return to the “System Diagnostics” section, select all 4 items there and start the scan by clicking the corresponding button. After the process is completed, review the list of faults. If you want the program to try to fix existing problems on its own, click the Repair button and let the application do its job.
Go to the "Windows Cleanup" section. As in the previous step of the instructions, activate the menu items and enable scanning. In most cases, as a result of such a check, the program finds a number of registry errors. If any are found, activate troubleshooting. The program successfully resolves registry problems without affecting important system files.
Antivirus of your choice
After you have completed a basic check of your computer for errors and made the required corrections, be sure to check the operating system for viruses and potentially dangerous software. Choose the program to search and destroy them at your discretion. It is better to first study the reviews of each available application and choose the option you like best. Regardless of the program you choose, you will need to do the following. Launch your antivirus and go to the section for selective scanning of hard drive partitions. Specify the desired partition (usually the one on which the operating system files are stored) or all the partitions of your computer’s hard drive at once. After the scan is completed, the program will offer to eliminate the detected threats. Follow the further recommendations. For such checks, I advise you to use malwarebytes anti-malware.
Make it a habit to perform these checks on a regular basis. For ordinary users, it is usually enough to check once every 3-6 months. For more advanced users, it is recommended to reduce the interval between checks.
Checking your computer for errors using standard tools
An initial check of your computer for errors can be performed using standard tools. It is recommended to start by checking the quality of the hard drive. To do this, just do the following:
- Go to the “ My Computer ” section.
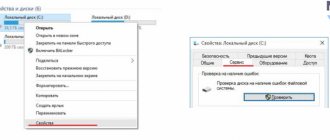
- Right-click on the icon of the hard disk partition .
- Go to the “ Properties ” tab, and then “ Service ”.
- Once in the desired section, run “ Check Volume for Errors ”.
In most cases, this simple method allows you to cope with all existing problems. But in some situations it is still powerless and you have to use special programs. You can also use the scan via the command line, which significantly increases the efficiency of the scan, more details.
A full check of your computer for errors necessarily includes disk defragmentation. It is done in the following order. You go to the Start menu, go to the “All Programs” tab, open the “System” section, then “Accessories” and run a program called “Disk Defragmenter”. With this check you can get rid of errors at almost any stage. It is recommended to perform it at least once every six months. If you use your computer intensively, run defragmentation once every 1-2 months. Learn more about defragmentation.
You can obtain information about errors in the system Event Log. It's very easy to find. Open the Start menu, go to Control Panel, then open Administrative Tools and click Event Viewer. If there are errors, you can easily recognize them by their designation in the form of a red circle with a white cross. Double-click on the event and review the information provided. The solution is selected separately for each problem.