On average, a typical user surfs the Internet more than 5 hours a day. And those who need a network for work - much more. People communicate through the World Wide Web, have fun, and earn money. This phenomenon should no longer surprise anyone. But here’s what can really surprise you: the lack of a network. For example, Wi-Fi does not work on a laptop with Windows 10. In this case, anyone will want to quickly get rid of the problem. How to fix the problem with Wi-Fi ? The following step-by-step guides will help with this.
Correct BIOS setup
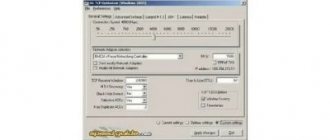
BIOS is the software required to configure a computer before starting it. To enable it, restart your laptop. When the startup screen with the motherboard logo appears, press the F2 key. This is the button to open the BIOS on most laptops.
Please note that the hotkey differs on different devices. Each motherboard has a microcircuit. The button depends on its manufacturer. In addition to F2, there are DEL, F9 and others; for detailed information, see the instructions on how to enter the BIOS or CMOS settings.
If Wi-Fi does not work on the “ten”, open the laptop configuration menu and scroll through the pages. You need to find the tab with wireless modules. The names of the items depend on the model. But look for something similar to the following:
- WLAN (Wireless Lan) - Wi-Fi devices;
- BT - Bluetooth.
On most devices, the required tab is called “Configuration”. If it is not there, scroll through each page, there are not many of them.
These two items need to be included. To do this, select “Enabled” next to each one. BIOS sometimes automatically disables them. This occurs due to a disconnected module on the motherboard or a BIOS software failure. After rebooting the entire system, the adapter does not turn on. Another common reason is conflicts in the operating system. The tenth version of the OS has a bug: after waking up from sleep mode, some laptop settings are lost.
If the gadget is not new, but purchased on an ad site (used), then it is recommended to check the BIOS. Perhaps the previous owners did not inspect it before selling it. Also, settings may go wrong on new laptops due to manufacturing defects. If the WLAN item does not turn on, check whether the wireless adapter is working properly and whether the device is connected. It is not recommended to disassemble the laptop yourself. But you can see if the wiring is disconnected.
Setting up the power supply
When the specified percentage of battery charge is reached on a laptop with Windows 10, Wi-Fi turns off automatically in order to save power, and permanently. Reconnection becomes impossible due to deactivation of the network adapter at the software level. The problem is solved as follows.
- Open “Device Manager” through the Start context menu.
- Expand the “Network adapters” item and open the properties of the network card.
- Uncheck the box next to the “Allow the computer to turn off this device...” option.
The second option for setting up a power plan is to select the maximum performance mode.
- Open the “Options” window and select “System”.
- Go to the “Power and Sleep Mode” tab, where we open the advanced power settings.
- Call up the configuration parameters window for the current laptop power consumption scheme.
- Click on the link to change additional configuration.
- Expand the settings of the wireless adapter, set both values to “Maximum performance” and save the changes.
Only works on a laptop! For the computer, changing the power configuration will not do anything.
How to fix the Wi-Fi problem: turning on the network on Windows 10
You may not have to bother with drivers, resetting network settings, etc. Sometimes a user mistakenly turns off Wi-Fi on a laptop. To turn it back on, do the following:
- Press the key combination “Win” + “I”. A window with operating system settings will open.
- Select “Network and Internet” from the list. On the side there is navigation through the parameters. Select WiFi.
- At the very top, under the words “Wireless Network”, there is an option to enable/disable the function. Switch the slider to the right position.
These settings work when the OS does not notify the user about the error.
Checking the network from a mobile device
If, after setting the BIOS and enabling the Wi-Fi function, the connection does not become available, check the network from your phone, tablet or other laptop. There may be a problem with the router, wireless connection settings, or a problem with the provider. To do this, simply connect to Wi-Fi from another device. If the gadget connects and loads pages, the reason is in a specific device.
It is also worth contacting the company that provides Internet services and reporting the problem. If anything happens on their part, the dispatcher will report it.
Windows 10 Settings: Network Discovery
These settings determine whether the laptop can find other devices using the network, as well as its visibility to other devices. To fix the problem with Wi-Fi, enable the option:
- Press the "Win" + "I" key combination to open the operating system settings.
- Select the Network and Internet tab.
- Click on "Status", then "Sharing Options".
- In the window that appears, expand the “Guest or public (current profile)” branch.
- Enable network discovery. On some devices, you also need to activate the option in the “Private” branch.
Reason #1. No connection after update
If there is no connection after updating the system, you will need to do the following:
- Check whether all the necessary protocols for the connection to function are enabled in its properties. To do this, press the keyboard shortcut “Windows + R” and enter ncpa.cpl in the window that appears.
- Click OK . _ _
- Go to the “Properties” of the connection you use to access the Internet from its context menu.
- For normal network operation, at least the IP4 . But in general, it is recommended to enable all protocols.
- Check the IP4 .
- Click "OK" .
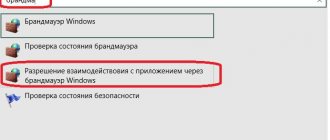
In addition to the reason described above, the connection may be blocked by your antivirus program or firewall. In this case, you will need to completely remove these applications, preferably using the official uninstall utilities from the developer’s website. After this, restart your PC and check the Internet.
How to fix a problem with Wi-Fi: resetting network settings
If the system shows an error with the text “Cannot connect to this Wi-Fi network,” then try resetting the wireless connection settings. Perhaps the reason is a conflict of options:
- Go to the operating system settings (“Win” + “I”).
- Select the network settings tab. Click on the "Status" item.
- Use the “Reset network settings” function at the very bottom of the window.
Note: User inattentiveness is often the problem. It's worth checking to see if airplane mode is turned off. To do this, click on the Wi-Fi icon in the system tray.
The reset will take a few minutes. The laptop may restart after this. Therefore, save all actions so that windows do not close unexpectedly. It's also worth writing down your Wi-Fi password so you can enter it again.
Why does Wi-Fi turn off on a Windows 10 laptop?
You can try to solve Wi-Fi problems on Windows 10 yourself
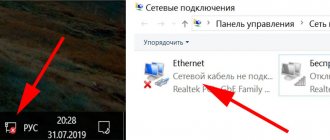
There are a huge number of reasons. It is easier to understand the problem by the nature of the problem. One of the most common cases is when a device running the Windows 10 operating system connects to a wireless network, the connection works, but crashes after a few seconds. The system tray displays a yellow icon with an exclamation mark on the Wi-Fi icon. The connection may turn itself off or indicate the presence of certain restrictions. When I try to reconnect, the scenario repeats again.
The second common scenario is that a laptop periodically loses its Wi-Fi network on Windows 10. Sometimes the device does not see the available network. In other cases, it may turn on, turn off, disappear, and Wi-Fi may disappear at a certain interval, that is, blink. Almost every user has encountered this. Often the cause is high network load. The most interesting thing is that the system does not write about any error.
For your information! This often happens when using adapters to access the Internet. A glitch on pirated OSes when the user uses sleep mode can also lead to this, but this cannot be ruled out on licensed systems.
Another case that users often encounter is the red icon with a cross. It also appears in the system tray on the Wi-Fi wireless connection function. As a rule, this problem occurs after updating the software (system or drivers). To rule out the cause on the side of the provider or router, you should try to connect some other device to the Internet (not necessarily a laptop, a smartphone or tablet will do).
Disabling IPv6
If the problem is with the connection protocol, you need to disable it. Step by step guide:
- Open the Start menu. Type “Control Panel” in the search bar. Launch the tool.
- Click on "Network and Sharing".
- Select Adapter Settings.
- Find Wi-Fi. As a rule, the name of the desired shortcut contains “Wireless”, “Wi-Fi” or “Wireless Network”. Right-click on it and go to properties.
- Uncheck the box next to "Internet Protocol Version 6" or "IP Version 6." Confirm your actions by clicking OK.
After that, restart your laptop and connect to Wi-Fi again.
Why doesn't WiFi work on a Windows 10 laptop? Main causes and options for their elimination
Hello dear readers.
Over the past few years, mobile computing has become increasingly popular. Not to mention their size, they have a lot of additional advantages. And one of them is the presence of a module for wireless communication with the network. But, like any other elements, they can fail. What to do when WiFi does not work on a Windows 10 laptop? In the following article I will try to describe the most common causes of the disease, as well as possible solutions.
Turning on Wi-Fi on a laptop (to contents ↑)
The wireless network module does not turn on automatically on all devices. On some you need to do this manually.
It is worth noting that everything described below in this paragraph applies only to computers with the original version of the operating system.
It’s just that you can often encounter a situation where problems appear precisely after reinstalling the system. This is usually driver related. But everything is in order.
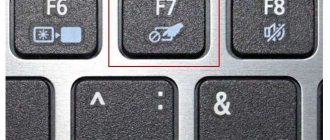
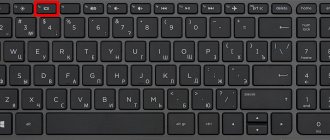
So, in some mobile computers the Wi-Fi module is turned on using a special lever. It's in the sidebar and can look different. Basically, next to the desired element there is usually a drawing of an antenna with waves.
But in most cases, you can achieve what you want using a key combination, one of which will be “ Fn ”. But the second one directly depends on the manufacturer. It's on the row of " F... " buttons and has a Wi-Fi, antenna, or airplane logo on it.
As mentioned earlier, this is only possible if you use the original OS. If you have reinstalled Win before this point, there is a good chance that the drivers to ensure the operation of the above keys are simply missing. Which means they won't work.
To verify the above, try using other buttons in the same row. Just keep in mind that screen brightness and volume can work independently - usually Windows has enough necessary software for this, regardless of the bit depth - x64 or 32.
To find a solution, you should go to the manufacturer’s official website, where you can find the necessary drivers. Often these can even be special utilities that allow you to use the panel. If you don’t know what exactly you need for a laptop, you can safely search on the Internet - everything has long been described in detail on numerous forums.
Enabling in the operating system (to contents ↑)
In addition to the fact that the adapter is turned on using keys, it often requires its additional use in the system.
So, in Windows 10, select the network connection icon in the lower area of the desktop. airplane mode is not active and the module itself is turned on.
You can also go to “ Start ” and “ Settings ”. Then in “ Network and Internet ”, where the desired switch will be located.
In addition, on the network connection icon in the tray, right-click and select “ Control Center... ”. A new window will open, on the left side of which we find “ Changing adapter settings ” (you can also press the combination “ Win + R ” and then enter “ ncpa.cpl ”). We look for the wireless network icon, call up the context menu on it and select “ Enable ”.
Often laptops come with special software from the manufacturer, which allows you to control some device parameters, including Wi-Fi. If you don’t find the corresponding shortcut on your desktop, try going to “ Start ” and “ All Programs ”.
Well, the most common reason is the lack of the necessary drivers. What to do and how to correct the situation? It is worth immediately noting that if the operating system was reinstalled, it could independently update the software. But at the same time it is not always suitable. It’s best to go to the manufacturer’s official website and download from there.
How to find out the driver and manufacturer?(to contents ↑)
To do this, we make several movements:
- Go to “ Start ” and “ Control Panel ”.
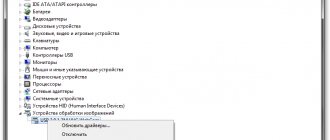
- Then in " Device Manager ".
- Find the line “ Network adapters ”.
- Call the context menu on the desired component. Usually the name includes Wi-Fi or Wireless.
- Now let's go to the " Driver " tab.
- Be sure to pay attention to the “ Supplier ” line. If “ Microsoft ” is indicated, feel free to go to the manufacturer’s official resource. In addition, if a “ Date ” is indicated that is several years behind the current one, do the same.
If you couldn’t find what you need on the developer’s website, go to the page for creating the module itself. But how do you recognize it? We take several steps:
- In “ Network adapters ” we select the same component. Sometimes, when the system was unable to determine it, there will be a question mark nearby.
- Go to “ Properties ” again.
- Select “ Information ”.
- In the “ Property ” line we indicate the equipment ID.
- We copy the first “ Value ” and go to the search engine, where we paste the information. Next, many links to download drivers will appear, from which you can find out the manufacturer.
- We go to the official resource, download the software, install it.
- We restart the system and check that everything is turned on.
Additional reasons for Wi-Fi not working (to contents ↑)
In addition to those described above, there are other options why the wireless network does not work on a laptop. Usually the culprit is a change in settings. But sometimes the reason is the inability to use a dedicated channel.
Therefore, it is important to pay attention to the wireless communication device itself, which is used to distribute the Internet. There are a few basic settings worth checking:
- Channel. Try changing it from " automatic " to specific. Which one you can find on the Internet on forums or even on the official website of the service provider.
- Signal type and frequency. Rarely, but still sometimes this is the problem. Change and check.
- Login and password. It is worth making sure that Cyrillic characters are not used to connect to the Internet.
- Change region. Let's say from the Russian Federation to the USA or vice versa.
Well, as you can see, there are a lot of reasons why the wireless module on a computer may not connect to the access point. Try different methods.
You can see more detailed information in the video on YouTube:
I hope the article will help you solve the problem.
Share to:
Windows 10 Network Requirements Check Error: Solution
When connecting to a new Wi-Fi, the message “Checking network requirements” often appears. This is fine. But sometimes the download takes forever, and you can’t connect to the Internet. There are two solutions:
- restarting the laptop;
- reinstalling drivers for Wi-Fi on Windows 10.
It is also worth using the methods above. For example, resetting settings.
Use an external modem
If none of the methods helps fix the Wi-Fi problem, try connecting an external modem to your laptop. There may be a problem with the adapter. This method will help you gain access to the Internet for a while until the device is repaired.
To do this, connect the gadget via a USB connector. Sometimes you will have to install additional drivers. If the manufacturer did not include the disc in the box, download the software from the developer's website.
These methods solve 90% of problems with Wi-Fi network on a laptop. But if there is no Internet on Windows 10 after all the steps, contact a service center. The adapter is probably damaged.