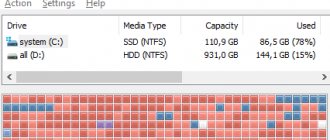
Changing the volume label
Users treat their PCs differently. Some are quite satisfied with the default parameters offered by the system, others prefer to “customize” the system for themselves, achieving the most comfortable conditions for using the computer.
After installation, all partitions on the hard drive are often named “Local Disk,” but it is much more convenient to designate the space allocated for movies, photos, or backups more clearly. This is especially true if the PC is used by several users.
A volume label is a descriptive name for a partition on a hard drive; it is necessary only for user convenience and does not affect the operation of the OS.
Let's look at the main ways to change the volume label:
- use of a graphical interface;
- label command.
Most users are not used to working with command-based systems. For them, changing the volume label using a GUI is much more suitable.
Here is the procedure for changing the volume label:
- open “My Computer”;
- right-click to open the menu on the desired drive;
- select “Rename”;
- enter a new name;
- press Enter.
Before changing the volume label, you need to know the basic requirements for it, because otherwise proper operation may be disrupted, consider them:
- maximum label length is 11 characters for FAT or 32 for NTFS;
- spaces are allowed;
- It is prohibited to use a tab character in a label;
- The label of a disk formatted in FAT cannot contain the following characters: * ? / | . , ; : + = ".
Hard drives have usually been formatted in NTFS for many years now; other drives may still be formatted in the older FAT file system.
It is more convenient for experienced users to change the volume label using the command line and the label command.
Let's look at how to change the label from the command line:
- open a command prompt with administrator rights;
- enter the command label drive letter;
- press Enter;
- specify a new label and confirm the entry using the Enter key.
Please note that the old label will be erased without displaying an additional warning.
If you just need to remove the volume label, you need to do the following:
- run command line with administrator rights;
- type the command label drive letter and press Enter;
- when prompted, leave the input field blank and press Enter;
- Confirm deleting the mark by pressing Y.
Possible problems
Sometimes Windows 7 users cannot change the drive name. This is due to the big changes that have occurred in this version of the OS. Often on computers with Vista and XP, to prevent infection by certain viruses, an autorun.inf file was created in the root of the disk. In Windows 7 there is no point in creating it, but this file may be hidden.
Let's look at how to enable the display of hidden files:
- open “Control Panel”;
- go to the “Folder Options” section;
- on the “View” tab, check the box next to “Show hidden files and folders”;
- Click Ok.
You can now delete the autorun.inf file and restart the computer, after which you can change the volume label.
RAW format: what is it?
In the usual sense, such a structure is a modified format that is simply incompatible with most known operating systems. Therefore, a notification appears on the screen stating that the volume’s file system is not recognized (although the RAW format flash drive is visible, the files on it are not visible, even if you enable the display of hidden objects).
Changing the format is most often associated with software failures due to incorrect formatting, improper shutdown of the device, and exposure to viruses. However, you can convert the format into a readable one quite simply, which will be discussed a little later.
Changing the drive letter
The drive letter is a pointer directly to the logical partition of the hard drive; it is also found in removable drives, CD/DVD drives, and virtual disks. Sometimes you may need to change it for greater convenience or to correctly transfer programs to the installed new drive.
Important! Never try to change the letter of a system drive. In most cases, this operation will fail, and in some cases there will be problems starting the OS.
Let's look at how to change the drive letter:
- go to “Control Panel”;
- select “Computer Management” and go to the “Disk Management” section;
- on the partition that needs to change the letter, right-click;
- in the menu that opens, select “Change drive letter or drive path”;
- in the window that appears, click on the “Change” button;
- choose the appropriate letter;
- click Ok;
- confirm the changes.
Important! Changing the drive letter can have unpredictable effects on installed applications. It is also not recommended to change the letter for the optical drive, as Nero and some other programs may not work correctly after this.
You can change the hard drive label an unlimited number of times, since it is only for the convenience of users and does not affect running applications. Changing the drive letter is recommended only for experienced PC owners, as these actions can harm the system.
>
Users often think about which file system is best to format a flash drive. Usually they choose the system that they like best, however, there are still a few tips. Fat32
It works faster, but such a drive cannot accommodate a file larger than 4 GB.
If you use the drive to store small files and documents, NTFS
.
When storing large files, such as videos or images, it is better to use exFAT
. Experiments have shown that in these cases such file systems cope best.
As an exception, it can be noted that some equipment requires drives with a certain system; in this case, you will still have to format it to meet these requirements. Typically, older or specialized equipment requires fat32, while others can use file systems at the discretion of the manufacturer.
Formatting a flash drive or disk at the command line using DISKPART
The Diskpart command line tool, available in Windows 7, 8 and Windows 10, allows you not only to format individual partitions of a flash drive or disk, but also to delete them or create new ones.
First let's look at using Diskpart to simply format a partition:
- Launch Command Prompt as Administrator, type diskpart and press Enter.
- Use the following commands in order, pressing Enter after each.
- list volume (here pay attention to the volume number corresponding to the letter of the drive that needs to be formatted, for me it is 8, you can use your number in the next command).
- select volume 8
- format fs=fat32 quick (you can specify ntfs instead of fat32, and if you need full formatting rather than fast, do not specify quick).
- exit
This will complete the formatting. If you need to delete all partitions without exception (for example, D, E, F and others, including hidden ones) from a physical disk and format it as a single partition, you can do this in a similar way. On the command line, use the commands:
- diskpart
- list disk (you will see a list of connected physical disks, you need the number of the disk that will be formatted, for me it is 5, you will have yours).
- select disk 5
- clean
- create partition primary
- format fs=fat32 quick (it is possible to specify ntfs instead of fat32).
- exit
As a result, the disk will have one formatted primary partition with the file system you selected. This can be useful, for example, when a flash drive does not work properly due to the fact that it has several partitions (more about this here: How to delete partitions on a flash drive).
Command line formatting - video
In conclusion, about what to do if you need to format the C drive with the system. To do this, you will need to boot from a bootable LiveCD (including utilities for working with hard drive partitions), a Windows recovery disk, or a Windows installation flash drive. Those. It is required that the system not be started, since formatting also deletes it.
If you booted from a bootable USB flash drive Windows 10, 8 or Windows 7, you can press Shift+f10 (or Shift+Fn+F10 on some laptops) in the installer, this will bring up the command line, where formatting the C drive will already be available. Also, the Windows installer, when selecting the “Full installation” mode, allows you to format the hard drive in a graphical interface.
And maybe this will be interesting:
Why not subscribe?
Distribution of new, sometimes interesting and useful, materials from the site remontka.pro. No advertising and free computer help for subscribers from the author. Other subscription methods (VK, Odnoklassniki, Telegram, Facebook, Twitter, Youtube, Yandex.Zen)
07/12/2018 at 23:54
For example, if the disk is divided into partitions C, D, and E, using format you can format D first, then E, but not merge them.
“but not, for example, combine them” Did you want to write?
07/13/2018 at 08:09
There, it seems, when writing a sentence, I saw that “for example” was repeated twice and I wanted to delete the second take... but somehow not completely. Thanks for noticing, I fixed it.
09.22.2019 at 12:58
Access denied. On behalf of the administrator. And Acronis too
09/23/2019 at 08:59
And not a system disk (or even if it’s not a system disk, didn’t you transfer anything system to it?) Is it even a disk or a flash drive? If a flash drive, are there write protection switches on it?
Note: Once you submit a comment, it does not appear on the page immediately. Everything is fine - your message has been received. Replies to comments and their publication are carried out every day, sometimes more often. Come back.
Users often think about which file system is best to format a flash drive. Usually they choose the system that they like best, however, there are still a few tips. Fat32 is faster, but such a drive cannot accommodate a file larger than 4 GB. If you use the drive to store small files and documents, NTFS . When storing large files, such as videos or images, it is better to use exFAT . Experiments have shown that in these cases such file systems cope best.
As an exception, it can be noted that some equipment requires drives with a certain system; in this case, you will still have to format it to meet these requirements. Typically, older or specialized equipment requires fat32, while others can use file systems at the discretion of the manufacturer.
Do I need to format a new flash drive?
There is usually no need to format a new drive. All of them now work right out of the box, you just need to unpack and connect to your computer. However, formatting will also not do any harm, because there is no information on the flash drive and nothing will be damaged. The user just needs to check which file system is on the flash drive at the moment. It often happens that this is fat32, which means that it will not be possible to record large files. If this situation does not suit you, then you should re-encode the flash drive while there is no information on it.
Volume label for disk when formatting ntfs
The volume label is simply the name of the drive
. It will be visible when you connect the drive to your computer. It’s worth changing the standard name of the flash drive so that you can immediately find yours and not get confused among many identical ones. Typically, media are named by manufacturer and model number, however, nothing prevents the user from coming up with something of his own.
To change the label, the easiest way is to go to your computer, right-click on the flash drive and select rename
. After this, you can enter the device name. However, lowercase will not be available here, so the user may not like it.
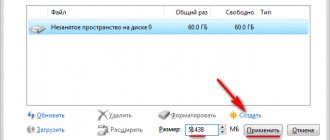
You can also set the device name during the formatting process
, indicating the name in the corresponding item indicated in the picture, after which the device will be renamed.
There is also the option to use an automatic launch file
.
To do this, you will need to create a text file named autorun
and save it with the .inf extension.
In the file itself you should write Label = Name of the flash drive
.
Many users block autorun because various malicious programs like to be registered there, so this method is not so reliable.
Do not forget about the restrictions that are imposed depending on the file system; if the requirements are not met, you may receive an error - “Invalid volume label specified.” For NTFS
:
- Name no more than 32 characters
- No tab
- Uppercase and lowercase characters.
For FAT
- No more than 11 characters
- No tab
- Capital characters only
Using the DiskPart utility
The Diskpart utility is designed to work with disks; the application performs the following operations: creating a new disk (volume), deleting an existing disk, creating a bootable USB flash drive, formatting a disk partition or the entire hard drive.
The program can be used on a running Windows operating system, but for simple formatting it is much easier to use the “format” command. We will consider two options for using DiskPart: formatting a hard drive partition, or formatting a system partition of a hard drive, the entire hard drive, if we only have one partition.
Due to the fact that we will not be able to format the system disk in a running Windows, we will use bootable media from which we will launch the command line. To do this, we need bootable media from which we can boot the computer and then run the command line: Windows bootable USB flash drive, Windows Recovery Disk, Windows installation DVD, USB flash drive or disk with Windows PE, “live disk” (Live CD, Live DVD, Live USB).
You need to boot onto your computer from a USB flash drive or CD/DVD, depending on what media you are using. First, enter the BIOS or UEFI boot menu, select the boot device, and then, after booting from the media, launch the command prompt in the Windows RE recovery environment.
Method 1: "format" command
Formally, you will do everything the same as in the case of standard formatting, but only using the command line.
The instructions in this case look like this:
- The command line can be invoked through the “Run” utility (“WIN” + “R”) by entering the “cmd” command.
- Type the command format F:, where F is the letter assigned to your flash drive. Additionally, you can specify the following settings: /FS – file system, /Q – quick formatting, /V – media name. As a result, the command should look something like this: format F: /FS:NTFS /Q /V:FleHka. Press Enter.
- If you see a message asking you to insert a disk, it means that the command was entered correctly and you can press “Enter”.
- The next message indicates the end of the procedure.
- You can close the command line.
If an error occurs, you can try to do the same thing, but in “safe mode” - this way no unnecessary processes will interfere with formatting.
Formatting a flash drive to NTFS
This section will directly tell you how to format the drive into the desired file system.
The easiest way
In this case, the built-in Windows utility will be used. You should go into your computer, right-click on the flash drive and select “ Format”
».
Here you need to select
ntfs
and here you need to specify the device name.
The cluster size
can be left standard.
In general, a cluster is the minimum amount of space that can be allocated for a file. If you plan to carry a lot of small files, then you should choose a smaller size, and if large, then a larger one. However, in most cases, the standard cluster suits the majority. Next, you should uncheck
quick formatting if there is a need to ensure that the data cannot be recovered. Then all that remains is to wait for the process to complete.
Using the Command Line
For formatting you should use
format
operator . The user will need to open the command line and enter the same command as in the picture, replacing E with the letter of his flash drive.
The format operator is written as FORMAT volume
Options:
- volume
– the letter of the drive to be formatted. - /FS:filesystem
– Specify FAT, FAT32, NTFS, or UDF here. - /V:label
- Volume label. - /Q
- Quick formatting. When using it, there is no need for the /p parameter. - /C
- for NTFS, compresses all data on the new volume. - /X
– If there is a need to disable all access to the drive, then you should enter this parameter. - /R:revision
- UDF only. - /D
- UDF only. - /A:size
- Replaces the default cluster size, discussed above.
Formatting via Disk Management
You can right-click on the computer and select Manage, then go to disk management
.
Here you should select a flash drive, also right-click on it and select Format
, after which all that remains is to configure everything and wait for the process to complete.
Using the diskpart utility
You can also use another command that is available on the command line. Enter one by one:
Using USB Disk Storage Format Tool
To get started, you should download and run the program. In
Device
field you will need to select the desired flash drive, then specify its name and cluster. Then all you have to do is press start and wait for formatting to finish. If you need quick formatting, you should check this box; the program is slightly different from the standard one.
If it didn't work out
Despite the fact that a flash drive is more reliable than a CD and DVD, it still suffers from problems. For example, it may simply not be displayed in “Computer”.
This happens for several reasons:
- File system is damaged
- The device was not formatted by the manufacturer
- The letter of the flash drive matches the letter of the drive already in use by Windows
To eliminate these reasons, go to Start - Control Panel.
Go to “System and Security” and/or “Administration”.
Open "Computer Management".
Click on “Disk Management” on the left side.
The window takes on the following appearance.
Right-click on the flash drive and select “Format.” "
Formatting using the command line
Another formatting method. But in order to use it, you need to know exactly the letter of the flash drive. Otherwise, you may accidentally delete data from another, desired drive.
1 . Press the keyboard shortcut Win + R.
2. In the Run window, enter cmd and click OK.
3. In the window that appears, enter format G: /FS:NTFS /Q /V:flashka
- format is a command to start formatting
- G is the drive letter under which your computer recognizes the flash drive (do not confuse it!)
- /FS:NTFS – file system in which you want to format the device. If you want fat32, then enter FS:FAT32
- /Q – quick formatting. If you need the complete one, just don't use this command
- /V:flashka – volume label (this name will be displayed when loading in “Computer”).
4 . Next, the system asks you to insert the required media if it is not already connected. Press "Enter".
When everything is ready, a similar inscription will appear.
Low-level formatting or “flash drive treatment”
This method should only be used if all of the above did not help.
Download and install the HDD LLF Low Level Format Tool program from the official website. During the installation process, select “Continue for free”.
Open the program, select your flash drive and click Continue.
A window with information about the device will appear. Go to the LOW-LEVEL FORMAT tab.
Click on the FORMAT THIS DEVICE button.
A warning appears that all data written to the media will be erased. Click “Yes”.
And we wait for the end of the process: when the window becomes something like this and 100% complete is written.
We close it and do the usual formatting, otherwise the flash drive will not open. To do this, follow the first instructions from this article (Start - Computer - right-click on the flash drive icon - Format...).
Users often think about which file system is best to format a flash drive. Usually they choose the system that they like best, however, there are still a few tips. Fat32 is faster, but such a drive cannot accommodate a file larger than 4 GB. If you use the drive to store small files and documents, NTFS . When storing large files, such as videos or images, it is better to use exFAT . Experiments have shown that in these cases such file systems cope best.
As an exception, it can be noted that some equipment requires drives with a certain system; in this case, you will still have to format it to meet these requirements. Typically, older or specialized equipment requires fat32, while others can use file systems at the discretion of the manufacturer.
Convert flash drive to NTFS
You don’t have to completely erase the media, but simply convert it
from one file system to another.
To do this, launch the command line and enter the operator convert h: /fs:ntfs /nosecurity /x
, replacing h with the drive letter. There must be free space on the flash drive to complete the process, otherwise you may receive an error message. Also, just in case, you should copy all the data.
"Disk 31.5 GB"
Important!!!
/dev/sda1 UNMOUNTED
and a new label
new_label
.
1. For Ext2/3
1.1.
Install e2fsprogs
if they are not installed:
e2label /dev/sda1 new_label
2. For ReiserFS
2.1.
Install reiserfsprogs
if they are not installed:
3. For XFS
3.1.
Install xfsprogs
if they are not installed:
4. For JFS
4.1.
Install jfsutils
if they are not installed:
5. For Fat32
5.1.
Install mtools
if they are not installed:
6. For NTFS
6.1.
Install ntfsprogs
if they are not installed:
ntfslabel /dev/sda1 new_label
Disk labels for different file systems
Many people have probably encountered the fact that when you mount disks somewhere, in programs (for example GnomeCommander) they are then displayed as /mnt/disk, etc. Or, for example, when you connect a USB drive, it is displayed in the system as “31.5 GB disk”
(For example). So I decided to get rid of such names and assign normal labels to the disks, as, for example, in the same Windows.
Unlike Windows, Linux has more file systems, so let’s look at the most common ones.
Setting tags via the console
Important!!!
Before changing or applying labels to disks, the disks must be
UNMOUNTED
. You also do all manipulations with sections at your own peril and risk. There have been cases where people have lost important information by not following commands correctly or not carefully reading warning messages.
Below, for example, the disk /dev/sda1
and a new label
new_label
.
1. For Ext2/3
1.1.
Install e2fsprogs
if they are not installed:
1.2. Set the disk label:
e2label /dev/sda1 new_label
2. For ReiserFS
2.1.
Install reiserfsprogs
if they are not installed:
2.2. Set the disk label:
reiserfstune -l new_label /dev/sda1
3. For XFS
3.1.
Install xfsprogs
if they are not installed:
3.2. Set the disk label:
xfs_admin -l new_label /dev/sda1
4. For JFS
4.1.
Install jfsutils
if they are not installed:
4.2. Set the disk label:
jfs_tune -L new_label /dev/sda1
5. For Fat32
5.1.
Install mtools
if they are not installed:
5.2. Set the disk label:
mlabel -i /dev/sda1::new_label
6. For NTFS
6.1.
Install ntfsprogs
if they are not installed:
6.2. Set the disk label:
ntfslabel /dev/sda1 new_label
Setting tags via gparted
1. Before labeling a partition or disk, unmount it and install the necessary programs for the file system you need. What programs these are are described above in the installation via the console section. 2. Right-click on the section and select “Label” and enter a new label. 2.1. If suddenly a message appears that you may lose all the data on the partition or disk, under no circumstances continue and double-check the correctness of your actions.
PS I changed the labels for Fat32, Ext3 and NTFS partitions - everything went without a hitch.
A volume label is a special configuration used to create hard disk volumes. Changing it is not recommended because you may lose some user files.
Instructions
- Open the Start menu and launch the Run software utility. In the small window that appears, type diskmgmt.msc and press Enter. The Hard Disk Management Setup Utility will appear. If you are unable to start it this way, use the “Administration” menu item in the computer control panel. In the window that appears, select the “Disk Management” menu item on the left.
- View all available storage devices. View the volume labels (letters) assigned to the storage media. If you need to change it, right-click on the disk device and select "Change drive letter or drive path."
- Please note that if there is an operating system and Program Files on it, there is a huge possibility of losing all user data and further reinstalling Windows. If this is an ordinary disk on which files are stored that are not related to installed programs or the operating system, then the maximum you risk is losing the path to the data, possibly registered by this or that program.
- If you want to change the volume label of a removable drive, for example, a phone memory card, change this option in the same menu, but it is best to back up the data to a local computer drive, since complete or partial loss of it is possible. When changing the map volume label, keep in mind that in the future it may become unreadable on your mobile device, and some data may not be able to be used for certain purposes.
- If this happens, format the renamed removable media from Safe Mode. Then format it using your mobile device, and only then start using the card as usual. When changing the volume label of a removable hard drive, check whether it contains torrent files, as you may lose the seed.
Recovery using the TestDisk utility
Now let's look at the situation when the file system of the volume is not recognized (the flash drive is not visible even in Explorer, although the LED is blinking). Let’s say right away that the solution below can be used for removable memory cards of any standard.
The program is free and does not require installation. True, many may be upset by the lack of a Russian-language interface and operation in DOS mode. But the utility is very powerful because it is capable of first restoring the file system and then the necessary information.
We launch the utility, in the window that appears, select the Create item. Next, a list of all available disks will appear, including a flash drive invisible to the system. As a rule, in the list it is designated as Disk /dev/sdc with an indication of the capacity (in addition, there may be a description like Generic-Multi-Card). If there is no description, you can determine that this is the flash drive you are looking for simply by its size or disk letter.
Next, we activate the analysis process (Proceed), after which we select Intel Partition in the partition table. Next, go to the extended file system (Advanced item), press the enter key, and then at the bottom of the window use the recovery command (Undelete). We wait for the scanning process to complete, and then red lines appear in the window, corresponding to all deleted files. Don’t be surprised that even those files that you don’t remember about at all can be found here (the program finds them with ease).
Now use the arrows to move through the list, select the desired object and press the C key to restore. Next, select the directory in which the files will be saved and press “Enter.” After selecting the folder, press C again. Once the recovery is complete, you will be notified that the copy is ready.