A little about monitor settings in operating systems
And in the Windows operating system, as well as in other operating systems, such as iOS or Linux, there are monitor settings. In Windows, monitor settings are located in the Control Panel, in iOS - in Settings. Using the settings, you can change the screen resolution, image scale, adjust colors, set image brightness and contrast, and do much more.
The monitor settings available in the operating system are usually enough to adjust the image as the computer user wants.
However, it happens that there is no “picture” on the monitor screen at all, or this picture cannot be adjusted as it should. This situation is quite rare. Because modern monitors are designed in such a way that they automatically “recognize” that they are connected to a computer. Next, following the logic of “obedience,” the monitors are connected to the computer. And then they “obediently” process the received signals from the computer, including signals for adjusting various image parameters.
But there are still times when the monitor, alas, does not show anything, or does not show it the way you want it to. Then we can remember that
Almost every monitor has its own settings, with the help of which there is a chance to make the image on it the way we need.
Method 1: Adjust Screen Resolution
Using this method, you can reduce all elements on your computer at once: menu items, icons, windows, etc.
Windows 10
1. Right-click on the Desktop and select “Display Settings”.
2. In the display settings, specify the appropriate value. It is advisable to choose the recommended one.
On a note. The higher the resolution, the smaller the size of icons and other elements will be.
For example, the computer is set to 1680x1050. To change it, click on the “Resolution” item.
The top menu has a value of 1920x1080 and states that it is recommended. This means that the system has automatically determined the appropriate resolution. By clicking on it with the left mouse button, the screen size will immediately be adjusted to the monitor settings.
Here is a clear example where the wrong value is configured:
Icons and taskbar are blurry and large. And if you pull the windows, they flicker and blur. This affects vision and makes working at the computer uncomfortable.
Here is the recommended value:
The icons and taskbar are straight, the screen is not blurry - everything works as expected.
Pay attention to the item “Change the size of text, applications and other elements”. It is located above the “Resolution” item and it also determines how elements will look in Windows 10.
Windows 7
1. Right-click on the Desktop and select "Screen Resolution".
2. In the “Resolution” section, set the recommended value. It's usually the top one.
On a note. The higher the value, the smaller the resulting elements will be: icons, menus, etc.
3. Click OK to apply the settings.
Pay attention to the item “Make text and other elements larger or smaller.” Using it you can also adjust the screen scale.
Where are the buttons for offline monitor settings?
If you have to configure a monitor using its own settings, without resorting to Windows or another operating system, then the monitor's offline settings are said to be used. Why "autonomous"? Yes, because such settings are made using the monitor’s own (hardware and software) capabilities completely separately, and this is not connected with the computer in any way. That is, “autonomously”.
True, it often happens that it is impossible to start offline monitor setup procedures if it is not connected to the computer and the computer is not turned on. However, these are still stand-alone settings, since they are absolutely not related to the monitor settings in Windows (or in another operating system - OS for short).
Let's say that we needed to configure a computer monitor autonomously (independently) of the Windows (or other OS) settings. Then for this we will need adjustment buttons, which are available on almost every monitor. These buttons can be located in different places on the monitor. There is no single standard for button placement. Typically the buttons are located at the bottom of the monitor, or on its stand, but there may be other monitor design options.
For example, in Fig. Figure 1 shows that the monitor adjustment buttons are located at the bottom of the monitor stand.
Rice. 1 (Click to enlarge). Monitor adjustment buttons. From left to right: Auto, Left Arrow, Right Arrow, Menu, and Network.
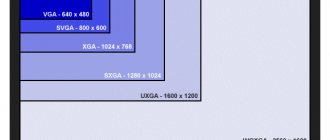
Monitor resolution
Perhaps I will reveal a secret to someone, but the resolution and diagonal of the monitor are characteristics that are not necessarily related to each other. In other words, a 19" monitor can have more dots than a 21" monitor. Naturally, an inverse relationship is more often observed, but still, these quantities are not necessarily related. The higher this indicator, the clearer the image will be, the dots (pixels) will not be noticeable.
Monitors with the same diagonal may have several resolutions, but computer manufacturers usually adhere to the following standards:
- 19 inches – 1440x900 pixels.
- 21-24 inches – 1600x900 pixels. If the screen is Full HD, then the resolution will be 1920 by 1080 pixels.
- Cheap monitors, 27-32 inches , have a resolution of 1920x1080 pixels, and QHD monitors have a resolution of 2560x1440 pixels.
- Giants with a diagonal of 32-45 inches have a matrix with 2560x1440 pixels. If you take models with 4K quality, their resolution will be 3840x2160 pixels. It's worth noting that the latter format is quite new, so it may not support some games or movies.
Adjusting the sound volume on a monitor with built-in speakers
Some modern monitors have built-in speakers. Let's assume that the user owns a monitor with sound. In this case, sound from the computer can be output to the monitor using a separate wire or using the HDMI interface. Then it becomes necessary to adjust the sound volume on the monitor.
Usually the sound is adjusted again using the operating system settings (Windows, iOS, etc.). But this is not always enough to get a quiet or, conversely, loud sound.
To adjust the volume of the monitor's built-in speakers, you need to know which buttons to use. In the monitor shown in Fig. 1, sound volume is adjusted using the left arrow (quieter) and right arrow (louder) buttons. These buttons are shown in enlarged form in Fig. 2. On another monitor, the buttons may be located in different places and be completely different - there is no single standard for the appearance and location of the buttons.
Rice. 2. Volume control buttons on the built-in speakers of the computer monitor. On another monitor, the location and names of the buttons may differ from the image shown.
The adjustment is carried out in an intuitive way. At any time when it is necessary to change the sound volume, the user presses once on one of the two buttons highlighted in Fig. 2. And then repeatedly pressing the “left arrow” button gradually reduces the sound volume. Repeatedly pressing the right arrow button, on the contrary, increases the volume.
When adjusting the sound, a “picture” may appear on the monitor screen, for example, as shown in Fig. 3.
Rice. 3 (Click to enlarge). Possible image of a slider showing how to adjust the volume of the monitor's built-in speakers. The image of the volume slider may differ from this image on another monitor.
Pictures for monitor settings do not change the information on the user's screen
This picture, although displayed on the monitor screen, is in no way related to those “pictures” that the computer itself displays on the monitor screen. The image of the engine is displayed as if “on top” of the image that is displayed on the monitor screen when the computer is running. This engine does not change the image of their computer in any way, it only temporarily “overlays” it on top of the computer image.
After completing the sound volume adjustment, the slider automatically disappears from the screen without any impact on the image from the computer. And if the user, at the time of any monitor adjustment, for example, edited his drawings, then the adjustment images will in no way “spoil” anything drawn by the user on the computer. All settings images will disappear from the screen once the settings are completed.
Autonomous adjustments of brightness and contrast of the image on the monitor
Typically, users have enough of the monitor image brightness settings available in Windows and other operating systems. Most often, there is no need to resort to additional offline settings available on the monitor. However, it happens that the brightness settings are too low, you need to increase the brightness of the monitor. The same goes for image contrast. It is not always possible to adjust the contrast using the monitor settings that are available in the operating system.
Then autonomous settings of monitor parameters come to the rescue using special buttons located on the computer monitor itself. Here, for settings, we will need four out of five buttons. And to adjust the volume of the monitor's built-in speakers, only two buttons were used.
Screen coating
The surface of monitors can have two types of coatings - matte and glossy. Each of these types has its own pros and cons that should be considered when choosing a monitor.
- The glossy surface of the monitor visually looks brighter. The entire color range is more saturated, however, when directly exposed to natural or artificial light, glare appears. Therefore, such monitors should not be placed near a window, because if exposed to sunlight, it will be difficult to see anything on it. By the way, a glossy screen can be turned into a matte one using a special film.
- A monitor with a matte finish is more faded than a glossy one, which is especially noticeable on TN matrices. In addition, not everyone likes the crystalline effect of the screen. However, the image on such monitors will be constantly clear, no matter how intense the external lighting.
- gloss is something between gloss and matte screen. Outwardly it looks matte, but when viewed from an angle, reflections are visible on it.
Entering the first level menu in the offline monitor settings
Let's take a closer look at how brightness and contrast settings can be made using buttons on a computer monitor. The first thing you need to do before starting the settings is to click on the “Menu” button (Fig. 4):
Rice. 4. “Menu” button for monitor settings. On another monitor, the location and name of the button may differ from the one shown.
A picture of the settings menu will appear on the monitor screen, for example, as shown in Fig. 5:
Rice. 5 (Click to enlarge). An example of a menu for offline monitor settings. On another monitor, the menu appearance may be completely different from the one shown in the figure.
On each specific monitor, the appearance of the offline settings menu can be very different. It all depends on the manufacturer, the monitor, its type, model, and other things. There is no single “picture” standard, as we are used to seeing in operating system settings. These are stand-alone monitor settings that have nothing to do with computer operating systems and are practically in no way connected with them.
In the picture shown (Fig. 5), in the top field of the menu there are images of the “top level” settings. In this case, the setting related to the brightness and contrast of the monitor is highlighted. The remaining settings are darkened, which will be discussed later.
In the lower field of the menu there are detailed settings of the next level. For the brightness and contrast settings option, in the lower field you can see the “Contrast” and “Brightness” settings. The menu names are in English. It is possible to change the language in the menu using the same menu - this will be discussed below. For now, let's focus on the English-language menu, because there is no Russian-language menu for this monitor.
Going to the second level menu in the offline computer monitor settings
To go to the second level settings (to “jump” from the top half of the menu picture to the bottom of the menu), you need to press the “Menu” button again (Fig. 4). Then the menu picture will change and take the form as shown in Fig. 6.
Rice. 6 (Click to enlarge). Second-level menu picture for adjusting the brightness and contrast of the image. On another monitor, the menu appearance may be completely different from the one shown in the figure.
Now we have the contrast adjustment icon highlighted (Fig. 6). You can switch from contrast to brightness and vice versa using the “left arrow” and “right arrow” buttons (Fig. 2). True, in Fig. 2, we adjusted the sound level on the built-in speakers, but now these same buttons serve to switch from contrast to brightness and vice versa.
In more modern monitors, in fact, there may be much more second-level menu options for brightness and contrast settings. You can adjust the color of the image and a lot of other light and color parameters.
The general principle of using the settings menu is the same:
to move from the first-level menu to the second level, press the “Menu” button (Fig. 4), and to move between the second-level menu options, press the “left arrow” and “right arrow” buttons (Fig. 2).
Autonomous adjustment of monitor brightness and other parameters using the example of brightness adjustment
We haven't changed the brightness or contrast yet. We only had the option to move the menu highlight between Brightness and Contrast. Let's say you need to adjust the brightness. Then we stop (using the “left arrow” and “right arrow” - Fig. 2) on the “Brightness” option, and press the “Menu” button again (Fig. 4). In this case, the “Brightness” bar turns red, its length can be changed using the arrows (left and right). In such a simple, but not at all obvious way, we find ourselves in the third level of the menu (Fig. 7):
Rice. 7. Third level menu picture for adjusting image brightness. On another monitor, the menu appearance may be completely different from the one shown in the figure.
And only now you can adjust the brightness of the image. In its original form (Fig. 7), the brightness value is set to 83 (this means 83% of the maximum brightness value). By clicking on the “left arrow” (Fig. 2), you can reduce the brightness down to the value 0 “zero”. And the “arrow to the right” (Fig. 2) allows you to increase the brightness even to the maximum number of 100, which corresponds to the maximum brightness of this monitor.
Let's say we set a new brightness value - 87% (Fig. 8). The difference between Figure 8 and the previous Figure. 7 only that the brightness value number instead of 83 became 87, and the red brightness slider was slightly longer. However, this means that the brightness is increased using the controls on the monitor, but without applying the operating system settings.
Rice. 8. Third level menu picture for adjusting image brightness, where image brightness is increased to 87%.
All computer monitor parameters that are in the offline settings menu are configured in the same way. The logic is the same:
- go to the menu of offline settings of the first level, select the appropriate setting of the first level;
- go to the second-level menu and select the appropriate parameter for its subsequent configuration;
- go to the mode for setting the selected parameter;
- configure the parameter;
- and complete the offline configuration of the parameter - see below for how to complete the parameter configuration.
What are the offline monitor settings in the first level settings menu?
For the monitor selected in our example, at the first level of offline settings you can see 10 icons, 10 options for the first level settings (Fig. 5). For each such icon, if you move to it using the “left arrow” and “right arrow” buttons (Fig. 2), icons and sliders for second-level settings will be shown. We move to the second and then to the third level of settings using the “Menu” button (Fig. 4). And we move back from level to level using the “Auto” button (Fig. 9).
What are the stand-alone settings of the first level of the monitor? Settings may vary from manufacturer to manufacturer. They differ even from the same manufacturer, but in different models of monitors, in different types of monitors. There is no universality. But using this example of a very specific monitor, you can see in general terms what these autonomous settings are (except for the brightness and contrast settings of the monitor already discussed above).
Menu of the first level of settings on a specific monitor
So, you can see the following first-level menu icons for offline computer monitor settings settings (see Fig. 10, 11, 12):
Rice. 10 (Click to enlarge). Settings: 1 – monitor brightness and contrast; 2 – focusing (sharpness, clarity) of the image; 3 – image centering. On another monitor, the menu appearance may be completely different from the one shown in the figure.
Number 1 in Fig. brightness and contrast already discussed above .
2 – autonomous settings for focusing (sharpness, clarity) of the image. Allows you to make the image as clear as possible for a given monitor screen resolution mode.
3 in Fig. 10 – centering . They allow you to position the image as centrally as possible on the monitor screen or, conversely, move the image relative to the center up/down and left/right.
Settings for menu language, tones and image zoom
Rice. 11. Settings: 1 – image tones; 2 – settings menu languages; 3 – image scale vertically and horizontally.
1 in Fig. 11 – image tone . They allow you to make an image in warm colors or, conversely, in cool colors.
2 – settings menu language settings . Here you can change the monitor menu language. The default language is usually Russian if it is in the settings, or English if there is no Russian language in the settings. Those who are more comfortable working in other languages, for example, German, can change the menu language.
There is even a Chinese language (what would it be like without the Chinese language in our time?!). It’s just better not to install such a language if you are not familiar with it, because then, looking at the incomprehensible hieroglyphs, it will be extremely difficult to return the menu to its previous form.
3 in Fig. 11 – vertical and horizontal image scale Here you can adjust the proportionality of the image vertically and horizontally. The image can be “flattened” or, conversely, stretched in two dimensions. Such settings are useful for, for example, trying to simulate a modern, horizontally stretched image on an old-style “square” monitor.
Current monitor resolution, computer connection method, serial number
Rice. 12. Settings for connecting the monitor to the computer (number 1). Information about the current resolution of the monitor, how it is connected to the computer, and the serial number (number 2).
Number 1 in Fig. 12 – settings for connecting the monitor to the computer. The monitor can have different connection options to the computer (VGA interfaces - analog connection, DVI - digital connection, HDMI - multimedia connection, and others). These settings allow you to determine exactly how the monitor should be connected to the computer.
2 in Fig. 12 – information about the current monitor resolution . In this case, the resolution is installed and configured only using operating system tools. Here we see only information, nothing more, without the ability to change parameters. Information is also provided on how to connect the monitor to a computer and its serial number.
Default monitor settings and exit menus
Rice. 13. Setting the monitor parameters to “default” (number 1). Exit the offline computer monitor settings menu (number 2).
Number 1 in Fig. 13 – setting the monitor parameters to “default”. This menu option is used if, as a result of offline settings, it was not possible to configure the monitor well. Then it is better to return it to the state it had before the start of manual offline settings.
2 in Fig. 13 – exit the offline computer monitor settings menu.
Items marked with number 2 in Fig. 12, as well as number 2 in Fig. 13 are not, in fact, stand-alone monitor settings. But they are needed in the menu so that it has a “finished look”. And also so that you can use this menu and perform all actions, including viewing settings, and exiting offline settings mode.
What to do if the buttons for offline settings look completely different on the monitor than described in the article
Typically, monitors, as well as other equipment for home or office use, have an intuitive appearance and interface. Therefore, it is necessary to focus on the appearance of the buttons, on the inscriptions of these buttons, and try to understand the intention of the designers and manufacturers of the monitor.
You can also try pressing the monitor buttons at random if you cannot otherwise understand their purpose. Usually mastering the monitor buttons does not take much time. After several unsuccessful attempts, the user understands the meaning inherent in the buttons by the manufacturer. Then it's a matter of technology.
The main thing is that you don’t need to rush to use the monitor’s offline settings buttons. They are needed, rather, “just in case.” Because most of the required monitor settings can be made without using standalone buttons - this is done using operating system settings (Windows, iOS, Vista, etc.)
Thus, buttons for offline monitor settings settings are needed only when, for some reason, monitor settings using the computer’s operating system do not help.
Image scaling when connecting a second monitor
Many desktop computers and even portable laptops are equipped with second monitors. It’s more convenient to work this way if there are as many as 2 screens. Some even connect more than 2 screens, for example, 3 or 4. But the latter is rather an exception, whereas quite often computers are operated with two monitors.
One of the monitors in this case will be considered the “first” or “primary” in the Windows settings, while the other will be considered the “second” or “secondary”. But the settings can be changed, for example, so that the “second” monitor becomes the only and “main” one.
Therefore, when connecting a second monitor, it is important to choose the right option for displaying information. If you choose incorrectly, you can install such a desktop extension that, for example, part of the screen goes to the second monitor. This mode is used if you want to see the computer desktop not on one, but on 2 monitors at once. Such an extended desktop will begin on the first monitor, and end (continue) on the second monitor. And then the following can happen: when you disconnect the second monitor, but while maintaining the previous settings, part of the Windows desktop will simply become invisible. It - this part - is there, but it is not visible, because the second monitor is turned off.
When you disconnect the second monitor, but save the settings, when part of the desktop continues on the second monitor, strange things can generally happen. The window of any program can be “dragged” off the desktop with the mouse, and then this window cannot be “brought” back by any force. The window will become invisible and inaccessible. And since entire windows can disappear from view, what can we say about some parts of the window where important clickable buttons or settings menus may be located?!
Second monitor in Windows 10
In Windows 10, you can use a free, built-in program (called Connect to a Projector) to choose one of four options when connecting a second monitor:
1) Duplicate these screens - the same image will be displayed on the first and second monitors.
This mode allows you to show others on a special screen everything that is happening on the main screen of your computer or laptop. This is how various presentations are displayed for public viewing if they are shown at a conference or meeting. This is a convenient mode for collective viewing of information from the monitor screen.
2) Expand these screens - the desktop will be extended, expanded from the first monitor to the second. One part of the Windows desktop will be visible on the first monitor, and the next second part of the desktop will be visible on the second monitor.
The mode is convenient for those who have little space on their desktop and want to place as many simultaneously open windows on it as possible. This is how professional programmers often work, having before their eyes windows with editable program texts (codes, in modern language) and at the same time windows with executable programs, allowing them to immediately see the results of writing the program (code).
This mode is also convenient for professional designers. They need to have numerous images and texts before their eyes, so that they can later combine them into a single composition.
3) Show only on the first screen – the second monitor will be disabled, nothing will be displayed on it, all information is visible only on the first monitor.
As if there is a second monitor, it is even connected, but nothing is output to it. Meaning? For example, to perform computer settings, when system work can affect the second monitor, and it is better to turn off the monitor while they are being carried out.
4) Show only on the second screen – the first monitor is disabled, all information will be visible only on the second monitor.
The latter is often used by laptop owners if they work at home, in a stationary workplace. Then they connect another monitor with a larger screen to see more and better than on the main, built-in laptop screen.
About the settings for the first and second monitors
Any connection of a second monitor somehow causes changes in the screen resolution settings of the main and additional monitors. And after connecting a second monitor, some windows may become invisible. Then you will have to return to what was previously written in this article: change the screen resolution or change the scale of the images displayed on the screens. Everything is done in the same way as described above, only you will have to make the settings twice: for the first and for the second monitor.
There is no simultaneous setting for two monitors at once; settings must be made separately for each monitor, depending on their types, capabilities, models, brands, drivers used, and other things.
Details on How to connect a second monitor in Windows 10
I wrote about connecting an external monitor in Windows 8, 7 and XP, as well as choosing the option for displaying information on monitor screens HERE.
Changing the image scale in Paint
You can change the image scale not only in browsers, as described above. Scaling is also possible in many other commonly used programs.
In the Paint drawing program (Fig. the image scale can be changed using the slider located in the lower right corner of the program window.
Rice. 8 (click to enlarge). Changing the image scale in Paint.
In Fig. Figure 8 shows that on the left side the image has a scale of 100% (number 1 in Figure 8, below), that is, it is reproduced with a one-to-one size, as is. But the image does not fit completely in the window; only the top part of the picture is visible.
If you reduce the scale to 50% (number 2 in Fig. 8, in the lower right corner), that is, make the image half the size, then the picture will completely fit in the window of the given size. So it’s more convenient to make some edits, changes, additions if the whole picture is visible as a whole, even if in a slightly smaller form, but everything is visible in full.
It is worth noting that changing the image scale only affects its appearance, how it looks on the screen, but the image itself does not decrease or increase in size. The size of a picture edited in the Paint editor remains unchanged when the image scale is changed.