How to get rid of dust from a laptop at home? Do-it-yourself methods for cleaning the cooler, cooling system, monitor and keyboard of a laptop. Features of cleaning various laptop models. Program for cleaning a laptop from Lenovo. Cleaning a laptop with a vacuum cleaner.
Cleaning a laptop is a very important and integral process that allows you to extend the life of this type of equipment. In this article we will figure out how to properly clean a laptop and how to rid all its parts of dirt.
What do you need to clean your laptop from dust, dirt and debris?
Cleaning your laptop yourself
- Before we talk about the cleaning process itself, it is necessary to clarify how often and when it should be performed.
- Ideally, you should clean your laptop every six months to a year.
- The frequency of cleaning operations on a laptop directly depends on its manufacturer - cheaper models need cleaning once a year, mid-priced laptops from reliable brands can be cleaned once every two years, but the famous Apple states that its products need cleaning no more than once every four years.
- If the time for cleaning has not yet come, but the laptop begins to act up, then perhaps it needs unscheduled cleaning.
When should you clean your laptop?
You can determine that equipment needs emergency cleaning by a number of the following signs:
- The surface of the laptop heats up very quickly - a few minutes after turning it on.
- There is noise coming from the laptop computer, like a dusty fan.
- The performance of the laptop deteriorates significantly - spontaneous shutdowns, glitches, sluggishness, blue screen.
What do you need to clean your laptop yourself?
To thoroughly clean your computer, you may need the following materials and tools:
- Phillips screwdriver
- Special cloth for screen
- Dry cloth or napkin
- Vacuum cleaner or hair dryer to blow out dust
- Machine oil or silicone grease
Required set of tools
Before you start disassembling and cleaning your laptop from dust, you first need to ask yourself whether you are ready for this procedure. In general, there is nothing complicated - if you know how to use a screwdriver and tweezers, there should be no problems. In addition, you will need a good memory to remember how everything was connected and the sequence of disconnecting the cable and connectors.
Among the tools you will need is a small Phillips screwdriver, possibly a flat-tip screwdriver, tweezers for disconnecting cables, a small vacuum cleaner for cleaning the keyboard (a regular vacuum cleaner with a narrow nozzle and a brush will do, but the suction power will need to be reduced).
Also, it would be nice to have a special kit for disassembling mobile gadgets, which includes plastic spacer wedges, inserts in the form of picks and small screwdrivers. This kit can be bought in Chinese household goods stores for about 100-150 rubles. And most importantly, to disassemble a laptop you need to have determination and relatively straight hands. Otherwise, you will have to invite a specialist for reassembly.
Before preparation, it is also worth warning that in addition to screws, the body cover and front part are secured with latches. Therefore, after you unscrew the screws, you need to carefully examine the case for proper opening and prying so as not to break the latches by applying force in the wrong place. You only need to pry off plastic covers with plastic wedges. A metal screwdriver can damage the surface and edges of the covers, causing scoring, which will have an unpleasant effect on the appearance.
How to clean your laptop screen from dust and stains yourself at home: photos, videos
Cleaning a laptop monitor with your own hands
When cleaning a laptop screen, you need to know a few rules:
- You only need to clean the laptop screen when it is turned off and cooled down.
- A plastic bag or cling film will help get rid of dust on the screen - they will attract dust from the monitor.
- It is advisable to get a special cloth for microfiber screens.
- If you don’t have a special rag, you can use wet wipes (without alcohol), cosmetic discs, flannel cloth, or microfiber cloth.
- In cases of severe contamination, you can use a weak soap or 3-6% vinegar solution. After dipping the rag into it and carefully wrung it out, you need to carefully wipe the laptop monitor until clean.
- It is prohibited to use materials such as paper napkins, foam sponges, terry towels, toilet paper and materials with coarse lint to clean the laptop screen.
- Do not use alcohol-containing substances, washing and cleaning powders, or window cleaners to clean the monitor.
- Under no circumstances should you scrub or remove heavy dirt from the monitor with hard objects, nails, or a knife - for this it is better to use a wooden stick, a plastic spatula, or a piece of plastic cut from a plastic bottle.
Rules for wiping your laptop monitor yourself
- With the dry cleaning method, you just need to carefully wipe away dust and dirt from your computer monitor or laptop. The corners of the screen can be wiped with cotton swabs - do not put strong pressure on them, so as not to damage the fragile surface.
- When wet cleaning, it is necessary to wet a rag of a suitable material in a soap or vinegar solution and wring it out thoroughly. Spraying the aid on the surface itself is not allowed - moisture can get into the laptop case, which will lead to malfunctions or permanent breakdown of the equipment. Using gentle circular or upward movements, you need to walk across the surface of the screen, and then remove any remaining moisture with a dry cloth.
Comprehensive cleaning with analysis of parts
If the laptop has not been cleaned for several years or has been stored in a place unprotected from dust, then deep cleaning is essential. It will require disassembling the case and careful care of each of its parts.
You should start by removing the back cover of the case . As a rule, it is fixed with screws. After unscrewing, they must be placed in some container so as not to be lost.
Important ! Under no circumstances should you try to pull out an intractable part by force!
Most likely, there is an undetected screw somewhere . After detaching the cover, you need to wipe it with wet wipes, removing the dust accumulated inside.
The battery must be removed from the case and set aside.
By the way ! In order not to get confused about where a particular screw was unscrewed from, you can also photograph the panel mounting points.
After completing all these procedures, you can begin cleaning individual components.
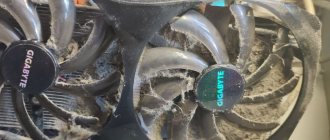
Cooler
The most dust accumulates on the fan and radiator, which remove heat from the processor. Most of the contaminants can be removed from them by blowing with compressed air. Using a bulky vacuum cleaner is not advisable, as it can damage fragile parts . The cooler itself can be removed by unscrewing the screws holding it and unplugging the power cable.
The blades are cleaned with a brush; particularly caked dust particles can be carefully removed with a cotton swab. Apply a little lubricant to the fan axis - it will reduce the noise level when the laptop is operating. The metal radiator can also be cleaned with a soft brush.
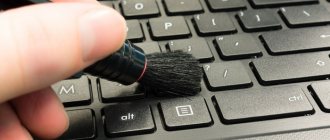
Keyboards
The outside of the laptop keys is treated with compressed air or a mild cleaning agent, which will not damage the symbols glued to them. This is usually enough to eliminate stuck buttons. If any liquids get inside, the keyboard will need to be partially disassembled.
Screen
It is better to clean the laptop display at the very end of the procedure. This way, new contaminants from other parts of the computer will not get on it. To care for it, it is advisable to use special products - aerosol or soaked wipes . They do not leave streaks or damage the surface, and provide an antistatic effect that repels dust particles for some time. The screen needs to be cleaned whenever it gets dirty.
Other details
It is also advisable to remove most of the dirt from the surface of the video card and processor . The components require careful handling and should not be subjected to unnecessary mechanical stress. Individual contacts can be treated with a brush or cotton swab soaked in isopropyl alcohol. You need to remove any remaining dried thermal paste from the processor and apply new one. You should be especially careful when removing it .
It is better to blow out dust from the connectors using a balloon, since they are quite small and it is quite difficult to get there using other means. At the same time, the most frequently used ports usually simply do not have time to get very clogged.
How to clean a laptop cooler from dust: photos, videos
How to clean a laptop cooler from dust?
- The cooler in a laptop is an integral part of the cooling system. Visually it looks like a small fan.
- If there are no serious problems with the cooler, and it is cleaned regularly, then simply blow the laptop with a can of compressed air through its inlet.
- If the fan is quite clogged and the device makes terrible noises, then it is better to perform a general cleaning. Before starting, you must remove the battery from the device.
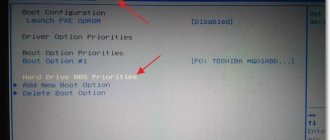
- To get to the cooler in the laptop, you need to unscrew the back cover of the switched off, cooled device using a Phillips screwdriver. In this process, it is very important not to touch the factory seals and unscrew all existing bolts - sometimes they are hidden under rubber bands, legs or on the side of the laptop. When all the bolts are unscrewed, you must carefully release the cover from the special latches.
- You can easily see the fan under the lid of the laptop. In most laptop models, coolers are very easily separated from their base - you just need to unscrew a couple of bolts. When unscrewing the cooler, you must act extremely carefully so as not to touch the spare parts of the device with your hands. The fact is that static electricity can still remain on them.
- When the cooler is removed, its blades and body must be carefully wiped with a paper towel or rag soaked in alcohol.
- It is also advisable to wipe the fan shaft and apply a drop of machine oil to it.
Remove the battery
Turn off your computer. Slide the latch and disconnect the battery. This will save the components from static electricity. In addition, in almost all laptops the battery interferes with removing the cover and hides the mounting screws.
In some models, the non-removable battery is located under the cover. In this case, you need to disconnect the battery cable from the motherboard after removing the back panel.
Browningate YouTube channel
How to clean the laptop cooling system from dust yourself at home: photos and videos
Do-it-yourself laptop cooling system cleaning
- In addition to the cooler, the laptop cooling system also includes a radiator. The radiator is located near the fan and looks like a grille of thin plates.
- The radiator can be released using a special mechanism. When removing the cooling system, you need to pay attention to the thermal paste - very often it melts and solders the radiator to the processor. In this case, it is recommended to carefully remove excess thermal paste with a napkin from both parts of the laptop and remove the radiator.
- To rid the radiator of dust, it is advisable to blow it thoroughly - with a vacuum cleaner, hair dryer or spray can.
When to clean and maintain your laptop
The need for preventive maintenance and comprehensive cleaning of a laptop arises when signs of incorrect functioning of the cooler and other elements appear. Users often find the following symptoms:
- increased noise of a running fan;
- strong heating of the case;
- Constant freezes and reboots when launching productive programs.
Cleaning the cooler and internal boards is the main preventive measure. This procedure reduces the risk of damage to heating components.
How to clean your laptop from dust and change thermal paste yourself at home?
Replacing thermal paste in a laptop with your own hands
- Another step in cleaning the laptop and its cooling system is replacing the thermal paste.
- This process must be carried out after cleaning the radiator.
- You can purchase thermal paste at any specialized computer store.
- When the radiator is cleaned, you need to apply just a little thermal paste to its body so that it does not extend beyond its limits.
- A clean radiator with new thermal paste can be replaced.
Assemble your laptop
YouTube channel F.ua
When everything is ready, assemble the parts in reverse order. Install the motherboard, connect all cables. Replace the cooler, install the front panel and keyboard. Install an optical drive, hard drive, and RAM.
Tighten all the screws on the back cover and connect the battery.
How to blow dust off a laptop without disassembling it?
How to blow out a laptop yourself?
- In order to clean your laptop at home without disassembling it, you can use the procedure for blowing it out.
- To do this, you need to turn off the laptop and let it cool down.
- Then on the side (in rare cases, back) of the laptop panel you need to find a ventilation hole - it looks like a ventilation grill through which exhaust, hot air comes out.
- Pointing the nozzle of a can of compressed air or a hairdryer into the ventilation hole, you need to thoroughly blow it out. It is recommended to apply pressure on the can for no longer than one second at a time.
- It is also worth paying attention to the fact that this cleaning method is not very productive, and its effect only lasts for a couple of months.
Signs that cleaning is needed
What happens to the PC:
- gets very hot;
- the processor makes noise that increases;
- the fan does not cope with its task;
- programs freeze;
- keys stick;
- switching on takes a long time;
- When the device overheats, it turns off unauthorized.
All of these things may indicate that your laptop needs cleaning. There are also programs for diagnosing temperature conditions. Indicators above 70 degrees are a sign of possible overheating due to contamination.
What program is there to clean and blow dust out of a Lenovo laptop?
Lenovo Energy Management laptop cleaning program
- Lenovo has developed a special program specifically for its devices that allows you to clean the laptop from the inside.
- The program operates by accelerating the fan, which expels dust from the device.
- It’s worth noting right away that the program is not capable of dealing with large amounts of dust and dirt, however, with regular software and mechanical cleaning of the laptop, its actions will not be superfluous.
- The program is called Lenovo Energy Management.
How to start the Lenovo Energy Management program
To activate the program, you must:
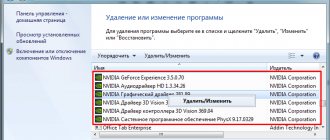
- For Windows 8, go to Control Panel.
- Open System and Security.
- Find “Power Options” and “Change Circuit Settings”.
- Open the Lenovo Energy Management program.
- Select the “Dust removal” mode in the program window.
- Click the “Start” button.
- After cleaning, click the “Cancel” button.
To summarize, I would like to note that no matter how simple and effective all the home methods of cleaning a laptop may seem, professional cleaning by specialists still remains the safest and most effective.
How to avoid frequent contamination
In order not to constantly blow dust out of the device, it is enough to arm yourself with simple tips:
- Use the laptop on a hard surface. By placing the computer on the lap or bed, the user blocks the air supply and small debris is sucked inside.
- You should not snack while working at the computer. Crumbs will get inside. And knocked over tea or coffee will completely kill the device.
- When finishing work, the laptop should be turned off so that it does not run idle.
- A USB cooler will provide additional cooling effect, but will not help avoid dust.
A laptop is a powerful portable computer, and keeping it clean is key to the safety and reliability of the device.
What you will need
You can perform laptop maintenance yourself, without involving service center employees. To clean at home, you will need to prepare a set of tools and materials, and then follow the step-by-step instructions.
Screwdrivers of different sizes for small parts
The laptop body and the parts located inside are fastened with screws of various sizes. To unscrew the device, you will need to use several screwdrivers; the easiest way is to prepare a set of tools.
Tassels
You should clean your laptop using different brushes. Parts with a scratched surface are best treated with soft brushes. To thoroughly clean the remaining elements, you can use brushes with stiff bristles.
Napkins
Special wipes are used to wipe the monitor, case and internal components. Treating parts with simple damp wipes can cause damage due to alcohol impregnation.
Possibly a plastic card
Often during maintenance it becomes necessary to remove the old layer of thermal paste on internal chips. To evenly distribute the new layer on the surface, it is most convenient to use a plastic card. It is important to take an unnecessary card, since it may be damaged if it interacts with thermal paste.
Thermal paste
Thermal paste is a creamy substance that has conductive properties. The paste is used as a layer in the cooling system of the elements and removes heat from powerful transistors.
It is recommended to replace thermal paste 2-3 times a year, since with frequent use of the laptop it quickly dries out, resulting in reduced heat dissipation efficiency.
Budget
Cheap types of thermal paste are made from powdered zinc oxide and polydimethylsiloxane liquid. It is advisable to use budget thermal paste in the case of preventive maintenance of inexpensive devices or in cases where a small amount of the substance needs to be applied to the chips.
See also
What can and cannot be washed in the dishwasher and why so
Expensive
Expensive types of thermal paste contain metals with high thermal conductivity characteristics. In particular, these are particles of silver, gold, copper or tungsten. Expensive thermal paste is required for high-end laptops.
How to choose
Depending on the composition, thermal paste takes on different consistency, density and color. When choosing the appropriate variety, it is necessary to take into account a number of indicators, including the following:
- Thermal conductivity is the main parameter of any thermal paste. The higher the indicator, the more effective the use of the substance will be.
- Thermal resistance, which is the reciprocal of thermal conductivity. Paste with low resistance is better at dissipating heat from internal parts.
- Plasticity, on which the uniformity of application to the surface depends. The thermal paste should smooth out well and create a thin layer without porosity.
- Resistant to temperature changes to prevent early drying out. When using a laptop, the paste is constantly affected by different temperatures, and a sufficient period of wear resistance is 1 year or more.
Excellent lighting
To avoid damaging parts, bright lighting is required to ensure good visibility. Work should be performed at a prepared workplace on which a table lamp can be mounted.
Attentiveness and accuracy
The cleaning process requires care, since boards and microcircuits contain a large number of fragile elements. Inaccurate movements may cause malfunctions.
Time
Comprehensive prevention takes several hours, and it is recommended to perform cleaning without long breaks. Leaving your laptop disassembled can result in the loss of small internal components. In addition, the likelihood of dirt getting on the surface of the microcircuits increases.