Updated 03/29/2019 : Official images of Windows 10, version 1809 build 17763.379 (KB4489899), are available for download.
Microsoft has begun rolling out the Windows 10 October 2018 Update for Windows 10, and users of the operating system who are not part of the Windows Insider program can finally get numerous new features. Note that the final release was Windows 10 build 17763.
The update became available for manual download on October 2, however, after Microsoft stopped distribution of Windows 10 October 2020 Update (version 1809), redeployment began on November 13, 2020. Microsoft offers several easy ways to get the feature upgrade to Windows 10 version 1809. While most users are aware of them, let's recap the options available.
How to download Windows 10 October 2020 Update (version 1809)
Method 1 – Using Windows Update
On October 2, the main stage of delivery of the new version begins, when the Windows 10 October 2020 Update will become available through Windows Update when checking for updates manually.
Starting November 13, compatible computers running Windows 10 can receive it automatically. This means that no user action is required. The update files will be downloaded through Windows Update, and installation will take place upon a subsequent reboot.
However, Microsoft says the update will be released in stages, so it may take some time to roll out. Depending on your computer's configuration and installed software, you may be able to get the update earlier or later, but you can't change this with Update Center.
If you want to update now, go to Settings > Update & Security and click Check for updates. Wait for Feature Update to Windows 10, version 1809 to begin installing. The required files will automatically download and the Windows 10 update will be installed upon reboot.
The offline upgrade phase to Windows 10 version 1809 (when the system is unavailable) will take an average of 30 minutes.
Method 2 - Using Media Creation Tool
The special Media Creation Tool will help you update the system directly on your PC without creating installation media. To do this, just launch the utilities and select “Update this PC now.” Detailed instructions are available on our website:
Using the utility, you can also download an ISO image and create an installation DVD/USB flash drive, which will allow you to update one or more computers to version 1809, as well as perform a clean installation of the system. Use the following instructions:
This method will be very useful for users who do not want to rely on automatic updates through Windows Update, but decide to complete the update process themselves. The Media Creation Tool will allow you to receive the Windows 10 October 2020 Update on the first day of the update's release, because phased implementation does not apply to this method.
Method 3 – Windows 10 Upgrade Assistant
One of the easiest ways to upgrade to Windows 10 (version 1809) without waiting for automatic updates is to use the Windows 10 Update Assistant utility.
Launch the tool and follow the on-screen instructions to update to the latest version of Windows 10.
Method 4 – Download Windows 10 disk image (ISO file) from Microsoft website
Microsoft has released ISO images that will allow you to speed up the update and perform a clean installation of Windows 10 October 2018 Update.
Basic ways to solve problems installing updates on Windows 10
The operating system has many tools and modules that can solve the problem of updating it. Determine the error code and act on it using our instructions.
Recommendations from Microsoft
Tens developers give the following tips for troubleshooting errors during system updates:
- To start searching for an update, click on the “Check for updates” button. If the search does not start or an error occurs, close the center, wait 15 minutes, enter it again and run the scan.
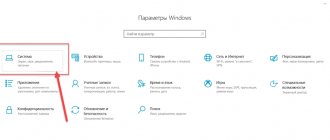
In the Settings window, select the section called Update & Security
- Open the “Windows Settings” window on the display: press the two Win and I buttons on the keyboard at once. If nothing appears, use the Start menu. Click on the gear above the power off button.
Click on the gear to open the Windows Settings window
- On the panel, go to the “Update and Security” block.
Click on the "Check for updates" button
- Also follow the "Advanced Options" link at the bottom of the button. Set up automatic installation for the update.
In the drop-down menu, select the first item “Automatic”
This solution can only help in a number of cases, for example, when the download of updates was interrupted due to some single failure in the system or due to a temporary lack of Internet.
Solve problems using the Computer Troubleshooter
The developers have built into Windows a special tool that allows you to find various problems in the system and fix them immediately. We will tell you how to use this tool in the instructions:
- We will launch the tool through the “Control Panel”. You can open it through the “Run” module: hold down Win and R, type the control request in the empty field and click OK.
In the “Open” line, enter the command control
- You can also launch the panel through “Search”. We enter the appropriate query and open the classic application in the results.
Search for "Control Panel" and open the desktop app
- On the panel, click on the “Troubleshooting” section.
In the Control Panel window, find and run the Troubleshooting block
- In the left column, click on the second link “View all categories”.
Go to the list of all categories for troubleshooting
- We are waiting for the system to detect available diagnostic packages.
Searching for diagnostic packages will take some time - please wait a moment
- At the end of the list there will be a “Windows Update” module. Right-click and select the “Run as administrator” option.
Run the Windows Update troubleshooter as an administrator
- In the troubleshooting tool window, click on “Next” so that it begins the search.
Click “Next” to start searching for problems on your computer
- Again, we wait until the tool completes the problem detection procedure.
Wait until the search for problems on your device is completed
- If problems are found, the tool will notify you about this and immediately provide the opportunity to correct them. For example, the module may offer to run a pending update. Click on “Apply this fix”.
Click on “Apply fix” to have Windows fix the problem with the update
- The system may also find any additional problems. You will learn about the success of the operations in the report, where there will be a list of errors and a mark opposite each one - “Fixed”, “Not fixed” or “Detected”. If any problems remain unresolved, run the diagnostic tool again. You can also view additional information about the problems.
Click “Close” to exit the module
- If the module does not find any problems in the operation of the update center, move on to other solution methods.
The tool may not detect any problems on your PC related to Windows Update.
Checking services
The Windows service corresponding to the Update Center may simply be turned off on the device at the moment. For the update to take place, you need to activate it and set it to turn on automatically every time the system starts:
- Call up the “Run” window using a simple combination of Win + R. In the free field, write services.msc or copy and then paste. To execute, click on OK or Enter.
Paste the short command services.msc into the empty field
- In services we find “Windows Update” at the very end of the list. Double-click on it so that a second window appears on the display. If the click does not work, right-click and select the last element “Properties”.
In the context menu of the service, click on the penultimate item “Properties”
- For the startup type in the menu, set the value to “Automatic” - the selected service will start working immediately after Windows loads. After that, click on “Run” and apply the changes. Close all windows and try to update again in class=”aligncenter” width=”1365″ height=”725″[/img] Set automatic activation in the “Launch type” menu
Clearing the update cache manually
Removing all data from the update cache is quite simple - even a beginner can do it. Follow the short instructions:
- Before getting rid of information about the previous system update, you need to deactivate the service responsible for the operation of the “Update Center” in the “Services” window. Open it using the instructions from the previous section.
- In the list of components we look for “Update Center”. In the middle part of the window, click on the “Stop” link. We don’t close the window with services yet.
Disable the Windows Update service temporarily using the Stop link
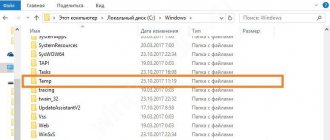
- Launch Windows Explorer and immediately go to the directories on the system drive. Here we need to open the following folders: Windows - SoftwareDistribution - Download.
On the system drive, open the SoftwareDistribution folder, and in it - the Download directory
- In the last section, select everything with the mouse, right-click and select delete from the options menu.
Delete all contents of the Download folder using the context menu
- We return to the “Services” window. Click on the “Run” link so that the update service starts working again. Let's see if the problem with the system update has been resolved. To do this, follow the steps from the “Recommendations from Microsoft” section.
Click on “Run” to reactivate the center service
Video: what to do if Windows 10 updates are not downloaded
Checking your computer for viruses
Even the presence of an antivirus on a PC cannot guarantee absolute security - a virus can penetrate through the protection. In addition, antivirus software may not be updated and therefore vulnerable. Let's look at how to identify and neutralize a threat on a PC, using the example of the standard Windows Defender antivirus, which is built into the Windows system:
- Open the Windows tray - the down arrow icon in the lower right corner of the display. Click on the small white shield.
- You will immediately see a window with the “Security Center” on the screen. Immediately click on the first tile “Protection against viruses and threats”.
In the Security Center window, click on the first tile “Virus and Threat Protection”
- Click on “Run check now”. Defender will immediately launch a quick scan. If the program does not detect anything, follow the link at the bottom of the “Run a new advanced scan” button.
To get started, you can run a quick scan and, if the defender does not detect anything, enable advanced scanning
- Select the first or third option. Please note that a full scan will take a lot of time, but you will be able to work in parallel on a PC. To perform the third option - offline - you will need to restart the PC. Within 15 minutes, the defender will search for and remove threats. After selecting, click on “Run Scan Now”.
Select the scan type depending on whether you want to wait a long time for the scan to finish
- Wait for the verification to complete. In the results you will see a list of actions that can be performed with the detected threat. Select removal for all viruses found, if present.
Wait for the advanced scan to complete and remove viruses if Defender finds them
You can also be helped by the small utility Dr.Web CureIt!, which can work with other antiviruses on the device without any conflicts and has a simple and user-friendly interface that is understandable to a beginner. It is better to download it from the official website. It is free for home use.
Fixing damaged system files
After scanning with an antivirus, it is necessary to “treat” the system files - restore them. Of course, they could have been damaged not due to viruses - in any case, checking for damage and eliminating it will not hurt. Do the following:
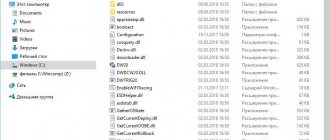
- Expand the “Search” panel through the “Taskbar” (magnifying glass icon). Enter cmd in the empty field.
Write a simple cmd code in the search bar of the panel
- Right-click on the classic Command Prompt application - in the small menu, click on the option to launch the console with administrator rights.
Click on the “Run as administrator” option
- Allow the module to make changes in the operating system by clicking on “Yes”.
- Now type or paste the command DISM.exe /Online /Cleanup-image /Restorehealth. After that, immediately press Enter to execute it. The console will start the process of searching and healing damaged system files. Wait for it to finish - the module will provide you with a report on the work done. After that, restart your PC and try to update.
Paste the copied command DISM.exe /Online /Cleanup-image /Restorehealth using the combination Ctrl + V
Video: how to check the integrity of system files and “cure” damaged ones
Cleaning the system disk from “garbage”
You can remove temporary files and clear various types of system cache, such as the DNS cache, using the built-in Disk Cleanup tool or third-party utilities. Let us describe the procedure using the example of the well-known free application CCleaner from the developer Piriform:
- We launch the official application page using any browser. On it, click on the first green button “Download free version”.
Click on the first button “Download free version” if you do not want to buy the Pro version
- After the file has been completely downloaded, launch it and install the software, following the installer’s simple instructions.
- Now open the utility and go straight to the required “Cleaning” section. All the necessary checkboxes are already selected in the columns on the left side of the window. You don’t need to change anything in the Windows tab, but in the “Applications” block you can optionally set checkboxes for the browsers you use most often. If you do not clear their cache, they will collect a lot of unnecessary information on the system disk and work very slowly. Click on “Analysis”.
Select the required sections to clean and click on “Analysis”
- The system will estimate the number of megabytes or even gigabytes that are recommended to be deleted, and will also inform you about the types of data that can be safely disposed of. Click on “Cleaning”.
When the analysis is finished, look at the amount of data that will be free on the disk and click on “Cleanup”
- We confirm our desire to get rid of unnecessary information and free up the disk. We wait for the procedure to complete, close the utility, restart the device and try to update the system in class=”aligncenter” width=”1365″ height=”629″[/img] Click on “Continue” to confirm your intention to delete unnecessary system files
Video: Smart cleaning of the system from unnecessary files using CCleaner
Temporarily disabling antivirus and Windows Defender Firewall
Deactivating your antivirus and Windows Defender Firewall can help install the necessary updates, the download of which is blocked by security programs by mistake. First, let's look at disabling the antivirus using the Avast utility as an example:
- Bring up the Windows tray on the display - find the Avast icon in it. Right-click on it.
- In the context menu, place the cursor on the second item “Manage Avast Screens”. In the following list, select the time for which antivirus protection will be disabled or select “Disable permanently.” In the latter case, then do not forget to activate Avast yourself after downloading and installing the updates.
In the context menu of the Avast icon, select the period during which the program's protection will not work
- Start downloading or installing the system update again in the center.
You can temporarily deactivate Windows Defender in its settings:
- Open the Defender panel through the Windows tray (image of a white shield). In the window, immediately look at the lower left corner - click on the “Options” link.
Click the "Options" link at the bottom left of the window
- In the notifications section, click on “Virus and threat protection settings.”
Click on “Virus and threat protection settings”
- Use the switch to deactivate the Real-time Protection option.
Click on the first switch to deactivate standard antivirus protection
- Click "Yes" to allow the defender to change anything on your device.
Click on “Yes” so that the “Security Center” can make changes to the system
- You will see that a cross in a red circle has appeared in the window. Repeat the update in the center. The protection will turn on itself after a while - there is no need to enter the defender again.
When you disable the antivirus, try updating the system again in the center
Now let's look at how to disable the "Firewall" to bypass the blocking of downloading system updates:
- Call the “Control Panel” through the “Run” window and the control command or using the “Windows Search” window. Find the “Windows Defender Firewall” link and click on it.
Select from all sections “Windows Defender Firewall”
- In the left column with links, click on the fourth one - “Turn on and off...”.
Click on the "Turn firewall on or off" link to go to the next page
- Check the boxes next to the “Disable” values for two types of network at once. At the bottom of the page, click OK to save the settings changes.
About two kinds of network
- Red shields with crosses inside will appear on the screen. Try the update again. After this, be sure to manually enable Windows Defender Firewall protection.
Make sure Windows Firewall is disabled and try updating your system
Video: How to disable Windows Firewall in several ways
Clean restart of Windows
Booting the operating system in clean mode means disabling all third-party services along with starting Windows, that is, utility processes that the user independently installed on the device earlier. This way, all extraneous components that could interfere with the installation of the update will be deactivated:
- In the “Search” panel, type the msconfig command into the line and launch the proposed classic utility with one click. The same code can also be entered in the Run window (Win and R).
Enter the query msconfig in the “Search” or in the “Run” window
- In the configuration window, switch directly to the third section “Services”. At the bottom of the list, click on “Hide Microsoft services.”
- After that, click on the “Disable All” button. Apply the changes and go to the next tab called Startup.
Deactivate all extraneous services using a special button
- To open an additional window, click on the blue “Open Task Manager” link.
In the “Startup” tab, click on the link to launch “Task Manager” on the screen
- In the manager, deactivate all program services in the list one by one using the “Disable” button in the lower right corner or through the corresponding item in the context menu.
In Task Manager, disable all services in the list one by one
- Return to the “System Configuration” window and in the “Startup” section, click on “Apply” and OK. Restart your device and try updating again in the center. If it does not work, run the troubleshooter again in clean boot mode using the instructions from the section of the same name in this article.
- Upon a clean start, the PC will lose some functionality. After a successful update, return everything to its place in the “System Configuration” window - enable all third-party services in the list using the special button.
Checking Device Manager for errors
If your PC has damaged drivers, they can be a barrier to installing updates. You need to check the serviceability in the “Device Manager”:
- Going to its window in the “ten” is quite simple: right-click on the “Start” button in the lower left corner of the display and select the manager from the list that appears.
In the context menu of the Start button, find the item "Device Manager"
- If the context menu does not appear for some reason, hold down R and Win and insert the code devmgmt.msc into the empty line. After that, click on OK or Enter to execute it.
In the “Open” line, enter the request devmgmt.msc and click OK
- Take a close look at the list of connected devices and their drivers. Modules that are indicated by an exclamation point in a yellow triangle or a question mark are problematic.
See if there is an exclamation mark next to any device in the list
- To fix a problem with the driver, update it using the special item in the context menu.
Click on "Update Driver" in the context menu
- In the new window, click on “Automatic search”.
Click on the first link to start automatically searching for updates for the problematic driver
- Wait while the system searches for an available upgrade on official resources. If present, it will be successfully downloaded and installed without any user action.
Wait for the end of the search for an update for the driver with which you are having problems
- If there is no update, you will see a corresponding message in the window. In this case, click on “Close”. Call up the driver context menu again, but this time click on “Remove device”. After a couple of seconds it will disappear from the list. Try installing the update without this device.
A message may appear in the window stating that you currently have the latest driver installed.
- After this, be sure to return it in place. In the manager, there is an “Action” section on the top panel. Open its panel with one click and select Update Configuration.
In the “Action” menu, select the first item “Update hardware configuration”
- If this method does not work, install the driver by downloading it from the official website of the manufacturer of the specific hardware or the PC itself. It also makes sense to contact the company's technical support to find out if your device is compatible with the update that the center cannot install.
Removing duplicate profiles
You can remove an extra account using the Registry Editor. However, any changes to it must be made with the utmost caution:
- Hold down the Win + R key combination on your keyboard and write the regedit code in the empty field. To execute it, press Enter or OK in the “Run” window itself.
In the "Open" line, enter the command regedit and click on OK
- Click "Yes" to allow the editor to make changes to the system. Double-click to expand the third branch called HKEY_LOCAL_MACHINE.
Open the HKEY_LOCAL_MACHINE section on the left side of the editor window
- Now open the following directories one by one: SOFTWARE - Microsoft - Windows NT - CurrentVersion - ProfileList.
In the ProfileList folder, look for directories with long names
- See if there are directories with long names in the last folder. Open them and notice the ProfileImagePath entry. If these files in the folders have the same path, delete one of them. Usually the name of the duplicate has the word bak at the very end.
If you find a duplicate entry, delete it using the context menu
System rollback
You can return the system to the state it was before errors with updates occurred using a restore point, a system backup (which is stored in an image file), and also by resetting to initial settings. Let's look at recovery using a point. Before applying any important changes to the system, for example, installing updates, the operating system automatically creates a restore point, so in most cases there are several points on the disk. Let's start following the instructions:
- On the “Desktop”, find the standard “Windows” “This PC” icon, which is usually used to open “Explorer”. Right-click on this icon and select the last item “Properties”.
Select Properties from the context menu of the This PC icon
- Now click on the “System Protection” link in the left pane of the window.
- You will immediately be taken to the desired tab. Click on the "Restore" button to launch the rollback tool.
Click on "Restore" to open the module to restore the previous system state
- On the initial screen of this tool, you either select the last point created (recommended value) or open a list with all available states. After that click on “Next”.
You can select a restore point from the list yourself or immediately roll back to the previous state
- If you want to select a point yourself, click on the desired item to highlight it. You can find out which programs and drivers will be affected when you restore to a specific state using the button at the bottom of the list. After selection, click “Next”.
Select the point with the left mouse button and click on “Next”
- In the next window, you can see the date and time when the restore point was created and its description. Click on “Finish” - the system will begin restoring to the previous state. During the rollback process, the computer will restart. When the procedure is completed, run the system update manually in the Update Center.
Click “Finish” for the module to begin restoring the system to its previous state
How to update the OS to version 1809
Windows 10 update packages should be automatically delivered to your computer with standard settings. Today this is common to all devices and operating systems. But for some reason you may never see them. The most common of them is the disabled function of automatic detection, download and installation of update packages. First, check to see if your computer already has the latest version installed. And you don't need to update anything in it.
- On your keyboard, press the WIN+R keys together;
- A small window for entering commands will appear in the lower left part of the monitor. Write “winver” here and select ENTER;
New utility for screenshots “Fragment and Sketch”
The new Snip & Sketch utility, previously included in the Windows Ink Workspace suite of pen apps, is now the standard screenshot editor in Windows 10 October 2020 Update. The classic Snipping Tool is still available, but will be removed in future versions of the operating system. Most likely, the utility will be completely removed in the next Windows 10 19H1 update.
Slice and Sketch allows you to create a rectangular cutout, a freeform cutout, and a full screen cutout. After taking a screenshot, you can immediately edit it: add annotations, draw with a pen/pencil and highlight with a marker, there is even a ruler and a protractor. The created image is automatically saved to the clipboard, so you can quickly share it.
Launching the new screen snipping feature works through the Windows key + Shift + S shortcut, the Quick Action button in the notification center, the Surface Pen button, or is programmed to the Print Screen key. The latter option can be enabled under Settings → Accessibility → Keyboard → Shortcut: Print Screen.
What to expect from the new version of Windows 10
After installing Windows 10 on your computer or laptop, you have probably already come across offers from various services and programs to update the functions of your system to version 1809. This is no coincidence. All programs that are developed for Microsoft OS focus only on the latest and stable updates. Which the computer receives. But what do these new packages carry inside - let's figure it out.
First of all, the clipboard process has been redesigned in Windows 10 1809. This is a feature with which you can copy text and files and paste them in other documents. We all know that you can only copy 1 file. And if you copy the next one, the previous one will simply disappear from the PC’s virtual memory. But the developers decided to improve the function.
Now you can even synchronize between devices the portion of memory that contains the copied file. You also have the opportunity to place multiple objects or files in it. And this significantly increases the user's capabilities. After all, we often have to copy files and work with each one separately in turn. With the arrival of new changes, we will save our time. The new version will also bring the ability to select the part of the screen that will be copied. And with the help of built-in graphic editors, you can change them in every possible way.
Known issues in the new release
Microsoft previously published a list of known problems in Windows 10 2004. There are currently 10 of them, seven of which are related to incorrect hardware operation. PCs with hardware components mentioned by the corporation will not receive the May update until the errors are corrected.
Among the most serious problems, we should note the possibility of difficulties connecting more than one Bluetooth device - drivers for Realtek Bluetooth adapters are to blame for this. In addition, drivers for Conexant and Synaptics audio chips can cause a Blue Screen of Death (BSoD). It also threatens users of docking stations with a Thunderbolt interface when they disconnect or connect the device.
Installing Windows 10 2004 on PCs equipped with Nvidia video adapters, with driver versions earlier than 358.00, may also cause BSoD and other types of failures.
Finally, the latest update may cause Variable Refresh Rate (VRR) mode to not work if the system uses a monitor compatible with this technology and integrated Intel graphics.
- The best software for ensuring a company’s IT security is on the Market.CNews IT marketplace. With prices.
- Short link
What other features does 1809 have?
The Windows 10 October OS update concerns many modules and functions in the system that we may not even notice. They also affect some graphic elements of windows. The changes also affected text settings. Not only for the entire operating system, but also for individual programs. This can be done in the settings by selecting the desired application.
Version 1809 has increased the ability to search for applications installed on your PC. There are new sections with functions for found programs, as well as a block with quick actions for found applications.
Features for found app in Windows 10 1809
For example, here you can immediately open the software as an administrator or navigate to its location on your hard drive.
On a note
Owners of HP equipment had additional fun. When encountering an update with the file HpqKbFiltr.sys (used in HP software), the laptop crashes into BSOD. This crash occurs when loading the OS. The treatment is simple: rename or move the file. The problem is aggravated by the fact that it was not always possible to log into safe mode/command line mode. This means that you need to remember where your boot image from the LiveCD is. Perhaps, if you're lucky, you'll have a bootable USB flash drive at hand (we showed how to make one here). Therefore, in any case, the problem will have to be solved by third-party means.
What to do if the update does not install automatically
For various reasons, your module for automatically searching for and installing Windows OS updates may not work properly. In this case, even after enabling this function, the system will not find anything. You can still install the important update 1809. For this, the developers have created a special utility. It works independently and does not depend on the settings of your PC. You can download it from the link https://www.microsoft.com/ru-ru/software-download/windows10.
Media Creation Tool must be installed on a computer with the appropriate version of the operating system and follow the instructions of the assistant. Even while downloading packages, the system may notify you with an error with a numeric code. A variety of errors may appear that indicate the cause of the malfunction or problem. If you see this on your screen, try entering it in the search bar. Users have already solved most of them and shared the solution with others.
What to do if errors appear when updating Windows 10
Sometimes it happens that instead of a message indicating the successful completion of the Windows update process, you see an error. If this is your case, be sure to write down its code in a notebook (paper or electronic). Go to the web page and answer all of the assistant's questions. Step by step, he will make sure that you are doing everything correctly and will tell you what to do. Your computer must be free of any kind of viruses or malicious code. This may not only cause updates to download, but also cause other programs to crash.
Update rollup KB4523205 is for Windows 10 version 1809 (October 2020 Update) on x86, x64 (amd64), ARM64 processors, and Windows Server 2020 (1809) on x64-based systems. The update is available as part of Patch Tuesday.
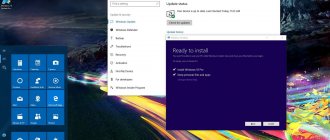
Installation via Windows Update
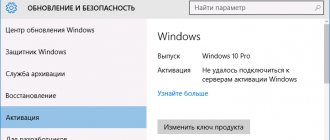
Cumulative update 4523205 is installed automatically through Windows Update. To check, go to Settings > Update & Security and click Check for updates.
You will need to restart your computer to complete the installation. After the update, the Windows 10 build number will change to 17763.864.
Download update KB4523205
You can also download the update from the Microsoft Update Catalog and install it manually using the link below:
Improvements and fixes KB4523205 (17763.864)
This update includes quality updates. New system functions are not presented. List of key changes:
- We fixed an issue that causes Windows Defender Advanced Threat Protection (ATP) to crash and stop sending data.
- Added protection mechanisms against the machine error checking vulnerability in Intel processors (CVE-2018-12207). Disabled by default; to enable it, use the registry editor according to the instructions.
- Added protection against the Asynchronous Transaction Abort Vulnerability (CVE-2019-11135) in the Intel Transaction Synchronization Extensions (Intel® TSX). To manage protection, use the registry editor according to the instructions for client and server versions of Windows. (The corresponding registry keys are enabled by default in client and server editions of Windows.)
- Security updates for Microsoft Scripting Engine, Internet Explorer, Windows App Platform and Frameworks, Microsoft Graphics Component, Windows Input and Composition, Microsoft Edge, Windows Fundamentals, Windows Cryptography, Windows Virtualization, Windows Subsystems for Linux, Windows Kernel, Windows Datacenter Networking , Windows Peripherals and the Microsoft JET database engine.
If you installed previous updates, then only the new changes in the rollup package will be applied this time.
Skype update for Windows 10
The Skype app has received a major update in the Windows 10 October 2020 Update.
Main innovations:
- Improved media gallery, notification bar, and user mentions feature.
- Customizable group call interface.
- Convenient screen sharing and access to contacts.
- Ability to take pictures during video calls.
- Function for quickly sharing content directly with Skype contacts. There is no need to launch Skype.
- Now you can customize the design of chats by choosing one of the themes (light and dark) and accent colors (yellow, pink, blue, mint, fuchsia, orange).
- To-Do integration. Add tasks to your To-Do notes to-do list directly from Skype. Tasks can be created, edited and saved, and they will be available in Skype or the To-Do application.
- Voice calls, messages and file sending are protected by end-to-end encryption.
After the presentation, Microsoft also became aware of the final cessation of support for the classic version of Skype. It will stop working on computers and mobile devices on November 1 and November 15, 2020, respectively.