What is a disk image? This is a file that stores an exact digital copy of the file system, or data previously recorded on disk (CD/DVD/BR).
Previously, such images were widely used for data backup, but with the development of the Internet, ISO applications migrated to the category of files that were convenient to transfer over the network.
In order for the image to be used, it must be written to disk. For these purposes, many programs are used, including Alcohol, Daemon Tools, Nero, and UltraISO. We will focus on the last one, since it is very convenient and intuitive.
Most often, this software is used to record an OS image, in particular Windows. Why is this being done? Over time, any system acquires a certain number of obscene system and user files that consume memory, disk space and slow down the performance of the OS as a whole.
You can also use standard Windows tools, for example, recovery, but this is not always possible, so it is much easier to remove the old system and install a new one. To restore, you will need a disk or bootable USB flash drive.
Let's consider the process of creating an image using the example of recording Windows 8, although “seven” and other operating systems are written the same way.
Recording with UltraISO
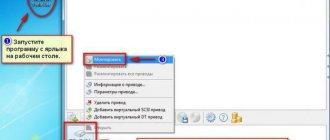
The UltraISO program is designed to work with disk images in various formats. Let's launch it. Go to the Tools
.
Next, select the menu item Burn CD image...
or press
F7
.
A new window appears.
Selecting a drive
, if there are several of them on the computer. The default recording speed is set to maximum, but it can be lowered. You can also change the recording method.
Opposite the inscription Image file: click on the image of the dots. We are looking for the required file with the iso extension on the computer. UltraISO also works with other formats - isz (compressed iso), bin, nrg and so on.
Click Open
.
Click on the Record
and wait for the result, the process may take quite a long time.
Another sequence of actions is possible. Select the File
, then Open... or
Ctrl+ O
. Find the required file and open it. And after that we go to the Tools tab. The window will already contain the path and name of the object being recorded.
ImgBurn
A very popular utility for working with disks. ImgBurn allows you to create ISO files by reading information from ready-made CDs and DVDs, as well as burn them to new media.
The application is distributed absolutely free of charge. You can download it from the official website of the developer without fear of getting a virus:
- Go to www.imgburn.com.
- In the navigation menu at the top, open the “Download” section.
- Select any mirror to download.
- Run the installer and install the program on your personal computer.
- Launch ImgBurn.
- Go to the “Write image to disc” section.
- In the “Source” column you need to indicate the location of the file. To do this, click on the folder icon.
- In the “Destination” column, indicate the drive into which the media is inserted.
- Click on the “Start” button.
Using standard Windows tools
All Windows operating systems, starting from version 7, have built-in tools for recording disk images. If no special software is installed, then the algorithm of actions is as follows. In version 7 you need to double-click
mouse, select the drive and click the
Burn
.
In versions 8 and 10, things are a little more complicated. Click on the object. At the top of the window the words Disk Image Tools
.
Below it is the Management
.
Let's click on it. A menu appears, in which there is an item Burn to disc
.
Let's launch it. In a new window, change the drive used if necessary. We check the box if we want to check the storage medium after the process is completed. Click Record
.
If software for working with images is already installed on the system, and for some reason it does not suit the user, then its automatic launch when you click on an iso file can be disabled
.
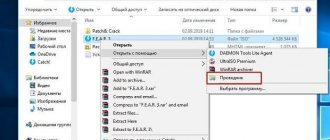
Let's look at the example of version 10. Right-click on the object. In the menu, click Open with
, then
Select another application
.
Select Explorer and turn on the checkbox next to Always use this application to open .iso files. We confirm. Now, when launching iso files, you can use standard operating system tools. Similarly, you can solve a similar problem for other versions of the OS.
In the 8th and 10th versions
Windows can also use the
isoburn
.
The algorithm of actions is as follows: press the key combination
Win + R. We write the name of the program with parameters. The isoburn launch format is:
isoburn
[ CD :] filename
Here the optional parameter CD: specifies the drive letter, filename specifies the object to be burned, the optional key Q specifies the immediate start of the process.
Let's launch.
Specific example
:
isoburn /QE: C:\temp\win7.iso
In the previous article, I discussed the issue of installing Windows 7. Several points were raised about where to get the Windows 7 distribution. One of the options involved downloading an operating system image from the Internet. In this article, I will tell you in more detail how to burn a downloaded image to a DVD disc, using various applications. Along the way, we’ll touch on some of the nuances of recording for Windows 10.
To create a boot disk with the Windows 7 or 8 or 10 operating system, we need a DVD-R or DVD-RW disk, a windows image and a computer or laptop with a burner drive. Previously, we looked at burning an image using the BurnAware Free
. You can get acquainted.
To begin with, we will describe the general recording rules, which will not differ for almost any recording program. These rules are typical for writing not only windows images, but also for writing any data to DVD, CD or BR disks:
- To burn a Windows image, try not to skimp on the DVD. Let it not be a top-priced blank, but also not a disk at the lowest cost. A high-quality disk will allow you to install the operating system many times, of course, with proper storage of the disk.
- The disc writing speed should be the minimum for your drive and for the specific DVD disc. The lower the write speed, the higher the probability of recording without failures.
- During recording, it is advisable to equip the computer with an uninterruptible power supply - a UPS, in order to minimize the risk of damaging the disc during power surges or power outages.
The most common user mistake is writing an image file to disk as a regular data file. Such a disk is not bootable and you will not be able to install the Windows 7 operating system from it. The principle of burning an image to a disk implies “unpacking the system installation files onto an empty DVD media.”
How to burn a disk image in .iso format to a CD?
Burning a disk image in .iso format to a compact disc (CD or DVD) is very simple. However, despite this, not everyone knows what the .iso extension and how to burn it to a CD.
Let's try to explain this process using the example of using a free program for burning .iso files - Free ISO Burner (for Windows XP), as well as standard tools in Windows 7 and 8.
Burning a disc image using Free ISO Burner (for Windows XP)
This program is designed to burn an ISO image to a CD using minimal configuration parameters.
The program's simple and intuitive interface, along with its settings, are conveniently grouped in one window, allowing you to set up the burning process very quickly. All preparation for recording comes down to a few clicks. First you will need to select the .iso file , as well as the drive that will be used for recording. Next, you will need to select the volume label and file name. In the settings you will need to specify the write speed and cache size. Moreover, the session on the disk can either be terminated or left open, that is, it can be determined whether there will be no possibility of additional writing to the disk or whether the disk can be additionally written.
At the bottom of the window there are indicators for monitoring the recording process, so the user can monitor the completion of all tasks. Free ISO Burner is one of the most reliable programs and works well with different versions of Windows.
So, let's begin.
- First, download the program from the manufacturer’s website.
The program contains one file and does not require installation on your computer. Its icon looks like this:
- Launch Free ISO Burner. In the window that opens, click on the OPEN button.
- Select the .iso file you want to burn to disk, and then click the OPEN .
- Check that you have correctly specified the .iso image file that you want to burn to the CD, and in the VOLUME LABEL , enter the name of the disk in Latin letters (without spaces) in order to somehow identify it in the future.
However, the field may not be filled in.
If you check the box next to FINALIZE DISK , further recording to the disk will be impossible.
Click on the BURN .
The .iso file has started burning to the CD. You can monitor the recording process using the indicator at the bottom of the window. Wait for the recording to finish.
- The disc has been successfully burned when the message DISK ISO IMAGE DONE appears on the screen. After successful completion of recording, the disc is usually automatically ejected from the drive.
- Check the contents of the CD in File Explorer.
Burning .iso files to a CD using standard Windows 7 and 8 tools.
The new Windows 8 OS, just like the previous version of Windows 7, has a free built-in utility designed for burning ISO files (images) to disk. The utility is called Windows Disc Image Burner. Thanks to it, the user can quickly and easily burn any DVD or CD images in .iso format to a CD.
- In the Windows 7 operating system, this functionality is implemented as conveniently as possible for the user. Just double-click on the image.
- The drive tray will open automatically if there is no blank CD in it to burn. In the window that opens, select the drive. You can enable the “Check disc after burning” option in the settings.
- Click the “Record” button. The recording process has begun.
- After the recording has completed successfully, the disk verification process will begin if you have selected the appropriate option.
- The drive tray opened automatically. The disc is recorded.
In addition, the utility can be launched from the command line by specifying additional parameters.
1. Enter the command in the command line ( Start>Run>cmd ):
isoburn.exe /q drive letter: “path_to_file.iso”
You can quickly open the console using a combination of the Windows and the Latin R. then type in it
cmd
We have previously written about some useful keyboard shortcuts and Windows options that every advanced user should know.
The Windows Command Prompt is not case sensitive, so you can enter both lowercase and uppercase letters. It makes no difference.
2. After this, a window will open in which the image file for recording will be displayed, as well as the selected recorder. To record, click on the Burn . The utility also allows you to check (verify) the disk after recording.
Guard
Now, in the era of information technology and the development of the Internet, it is not at all necessary to leave home to play slot machines for money. You can find out more information about one of them here. So, if you are a gambling person, good luck with your game!
ISO and UltraISO image
This application is very popular not only for burning discs, but also for burning boot images onto flash drives. In addition, UltraISO has the ability to create a virtual drive into which you can mount a disk image. We'll talk about all the features of this program another time. Stay tuned.
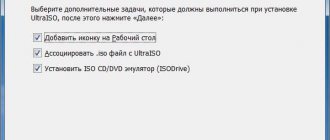
The first launch after installing the program is accompanied by an information window disclaiming warranties. Agree by clicking the button It’s okay
.
CloneCD first launch
Next, CloneCD notifies you that it is not free and you have 21 days to get acquainted with it. Well, we don't need any more. We close the message and the main program window appears in front of us, in which we select the second button from the left, Burn CD
.
Selecting an image entry
Selecting an image file
Information about the image file
In the next step, select the recording speed and click OK
.
Selecting the recording speed
After finishing recording, you can proceed to installing the operating system.
Burning an image to disk with Nero 7
Nero 7 is probably one of my favorite programs that I use for burning and copying discs. Go to Nero StartSmart, go to the Save tab.
Move the bottom slider to the right and select Burn image to disk (burning match with disk).
Nero Express appears, go to the bottom folder Image, project, copy and select Disc image or save project (Burn a disc from an image previously recorded on the hard drive).
Find the desired image file on your hard drive and click Open.
Next, a window opens with the final recording settings. You can specify the Number of copies of the discs to be written, and check or uncheck the Check data after burning to disc checkbox.
There are also additional settings, but to get to them, you need to press the small left arrow button on the left.
In the recording settings, you can select the recording speed from 4x to 16x, check or uncheck the boxes next to Define the maximum speed, Record and Automatically turn off your computer when the disc is finished recording.
After everything has been selected and configured, all that remains is to burn our disc by clicking the Burn button (a burning match above the disc).
How to burn an image to a disc - Nero 7 | Moicom.ru
Image MDF/MDS and Alcohol 120%
Another equally popular program for recording images is Alcohol 120%
.
As in the case of UltraISO, it can do a lot, but its main advantage is working with images like MDF/MDS
.
To install, go to the official website of the application, download and install the program. You can also download .
Launch the application and wait for the countdown to end, click OK
.
Alcohol 120% - first launch
Burning a disk image
Then select the image file in the dialog box by clicking the Browse
.
Selecting an image file
In the next window we set the recording speed, the recording method remains DAO
and click
Start
.
Selecting recording speed and method
After finishing recording, we go to install the operating system on the computer.
NRG image and Nero Burning ROM
Perhaps the most famous among the programs presented is the Nero Burning ROM program. Download it from the official website of the developers and install it.
The first launch, as in the case of any trial program, is accompanied by familiarization with information about purchasing the program or launching a trial version. Select Continue
.
Nero Burning ROM - first launch
Cancel – new project
The next step is to go to the menu and select Recorder - Record image...
Burn image
Next, in the standard Windows dialog box, select our file with the operating system image and click Open
.
Then in the next window set the Recording Speed, Recording Method and click the Burn
.
Recording a project
After pressing the Burn
The process of burning the Windows image to disk will begin.
MediaCreationTool for Windows 10
There is a simple option to burn a Windows 10 image to disk. To do this, you need to download the utility from microsoft.com and use it. Follow the link, download and run. In the first window, accept the licensing terms and proceed to the first step of the wizard, selecting the second option Create installation media for another computer
and click
Next
.
Create installation media for another computer
Next, you are offered a choice of language, architecture and edition, which can be changed by clicking the Use recommended settings for this computer
. This means that the image will be recorded in accordance with the capabilities of the computer on which the utility was launched. If you need to change these parameters, then uncheck the box and change it at your discretion.
Selecting System Parameters
In the next step, in the standard Windows dialog box, specify the path where the utility will download the image file of the Windows 10 operating system from the Internet and click Next
. The download process begins, which, depending on the speed of your Internet connection, can take from 5 minutes to 2 or 3 hours. Immediately after this, the creation of Windows 10 media will begin, which also takes a long time. Be patient.
Download and create Windows 10 media
Once you've finished burning the Windows 10 image, all you have to do is insert the blank into the DVD burner and click Open DVD Burner
.
Completing the Windows 10 image preparation
How to burn a bootable disc in Windows 8 (8.1) and Windows 7
You can burn a bootable disk from an image in the latest versions of the Windows operating system without the help of any additional programs (however, this may not be the best way, which will be discussed below). Here's how to do it:
- Right-click on the disk image and select “Burn disk image” from the context menu that appears.
- After this, all that remains is to select the recording device (if there are several of them) and click the “Record” button, and then wait for the recording to complete.
The main advantage of this method is that it is simple and straightforward, and does not require installation of programs. The main drawback is that there are no different recording options. The fact is that when creating a boot disk, it is recommended to set the minimum writing speed (and when using the described method, it will be written at the maximum) in order to ensure reliable reading of the disk on most DVD drives without downloading additional drivers. This is especially important if you intend to install an operating system from this disk.
The next method, using special programs for burning discs, is optimal for creating bootable discs and is suitable not only for Windows 8 and 7, but also for XP.
Burning windows to disk using a standard tool
Since the release of Windows 7, users have been offered the ability to burn an ISO image, including an image of the Windows operating system, to a disc without using third-party programs. To do this, in the Windows 7, 8, 10 operating system, right-click on the ISO image file with the Windows distribution and select Burn disk image
.
Selecting an image file
Burning an image
After the burning process is completed, you will receive a Windows 10 boot disk ready to use.
It's no secret to many that UltraIso is one of the best programs for writing Windows images of all versions to a flash drive. That is, in essence, with its help you create a bootable USB flash drive from an iso image in just a few clicks. You will learn how to do this in this article.
It is also one of the best programs for burning a Windows image to a USB flash drive.
So, to start recording Windows 7 onto a flash drive via ultraiso, launch the program. The main window opens in front of us.
UltraIso main window
In it, select “File” -> “Open”.
Open the windows image
In the window that opens, you need to select the Windows image that will be written to the USB flash drive. You had to download it in advance, for example on the Internet.
Selecting an image to burn
Select the iso image and click the “Open” button.
Now we insert the flash drive on which our image will be written to the USB connector.
Attention. There should not be any data important to you on the flash drive, since all of it will be destroyed during formatting.
Let's go directly to recording in UltraIso
A window will open in which you need to check that the flash drive you need is being used, and the recording method should be “USB-HDD+” and all other parameters as in the figure below.
Setting the parameters for writing a Windows image to a USB flash drive
First, click the “Format” button. In the window that opens, select the “FAT32” file system and check the “Clear table of contents” checkbox.
Preparing a flash drive for writing Windows to it
After a few seconds, the flash drive will be formatted. Click “Ok” and close the formatting window.
Now, in order to burn Windows 7 to a flash drive via ultraiso, click the “Burn” button and in the window that opens, click “Yes”.
Data Deletion Warning
Burning Windows 7 to a USB flash drive via ultraiso
The recording process will begin. After which you will need to close the Ultraiso program and your bootable flash drive will be ready for use. All you have to do is boot from the flash drive and you can start installing Windows.
The recording time depends on many parameters, ranging from the capacity and speed of the flash drive, ending with the volume of the image that you write to it. But on average, within 15 minutes your bootable Windows USB flash drive will be ready.
Now you know how to use UltraIso - Programs for writing windows to a flash drive to write Windows 7 and thereby make a bootable flash drive from an ISO image.
Using the shareware program UltraISO is the easiest way to create a disk image on Windows. The whole process will take no more than five to ten minutes, and below we will tell you exactly how to do it.
Creating a bootable USB flash drive
The methods described above were how to burn an image to a disk using UltraISO and an image to a flash drive, but most often the program is used to record a boot image of operating systems. The program copes with this very well. Now we will analyze in detail the instructions on how to burn a Windows 7 image to a disk using UltraISO. By the way, the instructions will be general for other versions of Windows, and not just for the seventh.
So, before you burn the image to disk via UltraISO with autorun, you need to:
- Launch the program by first inserting a flash drive or disk into the computer.
- Click the “File” button and select “Open” from the menu.
- In the Explorer window that appears, you need to open the folder in which the OS image you prepared is located, select it and click “Open”.
- Above the toolbar, click the “Boot” button.
- In the menu, click on the line “Burn hard disk image”.
- Now format the flash drive or erase the disk and click on the “Burn” button, which is located next to “Format”.
As a result, you need to wait for the recording to finish. This will be indicated by the line in the process log “Recording completed”. After this, you can take the drive out of your computer and use it for your own purposes.
What do you need to burn a disk image via UltraISO?
It won't take much to achieve your goal. We will assume that you already have the files at hand that need to be included in the image, there is a suitable recording medium (both CD\DVD and almost any memory card), a drive for reading it and the actual program for starting the process itself. If UltraISO is not yet on your PC:
- download it from the official website (there is a paid version and an option with a free trial period);
- install in the standard Windows way, indicating the key number or choosing a time for review;
- We are waiting for a message about a successfully completed installation;
- run the program and move on to the next step in the instructions.
Method 3: Daemon Tools
Let us immediately clarify that burning an image to disk is only available in the full version of Daemon Tools, so this option is suitable only for those who are ready to purchase this program. After successful purchase and download, you will need to complete the following steps:
- Launch the program and through the left menu go to the “Disc burning” section by clicking on the button with the flame icon.
- There you are required to select the “Burn image to disk” function, which is first in the list.
- After this, proceed to selecting the ISO image itself, finding it through the Explorer window that opens.
- All that remains is to select the drive where the disc has already been inserted, configure the speed and additional recording parameters, and then you can start burning.
If you decide to purchase Daemon Tools, most likely, this program will be used for other purposes. In another material on our website, we suggest finding out what other options for interaction with this software the developers have provided.
Read more: Using the DAEMON Tools program
In conclusion, we note that there are still a huge number of free and paid programs on the Internet that allow you to burn an ISO image to disk. You can read a full review of the most popular such solutions below, and after successfully selecting a tool, use the instructions above as universal ones to quickly understand the program itself and burn the disc without any problems.
Read more: Programs for burning an image to disk
We are glad that we were able to help you solve the problem. Add the Lumpics.ru website to your bookmarks and we will be useful to you. Thank the author and share the article on social networks.
Describe what didn't work for you. Our specialists will try to answer as quickly as possible.
Step-by-step recording of an image from media using UltraISO
To start the process itself:
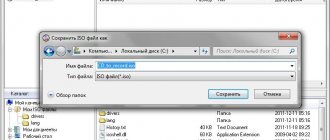
- On the top panel, select the “Tools” tab. Click on it, select the line “Create CD image” from the list (or use the F8 hotkey).
- A new window appears in which you must specify the correct settings for recording the image. In the CD/DVD drive column, select the media from which we copy the image. And the “Save As” item accordingly indicates where the final file should be placed. The “Output Format” panel allows you to select the image type - for example.iso, .nrg, .mds/mdf.
- Click on the “Make” button and start the process of creating an image from ready-made media, which will take place automatically.
LiveInternetLiveInternet
Quote from BraveDefender
Read in full In your quotation book or community!
How to burn a disk image and copy a disk in the UltraISO program
Some disks are designed in such a way that the software installed from them does not work when the disk is not in the CD/DVD drive. For example, games or city maps.
In order to “deceive” the computer, you can create a so-called disk image and use it instead of a full-fledged CD/DVD.
For copyright lovers, I will note that I will be working with a licensed disk solely so as not to overwrite the disk every time I need to turn on some program.
I create disk images in Nero, Daemon or Alcohol programs. Now I’ll tell you how easy it is to do this in UltraISO:
- Let's create a disk image
- Let's burn a disk image
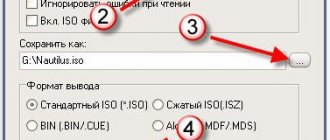
Insert the disc into the drive. Launch the UltraISO program. Click on the “Create CD image” button.
Or you can select “Create CD image” from the “Tools” menu, or press the F8 key.
In the window, select the CD/DVD drive in which the disc is located. Select where to save the created image (“Save As”). If necessary, specify other settings.
Click the “Make” button and wait for the disk image creation process to complete.
You can minimize the program window - the percentages in the bottom panel of Windows will show you at what stage the work on creating a disk image is.
At the end of the process, a prompt will appear: “CD image creation completed successfully!”
If you click “Yes” in response to the question “Open now?”, you will see in the upper right window of the UltraISO program all the files recorded in the image.
You can create a disk image without using a CD/DVD source, but from some files on your hard drive (hard drive). For example, if you want to turn many folders and files into one immutable file so that nothing is lost.
To do this, you are offered an empty image for now (its name in the upper left window of the UltraISO program can be changed). The easiest way: select folders/files in the lower left window of the program explorer and drag them to the upper right.
To make it look like the picture below:
After that, click the “Save (disk image)” button.
In the window that opens, indicate exactly where the image should be saved.
That's all!
In the UltraISO program, images and files can also be burned to another CD/DVD. To do this, click on the “Burn CD image” button.
Or select from the menu: “Tools” - “Burn CD image”, or press the F7 key.
In the window that opens, select the drive that will burn the prepared empty disk. Select the recording speed (low speed is recommended). Select the image file on your computer. Click “Record”.
That's all it really is now.
Good luck!
Creating an image from a hard drive
This process is useful for backing up and storing important files securely.
- We assign a name to the future image. To do this, right-click on the name next to the disk image in the left center part of UltraISO. Select the “Rename” option and enter a name.
- We select which files we will add to the image. Using the explorer located below and to the left of the main part of the program window, simply drag files and folders to the right.
- Save the project to an image by clicking “File” -> “Save As” in the menu. In a new window, select the path to save, expansion of the finished image.
- The creation process will start, after which the program will notify you with a corresponding window. To check if everything was done correctly, mount the image and check for the presence of all files.
UltraISO is not the only program that can quickly and easily record images on a PC. As an alternative, you can use the free utilities Free DVD ISO Maker, ISODisk, and the Windows command line.
Recording the image
The first step is to have at least one disk image on your computer with the information you need. If you don’t have one, you don’t know how to make one, then read here How to create an ISO disk image. In the same article you will find links to working programs with which we will burn images to disk.
Windows 7 Standard Tools
The easiest and fastest option, in my opinion, is to use standard Windows 7 tools to burn an existing disk image. This method can be used if you have a file with the extension (*.iso).
To do this, find our image file, right-click on it, go to the Open with tab and select Windows Disc Image Burner.
The image recording window opens, in which you can select Disc recording device, check or uncheck the Check disk after burning box, and click the Burn button.
How to burn an image to disk using standard Windows 7 tools | Moicom.ru