Windows 7 100% Yuri Zozulya, 2010
Basic elements of the Start menu
The Start menu (Fig. 3.25) consists of two columns: on the left there is a search bar and shortcuts to frequently used programs, and on the right there are links to open the user’s personal folders, system objects and utilities.
Rice. 3.25.
Start Menu
The logged in user's name and icon are at the top of the right column. Clicking the icon opens the User Accounts window, and clicking the user's name opens the user's profile folder.
While the user is working, the system counts the frequency of launching various applications and places the programs with the highest “rating” of use in the left column of the Start menu. Try launching a certain application from the All Programs menu several times in a row, and its icon will appear in the Start menu instead of one of the previously existing ones. Programs with higher frequency of use will gradually move to the top of the list.
The top left column of the Start menu is called pinned.
The icons placed in it will always be present, regardless of the frequency of their use. By default, the pinned area does not have any elements, but you can add your own icons there and remove existing ones.
If there is a → arrow next to the program name on the left side of the Start menu, the app will display a Jump List, which you can use to open recently used documents and perform other actions. The Start Menu Jump List differs from the Taskbar Jump List in that it lacks application control commands.
At the bottom of the left column is a link to open the All Programs menu. Compared to Windows XP, the principle of operation of this menu has been slightly changed. Now all navigation will be performed within the left column of the menu, and you can use the scroll wheel to select the desired program. If you install a new program on your computer, a shortcut to launch it will automatically appear above the All programs link.
Items in the right column of the Start menu are presented as text only, and a corresponding image will appear at the top when you hover over any item. In total, you can place two dozen elements in the right column, but by default only the most important ones are displayed.
• <Username>. Selecting this option will open the user profile folder, which contains all files and directories related to the user who is logged in.
• Documentation. In Windows 7, this command opens the Documents library. A library is a collection of folders with similar content that is displayed as a single unit. By default, the Documents library includes two folders: the Documents folder from the current user's profile and the folder with documents common to all users.
• Images. Library for storing graphic files. Like the Documents library, it consists of two folders: User Pictures and Shared Pictures.
• Music. Library for storing music files. By default, it consists of two folders similar to the Documents and Images libraries.
• Games. Opens the folder with games installed on the system.
• Computer. The Computer window contains icons for disks and other devices in the system. It is an important system object; many actions to configure and use the computer will begin with it. In Windows XP and earlier versions, this window was called My Computer.
• Control Panel. Contains links and icons for performing various actions to configure your computer (see Section 9.1).
• Devices and printers. A system folder that displays external devices connected to the computer: printers, scanners, cameras, players, etc.
• Default programs. When you select this item, a window will open for selecting default applications for processing files of various types (see Section 5.4).
• Help and support. Launches the Help and Support window, allowing you to find a variety of help information.
In the Start menu settings window (see below), you can also enable the display of the following items.
• Administration. A folder containing links to various administrative utilities.
• Video. Library for storing video recordings.
• Home group. Command to open homegroup shares, if one has been created (see Chapter 8).
• Run command. Opens the Run window, which in previous versions of Windows was used to launch various system utilities. In Windows 7, it is more convenient to use the search bar in the Start menu for these purposes.
• Favorites menu. This menu displays the same items as Internet Explorer Favorites, but these items are actually located in the Favorites folder of the user profile.
• Recent documents. When you select this item, a menu opens with shortcuts to the 15 most recently opened documents. In Windows 7, it is more convenient to use Jump Lists to open recent documents.
• Connect to. Opens a window with which you can manage remote connections (see Section 7.1). In Windows 7, you can simply click on the network icon in the notification area to open this window.
• Net. A folder with which you can access local network resources (read about setting up a network in Chapter 8).
• TV recordings. A library for storing television recordings common to all computer users.
• Files to download. Opens the User Profile Downloads folder.
Windows and folders in Windows 7
The window is perhaps the most important element when working in Windows. Actually, the name of the Windows operating system is translated from English as “Windows”.
All Windows programs open in windows. They can be stretched, contracted, expanded and collapsed, and windows can be dragged by “grabbing” the top strip.
In the upper right corner there are three buttons (from left to right): minimize, expand to full screen and close.
Below is the address bar, which indicates the path to this folder. In the address bar, you can manually enter the path to a particular folder or file, then click the “update” button to go. To the right of the “refresh” button there is a search bar, which actually duplicates the “find files and folders” button in the Start menu.
Below the address bar is the Toolbar, thanks to which you can make quick transitions through the Control Panel, as well as go to the Control Panel itself. To the right of the Toolbar are buttons for customizing the appearance of icons, a file preview area, and a help button.
On the left side of the window there is a “Directory Tree”, although in Windows 7 it was renamed to the “Navigation Area”, essentially this is the good old “Explorer”, which makes it easier to navigate through local drives, folders and subfolders.
At the bottom of the window you are provided with complete information on a particular file; just click once on the file with the left mouse button. This area is called the Windows 7 Information Area.
Microsoft Windows 7 presentation
Part 1: Interface and navigation capabilities of the latest operating system On October 22, a presentation of the Windows 7 operating system took place in Moscow. At the presentation, Microsoft Russia President Nikolai Pryanishnikov spoke, as well as the company’s partners (computer manufacturers and retail representatives), on whose activity Microsoft has high hopes (It’s no secret that the speed of distribution of the operating system depends not only and not so much on sales of boxed versions, but on the number of computers and laptops where it is pre-installed by the manufacturer).
But Microsoft did not limit itself to an event for partners and a limited circle of journalists. Two weeks later - on November 7 - Mr. Pryanishnikov presented Windows 7 to ordinary customers in the M.Video store, talking with people face to face. This communication should continue within the framework of an online conference on Lenta.ru, where Internet users have been asking questions to the President of Microsoft in Russia since October, and the answers were published just the other day.
But that's not all. Perhaps the most important stage in the promotion of Windows 7 was the Platform 2010 conference, which was attended by IT professionals from all over the country (as listeners) and, of course, Microsoft representatives led by Pryanishnikov (as speakers).
Thus, it is obvious that the Russian representative office of Microsoft is now taking the most active measures to advertise Windows 7, trying to reach all possible target groups: Internet users, developers, ordinary PC users... And, in general, it’s easy to understand why. The previous OS - Windows Vista - undermined confidence in the company and did not live up to the expectations of either users or, presumably, Microsoft itself. Vista sold slowly and poorly, and although the release of service packs slightly increased loyalty to Vista, the majority of users (both ordinary and corporate) used and continue to use Windows XP (not necessarily licensed, but that’s not the point).
However, Vista was an innovative system and, as is now clear, started a new branch of Microsoft operating systems. After all, Windows 7 is built on the Vista kernel, which Microsoft representatives have repeatedly emphasized since last year, when the first information about the “Seven” was provided to the press. It is true that it is curious that recently Microsoft representatives have been talking less and less about this continuity, apparently not wanting to immediately cause rejection and unnecessary questions among ordinary users. But the fact remains: Windows 7 is the direct successor to Windows Vista. What did “Seven” take from Vista, and how much of this connection with its predecessor will ordinary users feel? Let's take a quick look at the main innovations of the system!
Windows 7
Interface and themes
At first glance, the operating system looks very similar to Vista - light and airy in appearance, replete with beauty and visual effects.
It uses the same Windows Aero that was in Vista. Translucent windows, Flip and Flip 3D function (displays all open windows in two-dimensional or three-dimensional form when pressing Alt+Tab and Win+Tab, respectively).
However, as in Vista, Aero can be disabled. To do this, go to Control Panel / Design and Personalization / Personalization, and then select Basic (simplified) themes from the list of themes. Here we are offered Windows 7 - simplified style and Classic. The simplified style is, first of all, disabling animation and translucency of windows. In general, the appearance of this theme remains the same (see screenshot below).
Classic is a more radical option, suggesting a design in the style of Windows 98, with the exception of the Start panel (discussed below). As for Aero themes, it should be noted that the standard Aero desktop screensavers in Windows 7 are designed as slide shows. That is, each Aero theme has a certain set of pictures that will change at a given frequency. By default, there are six pictures, and the change frequency is every thirty minutes. But you can change this. To do this, click on the Desktop Background link at the bottom of the Personalization window.
Here you can change the default settings and specify the path to your own photos. You can also edit existing themes (for example, remove pictures from them that you don’t like) or download new ones from the Microsoft website. To do this, in the Personalization window, click the link Other topics on the Internet. But the main and fundamental difference from Windows Vista is not the slide show, of course, but the Start panel. We’ll talk about this innovation in connection with navigation.
Navigation
In previous Microsoft operating systems, programs were launched mainly through Start / Programs, or by double-clicking on icons on the desktop. The panel to the right of the Start button, of course, existed, but the icons in it were small and not informative enough. They had no indication that the application was running. True, if the application was actually running, then elongated rectangular mini-windows of the corresponding programs appeared on the panel. In Windows 7, the developers decided to take a different path. Now program icons are the same size as the Start button (by the way, curiously, its design has remained unchanged, although it was the Vista logo). No rectangular windows appear, but the icons of running programs stand out from the rest (see screenshot).
Probably, all this was invented not without the influence (direct or indirect) of Apple and its Mac OS X system, where the bottom panel (Dock) is the main tool for launching programs. But Microsoft developers went further and came up with this “trick”: if you hover your mouse over the icon of an open application or window, you will see its thumbnail, and all processes will be reflected in this thumbnail in real time.
This is very convenient if, for example, you are loading a file in your browser, and at the same time you are working on something else. By the way, the file download progress is also displayed on the icon itself (it gradually fills with a light green color). This function is no less useful if you have a large number of open pages or documents in one application. In the screenshot above this paragraph we see thumbnails of three sites opened in the browser. And if you want to see one of them on the whole screen, then just hover your mouse over the thumbnail. The remaining thumbnails will not disappear anywhere, but will remain on the screen until you click on the selected thumbnail. If you want to close a window, then simply click on the cross in the upper right corner of the thumbnail.
Despite the undoubted advantages of the new taskbar, some minor disadvantages were also noticed during the work process. In particular, after uninstalling some applications, icons remained on the taskbar that could not be “killed” (standard right-clicking and selecting the Remove program from taskbar command did not help). This, however, was in the Release Candidate build - perhaps this problem will not appear in the final version. In the final version, however, another “glitch” was noticed: when you launch an installed application, a new icon for it appears, highlighted accordingly (the old one remains in place and looks the same as before the application was launched).
The above screenshot shows that there are two Safari 4 browser icons on the taskbar. This, of course, can be attributed not to the lack of optimization of a particular browser for Windows 7, but given that, in principle, Safari 4 works correctly on Windows 7, we are inclined to blame it on task bar. However, I think Microsoft will fix such problems in the very near future - after all, this is a small thing, it’s not difficult to fix. In general, I repeat, navigation using the taskbar is very convenient, and if you compare it with the Dock in Mac OS X, it is still unknown which side will have the advantage.
Of course, in addition to the taskbar, programs can also be launched through the Start menu.
And here it should be noted that to turn off the computer you no longer need to click on the arrow and open a separate menu. Just click on “Shut down”. It might seem like a small thing, but it made me especially happy. As we remember, in Windows Vista there was a sleep button in this place; it was possible to change the settings, but the average user would hardly do this. Most Vista owners didn't even think about this problem. Now it will not arise.
A little less useful, but still nice, is organizing a menu of hidden icons in the system tray. Now, to see what programs you have there, just click on the arrow, after which a “tray” will open, in which there will be small icons of the corresponding applications. The connected USB drives will also be displayed there.
Search
Minor changes have been made to search. As we remember, the ability to conveniently search your computer directly from the Start menu was implemented back in Windows Vista, and it was indeed a very convenient tool. Now, search results are grouped by belonging to different programs, and if you click on the View other results link, a window will open where you will see informative previews of all found files (for example, the first lines of letters).
There will also be an opportunity to organize a search in libraries and home groups or search on the Internet. But there is a flaw with the latter: after clicking on Search on the Internet, I received the following picture.
In this case, Safari 4.0.3 was chosen as the main browser. If we make Internet Explorer 8 (available as part of the system) the main browser, then everything will be in order, and we will get search results in Bing.
However, incorrect work with Safari is an alarm bell. It is not a fact that this function will work quite correctly with other popular browsers.
Additional "chips"
In addition to the innovations described above, the Windows 7 interface has several interesting features, the benefits of which are not so obvious to me personally, but they cannot be ignored at all. For example, additional functionality has appeared in the Minimize all windows button. The button itself (a small vertical rectangle) is now located in the lower right corner, next to the clock and date.
If you hover your mouse over it, all windows will become transparent. It looks like this:
To be honest, for a long time I could not understand what the practical meaning of this was. Moreover, when one day the mouse accidentally jumped into the lower right corner and the windows suddenly disappeared, I was pretty scared - why did my running applications and open documents disappear from the screen? This, of course, is out of habit, but the moment is indicative. Because the practical load of this “trick” is almost zero. Unless you want to see working gadgets, but are too lazy to make one click.
In addition to minimizing all windows at all, you can also select one window and minimize all others. This is done as follows: take the window we need and sharply jerk the mouse from side to side. The window you shook remains open, the others are rolled up. It’s a fun feature, but I admit that in six months of working with Windows 7, I never used this feature during real work. Another function turned out to be useful somewhat more often: if you take an open window and move it beyond the right or left border of the screen, it will open in such a way that it takes up exactly half of the screen. The second half can be occupied by another window, leading it beyond the border of the opposite side.
This can be useful when comparing two documents or when working in Explorer. You don’t have to constantly switch between windows, you don’t have to manually stretch and contract windows, trying to fit them side by side.
There is one more “trick”. You can take a window that is not open to full screen and move it to the upper edge of the desktop. Then the window will automatically open to full screen. Conversely, if you take a fully open window and move it down, it will shrink.
Further, Explorer now has a separate icon in the Taskbar and by default shows us the user's libraries (previously it was called My Documents).
And, subjectively, using Explorer has become more convenient. At least, after some time working with Windows 7 Explorer, I no longer wanted to install the file managers that I had previously used.
Gadgets
The last thing worth mentioning is about gadgets. Microsoft has also done a good job on them, making this tool really convenient and useful. Now gadgets can be located anywhere on the desktop, and not on a separate panel, as in Vista. In the screenshot below, pay attention to the location of the Clock gadget.
As before, additional gadgets can be downloaded from the Internet. In addition, third-party applications installed on your computer can also add their gadgets to the menu.
This screenshot shows the gadgets menu with Nero DiscCopy that appeared after installing the Nero 9 package.
In the second part of the article, we will talk about the stability and performance of Windows 7, and consider the main innovations in the functionality and settings of the OS.
Windows 7 - interface customization - how to return a look similar to XP
If you are an ardent supporter of the Windows XP interface, but already have to work in Windows 7, here are brief instructions on how to make working in the new system visually familiar and convenient.To begin with, what the result will be:
If you don’t quite understand, then in the second picture there are tray icons.
Now let’s talk about how to actually return everything: Right-click on the free space of the Start bar and select “Properties”. We set all the settings as in the screenshot (except for the position of the panel, in the screenshot - “Top”, you can set the value where you are used to, so that you have the “Start” panel):
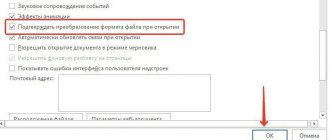
In the same window, select the “Customize” button and in the next window, check the box “Always display all icons and notifications on the taskbar.” Without closing this window, select “Turn system icons on or off” and on the next screen select which icons you do not want to see. Click “OK” and “OK” again.
Again, right-click on the free space in the Start menu and call “Properties”. Go to the “Start Menu” tab and click on the “Customize” button with the mouse:
We turn on and off the display of elements we need and don’t need in Start. Click “OK”. Thus, we got a narrow start line and display of open windows, like Windows 7
Now, in order to return the classic look of the menu itself, called up by the “Start” button, you need to use a third-party program called Classic Shell (you can read about the program here). So, download Classic Shell. Run the downloaded installation file and install the program.
After installation, we see the already familiar “Start”.
If you want to make additional settings, for example, make it smaller, right-click on the Start icon and select “Settings” from the drop-down menu:
Next, set the necessary settings and that’s it.
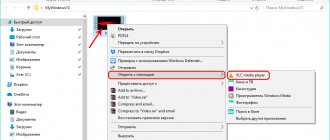
To get the standard view of Explorer (the “my computer” folder), open it, go to “Tools” - “Folder Options”. Set the settings as shown in the screenshots below:
After that, click the “Apply” and “OK” button. Next, in Explorer (the “my computer” folder), select “Arrange”, check the “Menu Bar” checkbox.
Next View – Select Columns. Set the columns you need in Explorer
Click “OK” and that’s it. You have an old, studied and familiar menu. Happy work!
Share:
Leave your comment!
- Comment on VKontakte
- Facebook comment
Tags:
- windows 7
Read further:
- Windows 7 Security Guide
- Windows 7 - system setup - disabling unnecessary services
Comments
0 Alexander 03/01/2014 21:15 Great, everything worked out!
Answer
0 Alexey 07/10/2017 16:44 thank you for the tips! You can also change the system-wide font size to %.
Answer
0 Mikhail 03/08/2019 22:37 How can I make the window icons on the taskbar opaque? In win.
Answer
Update list of comments
Add a comment
| Next > |
Similar articles:
- Linux Mint 17.3 instead of Windows 10 and Mac?
- How to make a Windows 10 PC a Wi-Fi hotspot?
- Windows 10 vs Windows 8.1 vs Windows 7: performance
- How to remove Windows 10 upgrade notification?
- Windows 10: to go or not to Windows 7 and Windows 8?
- New in Windows 10
- Welcome picture in Windows 7: how to change it?
- How to activate god mode in Windows 7?
- What operating systems are most popular?
- How to run Windows 8.1 and Windows 7 on the same computer?