Modern systems, starting with Windows 7, can independently select the optimal value for the screen, so basically there is no need to worry about this. It turns out that there are people, most likely beginners, asking the question of how to change the screen resolution, no matter what operating system or computer. The instructions will be individual for everyone and, I hope, will help you.
There are a couple more points that I will touch on here. Let's say you have a monitor with a resolution of 1920 by 1080 or higher. It is known that setting the value 800×600 for it will not work. Why? But because you will see screen distortion as the values do not match the physical values for the screen.
How to change screen resolution on Windows 7
Let's start from the depths, namely seven. Using this particular operating system, you do not have to worry that the value will not be selected accurately. Although sometimes the value is set lower than necessary, so the knowledge that can be gleaned from this manual comes to the rescue.
In the article How to increase the font size on a computer screen, some points on the topic were mentioned, and the article itself is quite useful. If interested, you can read it.
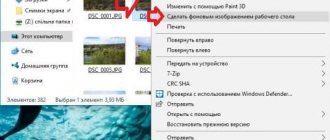
To manually adjust the screen resolution, you need to right-click on an empty space on the desktop. A menu will appear where we select the “Screen Resolution” option.
One of the subsections of the control panel called “Display Settings” opens. Here we see three parameters:
- screen;
- permission;
- orientation.
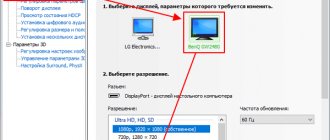
Naturally, we are concerned about the second point. The first one is responsible for choosing an additional monitor, and the last one is already clear. Open the Resolution options tab and select the maximum. In my case - 1366 by 768. Most likely, opposite the maximum resolution there will be a corresponding word - Recommended .
It is worth paying attention to the moment when you cannot change the screen value. The fact is that you must install drivers for the graphics adapter. As a result, you can change the screen value not only from the control panel, but also in the video card settings. Below I will explain how to use these settings. (Drivers are usually installed automatically).
The screen resolution became small after reinstalling Windows 7. What should I do?
Good day!
I will describe a fairly common situation about which I often receive questions. So …
On an ordinary “average” laptop by modern standards, with an IntelHD video card (possibly plus some other discrete Nvidia), Windows 7 is installed. After the system is installed and the desktop appears for the first time, the user notices that the screen has become somewhat then small compared to what it was (note: i.e. the screen has a low resolution). In the screen properties, the resolution is set to 800x600 (usually) and cannot be set differently. And what to do in this case?
In this article I will give a solution to a similar problem (so that there is nothing tricky here :)).
SOLUTION
This problem most often occurs with Windows 7 (or XP). The fact is that they do not come with (or rather, much fewer of them) built-in universal video drivers (which, by the way, are present in Windows 8, 10 - which is why there are significantly fewer problems with video drivers when installing these OSes). Moreover, this applies to drivers for other components, not just video cards.
To see which drivers are having problems, I recommend opening Device Manager. The easiest way to do this is to use the Windows Control Panel (just in case, see the screenshot below on how to open it in Windows 7).
START - control panel
In Control Panel, open the address: Control Panel\System and Security\System. On the left side of the menu there is a link to the device manager - open it (screen below)!
How to Open Device Manager - Windows 7
Next, pay attention to the “Video adapters” tab: if it contains “Standard VGA graphics adapter”, then this confirms that you do not have drivers in the system (because of this, the resolution is low and nothing fits on the screen :)) .
Standard VGA graphics adapter.
Important! Please note that the icon shows that there is no driver for the device at all - and it does not work! For example, the screenshot above shows that, for example, there is no driver even for the Ethernet controller (i.e. for the network card). This means that the driver for the video card will not be downloaded, because... there is no network driver, and you can’t download the network driver, because... no network... In general, it’s still a node!
By the way, the screenshot below shows what the “Video Adapters” tab looks like if the driver is installed (the name of the video card will be visible - Intel HD Graphics Family).
There is a driver for the video card!
The easiest way to solve this problem is to get the driver disk that came with your PC (however, such disks are not provided for laptops :)). And with its help, everything can be quickly restored. Below I will consider the option of what can be done and how to restore everything even in cases where your network card does not work and there is no Internet to even download the network driver.
1) How to restore the network.
It won’t be possible without the help of a friend (neighbor). As a last resort, you can use a regular phone (if you have internet on it).
The essence of the solution is that there is a special program 3DP Net (the size of which is about 30 MB), which contains universal drivers for almost all types of network adapters. Those. Roughly speaking, download this program, install it, it will select the driver and your network card will work. You can download everything else from your PC.
A detailed solution to the problem is discussed here:
How to share the Internet from your phone:
2) Auto-installation of drivers - useful/harmful?
If you have Internet access on your PC, then auto-installing drivers may be a good solution. In my practice, of course, I have encountered both the correct operation of such utilities and the fact that sometimes they updated drivers in such a way that it would be better not to do anything at all...
But in the vast majority of cases, the driver update proceeds correctly and everything works. And there are a number of advantages from using them:
- save a lot of time identifying and searching for drivers for specific equipment;
- can automatically find and update drivers to the latest version;
- in case of unsuccessful update, such a utility can roll back the system to the old driver.
In general, for those who want to save time, I recommend the following:
- Create a restore point manually - how to do this, see this article:
- Install one of the driver managers, I recommend these: .
- Using one of the programs above, search for and update “firewood” on your PC!
- In case of force majeure, simply roll back the system using a restore point (see point 1 just above).
Driver Booster is one of the programs for updating drivers. Everything is done with one click of the mouse! The program is provided at the link above.
3) Decide on the video card model.
If you decide to do it manually, then before downloading and installing video drivers, you need to decide what model of video card you have installed in your PC (laptop). The easiest way to do this is to use special utilities. One of the best, in my humble opinion (and also free) is HWiNFO (screenshot below).
Determining the video card model - HWinfo
We will assume that the video card model has been determined and the network is functioning :)…
An article on how to find out the characteristics of a computer:
By the way, if you have a laptop , then video drivers for it can be found on the laptop manufacturer’s website. To do this, you need to know the exact model of the device. You can find out about this in the article about determining the laptop model:
3) Official sites
There seems to be nothing to comment on here. Knowing your OS (for example, Windows 7, 8, 10), video card model or laptop model, all you need to do is go to the manufacturer’s website and download the required video driver (by the way, the newest driver is not always the best. Sometimes it is better to install an older one - because it is more stable. But here it is quite difficult to guess, just in case, I recommend that you download a couple of driver versions and try it experimentally...).
Websites of video card manufacturers:
- IntelHD - https://www.intel.ru/content/www/ru/ru/homepage.html
- Nvidia - https://www.nvidia.ru/page/home.html
- AMD - https://www.amd.com/ru-ru
Websites of laptop manufacturers:
- ASUS - https://www.asus.com/RU/
- Lenovo - https://www.lenovo.com/ru/ru/
- Acer - https://www.acer.com/ac/ru/RU/content/home
- Dell - https://www.dell.ru/
- HP - https://www8.hp.com/ru/ru/home.html
- Dexp - https://dexp.club/
4) Installing the driver and setting the “native” screen resolution
Installation…
As a rule, there is nothing complicated - just run the executable file and wait for the installation to complete. After restarting the computer, the screen will blink a couple of times and everything will start working as before. The only thing I also recommend is to make a backup copy of Windows before installing -
Changing resolution...
A full description of changing the resolution can be found in this article:
I'll try to be brief here. In most cases, it is enough to right-click anywhere on the desktop, and then open a link to the video card or screen resolution settings (which is what I will do, see the screenshot below :)).
Windows 7 - screen resolution (right click on the desktop).
Next, you just need to select the optimal screen resolution (in most cases it is marked as recommended, see the screenshot below).
Screen resolution in Windows 7 - choosing the optimal one.
By the way? You can also change the resolution in the video driver settings - usually it is always visible next to the clock (if anything, click the arrow - “Show hidden icons”, as in the screenshot below).
IntelHD video driver icon.
This completes the mission of the article - the screen resolution should have become optimal and the workspace should have grown. If you have anything to add to the article, thank you in advance. Good luck!
How to change screen resolution in Windows 10
The specified operating system has the same parameters from the control panel, but it still needs to be found. We won't bother, but let's see how to do this from the options menu.
As in the first case, we right-click on the desktop and select the “Display Settings” option.
A window opens with the “System” subsection. There are many tabs there, but we are interested in “Screen”. On the right side of the window we see several parameters:
- Night light mode – best suited for reading in the dark;
- Scale and layout are what we need;
- Multiple displays – we can connect additional monitors.
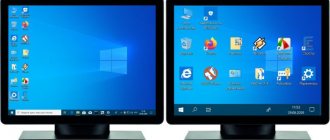
Find the “Resolution” parameter and change it to the maximum value, it will be o.
In addition, you can specify the text size in applications. The standard value is 100%, but the value can be changed to 125%.
Unfortunately, this method is the only one in the top ten. The “Display” section has been removed from the control panel and the necessary settings can only be changed through the “Options” menu. That's how bad they are, these Microsoft people.
Solving the problem in Windows 7
You can change the resolution value (the number of pixels vertically and horizontally) on your computer using several methods.
Feature integrated into Windows
To expand the screen in Windows 7, we perform a list of simple actions that any beginner who wants to choose the optimal value for the number of pixels used to display the image on the display can handle.
- Call the context menu of the desktop area free of icons and select “Screen resolution”.
The second method to open the same window is through the Control Panel item called Display. Click on its icon and select “Adjust screen resolution”.
- In the line of the same name, select the desired value from the list of suggested ones.
- Click “Apply” to evaluate the selected settings.
Follow the advice of the monitor developers and select the optimal setting value they recommend. There is always a “Recommended” sign next to it. If there are two or three items in the list, check whether the drivers are installed on your video card. Without them, you won't be able to change the resolution to a higher resolution than 1024x768.
Video card driver
If you have a video adapter driver installed, you can change the extension using the software that comes with the driver. Moreover, these programs will differ for different video chip manufacturers, but the principle will remain the same, and the algorithm for changing the extension value will be almost identical.
See also: How to remove crossbrowser from a Windows 7 computer
nVidia
When using more popular and, as a result, more expensive with the same performance, video cards from nVidia, the control panel for device operating modes will help you change the resolution.
- Call the context menu of free desktop space.
- Select the item highlighted in the screenshot to launch the window for setting up various video card parameters.
- Expand the “Display” menu item, where we click on the link shown below.
- When using multiple monitors, select the target for which we want to change the settings and determine the resolution value.
As already mentioned, you should choose your own resolution, assigned to the first position.
- Apply the new settings and close the window.
Radeon
If you have a video card developed on an ATI graphics chip from Radeon, we perform the following steps in Windows 7.
- Call up the desktop context menu and click on the first item in the drop-down menu, or open the application via its tray icon.
- Click on the “Display” button, then click on “Advanced settings”.
- Select the desired parameter or enter it manually (which is also allowed) and save the changes made.
Color calibration
This setting is discussed in some detail in the article How to calibrate a monitor and set it up at home.
The article discusses in detail questions such as: why calibration is needed, practical methods of calibration, and how to calibrate the monitor in Windows 7 using the system itself.
This concludes the basic screen settings in Windows 7 that deserve attention.
Additional operating system settings
In addition to choosing a resolution, Microsoft developers allow you to experiment with interface scaling through Windows settings:
Changing the size of desktop icons
The appearance of the shortcuts changes through the context menu, which is called up with the right mouse button when you click on an empty spot on the desktop. Through the “View” sub-item, small, regular or large icons are displayed.
An alternative way to change the image on the screen is to use the CTRL key and the mouse wheel.
Selecting font sizes and elements
The “Settings” section and the catalog of options centered around “Display” will help you comprehensively increase the size of the interface in Windows. In addition to the slider that changes the text size, the developers allow you to change the entire screen scale as a percentage.
Suggested options: 100, 125, 150 or 175%. This also changes the position of the text and the screen size on third-party displays currently in use.
Cursor magnification
It wouldn’t hurt to add a cursor of a suitable size to the text and changed icons on the desktop.
As with text, there is a whole set of parameters that affect the size, thickness, and even color. In the latter case, developers allow you to select pre-prepared options (white, black or adaptive, that is, adapting to specific application scenarios and background), and use a special palette to manually determine the shade.
Activating Magnifier
A special tool for the visually impaired has been available in Windows for a long time. Developers from Microsoft propose to zoom in on individual parts of the image on the monitor screen. How much the scale will change depends on the selected settings. And the mode is activated either through a special slider in the operating system parameters, or using the keyboard and a combination of the hot keys WIN and “+” on the keyboard.
The WIN + ESC combination will help you deactivate Magnifier.
Ways to fix the problem
If you are unable to change your monitor resolution, try one of several methods below.
Checking drivers
Right-click the main Start menu and launch Device Manager.
Find the "Video Adapters" section and expand it. If you see a device there with the name “Basic video adapter (Microsoft)”, you can be sure that the correct video card driver is not installed. Also, an incorrect driver may be indicated by the presence of a “VGA-compatible video controller” device in the “Other devices” section.
If you follow the usual method to solve this problem – right-click the device and select “Update driver” – you will not be able to solve the problem. Even the received system message that you already have the driver installed indicates that there is simply no other version of it on the Microsoft server.
Download the latest driver from your video card manufacturer's website and install it. If necessary, uninstall the previous driver first.
Other options
- Check the cable that connects the monitor. Try connecting using a different option and also make sure the cable works on another device. If the connection is made through an adapter, do not forget to check that too.
- If after restarting Windows the resolution selection becomes available, you should update the chipset drivers. You can also try disabling Windows Fast Startup. Open the classic Control Panel, Power Options section. Click “What the power buttons do” and then “Change settings that are currently unavailable.” Uncheck the box next to the appropriate item.
- Try changing the screen resolution in your video card's control panel.
ClearType Settings
Sometimes in Windows 7 you will need to pay attention to the link - ClearType text settings.
When you select a setting, you will be prompted to step by step select an option for smoothing fonts on the monitor screen.
A window will open – ClearType Text Adjustment Tool. After checking the Enable ClearType checkbox, click Next.
In a new window, Windows ensures that this monitor is set to its base resolution. Click Next.
In a new window in Windows 7, you are asked to select display option 1 of 4, which is more convenient to read.
For most people, the standard settings are fine. Click Next and finish setting up the display of text on the monitor in Windows 7.
How to increase the maximum resolution of your monitor screen
High screen resolution plays a special role in games. The more dots (pixels) there are on the screen, the better the picture as a whole becomes. Other graphic settings, such as anti-aliasing, texture quality, drawing shadows and water, often affect the image on the screen not as much as the resolution value, that is, the number of these same pixels. Therefore, increasing the resolution (and in our case, the maximum resolution) will help raise the overall level of graphics in games.
Of course, the methods described in the article will allow you to increase the screen resolution in the operating system as a whole, not only in games.
Nowadays, the video card market is divided between two large companies: AMD and Nvidia. Each of them has developed its own technology that allows you to increase the maximum permissible (according to the monitor specification) resolution. You must have a video card from one of these manufacturers that is not too weak (not too old) for the material in this article to make sense for you.
If you do not know the brand of your video card, then read the next paragraph of the article. If you know, then feel free to skip.
How to find out the brand of your video card
We offer a solution for Windows owners. We need to get into Device Manager through the Control Panel. In Windows 8, open the side menu on the right, click on Settings (the button with a gear icon), and then click on the corresponding Control Panel item.
In previous versions of Windows, Control Panel can be accessed through the Start menu. So, now from the Control Panel we go to the Device Manager.
In Device Manager, go to the Video adapters section, and right from there you can see at least the brand of your video card in the corresponding item. If you want to find out more information about the video card, then double-click on this item or call up the context menu by right-clicking on it, in which click on the Properties item.
AMD requirements
According to AMD's website, you must have one of the following graphics cards, or a newer and more powerful one:
- AMD Radeon™ R9 Fury Series.
- AMD Radeon™ R9 390 Series.
- AMD Radeon™ R9 380 Series.
- AMD Radeon™ R7 370 Series.
- AMD Radeon™ R7 360 Series.
- AMD Radeon™ R9 295X2.
- AMD Radeon™ R9 290 Series.
- AMD Radeon™ R9 280 Series.
- AMD Radeon™ R9 270 Series.
- AMD Radeon™ R7 260 Series.
- AMD Radeon™ HD 7900 Series.
- AMD Radeon™ HD 7800 Series.
- AMD Radeon™ HD 7790 Series.
- Desktop A-Series 7400K APU and higher.
Below is a table with supported resolutions and those resolutions that can be achieved, respectively supported.
Supported Resolutions Available permissions after VSR activation
| 1366 X 768 @ 60Hz | 1600 X 9001920 X 1080 |
| 1600 X 900 @ 60Hz | 1920 X 1080 |
| 1920 X 1080 @ 60Hz | 2560 X 14403200 X 1800 3840 X 2160 (R9 285, R9 Fury Series) |
| 1920 X 1200 @ 60Hz | 2048 X 15362560 X 1600 3840 X 2400 (R9 285, R9 Fury Series) |
| 2560 X 1440 @ 60Hz | 3200 X 1800 |
Solution for owners of AMD Radeon video cards
AMD has Virtual Super Resolution technology (abbreviated as VSR), developed several years ago precisely to enable players to improve the quality of graphics in games. To change the maximum screen resolution, you will need the latest version of the AMD Catalyst Control Center program, which must be installed for all owners of AMD video cards. If you do not have the program for some reason, you can download it on the official website. We also recommend updating the drivers for your video card.
Step 1. So, go to the program: click on the item My digital flat panels. Another list appears.
Click on Properties (Digital Flat Panel). In the Image Scaling Preferences section, check the Enable virtual super resolution box.
Click on the Apply button in the lower right corner of the program.
Step 2. Then you need to go to settings to change the resolution. To do this, you need to right-click on an empty space on the desktop and select Screen Resolution in the context menu or go to the control panel, and from there to the Screen section, where you need to click on the Adjust screen resolution button. Now you can select a higher resolution in the list of the same name.
New available resolutions can also be selected in other programs where there is an option to change the resolution.
It should be noted that as the resolution increases, the computer spends additional processing power. This usually requires significant computer resources, and it is worth remembering that changing the screen resolution to a higher one may cause a decrease in performance.
Nvidia requirements
You must have a monitor with a resolution of at least 1920x1080 pixels, and a video card of at least 400 series (GeForce 400 Series)
Solution for owners of Nvidia video cards
Nvidia has a similar technology - Dynamic Super Resolution (DSR for short) - which allows you to increase screen resolutions in games up to 4K, that is, up to 3840x2160 pixels. We recommend updating your video card drivers, as is the case with AMD Radeon.
Go to Nvidia Control Panel, then under 3D Settings, select Manage 3D Settings. Here, in the DSR - degree parameter, in the drop-down list, mark those items with the corresponding resolution that you need. For example, if you want to set the resolution to 4K, then select 4.00x (native resolution). You should not select too many resolutions, as this can lead to slower performance: select only the ones you want to use. Don't forget to save your settings.
Now similarly selected resolutions are available in games and in the screen resolution settings in your operating system. Remember that too high a resolution reduces computer performance, which can cause FPS to drop in games.
soft-storage.ru
What to do if you can't set the resolution higher than 1024 x 768 in Windows 10
Windows 10 update packages do not include system components and new features, but sometimes also drivers, for example, for video cards or other devices. It may happen that the drivers provided by Microsoft do not work properly, as a result, the screen resolution in Windows 10 does not change and the video card displays the picture in poor low quality. Installing the latest drivers from the manufacturer's website does not help, because Windows constantly rewrites them on its own.
This problem has been encountered by some users who use laptops and computers with ATI Radeon HD 4000 series and lower video cards. After updating "Advanced Micro Devices, Inc." There are problems with Radeon cards, as a result of which panoramic modes are no longer displayed. Only screen resolutions available: 640x480, 800x600 and 1024x768. How to fix?
Step 1: Disable automatic device updates in Windows 10
First of all, you need to disable automatic device updates, since in this case it is the source of the problem. The system constantly changes the manufacturer's driver with its own from Windows Update, which ends up causing problems.
To begin, open an Explorer window. In the side menu on the left side, right-click on the “This PC” shortcut and select Properties from the context menu.
The System tab will open. Pay attention to the left side of the window with a list of available bookmarks. Click on the “Advanced system settings” field.
The System Properties window appears. Go to the Hardware tab, and then click on the "Device Installation Options" button.
Here you can choose to have the system automatically install manufacturer applications and custom icons.
This feature also includes drivers for specific devices, such as ATI Radeon or NVIDIA GeForce graphics cards. Check “No (the device may not function properly)” in this section.
If Windows 10 asks you to reboot, confirm this action.
The first step has been taken - the system will not change the current driver to a new one that causes problems with screen resolution. Now you need to restore the original one for the video card so that all resolutions are available again.
Step 2: Restoring the original driver for the video card
First, you should try to do this the simple way, that is, using Device Manager. Open Control Panel in Windows 10 (if there is no “parked” tile, you can find it using a search engine), then go to the “Hardware and Sound - Device Manager” tab.
Then find your video card, go to the Driver tab and use the "Driver Repair" option. Windows should automatically restore the original one that previously worked correctly, and thanks to the fact that we turned off automatic updates in the first step, it will no longer be overwritten.
Immediately after recovery, the screen will turn black for a moment and then return to the correct resolution.