The GIF animation graphic format is very common today on social networks and regular information sites. Due to the light weight of such files, they do not take up much space on servers, so their use is completely justified. Most often, “gifs” are short animated videos that demonstrate funny incidents from life, jokes and short cooking recipes.
You can create such a file yourself in almost any graphics editor. But what to do if you want to keep the video you like as a souvenir? How to save a GIF?
Download to computer
Not everyone knows that GIF videos can be played not only in their “native” format, but also in MP4. Thanks to this, you can quite easily download the animation to your PC and watch your favorite clip at any convenient time. To do this, just follow very simple instructions that tell you how to save a “GIF” to your computer:
- Activate file playback in the browser you are using.
- Place the cursor over the moving image and press RMB.
- Select “Save image as” in the window that appears.
- Copy the file to your computer. The GIF will be saved in GIF format.
If the Save image as option does not work, then you must select “Save video” and specify the path to the folder on your PC. In this case, the video will be downloaded in MP4 format. After this, you need to use one of the Internet resources to reformat the saved file back to GIF. Any online converter that converts videos from MP4 format to GIF is suitable for this. On the site, you only need to indicate the path to the folder in which the video is located, and wait until a new document is created, which will also need to be downloaded to your computer.
We learned how to save a GIF to your computer, but you can also download it to your smartphone. This is very important, since most modern phones have the ability to view files in this format.
How to insert a gif into
Hello, friends! In the previous article, we figured out what gifs are in Odnoklassniki and where to look for the corresponding album on your page. Now let's figure out how you can add the animation you like to your album, and how to properly save it to your computer and then add it to a social network.
How to save a GIF to your computer
So, if you find an interesting animation on the Internet and want to save it to your computer, then do the following. For example, I will use the Google Chrome browser.
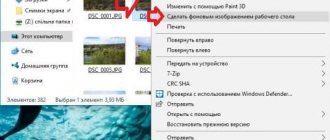
Left-click on it to start playing, then right-click. A context menu will open, in which select “Save picture as” or “Save video as”.
Next, through Explorer, select a folder on your computer. In the “File name” field, enter the name, and add “.gif” at the end. Click "Save".
The animation will be saved on your computer in the specified folder. You won't be able to play it, but when you upload it to , it will be displayed correctly.
How to upload a GIF
Now let's figure out how to upload a GIF to a file that is stored on your computer. Go to your social network page. You need to add animation through notes, so you can either click on the corresponding menu item under your avatar, or immediately click on the field to create it.
How to make a note in Odnoklassniki
A window will open to add a new entry. In it, click on the “Add Photo” button.
Since our gif is saved on your computer, click on the “add photo from computer” button.
Then, through the Explorer window that opens, find the folder on your PC in which the desired moving image is saved, select it and click “Open”.
Wait for the GIF to load into the post you're creating. You can add your description in the field at the top. If you want it to be shown in the status, check the “In status” box. Click on the "" button.
After this, your friends will see the added note with a moving image in their feed. We'll talk about where the added animation is saved on your page below.
Saving on iPhone
In this case, you will have to do a little more manipulation. Before you save a GIF to your iPhone, you need to download the special Camera Roll iOS application. Without it, the video will not play correctly (only the first frame of the file will be displayed), and it will be impossible to view it. It is also recommended to download the GIF Viewer application or any equivalent. In addition, the easiest way to download “gifs” is through the Safari browser.
In order for the video to display correctly, you must complete the following steps:
- Launch your browser and activate GIF animation in it.
- Click on the image and select “Save Image” in the window that appears. After this, the picture will be uploaded to the standard iPhone gallery.
- Enable the application to display all animation frames correctly.
- Enjoy watching.
How to play downloaded gif on computer
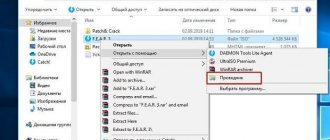
If you launched a downloaded animation, but it does not play, then most likely you opened it through some kind of graphic editor or photo viewer.
In order for the GIF to play, it must be opened in a browser. Right-click on the animation file, select “Open with” from the context menu that drops down, and then “Internet Explorer”. If you want to open with another browser, then, in this case, you need to click on the “Select program...” item.
Look at the screenshot and everything will become clear to you:
And that’s all, dear friends, we have learned how to search and save GIFs on the VKontakte social network.
How to download a file from VK to a smartphone
Many social network users are interested in how to save a “GIF” from VK, since it is on this platform that such videos are most often found. However, if a person does not have an iPhone in his hands, but any other smartphone, then in this case standard applications will not help. Therefore, you don’t even have to waste time on them.
However, there is one method that will help you save the GIF. How it works:
- You need to go to the Safari browser and find any “GIF” in VK.
- Click on the image and select “Open in new tab.”
- Wait for the video to load completely.
- Click on the image again and select “Save Image”.
In the same way, you can save any videos from other popular social networks to your smartphone. If you use the Google Chrome browser, the “gif” will be saved, but will not be played.
Where can I find a GIF for VKontakte?
Finding graphics in GIF format for use on VKontakte is actually very simple.
- Firstly, you can save a GIF that you accidentally saw somewhere to your documents. To do this, you need to move your mouse over the animation during playback and click on the cross that appears in the upper right corner.
Preservation
- Secondly, you can engage in a targeted search for GIFs. There are entire communities aimed at creating and systematically posting new animations - for example, vk.com/best_gif and the like.
Can be found on the Internet
- Thirdly, it’s trivial to use one of the search engines and save it to your computer as a picture in the traditional way. As a result, all you have to do is upload it to the page after logging into VKontakte.
How to download GIF from mobile applications
Many users of Viber and WatsApp messengers are concerned about the question of how to save a “gif” to their phone if it was sent in correspondence. In this case, everything is much simpler. The fact is that all free messaging applications have a function that allows you to perform various manipulations with received files.
If you want to save a GIF animation from a conversation, just click “Save” and the file will automatically be sent to your phone’s standard album. You can then view it and send it to other users. If for some reason the video does not work, you need to download GifPlayer from the App Store. Knowing how to save a “gif” to your computer or phone, you can download the videos you like and send them to friends using any messenger or application.
How to download and save *.gif files on iPhone?
Starting with iPhone, iPad or iPod smartphones with iOS 11 or higher installed, gifs (gif files) can be saved easily and quickly directly through the Photos application. In this article we will tell you in detail how you can save a gif to your iPhone in three different ways: by sending it to yourself by e-mail, by saving it in Photos, and using a special application. For greater clarity, we will provide step-by-step photo and video instructions taken on the iPhone 8 Plus. At the end of the article, you can always ask our technical expert questions.
Table of contents
Saving gifs by sending them to your email
On Apple devices that support operating systems lower than iOS 11, the easiest way to save a GIF animation is by sending it to yourself by email. How to do it:
- Click on the desired gif image on the website
Figure 1. Click on the gif on the website.
- In the menu that appears, select the “Share” option and click.
Figure 2. Select “Share”.
- We find a way to share via e-mail in the menu that opens, click on the Letters icon, enter your address and send the gif by e-mail.
Figure 3. Select the e-mail icon to send a gif.
Saving gif through a third-party application (example - GIF Viewer and Player).
If for certain reasons you need to constantly save and send a large number of GIF images, then a more convenient way to view and save GIFs will suit you, namely a specialized application. On the AppStore you can find a lot of similar programs - free and paid, with varying functionality. As an example, we took the shareware (with in-app purchases) GIF Viewer and Player application. The application allows you to search for GIFs by keywords, save them to different albums in the program itself, and download them to Photos. Let's see how it works:
- Open the application, click Search to search for gifs by keyword.
Figure 4. Click Search.
- Enter a keyword, for example, “cats”.
Figure 5. Enter a keyword in the search bar.
- Click on the image you like.
Figure 6. Click on the desired gif.
- Click Save to save it to an album in the application. Then in the window with albums that opens, select the desired album. The GIF is saved there.
Figure 7. Click Save to save.
Figure 8. Selecting which album to save in.
- To save a gif from the application to your iPhone, select the Albums tab, find the desired album and image.
Figure 9. Find the required album and open it.
- Having opened an image in the album, click on the “Share” icon at the bottom left and click on it.
Figure 10. Click the “Share” icon.
- Select “Save to Camera roll”. You can also send by mail, SMS, copy and open in another program, or convert gif to video.
Figure 11. Click save to gallery.
Standard saving via gallery (Photo).
As we already described in the Introduction to the article, on all Apple devices running OS starting from iOS 11 and higher, saving GIF images can be done in the simplest way - through the built-in Photos application, or gallery. There they can be viewed and sent to people. The gallery displays GIF images as animated pictures among the photo feed; they can be found separately in the “Animated” folder.
How to save your favorite GIF image from the Internet?
- Click on the gif on the Internet page (as we usually do when saving a photo).
Figure 12. Click on gif.
- In the menu that opens, select “Add to Photo”. That's it, the gif is now saved in the gallery.
Figure 13. Select Add to Photo.
- If we want to share a GIF, open it in Photos, click on the “Share” icon at the bottom left:
Figure 14. Select the “Share” icon.
From the offered options, choose exactly how to send a GIF image.
Figure 15. Selecting the gif transfer method.
To find a special album with gifs in Photos, select the Albums tab and scroll down.
Figure 16. Scroll down in the “Albums” tab in Photos.
Find the “Animated” folder - all gif images saved on the device will be located in it.
Figure 17. Find the “Animated” folder.
conclusions
Thus, we learned that it is possible to save a gif on the iPhone in three ways: by sending it to yourself by email, through a special application, and by saving it in Photos (with iOS 11 and subsequent ones). The saving process everywhere takes place in several steps and does not cause difficulties. Which method is more convenient is for the user to choose, depending on personal requirements: the purpose of using gif images, the number of them to view and save, and so on.
We tried to show all three methods in detail, and we hope the instructions were useful to you! Save the coolest gifs on your iPhone and use them for your health!
Previous
ArticleHow to open or read PDF on iPhone?
Next
ArticlesWhat is 3D Touch on iPhone?
How to create and save GIF animation in Photoshop?
Below is an example of an animated GIF that you can create using this tutorial:
Step 1: Load the Images into Photoshop
If you already have images...
Save the images you need in a separate folder. To load them into Photoshop, click File > Scripts > Load Files into Stack.
Then click the Browse button and select the files you want to use in the GIF you create. Click OK.
Photoshop will then create a separate layer for each image you added. Next, go to step 2.
If you don't have a set of images yet...
Create each frame of your animated GIF as a separate layer. To add a new layer, select Layer > New > Layer.
To name a layer, go to the Layers palette, double-click the default layer name, and enter the name you want to give. Press Enter to save it.
Once you have created all the necessary layers and given them clear names, you can move on to step 2.
Pro tip: If you want to combine layers so that they appear in a GIF image in one frame, turn on visibility for the layers by clicking on the “eye” to the left of the name of each layer you want. Then press Shift + Command + Option + E (Mac) or Shift + Ctrl + Alt + E (Windows). Photoshop will create a new layer containing the merged content, which will also need to be renamed.
Step 2: Open the Timeline window
To open the Timeline window, go to the top menu and select Window > Timeline. It allows you to use different layers at different times, thereby turning a static image into a GIF animation.
A Timeline window will appear at the bottom of the screen. Here's what it looks like:
Step 3: In the Timeline window, click the Create Frame Animation button
How to Create an Animated GIF in Photoshop
If this option is not automatically selected, select it from the drop-down menu.
The Timeline window should now look something like this:
Step 4: Create a New Layer for Each Frame
First, select all layers by going to the main menu and then to Select > All Layers. Then click on the menu icon located to the right of the timeline.
From the drop-down menu, select Create a new layer for each new frame.
Step 5: Click on the same menu icon and select “Create frames from layers”
As a result, each layer will be used as a frame of a GIF image.
Step 6: Under each frame, set how long you want it to be displayed before moving on to the next one
How to Add Contact Information to an Image Using Photoshop
To do this, click on the time indicator located under the frame and set how long it should be displayed. In our case, we chose 0.5 seconds per frame.
Step 7: At the bottom of the toolbar, select how many times you want the animation to play
The default value will be "One Time". Click on “Other” if you want to specify an arbitrary number of repetitions.
Step 8: View the created GIF image by clicking on the play icon
Step 9: Save and Export the GIF Image
All that remains is to figure out how to save an animated GIF in Photoshop for later use. To do this, go to the top menu and select File> Save for Web.
Then select the GIF file type you want to save. The number next to the GIF designation determines how closely the colors of the GIF image will match the original JPEG or PNG images. According to Adobe documentation, a higher percentage of anti-aliasing results in more colors and more detail. But this increases the size of the resulting file.
Click "Save" to save the created GIF file to your computer. You can now use this GIF in your marketing efforts.
Upload the GIF to any location from which it can be played. This is what the final result looks like: