Part 2. How to Import CSV Contacts to Android
It's not without thought for importing CSV into Android.
All you need is a Gmail account. Simply download the CSV file to your Gmail account and then sync the account to your Android phone. How easy it is. Below is a step-by-step guide. Follow him. Step 1. Open Browser on your computer and land in Gmail. Sign in to your Gmail account. Step 2: Go to the left column and click on Gmail
.
From the drop-down menu, select Contacts
.
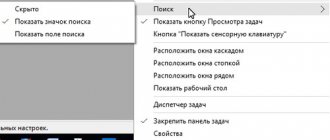
Step 3: Click the More...
From the drop-down menu, select
Import
Step 4: This will bring up a dialog box. Click select file
.
In the pop-up file browser window, navigate to the location where the CSV file is saved. Select it and click Open
>
Import
to download the CSV file to your Gmail account. Step 5: Now all the contacts in the CSV file are downloaded to your Gmail account.
Step 6: Sign in to your Google account on your Android phone. Then go to settings
>
accounts and synchronization
.
Find your Google account and click on it. Next, check the Sync contacts
>
Sync now
. Once completed, all contacts CSV will be on your Android phone.
Step 7
It doesn't matter if you don't have a google account on your Android phone. You can still import Android contacts from a CSV file
Just skip step 6 and click More details...
>
export...
Select the group in which all CSV contacts are saved.
Then select Save as vCard Format
.
Click the Export
to download the vCard file to your computer.
Step 8: Connect your phone as an external hard drive. Once detected successfully, go to your computer and find your Android phone.
Step 9: Open your Android phone. All folders and files saved on the SD card are displayed in front of you. Just copy and paste the vCard file here.
Step 10: On your Android phone, tap the Contacts icon next to the Contacts
categories and press the virtual button on the left of the main button to show the menu.
Select Import/Export
>
Import from USB Drives
>
Import from SD Card
(this means external SD card).
Step 11. A dialog box appears asking you to save contacts to your phone or your accounts. Select one and your phone starts searching for the vCard file. When done, select Import vCard File
>
OK
. Then all the contacts in the vCard file will be imported to your Android phone.
Previously, it was impossible to transfer contacts from one phone to another. When purchasing a new device, you had to enter all the phone numbers again, which many people did not like at all. Everything changed only with the advent of smartphones. And if on Symbian transferring contacts still caused certain problems, then on Android this process takes a matter of minutes.
If you are afraid of losing your smartphone, then be sure to synchronize your phone book. In this case, when you buy a new device, you will not need the old one - all your contacts will be displayed immediately after you log in. To synchronize with Google servers you need to do the following:
Step 1.
Go to the “
Settings
” section.
Step 2.
Go to “
Accounts
” or “
Accounts
”.
Shchag 3.
Select "".
Step 4.
Go to your sync settings by tapping on your email address (some smartphones do not require this step).
Step 5.
Now check the box next to the Google services you would like to sync.
In particular, you should be interested in the “ Contacts
” item.
Part 3. How to Transfer iPhone Contacts to Gmail/Computer (vCard/VCF File)
Google's Gmail is one of the most popular email services in the world. One Gmail account for free access to all Google services. Here we will show you how to sync iPhone contacts to Gmail, and then you can export contacts from iPhone to computer via Gmail at any time.
Step 1: On iOS 10.2 or earlier, you can go to Settings > Mail, Contacts, Calendars. If you updated to iOS 10.3 or later, go to Settings > [your name] > Contacts > Account. Then click "Add Account" and select Google from the list.
Step 2: Enter your Gmail username and password and make sure to turn on the Contacts option. Once set up, every time your iPhone connects to a Wi-Fi network, the contacts on your iPhone will automatically sync with your Gmail account.
So you can sync iPhone contacts with Gmail, Yahoo Mail, etc.
Step 3: If you want to export contacts from iPhone to computer, open Gmail in the browser, go to Gmail > Contacts, select the iPhone contacts you want to export, click More, and select Export. Gmail allows you to export contacts in vCard and VCF formats.
Disadvantages of Exporting iPhone Contacts to Gmail:
1. Google cloud backup storage is limited.
2. You need to create a Gmail account to use.
Are your Gmail contacts lost or accidentally deleted? Simply recover contacts from Gmail here.
Google account
Almost all firmware of Android gadgets are somehow tied to Google. The services of this search engine can also be used to import contacts to a new device. If you don’t have a Google account, you need to create one. The best way is to register a mailbox. This can be done on the official website of the search engine.
Contact transfer process:
- Let's go to the standard settings of the Android platform on the old gadget.
- Open the “Accounts” item.
- Find your current Google account and click on it.
- In the synchronization window that appears, move the switch to the active position opposite the “Contacts” line.
- Click on “Options” and then on “Synchronization”.
Now on your new mobile gadget you need to log in to your Google account. After some time, the phone book should be updated, and contacts from the old smartphone will appear in it. It is also worth clarifying that this method only works with numbers saved in the phone’s memory.
To SD card
In addition to transferring to a SIM card, the phone book, like other personal data, is moved to an external drive, after which it is removed and installed for importing to a new device.
We recommend: Setting up an Android smartphone for a child
To export, open “Contacts”, then “Import/Export”, indicate the phone to copy the data and the MicroSD card on which the information is saved. Next, select the required entries and confirm the action. Upon completion, a file with the .vcf extension will appear on the external media, in which the exported contacts are located.
Importing from a MicroSD card is done in a similar way. In “Contacts”, select “Import/Export”, indicate the external media from which information will be extracted, and then the phone or tablet. The system searches for documents with the .vcf extension on the map and transfers information from them to the smartphone.
This method has no restrictions on the number of records.
Part 1: How to Import CSV Contacts from Email Account to Your iPhone
There are many different scenarios that you need to import contacts into iPhone. The traditional solution is to import CSV contacts into the email address synced to your iOS device. Here you can get two examples to import Outlook and Gmail Contacts to iPhone. Just read and learn.
Section 1: Import CSV Contacts from Gmail to iPhone
Step 1
Export existing contacts
Step 2
Import CSV Contacts to Gmail
Return to the Google Contacts page. Select "Import" in the left pane. Select "CSV or vCard File" and then "Select File" to import CSV contacts into Gmail. You can use the Find Duplicates or Merge All functions depending on your needs.
Step 3
Import contacts from Gmail to iPhone
Open the Settings app on your iPhone. If you're using iOS 8/9, tap "Mail, Contacts, Calendars" and then "Add Account." Select your email service provider and fill out the required information. Click "Next" to move on. Enable the Contacts option to import CSV contacts to iPhone. Later, you can see the CSV contacts in the iPhone Contacts app.
Note. For iOS 10/11/12 users, you can tap Settings, Contacts, Accounts, and Add Account instead.
Section 2: Import CSV Contacts from Excel Spreadsheet to Outlook on iPhone
Step 1
Save as .csv file
Open the worksheet containing the necessary contact information. Select "Save As" from the File drop-down menu. Set the destination folder. Then you need to select CSV (*.csv) as the output format. Select "Save", "OK" and "Yes" to get the CSV file in Excel.
Step 2
Import CSV Contacts to Outlook from Excel on iPhone
Select "File" in the top left corner of Outlook. Select Open and Export, then Import/Export. Select "Import from another program or file" from the list. Then click "Next" to continue.
Select Comma Separated Values and Next. Follow the onscreen instructions to import CSV contacts into Outlook. Don't forget to check the box before "Import 'MyContacts.csv'". If necessary, map the columns of the CSV file to the Outlook contact. Later, you can import CSV contacts from Outlook to iPhone by following similar steps mentioned above.
What is csv and how to create it
CSV is the same document of a given format that is used to transfer addresses between postal services. It is a kind of tablet - a storage of data separated by commas. You can create it in two ways:
- Export from an existing postal service address book.
- Create manually using Microsoft Excel, OpenOffice and others.
Mail clients
Friends, so that you can see with your own eyes what a csv file looks like, I’ll first tell you how to create it to export contacts from Google and Yandex.Mail using the functionality of the mail services themselves, as well as how to import them back from this file.
Let's start with Google, to export do the following:
- Log into your Google account (by default, we assume that you have one and there are addresses there).
- Tap the apps menu icon on the top right, which looks like 9 dots in three rows.
- Go to "Contacts".
- Mark the addresses for import with check marks (a place to put a check mark will appear when you hover over the name).
- On the left side of the main menu, click on “More”.
- Select "Export".
- Set the export settings - the addresses used (only selected or all), the format of the future file, in this case Google CSV (you can also select Outlook CSV there to transfer data to the program of the same name or vCard to create a document on an SD card for mobile devices). Confirm the action by clicking the “Export” command.
- After these steps, the CSV will be created. By default, it will be saved in the Downloads folder on your PC. A notification about its downloading will appear at the bottom of the screen. Click on the arrow to display a list of options and select “Show in folder.” After which a folder will open where the desired contacts.csv document will be highlighted by the system.
Friends, you have created it. If you open it, you will see that the top line is the name of the sections - Name, Phone, Mail and others.
In the case of Google, they will be written in English. Names written in Russian will be encoded, while names written in Latin will remain as is. Sections are separated by commas. If some column does not have data, then a comma is also placed instead.
To import contacts into a new Google account from the contacts.csv you created, do the following:
- Log in to the desired account and, using the same application menu, go to “Contacts”.
- Click on "More" on the right and select the "Import" command.
- Click the Select button.
- Find contacts.csv on your computer (most often it remains in the “Downloads” folder) and open it.
- The name contacts.csv should appear next to the blue button, click the Import command.
Friends, that’s all simple science. This principle is used to import and export to all postal services. To consolidate the material, I will also describe how to import contacts using the same principle into the Yandex.Mail address bar:
- Go to the old Yandex email box, where you need to copy the addresses and go to “Contacts”.
- Click on “More” and first select the “Save...” action.
- Configure your export options, specify your language and email client, and start the CSV creation process.
- Go to the new mail where you want to place the addresses and go to “Contacts”.
- Click on “More” and select the “Download” action.
- Find the previously created document on your PC and start the import process.
More on the topic How to strengthen the signal of a 4G modem with your own hands at home, what is needed for this
Manually
Friends, now that you have an idea of what a CSV file is, try creating it manually:
- Open a blank Microsoft Excel or OpenOffice document.
- In the first row, place headings for the information columns - first name, last name, telephone, email, and so on.
- Fill out the table (it is not necessary to write data in each available column, some cells may be empty, names cannot be deleted).
- Save the document in csv format – file, save as, configure the location, set a name, select the desired extension from the list (“CSV (comma delimited) (*.csv)”), click “Save”.
Transferring bookmarks
To perform this operation you will need Internet Explorer (IE). It is worth saying that the method can only work on version Windows 8.1. This applies to both smartphones and computers.
To get started, import your bookmarks into your browser. If you previously used Google Chrome on Android, then after synchronization the bookmarks will appear on the PC, respectively, in it. To display them in Internet Explorer, launch this browser and select “Import bookmarks” in the settings.
How to transfer bookmarks to Windows Phone?
If you have a completely different browser for Android, then move all the bookmarks to a separate file, and then transfer them to your PC and add them to IE.
Adding bookmarks in Internet Explorer on Windows Phone
After transferring all tabs, you need to synchronize with Windows Phone. To do this, go to “Computer Settings” and in the “Settings Synchronization” section, select “Web Browser”.
Sync Internet Explorer and Windows Phone
Moreover, check that synchronization on your smartphone is also enabled:
- Launch settings on your smartphone
- Open "Settings Sync"
Transferring bookmarks to Windows Phone
Check that the button next to Internet Explorer is active
Activating Internet Explorer synchronization on Windows Phone
If all actions are performed correctly, the bookmarks will appear on the new phone.
In conclusion, it is worth saying that switching from Android to Windows Phone is not so difficult. The main thing is to have some free time and follow the instructions.
Part 2: Manually Import Contacts from VCF for Android
You can import vcf contacts for your Android phones manually also which means you can import your vcf contacts without using or downloading any third party app or tool. The features are all present on the Android device and do not require any apps.
However, it is not as simple as it sounds. Manually importing contacts from vcf to an Android phone has two main disadvantages. Firstly it is not available on all Android devices and the other main disadvantage of this method is that it is very complex and involves many many steps. It may also be a little too complicated for people who are not very tech savvy; also taking into account the time involved.
Anyway, the different steps are as follows (you can use this guide to import your vcf contacts) -
This is how you can import your vCard data that is already exported to vCard (.VCF file).
We will explore the best option for importing and exporting contacts, which is a third-party application but will allow you to import and export contacts; and convert .contact to .vcf or convert .contact vCard with one click.
Using Wondershare TunesGo will help you import and export contacts very easily. It is a reliable and efficient management program that will prove to be a faster and easier method compared to other traditional methods. Traditional methods (which involve manual processing) are much more time consuming and time consuming, the main disadvantage is that the steps and process are very complex which makes it a less used option. We hope this article helps you make an informed choice.
Address book and contact information
can be imported from multiple program formats, converted for use in Windows, and stored in your Contacts folder. You can also convert contacts to different file formats by exporting them. This allows you to share contacts with users who are using previous versions of Windows or another operating system.
Transferring a contact book using a PC
If the above methods fail to copy contacts from Android to Android, then you can try using a computer. A convenient MOBILedit program has been created especially for Windows !
, which is capable of identifying almost any tablet or smartphone running Android. It helps not only to transfer contacts from Android to Android, but also to synchronize call logs, SMS messages, calendar events and all sorts of media files.
To move contacts from Android to Android using a PC, follow these steps:
Step 1.
Install and launch MOBILedit!
Step 2.
Connect your old smartphone to your computer using a USB cable.
Step 3.
Wait until the program displays a list of information contained on the connected device.
Step 4.
Select
Phonebook
.
Step 5.
Click on the
Export
.
Step 6.
Save your contact list in the format you need.
Step 7
Unplug your old phone.
Step 8
Connect your new smartphone using a cable.
Step 9
Import
button at the top of the window .
Step 10
Specify the folder in which the contact list was previously saved.
Step 11
Now all that remains is to transfer the phone book to the new device.
What is importing and exporting contacts?
Long gone are the days when the phone book was a physical entity separate from the phone. Everyone is accustomed to the convenience of an electronic database stored in the memory of a smartphone.
But you have to pay for every pleasure: when you buy a new device, you need to transfer contacts to your address book. Entering the name and number again is very labor-intensive and can irritate even the most patient person.
It is much easier to use the Yandex-Moving application, which will take all this headache upon itself. For this it is necessary
- Install the program on your old phone;
- Once launched, the application will collect all entries from the phone book and send them to the cloud storage;
- Then, on the new device, open Yandex Disk and open the settings;
- Click on the item “Moving from phone to phone”;
- The application will require a PIN code, which will be sent to your old phone.
In addition to the product of the Russian technology company, similar solutions are known. For example, “My Contacts Backup”, “CardDAV”, etc.
About the origin of the word
The word "import" comes from the Latin importo. Import really means to bring in or introduce. And here there is a certain ambiguity: after all, import can be carried out in different ways. In what cases is it appropriate to talk specifically about imports? It seems important to clarify those dictionaries that deal not simply with the entry of goods into the country from abroad, but with their import into the customs territory of the state. That is, a sweater or jeans bought by a Russian tourist while on vacation in Turkey, or the personal belongings of a foreigner, which he then takes back, will not be called imports. To import is to engage in targeted activities in accordance with the laws of your country (including customs). This activity is based on economic and political state interests.
Bluetooth
You can also transfer contacts using the Bluetooth protocol. For this procedure, you will need to transfer all subscribers from the phone book to the memory of the old phone, if previously they were located only on the SIM card.
It is necessary to turn on both mobile gadgets and establish connections between them using the Bluetooth protocol
If any problems arise, you should pay attention to the “Visibility to other devices” option in the wireless network settings
Transferring contacts via Bluetooth:
- Open the phone book and select “Options”.
- In the drop-down menu, click on the “Send contact” item.
- Select all (or necessary) contacts for transfer.
- Enter the password (variably) and agree to begin the procedure.
The process of transferring data via the Bluetooth protocol is quite lengthy, so don’t be surprised if your phone freezes for a while. Especially when it comes to transferring a large number of contacts.
Import contacts from computer to Android phone
Now set up your Android phone with this MobileGo for Android program as step 1 above shows. Then click the “Contact” button to enter the contact management window. Then click the “Import/Export” button. You will now be prompted to import your contacts from Outlook, vCard, Windows Live Mail, and Windows Address Book.
Yes, it is possible to import contacts from computer to Android Phone as long as you have a backup of all contacts to a vCard file on your computer. In addition, you can also do this by Syncing contacts from your Android phone directly if you ever save those contacts to Gmail, Facebook, and accounts.
Sooner or later, the user of any phone may need to export contacts from his phone book. And if you have such a situation and you are the owner of an Android smartphone, then this process will be much easier. The open system allows third-party programs downloaded from the PlayMarket store to use contacts for various purposes, including import/export. Such applications can also not only store data, but also transfer it to a computer and subsequently edit it.
Of course, there is synchronization of contacts with Google, but this option may not be suitable for some. Therefore, in this article we will look at what ways you can save your contacts and how to avoid or solve related problems.
First way
And so, everything couldn’t be simpler here. We take a smartphone and go to the computer. Here we don’t need anything else except a cord (USB).
- Import from storage - delivery of phone contacts from an SD card or any other storage device by transferring them from storage.
- Export to drive - creates a file with the vcf extension. The most interesting thing is that it can be stored anywhere and even transferred for use by another mobile gadget.
- Transfer visible contacts - this method is useful if you need to transfer not the entire phone book for storage. For example, you have set up contact filtering. In this case, the system will not save the vcf file in the device, but after creating it, it will send it to the selected email (you can even send it to the one that sends it). After this point, you can download it to your computer or other device.
- Windows Contacts
- Microsoft Outlook
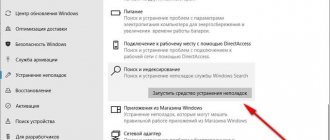
Fixing an issue with encoding of Android contacts in vcf file when importing into Outlook and Windows Contacts
Windows programs
Now let's look at how this problem can be solved:
- You can just find a program that will work with the UTF-8 format
- Use special tags in the vсf file. This will allow Outlook to correctly determine the code type.
- You can also save the vcf file itself with a code format suitable for Windows.
Since the simplest and fastest method is the third one, we will describe it in detail:
Saving contacts to your computer using Google
On the page, under the search bar (almost in the middle), find and click on the “more” item and after “export...”. In the menu on the left, click “More” - “Export”.
By selecting the “my contacts” tab, you will export your phone book contacts. The difference from the “all contacts” item is that in this case all contacts are copied, and not only from the phone book. Whether it is advisable to choose this is up to the user, but it is worth remembering that this may result in a lot of unnecessary information that you do not need.
Having done all this, click the “export” button and save the data to your computer.
Using Third Party Programs to Export Android Contacts
standard programs
For computer systems, many companies produce software for individual work with the contacts of a specific device. You can find out which one is suitable for your device using an Internet search.
Saturday, January 14, 2020 — 15:00
How to copy contacts from an Android smartphone to another Android smartphone or computer
Thanks to a special application from Google, you can copy selected contacts to other devices via email. This method is most suitable for transferring contacts between devices that you do not want to associate with a common account.
- On the source smartphone, launch the Contacts application. If it is not installed, download it from Google Play.
- Inside the application, log into the account to which the desired contacts are linked, and then select them.
- Click the Share button, then select Gmail and send copies of your contacts by mail.
Contacts in the form of a single VCF file will be attached to the letter. The recipient can save this document on their computer or smartphone. To add the entries stored in the file to the phone book of another Android device, just open the received VCF document using the Contacts application.
Download QR Code
Contacts
Developer: Google LLC
Price: Free
Transfer Contacts from Android to Android: 4 Easy and Fast Ways to Transfer Contacts.
Transferring contacts from the phone book from an Android phone to another Android smartphone is a hot topic. Sooner or later, every owner of an Android smartphone or tablet is forced to change the device for a number of reasons: the appearance of a new device, switching to another model, or buying a second device for work purposes. And then there is a need to transfer contacts from one device to another.
In this article we will look at several simple and common ways to transfer contacts from Android to an Android device. We will also look at the features, advantages and disadvantages of each method.
Via Bluetooth
When importing data in this way, entries from the phone book are transferred between devices in the form of a file with the .vcf extension, saved on MicroSD or in internal memory. Next, open it and save the information to the phone.
Procedure:
- Activate Bluetooth on both devices.
- Mark contacts, click “Transfer”, then “Bluetooth”.
- In the list of equipment available for connection, find the gadget to which the numbers will be transferred and click on it.
- Confirm the appointment and wait for it to finish.
- Find the “Bluetooth” folder in the internal or external memory, in it there is a file with the .vcf extension and click on it.
We recommend: Android Secure - what is this folder and can it be deleted
- Specify the account in which the entries will be created. This could be a Google account or the gadget's internal memory.
- Wait for the process to complete.
A quick option that has no restrictions on the number of numbers and allows you to transfer all their information, including additional information.
Transferring contacts through the phone functionality
There are several alternative ways to import contacts. The most commonly used options are:
- Use your Google or Apple account to synchronize your database across multiple devices. To do this, you need to go to your phone's mail and use the import function in the application menu. The phone book will be copied to the account database. After connecting a new device through the account management manager, you can synchronize data in its user database.
- Sending by email. You can simply send yourself a file with your contact database in CSV format, and then access this mailbox from another device. After downloading the information, update it on your new phone.
- Using bluetooth. You need to turn on both devices, go to the bluetooth menu, find the device of interest in the list and distribute a file with the necessary information to it. After that, export the phone book using the received data.
If other methods do not work, you can try saving the user list to your phone's SIM card, and then insert it into a new device and synchronize the information. If there is a lot of data, this procedure will have to be performed several times, sequentially saving blocks of transferred data to the card. In a similar way, you can use an SD card for this procedure, selecting its memory as storage.
We only use the phone
Accessories for electronic books. . The following applications are available. Set an alarm with the following options. To create a new alarm, select New Alarm from the alarm app. If you skip this option, unless you select a day, the alarm will ring every day. Save the alarm by selecting "Save Alarm." Once you select a specific saved alarm, you can edit or delete it. When the alarm sounds, you have the following options: Long touch with one or two fingers to turn off the alarm. Read the time with a short tap of two fingers.
- Fill in the Alarm Time field to enter four digits.
- The first pair of digits marks the hours and the second pair of minutes.
- Select the days on which the alarm will ring in snooze mode.
Today, any state is an active participant in global trade. Every day, millions of tons of cargo cross borders. In these transactions, one party acts as a seller, the other as a buyer. Knowing what imports and exports are for a particular country can say a lot about its welfare.
Import using PC
The computer's hard drive is used as data storage. The resulting file is then transferred to the new device. To transfer your contact list, do the following:
- Connect your old phone via a USB cable to your personal computer. You may need to enable the USB debugging feature on your device in the Settings section. New models perform this procedure by default.
- Save the information in VCF or CSV file format to disk. The list is stored in the Phonebook folder. If the phone does not support importing and exporting contacts in a given format, then you need to install a specialized program, such as Mobedit or similar, on your personal computer. It will quickly find the desired file and save it in the optimal extension to the target folder.
- Connect the new device with a cable and replace the file with contacts on it. After the replacement, you need to restart the phone and check whether all the information was copied in the correct form.
In order not to search for a file in the phone's memory, you can use specialized software that will automatically make all the settings after the user selects the type of operation.
Something about inflation
“Imported inflation” is a relatively new term. But its essence is the same as in previous cases: something is brought to us from the outside. What happened to our area this time?
Inflation (from the Latin Inflatio - “inflation”) is a steady increase in the prices of goods and services, as a result of which the local currency becomes lower. That is, as a result of some internal cataclysms, money depreciates, and a person can buy less goods today for a certain fixed amount than he could buy yesterday. Inflation is an extremely unpleasant phenomenon, and it is doubly offensive if its causes lie outside the country. For example, as a result of rising costs of imported raw materials, prices for local goods dependent on them rise. Sometimes imported inflation can be the result of complex financial relationships between the national currency and the currencies of other countries.
Importing international mail: what does it mean?
Modern Internet capabilities allow you to track the location of a parcel without leaving your home. The status of the shipment will be indicated as the corresponding status. If the parcel arrives in Russia from another country, then after crossing the border the status “ Import”
»:
After returning with a single two-finger tap, you now have access to your email account folders. Selecting an app will automatically read the contents of your inbox. Long tap with one finger on your email to open the following options: Reply Reply all Delete your email address. Select "Recipient", enter the recipient's address and save using the "Save" button. Enter the subject and text in the same way. “Send” sends the email “Save to Drafts” saves the broken email to drafts so you can continue with it later. Select "New Email" from the main email menu. . Songs are not retrieved from the phone's memory.
- Postal workers assign this value approximately a couple of days after the arrival of airmail. This is how much time the unloading procedures, checking the condition of cargo, etc. take;
- A day after registration, the item arrives at one of the large postal exchange centers;
- Customs processing takes place at these centers. The parcels are then sent to post offices in the recipients' area of residence.
The duration of maintaining the status depends on the size of the queue for customs clearance. If the recipient has good reason to worry about the condition of the shipment, it is necessary to submit a search application.
Video: saving contacts on Android
If it doesn't play, scroll through the shortcuts with one finger in the playlist. If it's not playing, a long tap with one finger brings up options to save to favorites, etc. A long tap with two fingers stops playback. . You can browse stations, save them as favorites, and listen to stations as you wish. If the radio is playing, you can browse stations with a short touch with one finger. A long tap with one finger on a station being played opens a menu with the option to save the station to favorites. Use headphones to act as an antenna. "Start Radio" will start the last station you play. Favorites displays a list of your favorite stations. A long tap with one finger while a station is playing opens another menu. From this menu, you can save or remove a station from your favorites, you can turn on the speakers to play, and cooking can be set manually. Auto tuning only shows stations with good signal, manual tuning will increase or decrease the frequency by 0, 1, or you can record the frequency manually. A long touch with one finger on the station will start playback. . This app uses your phone microphone to record and recognize the song that is playing in your area.
Synchronization using Google account
The first and easiest way to transfer contacts to Android is to synchronize your Google account. The method will allow you to quickly transfer your telephone database from one device to another without any extra effort. This is also true if the directory contains a large database. Not suitable if you only need to transfer some contacts.
The instructions consist of a couple of simple steps:
- On your old Android device, add or create a Google account. If the account is present, skip the action and move on to the next step.
- Synchronize your phone book using your Google account. To do this, you need to go to the device settings menu, open your Google account, and then select “contacts” and synchronize phone numbers.
- On a new Android smartphone or tablet, add the same google account as on the old device, and then synchronize the data. Phone numbers will appear in the directory automatically.
Note!
When performing the operation, access to mobile or wireless Internet is required, otherwise you will not be able to transfer contacts. Internet speed also affects the data synchronization time, on average 5-15 seconds, and sometimes up to one minute.
Main advantages:
- The method is simple and also requires a minimum of effort and time.
- Complete transfer of phone numbers from one Android device to another.
- Allows you to do without a computer.
- Convenient if the phone book contains many numbers.
Export
First of all, you need to go to the “Phone” tab and select “Connection” (“Connection” / “Communication”, etc.). In the drop-down window you need to click on PC Sync. In some cases, there may be a different name for the connection, and it depends on the manufacturer and model of the mobile gadget. Next, you need to enable USB debugging on your smartphone or tablet:
- Go to the standard settings of the Android platform.
- Find the “Developer Options” section.
- Place a beacon next to the line “USB Debugging”.
On some firmware the procedure is slightly different:
- Go to “Settings”.
- Go to the “System” section.
- Open the “Device Information” window.
- Click on the “Build number” line.
- Activate the “USB Debugging” item.
Now on a personal computer in the “MobileDit” program on the panel, click on the “Export” item. In the main window, you need to select what exactly you want to copy: photos, videos, applications, or, in our case, contacts. You also need to specify the file format – CSV.
This method of transferring contacts can hardly be called very convenient, but it works quite well.
Go to the Phone or Contacts app on your current smartphone. Click on the "Menu" button and select "Import/Export".
Here - “Export to storage”.
Confirm the export of contacts.
Select where to export your contacts from. Typically a Google account is used if contacts are linked to it.
The file has been created and saved in main memory and can be seen using the file manager.
https://www.youtube.com/watch?v=ytpressru
This file must be transferred to a new smartphone. You can do this using a computer (the file is transferred to the computer, then from it to a new smartphone), but this is not very convenient, so you can transfer it using Bluetooth. Select the file and click on the three dots.
Tap on the “Send” line.
Select Bluetooth.
Select a new device to transfer data to (don't forget to turn on Bluetooth).
After transferring the data import, click on the file itself in the file manager (already on the new smartphone).
More on the topic How to call for free from a computer to a phone
You will be prompted to import contacts. Confirm the action.
Waiting for the process.
Contacts have been added to your Google account.