To restrict access or to protect a document, you need to set a password for the Excel file. The most reliable way to protect a file: encrypting the entire Excel workbook. Protecting Excel with a password will keep your important data safe.
Microsoft Excel is a popular spreadsheet program that is part of the Microsoft Office suite. Excel is widely used by individuals and businesses for work.
Working in Excel can sometimes be labor-intensive; a lot of time is spent on creating tables. Therefore, it makes sense to protect your work from accidental or intentional impact, especially if unauthorized persons have access to the Excel workbook. Due to corrections or editing made to an important document, you can lose the data collected over several hours or days of work.
The program offers flexible settings to protect entire or individual elements of an Excel file:
- Book protection - protection of structure and windows.
- Sheet protection - protection of the sheet and cell contents (customizable in detail to specific needs).
- Book access—control access to the book for computer users.
- Protect a document with a password—set a password to open the document.
All other passwords in Excel, except the password to open a document, are not encrypted, so there are ways to remove them. For example, there are ways to unprotect an Excel sheet.
In this instruction, we will look at how to set a password on an Excel file to protect the entire document (book). We need to protect Excel with a password to restrict access to the file, so we will set a password in Excel to open the file. Another user without knowing the password will not be able to open the Excel workbook, our data will be reliably protected.
Attention! Remember and keep the password for opening the Excel document in a safe place. It will be impossible to recover your password.
In this article we will look at encrypting Excel files using a password in the following programs: Microsoft Excel 2020, Microsoft Excel 2013, Microsoft Excel 2010, Microsoft Excel 2007, Microsoft Excel 2003.
How to put a password on an Excel file in Microsoft Excel 2016
In MS Excel 2020, you can set a password to open a file to protect the workbook from unauthorized persons.
Follow these steps:
- With your Excel workbook open, go to the File menu.
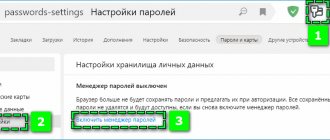
- In the “Details” tab, click on the “Book Protection” button. The following settings for document protection will open in the drop-down menu:
- Mark as final - marks the book as final and not editable
- Encrypt with password—set a password to open this workbook
- Protect Current Sheet - Manage permissions to make changes to the current worksheet
- Protect workbook structure—prevent changes to the workbook structure
- Add Digital Signature - Add an invisible digital signature
- Click on the “Encrypt using password” option.
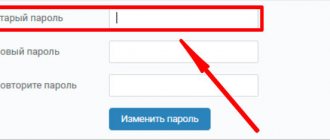
- In the Document Encryption window, enter the password in the appropriate field.
- In the Confirm Password window, confirm the password you entered earlier.
After setting a password to open a document, the “Book Protection” section in the “Information” tab will turn yellow.
- Close the Excel file and click the “Save” button in the warning window.
When you try to open an Excel file, a password entry window will open. To open access to the file, you must enter the password for the encrypted book.
How to set a password to protect an Excel workbook?
The third form of spreadsheet protection is where you can ensure the safety of the Excel workbook as a whole. By setting a password, you will prohibit other users from performing any manipulations with the sheets, i.e. move, add, delete, rename and hide. To use this protection system:
- Create a new or open an existing Excel workbook.
- Go to the “Review” category, click “Protect Book” and select “Protect structure and windows”:
- A settings window opens, asking you to select protection for the structure or windows. You can block changes with a password or without it. If in the first case you are guaranteed to protect the document from any user actions, then in the second case only from unintentional ones, since anyone can remove this protection if necessary:
- It’s quite simple to check whether the security measures work - right-click on any of the open sheets and you will see that the commands for changing the workbook: delete, paste, rename, copy, hide, display are not available:
- Removing protection, i.e., a password, is as simple as setting it - we perform the same steps as in the second paragraph of this section and see the “Remove book protection” window:
How to remove the password to open a Microsoft Excel 2016 workbook
If you no longer want to protect your Excel file with encryption, you should remove the password from your Excel workbook.
You can remove the password from Excel 2020 as follows:
- Open an Excel workbook.
- Enter the password to open the document.
- Go to the “File” menu, in the “Information” tab, click on the “Book Protection” button.
- Select Encrypt with Password.
- In the “Document Encryption” window, in the “Password” field, remove the previously set password, and then click on the “OK” button.
- Close the Excel workbook and agree to the changes in the file.
How to Protect Excel Cells from Changes
You can protect an Excel cell in several ways: use the “File” menu to lock individual cells or the “Review” tab. It is also possible to block a specific range or one cell. Each person can choose the one that will be most attractive to him.
Method 1: Using the File Menu
To use the “File” menu to lock cells, you must perform the following sequence of steps:
- Select all cells that need to be locked. There are several ways to do this: through the combination Ctrl + A or by clicking on a special rectangle that is located in the coordinates panel. In the first case, you need to click once if a cell was previously selected that is outside the table and twice if within it.
1
- After this, by right-clicking on any part of the selected area, then selecting the “Format Cells” item in the panel that appears.
2
- A small window will appear with many tabs. We are interested in the latter (with the signature “Protection”). First, we need to make sure that the “Protected cell” checkbox is not checked. After this, press the “OK” key.
3
- Now, using any method (for example, using the mouse), we select those cells that should not be changed by third parties. In the case of our example, this range is the column where the formulas are written. Next, by right-clicking on the selected area of the table, we call up the menu, where we select the same “Format Cells” item.
4
- Now put a tick next to this item. Confirm the changed parameters using the OK key.
5
But just doing the steps just given is not enough. You must first protect the sheet itself. Once this is done, the user will not be able to edit certain cells. To do this, you need to click on the “File” button, which is located in the upper left corner of the latest versions of Excel.
6
Next, the main menu of the program will appear. We are interested in the “Information” section, which we go to. There are many settings there, one of which is “Protect Book”. When you click on this button, a large number of options appear, but we are interested in “Protect the current sheet”.
7
Next, a window with parameters will open. Be sure to make sure that the checkbox next to “Protect the sheet and the contents of protected cells” is checked. Below you can select additional parameters that are set voluntarily. Here you can more flexibly configure the protection of cells and the document as a whole, not only for one user, but also for several. To protect, you must enter a password, with which a person can change the protection settings or remove the lock. After entering the settings, you need to click the “OK” button.
Let's describe some parameters:
- Highlighting locked cells. After this, a person without a password will not be able to even click on a locked cell.
- Selecting unlocked cells. The same thing only applies to those cells that were not blocked.
- Formatting cells. The user does not have the ability to change the appearance of cells.
- Column formatting.
- Formatting strings. Like the previous one, this paragraph prohibits changing the appearance of columns or rows in general.
- Inserting columns/rows/hyperlinks. These are three different points that mean you are not allowed to add new columns or rows or links.
- Removing columns/rows/hyperlinks.
You can also manage some other settings to make file protection more flexible.
8
Next, another window will appear in which you need to re-enter the password. To confirm your actions, you need to press the “OK” key again.
9
Now the cells are reliably protected from editing. But if there is a need to make changes, you still need to, you can always enter a password and do it. The same cells that were not previously blocked can be changed by anyone at their own discretion.
Method 2: Using the Review Tab Tools
This is another way to protect cells, which is no more complicated than the previous one. The first five points of the previous instructions are generally identical. That is, you need to make sure that the protection of the entire sheet is removed and remains exclusively for certain cells.
Then you need to go to the “Protection” tool group, which is located on the “Review” tab, and then click the “Protect Sheet” button.
10
All these items are located on the main panel at the top of the Excel window.
After this we will see a window that is already so familiar to us. In it you need to specify the necessary settings for protecting cells or the sheet as a whole. In all other respects, the actions are similar to those we described earlier: enter a password and so on.
11
Attention! If the size of the Excel window is small, then the dimensions of the “Protection” button will also change. It will become smaller, and you can give specific commands using the pop-up menu that appears after clicking on this button.
12
How to protect individual cells in an Excel file
The sequence of actions that need to be taken to add protection to specific cells does not fundamentally change. But there is one problem. The fact is that the standard functionality of this program does not include such an opportunity. Of course, this is not convenient. What actions can be taken?
For example, we have a simple range that needs to be sent to other departments of the store so that they can enter their data and send it. However, they cannot be allowed to edit other cells. Therefore they need to be protected.
First, you need to make sure that those cells in which edits will be made are not protected. To do this, select the required range. After this, call up the “Format Cells” window in the same way as described above, only select the “Protected Cell” item.
After that, go to the “Review” – “Protect Sheet” item. Next, a dialog will appear in which two checkboxes will be selected by default. We need to remove the first one. After that, we protect this window with a password, and confirm our actions by pressing the “OK” key.
13
Now the range D4:D11 is open for editing by others, while those without the password cannot make the desired changes. We see that the sequence of actions is very similar. You just need to select not the entire sheet, but a specific range. That is, using one function you can do several actions at once. Very comfortably.
How to protect all cells in an Excel file
Sometimes you may need to password protect not only one sheet, but the entire file. This can be useful, for example, if many people can access the document. If you protect it, it can still be viewed, but a person without a password cannot make any changes.
After protecting the entire workbook, any adjustments will be prohibited, including renaming sheets, inserting new ones, changing their location, changing the contents of cells, and so on.
What can be done to make this possible? Simply click “Protect a book” on the “Review” tab and enter the appropriate checkboxes next to the protected object - the structure of the document or windows. Next you need to enter a password.
14
Now you can check everything in practice. If making changes to the sheet name is not possible, then the protection has worked. You can also find that all teams are gray. This says the same thing.
If you need to remove the protection, you need to go the same way, just uncheck the boxes that were checked earlier.
How to password protect an Excel file in Microsoft Excel 2013
Let's see how to password protect an Excel document in MS Excel 2013.
In Excel 2013, follow these steps:
- With your Excel workbook open, go to the File menu.
- Open the “Details” tab, and then click on the “Book Protection” button.
- From the context menu, select Encrypt with Password.
- In the “Document Encryption” window, enter the password in the “Password” field, click on the “OK” button.
- Confirm your password in the next window.
- When closing the Excel document, confirm that you agree to change the file.
After launching the Excel file on your computer again, enter the password to open the document.
How to protect all worksheet cells? How to remove protection from all sheet cells?
To install/unprotect all worksheet cells at once, you need to select all cells by clicking on the so-called zero cell or use the hotkey combination Ctrl+A. The zero cell is the rectangular area that is at the intersection of the first row and the first column (marked with a red border in the image below).
After all cells are selected, you need to call the “Format Cells” dialog box in any convenient way (for example, with the hot keys Ctrl+1), go to the “Protection” tab and check (or uncheck) the boxes in the “Protected cell” and “Hide formulas” fields " The “Hide Formulas” option allows you to hide not only formulas, it hides any information displayed in the formula bar.
How to remove Excel protection in Microsoft Excel 2013
If you no longer need to protect your Excel workbook with a password, remove the password for opening the document in MS Excel 2013.
To remove password protection in Excel 2013, follow these steps:
- Click on the Excel file to open it.
- In the “Enter Password” window that opens, insert the password to open the file.
- Go to the “File” menu, open the “Information” tab, click on the “Book Protection” button.
- Click on the “Encrypt using password” option.
- In the “Document Encryption” window, remove the password and click on the “OK” button.
- When closing the Excel file, agree to the changes.
How to protect a file
For a clear example, let’s set several passwords for 1 document, using different types of protection:
- Select the option: “File” - “Save As”.
- In the window that appears, click on the “Tools” button and select the “General Settings” option.
- In the next window that appears, enter different values in the fields: “Password to open” and “Password to change.” Also check the boxes: “Always create a backup copy” and “Recommend read-only access”.
- Next, Excel will ask you to re-enter first the password to open, and then the password to change the document. After re-entering the passwords, you should follow the standard procedure for saving the file, indicating its name and selecting a folder.
Note. In the General Settings window, each option functions independently. For example, you can only set a password to open a document or only check the option to permanently reserve a copy of the document, etc.
Description of the functions of the General Settings window parameters:
- Always create a backup. When saving a document along with the original main *.xlsx file, a backup file with the *.xlk extension is created in the same directory. In fact, this is a complete copy of the source file with all its saves in the process of working with the document.
- Password to open the file. If a password is entered, it will be requested each time the document is opened. Until the user enters the correct password, the document will not open. And the data will not be available even for reading.
- Password for changing the document. If the document is protected with this password, it will open in read-only mode. Data can be viewed, but cannot be changed.
- Recommend read-only access. If this option is enabled, then each time you open a document, a dialog box will be displayed with a recommendation to view it in reading mode. But the user will be able to choose in which mode to open the document: full access or read-only.
Note. The “Tools” button and the “General settings” option in the document saving dialog box are also available in other programs included in the MS Office package (Word, PowerPoint, etc.). The interface for setting general parameters is slightly different from Excel, but in general everything is intuitive and similar.
How to put a password on an Excel document in Microsoft Excel 2010
When working in MS Excel 2010, you can protect Excel with a password to restrict access to the file.
Do the following in Excel 2010:
- In the Excel workbook, go to the "File" menu, open the "Information" section.
- Click the “Protect Book” button.
- In the context menu that opens, select “Encrypt with password.”
- In the "Encrypt the contents of this file" window, enter a password.
- In the Confirm Password window, enter your password again.
- Close the Excel document, changes made.
Now, when opening an Excel workbook, you will be required to enter a password.
Setting an external password on an Excel file
In addition to the internal password, you can set up additional protection using special programs for hiding, password protection and encryption. Most of them are free and very easy to use. The table below shows the most popular programs that help protect your Excel files.
| Encryption method | Description |
| Creating an encrypted archive | Windows XP allows you to create password-protected ZIP files. On Windows 7, you can download a free third-party file compression program. It's better to use the completely free and open source 7-Zip. Create a new file adding all sensitive files and set a password. All files will be encrypted |
| Encryption with TrueCrypt | Create a container that will store and protect files on your hard drive. No one will be able to access the contents of the folder without a password |
| FolderGuard | Powerful computer security software. It can be used to control access to files to other system resources. You can use FGuard to protect your personal documents and folders with passwords so that others cannot view or change them. You can password-protect any folder on your computer, allowing only authorized users to view protected files |
Video - Protecting Cells and Sheets in Microsoft Excel
How to password protect Excel in Microsoft Excel 2003
In MS Excel 2003, it is possible to set a password for opening an Excel document.
In Excel 2003, do the following:
- With an Excel document open, go to the Tools menu and select Options.
- In the Settings window, open the Security tab.
- In the “Password to open” field, enter the password, and then click on the “OK” button.
- In the Confirm Password window, enter your password again.
- Close the document, confirm changes in the Excel file.