Author: Andrey Pivovarov
|
Creating a disk image may be necessary if you want to record a distribution of useful software or a backup of your system. You can pack a large amount of information into an ISO file. Whether you want to create a bootable USB flash drive or copy your favorite music album, you need an easy-to-use ISO image creator. In this rating, we will look at options that will help you quickly cope with the task.
Download the best ISO image creator
Works great on Windows 10, 8, 7, Vista, XP
Disc Studio
Disc Studio is functional software for working with CDs and DVDs with a clear step-by-step operating principle. With its help, you can assemble an image from files and folders, do ripping, and burn bootable discs. The software includes a number of capabilities for recording music and video collections; you can copy CDs and DVDs, format them and re-record them. You can also create backup folders and restore files. The Russian-language interface will be clear even to a beginner.
Functional:
- Clear step-by-step algorithm of actions;
- Russian-language menu;
- Recording data, video and audio collections;
- Copying, cleaning and ripping;
- Backup and recovery;
Disc Studio Interface
Origin of virtual drives and disks
Virtual drives arose at a time when CDs and DVDs were still widely used. There were many reasons, the main one being computer games. Those, over time, began to spread on several media, and the player had to constantly alternate them.
There was, therefore, nothing more complicated than creating a virtual image of the media, saving it as a file with an ISO or some other extension (depending on the program used) and mounting it into the Windows virtual optical drive. This approach saved the player from a lot of inconvenience, although in most cases, the problem was that the player did not have the original disc, or he needed to return the original.
Game and software manufacturers have begun to prevent this problem and have tried to develop varying degrees of protection against copying the original discs. The virtual drive for discs kept pace with them, and several specialized programs were created that were intended only for photocopying the game and were able to emulate various protective mechanisms of the original discs.
Today the situation is a little different, and optical drives are fading into the background, and there are changes in the gaming space. And although the development of programs for creating virtual disk images is not so rapid, they themselves are very convenient and are used everywhere.
Specialized programs for mounting virtual media into virtual drives work in such a way that one or even several disk drives appear in the system with impressions in them, which are perceived as real optical media.
What is and why do we need a virtual disk image?
Many computer users had to install an operating system from a CD or DVD drive. We will not touch on multiboot flash drives and similar things now, but simply take it as a fact - there is a CD, when loaded from which a console window appears with instructions for installing WindowsXP. We used such a disk once, twice, three times, ... tenth time, and ... we realized that it is not eternal and we could create a copy of it and save it on the computer. Next, write all the copied files onto a brand new CD, which will be kept in reserve.
But now, the day of PI comes, the old CD with the XP installation has become unusable, and we decided to use our reserve. However, to our surprise, the system stubbornly refuses to boot from the brand new installation CD. The reason for this inappropriate situation is that the computer is stupid. The user understands that on this disk, in its root, there is a file like setup.exe, which, when launched, should begin the installation of Windows XP. However, the computer aside, whatever it is called, it focuses on the boot sectors of the disk, and if there is nothing there to perform, then it will simply ignore the contents of the drive. This is where the concept of a virtual disk image comes into play.
Simply copying files cannot preserve the correct placement of data in the right sectors. For this purpose, special programs are used that allow you to make an impression of the desired optical drive and save it in one file, making a virtual file an image of the desired disk. It is so accepted that in most cases, a virtual disk is saved in a file with the ISO extension, hence the more popular expressions like iSO file/image. There are several formats that provide storage of a disk impression : ISO , CUE , MDF , CDI , BIN , and so on, but the ISO format is the most commonly used and most supported by various programs.
If there are flash drives, then why create virtual disks?
Logical, but everything is not as simple as it seems. Thus, some games could not be launched without an installation disk in the drive, and here virtual disk images came to the rescue, which were then mounted on virtual drives, which were perceived by the system as physical devices. Among other things, it is convenient to store various RESCUE DISK (rescue disks) in virtual disks, which can then be easily added to a multiboot flash drive - we use a virtual disk image with Windows 7, 10, LINUX in addition, and several RESCUE DISKs, and create our own multiboot flash drive on case of critical situations.
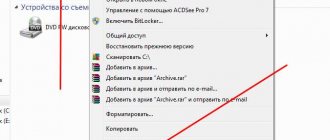
Among other things, you can create your own virtual ISO disk image, which will contain files and folders from your hard drive. So, if you have a large collection (several gigabytes) of documents and books devoted to one topic, then you can put them all in one ISO file. Remember that the process of copying one file is faster than copying several. And unlike an archive like RAR/ZIP, access to packed files will be much faster; you just need to mount virtual disk images on virtual drives and that’s it, you can work.
How to create and open a virtual disk
Oddly enough, creating or opening virtual ISO images of disks or files is also vague. Let's note a number of factors associated with virtual ISO disk images:
- Possibility of grouping several files into one with ISO, CUE, MDF, CDI or BIN extension.
- Opening a previously created image for editing without the need to bind to a virtual drive.
- Creating a virtual drive/drives with the ability to mount virtual images of any disk format (ISO,CUE, MDF, CDI, BIN, and so on).
- Availability of additional functions for creating copies of copy-protected drives.
As you can see, there are quite a lot of aspects. The programs discussed in this article can handle most of them (if not all of them), and the famous NERO can do a lot of things.
Alcohol
Alcohol allows you to create virtual copies of any CD, eliminating the need to search for the desired album on physical media every time. The program is used to mount disk images, supports all popular formats and allows you to burn CDs, DVDs and Blue-ray. Also, using this software, you can copy information from removable drives and erase data from flash drives and rewritable RW-CD/RW-DVD.
Pros:
- Russian language support;
- Works with all versions of Windows;
- You can create 31 virtual drives;
Minuses:
- The official installer can download third-party software;
- The Alcohol 52% version is greatly reduced in functionality;
- May freeze on weak PCs;
Alcohol interface
How to mount a disk image into a virtual UltraISO drive
To open an image file on a computer, you need to mount the disk image using the UltraISO program in a virtual CD/DVD drive.
To mount a disk image using UltraISO, use the following methods:
- mounting an image from Windows Explorer
- mounting from the main UltraISO program window
The first way to mount the disk image file is:
- Right-click on the CD drive.
- From the context menu, first select “UltraISO” and then “Mount”.
The second way to mount a disk image:
- In the main UltraISO window, go to the “Tools” menu.
- Select "Mount to virtual drive...".
CDBurnerXP
A small-sized program for ISO files and working with removable media. CDBurnerXP is an excellent solution for creating collections of various types, packaging archives and burning. Among its functions are tools for recording data, music albums, copying information from removable drives and memory cards. All tools are conveniently sorted in the main window, so there will be no problems mastering the functionality. The new version adds DVD support.
Pros:
- Burning, editing and converting ISO;
- Copying protected CDs and DVDs;
- Backup and recovery;
Minuses:
- May “fly out” during burning;
- Does not support USB;
CDBurnerXP Interface
Daemon Tools Lite 10 Settings
You can enter the DAEMON Tools Lite settings from the main program window. To do this, click on the “Settings” button (gear) on the panel.
In the “Integration” tab you can change file associations with the DAEMON Tools Lite program.
ImgBurn
ImgBurn does exactly what its name suggests: writes different types of data to removable devices. It works with almost all types of images and allows you to record information, do quality tests and check the media for errors. The application also allows you to collect ISOs from folders and individual media files. ImgBurn has a simple, understandable interface in Russian, so even a beginner can understand it.
Pros:
- Virtually no system resource consumption;
- Russian-language localization;
- Checks the quality of the recording and compares it with the original data;
Minuses:
- Limited functionality;
- Does not support USB recording;
ImgBurn interface
VirtualCD
VirtualCD helps you mount drives on your computer, thereby keeping the collections on the system and saving you from having to look for real copies. VirtualCD is built into Windows Explorer so you can connect and disconnect new slots directly from the context menu. You can use it to manually pack an ISO or copy data from media. Created projects can be edited, reduced in size and password protected.
Pros:
- Edits, compresses, protects created archives;
- Converts formats;
- Works from Windows Explorer;
Minuses:
- No USB support;
- Not very friendly design;
VirtualCD interface
DAEMON Tools
DAEMON Tools is a popular software that will allow you to mount images and organize your media files. There are two versions: free Light and premium Pro, but they differ little in functionality. The program can process almost all formats and allows you to open even protected files. You can use Daemon Tools to play FLAC or APE, process VHD, decompress archives and convert different formats.
Pros:
- Clear Russian-language interface;
- Advanced functionality;
Minuses:
- The free option loads ads;
- May slow down on low-power laptops;
DAEMON Tools Interface
Daemon Tools Lite program interface
The main part of the program's main window is occupied by the “Image Catalog” area. The images added to the program will be displayed here. Naturally, if necessary, you can delete images from this directory.
On the left side of the program window there is a vertical panel with tabs. In the free version of the program, you will be able to use the functionality from the “Images” and “New Image” tabs. To use additional features from the “Disc Burning”, “Virtual HDD”, “USB”, and “Writer Drive” tabs, you will need to pay.
In the lower left part of the program window, there are buttons “Settings”, “License”, “Help”.
At the very bottom of the program window there is a panel on which all virtual drives connected in DAEMON Tools Lite will be displayed. When you turn it on for the first time, using the “Scan” button, you can start searching for images on your computer to add the found images to the “image catalog.” You can add images to the catalog manually whenever you want.
In the images tab, you can add images to the “image catalog” using the “Add image” (plus) button, or find the image on your computer using the image search.
Ultra ISO
The tool for connecting virtual drives UltraISO is very popular among computer software lovers. In addition to the ISO format, it also works with NRG, MDF, BIN, CUE, IMG, CCD and others. UltraISO allows you to extract and create images yourself from media files on your computer or copy media. In addition, you can edit created projects, compress them to save space, and test for errors. Also, with its help you can open and connect ISO as a removable drive. Thanks to this, you can view individual folders and media files without unpacking the entire archive.
Pros:
- Creates bootable flash drives;
- Allows you to connect virtual disk drives;
- Runs on all versions of Windows;
- Has a large number of professional tools;
Minuses:
- Not very clear interface;
- More suitable for professionals;
UltraISO interface
Power ISO
PowerISO is software for Windows computers for creating, compressing, editing and unpacking archives and images. You can also use it to encrypt an archive and protect it. The application supports working with more than 20 formats, including the ability to read images created by similar software: VirtualPC, VirtualBox, VMWare. In PowerISO you can mount a virtual drive, assemble ISO manually or copy data, create bootable USB.
Pros:
- Works with all popular formats;
- Creates boot floppies and flash drives;
- Launched from the context menu;
Minuses:
- Not very convenient controls;
PowerISO interface
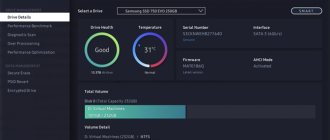
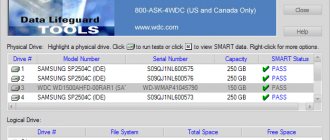
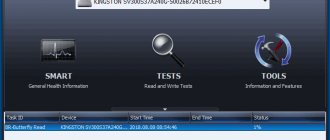
R-Drive Image
R-Drive Image is a functional application for packaging images and creating a backup of your system. In it you can make an exact copy of the original media with all partitions in a couple of clicks. The software supports work on any operating systems and with any file types. The software checks the integrity of the created project and compares it with the original. It is also possible to mount ISOs into the system and use them as virtual drives. This allows you to install software packaged in an image on your PC and gain access to folders without unpacking the archive.
Pros:
- Simple, intuitive interface;
- Russian localization;
Minuses:
- Most actions require administrator rights;
- Limited functionality;
R-Drive Image Interface
Virtual hard disk
A virtual hard disk is quite often used by IT specialists, as it allows them to solve many problems with backup , virtual machines and testing of various operating systems. A virtual hard disk is a file container that mimics the file structure of a hard disk.
Since such a disk is a file, it is therefore usually stored on a physical HDD or SSD. Starting with Windows 7, users have the opportunity to create and mount a hard disk directly in the operating system .
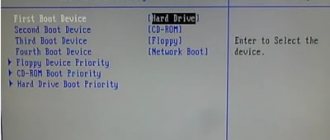
Let's look at an example of creating a virtual hard disk using Windows 10. First, let's go to the " Run " utility using the Win + R key combination and enter the following command in it: diskmgmt.msc
This command will take us to the Disk Control Panel.
To create a new virtual HDD, you need to go to the menu “ Action / Create virtual hard disk ”, which will open a window to create such a disk.
Starting with Windows 10, it became possible to create a disk from the “ VHDX ” format. Unlike the "VHD" format, the " VHDX " format can create containers that are up to 64 terabytes . Let's make our virtual hard disk 100 GB in the new " VHDX " format, and also set the switch to dynamic creation mode, in which our disk will grow as it fills up.
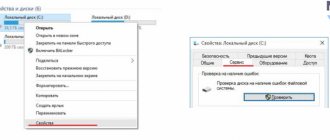
After setting the parameters of our hard drive, press the OK button, which will allow you to write it to the specified folder on the screw. Once created, the output will be a virtual hard disk named “virtual disk.vhdx”. From the image below you can see that our disk was automatically mounted, but it is still not visible in the system.
For the system to see our VHDX disk, it must be initialized. This can be done by right-clicking on the VHDX disk and selecting “ Initialize disk ” in the context menu.
In the window that appears, do not change anything and click OK.
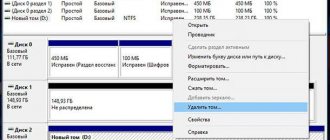
Now the simplest thing left is to select a file system and letter for our disk. To do this, let’s go to it and select the “ Create simple volume ” item in the context menu.
After this, a wizard will launch in which you need to assign a drive letter and select a file system. After completing the wizard, the virtual hard disk will appear in Explorer.
The example shows that creating a virtual HDD using OS tools is very simple, so we hope that you will no longer have the question of how to create a virtual hard disk. I would also like to note that with the created VHDX disk you can do the following operations:
- Encrypt it using BitLocker;
- Install an additional OS on it;
- Move and open it on another computer;
- Connect it to a virtual machine.
Computers based on the Windows XP operating system, which is still quite popular, do not support VHD drives. But don’t be upset, because the DAEMON Tools Lite has support for VHD disks and is fully compatible with Windows XP .
WinSetupFromUSB
WinSetupFromUSB is designed specifically for writing bootable USB flash drives. The application has a minimalistic design, does not require installation and is extremely easy to learn. Supports work with all versions of Windows, from 2000 to 10. The boot drive allows you to write in BIOS and UEFI mode, so the created flash drives can be used even on low-power computers with an outdated boot method. In addition to the write and read functions, it offers a number of useful tools: you can format the device, create a backup copy, check the drive for errors and manage the computer’s HDD partitions.
Pros:
- Simple interface;
- Checking, formatting, error correction;
- Works with all versions of Windows and Linux;
Flaws:
- There is no Russian language;
- No advanced features;
Interface WinSetupFromUSB
conclusions
Each of the programs discussed above has its own disadvantages and advantages. Which option to choose depends on your goal. If you need an all-in-one solution, but don’t want to waste time learning complex software, we recommend installing Disk Studio. This ISO disk image program helps you manually package information, burn different types of media, make backup copies and restore files. You can download the distribution kit from the site and see for yourself that professional computer work does not have to be difficult.
Download the ISO disk image program
Works great on Windows 10, 8, 7, Vista, XP
Instructions for creation
There are two ways to achieve your goal in the “seven”. One of them is somewhat more complicated, as it involves using the command line. However, it provides the user with slightly more options.
Via Disk Management
First you need to go to the main menu of the “Start” operating system and enter the word “controls” in the search bar. After the operation is completed , a window will appear in which you need to click on “Computer Management”. By opening the “Storage Device” drop-down menu, select the “Disk Management” option. The central part of the window will display all the logical drives into which the hard drive is divided.
To create a virtual disk on Windows 7, you should go to the “Action” tab located on the top panel. After that, select the appropriate item in the pop-up menu. A new window will appear in which you need to configure the parameters of the future disk - the user must specify the file location, size and name. When performing these actions, you need to follow two simple rules:
- The name should not use the word Windows.
- The virtual disk cannot be located in the folder with the installed operating system.
When choosing a format, you should prefer “Fixed”, which will allow the partition to immediately take up all the free space allocated to it and thereby reduce the load on the system . If you use a dynamic disk, its size will gradually increase as new information is added. As a result, when the physical partition is full, problems with the computer's performance may occur.