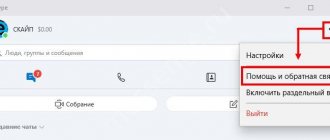
How Radmin works
Radmin consists of 2 parts:
- Radmin View - client module
- Radmin Server - server module
Initially, Radmin Server is installed on a remote PC, a password and access capabilities are specified, and a launch is created as a server. Afterwards, you should restart the computer to display the screen or window of the remote PC on your computer. All mouse movements are visible on the remote computer. Thanks to this, remote access to the computer is provided.
Radmin program
The program provides the ability to reduce the quality of transmitted images, which makes it convenient to use Radmin with a minimum connection speed. If you know the IP address, the owner of a specific PC can easily install it in the system.
Radmin - what is it?
Program for remote PC control.
The name stands for Remote Administrator.
In addition to remote control, the program allows you to transfer files, and there are also functions for text or voice communication with the user.
In simple words, Radmin allows you to work on another computer, via the Internet, and work as if you were working on your own. You can even make the window of the remote PC fill the entire screen and it will look as if you are working on your own.
Where is the program used? Mainly in two directions:
- Remote assistance to users. For example, there may be a company that has a staff, they have computers and Radmin is installed everywhere. And there is an administrator who, in case of problems, connects through Radmin and tries to solve the problem.
- Private use. Everything is simple here, for example, you have a problem, and your friend understands PCs, then he can connect to you through Radmin and try to help. But most often for these purposes it is not Radmin that is used, but TeamViewer.
You also need to understand that Radmin consists of two parts:
- Radmin Server is a server part that is installed on a remote PC; you must specify a password and configure the program to run as a service. Then a reboot is done and that’s it - this PC can already be accessed from another PC via Radmin.
- Radmin Viewer - on the contrary, it is already a client part, with which you can connect to those PCs on which the server part is installed. You can adjust the picture quality, so even with a slow Internet you can control your PC (but of course the image quality will not be very good).
All remote computers can be combined into one network using Radmin VPN.
The program also supports Telnet, a special protocol for remote administration.
Step-by-step installation of Radmin
Connect computers using the TCP/IP protocol via the Internet, modem or local network. Radmin Server is installed on a remote personal computer. Select access rights and security mode. 2 modes will be offered: Radmin and Windows NT.
The last mode is intended for corporate networks. After this, you should add a user to security mode to manage the server module. After completing the procedure, select the rights:
- Full - Control - View - Telnet - File transfer - Forwarding - Text chat - Voice chat - Text message transfer - Shutdown
Radmin Viewer is installed on the local computer. Run the rview34ru.exe file and follow the detailed instructions on the screen. Specify the IP address for using the server module. When prompted, select the folder to install the program. Check access to the remote PC using the built-in scanner. Repeat the username and password entered on the Radmin Server.
The program is ready to use.
So: Remote computer administration program. Fast! Professionally! Reliable!
Download the program: Radmin 3.5 » Server + Viewer from the official website:
Radmin 3 - remote system administrator
Control over employees is an integral part of the company’s work process. A full-time system administrator must monitor the computer network, the operation of servers and network equipment. But the age of information technology has greatly simplified this process, allowing a person to be at a remote distance from the computer and office. Using the Radmin program, the administrator can fully monitor user actions, as well as perform certain operations remotely, even while in another country.
Server component Radmin
The Radmin (Remote Administrator) program , which is published in Russia under the 1C: Distribution brand, is a tool for remote administration in operating systems of the Windows family. There are two program components – server and managed (Viewer). The first is installed on the computer that needs to be monitored, while the second, in turn, serves to manage the server part.
Let's take a closer look at the server part. It all starts with the installation of this component; it goes quickly and without any problems. After the installation process is completed, the user will be asked to configure Radmin Server for themselves. The first thing you need to select is the launch mode. If you plan to use the server part constantly and always need access to your computer, then it is better to use automatic launch of the application. If the situation is the opposite, then it makes sense to set the launch mode to manual.
The number of server operation settings is not so many; they are all intuitive. The main ones are the port (which is set by default, but it is possible to change it), a confirmation request for incoming connections, and display of the program icon in the tray.
The user can also disable some functions of the program, thereby outlining the range of tasks that can be performed by the user connected to his computer. There is a built-in IP filter and sections for fine-tuning text and voice chat.
Using this filter, you can outline the circle of those IP addresses from which a connection to a computer can occur; in addition, you can specify not only ranges, but also specific IP addresses.
To increase the security of working with Radmin, the program includes authentication of incoming connections. In access rights, user names and passwords are created, and rights to manage the computer are also set.
In addition to individual names, entire groups can be organized similar to how it is implemented in the Windows operating system in the form of Active Directory.
When using the IP address filtering table and authentication at the same time, when connecting to the server, the program will check the correctness of the specified parameters and if the IP address, login and password are correct, then access will be allowed to the third-party user, otherwise the connection will be reset.
Several computers can simultaneously connect to the server part; all connections can be viewed by clicking on the Radmin located in the system tray.
Radmin management component
The second component of the software product is called Radmin Viewer and is precisely the Radmin Server .
All addresses are stored in the address book; elements of folders and remote computers are easily distinguished by icons. To create a new connection, you must enter the computer's IP address or domain name.
There is also an analogue of a proxy server in the program - the connection is made through an intermediate server Radmin , which can be selected from the available list, and the IP address of the final server will be displayed in the list of connections for the user. Through Radmin Viewer you can fully control the remote machine. An image of the computer's workspace is displayed in the program window.
Control of the mouse cursor passes to the administrator. This function is indispensable in situations where the user’s inexperience does not allow him to fix the problem on his own, if the visit of the system administrator is impossible or difficult.
When working in full control mode, it is necessary to configure the program so that the speed of the Internet connection does not interfere with work. Therefore, one of the most important parameters is optimizing image quality. Color depth can range from 1 to 24 bits. By experimenting with the settings, you can achieve the most comfortable experience. The frame rate when transmitting images is also important; accordingly, the higher it is, the less noticeable the “twitching” of the cursor.
A voice or text chat can be organized between two connected machines. In a text chat, the user specifies his nickname and optimizes the display of messages for himself. Due to the fact that the connection is possible between several machines, all connected users will be displayed in the chat. In the chat, the maximum speed of your connection is adjusted so that the program can optimize the transfer of information with the least loss, while maintaining high-quality sound.
Everything is strictly according to the regime
Earlier we talked about one of the interaction modes - the control mode. In it, the administrator can use the keyboard and mouse, while the entered text and cursor movement will be transmitted in real time, without delays. The image of the remote computer is displayed either in a separate window or on the entire screen.
To exit full-screen mode, there is a special panel displayed on the desktop. The next mode is designed to monitor the operation of the computer. The limitation is that it is impossible to control the workstation; transmitting text from the keyboard or moving the mouse is impossible; we can only monitor the user’s work.
This mode is the most favorite among bosses who want to see what their employee is doing at any time - whether he is working or spending time on a social network.
For advanced users, a command line mode is provided. Here all the work is done via telnet and without knowledge of the commands it is very difficult to understand. However, this solution also has an undeniable advantage - at very low speeds, working through the command line seems to be the most convenient. Data in this case is transferred quickly due to its small volume.
The next feature of Radmin was allocated by the developers to a separate mode. This is a file transfer between two computers. The component's interface resembles classic two-panel file managers. Copying, cutting, selecting all files can be done using hot keys, as well as by dragging and dropping.
Conclusion
Evolving from a simple application, Radmin has grown into a full-fledged commercial project that is extremely popular in Russia. The program includes a set of up-to-date functions that greatly simplify the work of the manager and system administrator. You can buy Radmin from partners of the 1Soft network.
Neberekutin Alexander
All rights reserved. For questions regarding the use of this article, please contact:
Both computers must be connected to each other via TCP/IP protocol on a local network, via a modem or via the Internet.
Installing and configuring Radmin Server 3
| To install Radmin Server, download and run the rserv35ru.msi on the computer to which you are going to connect remotely. Follow the instructions on the screen. During installation, the necessary files will be copied to the default system directory (C:\WINDOWS\system32\rserver30\). Previous versions of Radmin Server 3 installed on your computer will be automatically replaced by the new version (with all settings retained). ( illustrations ) |
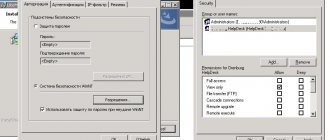
| Configure access rights to Radmin Server. Follow the instructions below. Right-click on the Radmin Server tray icon and select “Radmin Server Settings” -> “Access Rights...”Select security mode. The Radmin security system is most convenient when connecting via the Internet and has more flexible access rights settings. Windows NT security is primarily used on internal corporate networks. You must add a user to the security system. If no user has been created, access to the Radmin Server is not possible under any circumstances. Add a new user to the system. It is advisable to enter the username and password in Latin characters. The minimum password length is 6 characters. Now you can set access rights for the created user. If no option is checked, access to the Radmin Server is not possible. To provide an additional level of security, you can change the general settings of the Radmin Server. If you use Radmin only for a technical specialist to connect to you and solve your problems remotely (when you are at the computer), you can configure confirmation of incoming connections (reject or allow connections manually and by timer). In addition, you can change the default port through which a technician or administrator connects to you. If you have changed the default port, write it down or tell your administrator that this port number will be needed to configure Radmin Viewer. |
Write down the IP address of your computer. Select your connection type for further configuration: A: You are connecting to a computer inside the local network or the remote computer has an external IP (see more details). To find out the IP, hover your mouse over the Radmin Server icon. You can also see your external IP address here.B: You connect to a computer on another local network and have access to the router settings (see more details) To configure port forwarding on your router, please follow the instructions below: www.portforward.com Briefly about setting up port forwarding:
C: You are connecting to a computer on another local network, you do not have access to the router (see more details)1. Please download Radmin VPN from here: Radmin VPN.2. Install Radmin VPN on your local computer. Launch Radmin VPN and create a network by clicking on the “Create Network” button. Specify the desired network name and set a password. Click the “Create” button. The new network will appear in the main Radmin VPN window.3. Download and install Radmin VPN on the remote computer.4. Launch the program and click the “Join Network” button. Enter the network name and password in the window that opens. Click the “Join” button. The Radmin VPN working window will display the previously created network and its participants. The connection between the computers has been established. Manage the remote computer via the Internet. 1. Download and install Radmin Server on the remote computer.2. In the Radmin Server settings, create a user and set access rights. 3. Download and install Radmin Viewer on the local computer. 4. Connect the local and remote computers using the Radmin VPN IP address. 5. Select: “Radmin—> Management” in the context menu of the remote computer .6.Enter the username and password specified in the Radmin Server settings.and join an existing Network, enter your username and password to connect to the created network. Then, if you hover your mouse over the Radmin Server icon, you will see two or more IP addresses. You have finished installing the virtual network. |
Installing and configuring Radmin Viewer 3
| To install Radmin Viewer, download and run the rview35ru.msi on the computer from which you are going to connect remotely. Follow the instructions on the screen. During installation, the necessary files will be copied to the default directory (C:\Program Files\Radmin Viewer 3\). Previous versions of Radmin Viewer 3 installed on your computer will be automatically replaced by the new version (with all settings retained). The installation process for Radmin Viewer 3 is similar to the installation process for Radmin Server 3. |
| Launch Radmin Viewer and create a new connection. Specify the IP address of the computer on which Radmin Server is installed and configured and to which you are going to connect. Also specify a friendly name for the connection. If necessary, you can change the default connection settings to save network traffic or to increase the speed of work with a slow Internet connection (for example, via GPRS). |
| Check the accessibility of the remote computer by scanning with the built-in scanner. If the connection icon is checked after scanning, Radmin Server is installed on the remote computer and is ready for connection. Enter the username and password previously specified in the Radmin Server settings on the remote computer. |
Now you can enjoy fast and secure remote control of your computer!
Problems:
If you receive an error message when connecting to a remote computer, this means that the connection was interrupted on the server side due to blocking by an IP filter. In order to find and change the IP filter settings, you need to launch “Radmin Server Settings” from the “Start” menu on the computer from the server side.
If you receive the error “Unable to connect to the server,” you can open the log file to determine the reason. Please make sure the following:
- Radmin Server is running on a remote computer
- You are using the latest version of Radmin 3 on both computers
- You can "ping" a remote computer
- You are not using multiple remote administration programs (they may not be compatible with Radmin)
Removing Radmin
Select Add or Remove Programs in Control Panel. Run the uninstall via Start/Programs/Radmin Viewer/uninstall or Start/Programs/Radmin Server/uninstall
In some cases, there are problems with uninstalling the R Admin program, then find the file in the specified path or copy \system32\drivers\rminiv3.sys.\ to the command line, and delete it manually. Restart your PC.
If during your work you have questions about using the radmin program, you can find the answers on the technical support page of the official website https://support.radmin.com/index.php?/ru/Knowledgebase/List or contact the developer support service.
Free analogues of Radmin - TeamViewer program, Ammyy Admin, VNC client
By the way: VNC or VNC viewer installed on one operating system can connect to a VNC server running on any other OS (Windows, Android, Linux...)
UltraVNC/RealVNC
VNC (Virtual Network Computing) is a system for remote access to a computer desktop using the RFB (Remote FrameBuffer) protocol. Previously, it was shown how to organize a VNC server in Linux; in Windows, such a server can be created using the UltraVNC or RealVNC programs. The UltraVNC program is similar to RealVNC, but has additional features such as encrypting the connection between the client and the server, the Java Viewer module (access to a remote PC through a Java-enabled browser) and others. Although RealVNC has a VNC Viewer plugin for Google Chrome, so there is no need for Java Viewer. As already noted, the programs are largely similar, so in this article we will only consider UltraVNC.
When installing UltraVNC, it is possible to install both a VNC server and a VNC client. If you don’t need remote access to your computer, you don’t need to install a VNC server. When installing a VNC server, you will be able to configure it to run as a system service, but this requires administrator rights. The RFB protocol that VNC uses typically uses ports 5900–5906. Therefore, to connect via VNC you need to configure a firewall, otherwise it will kill the connection.
To connect to the VNC server, use the UltraVNC Viewer program. The program is universal, and you can use it to connect to any VNC server, not just the one running UltraVNC Server. Similarly, you can connect to a server created by the UltraVNC Server program using the RoyalTS program or any other VNC client.
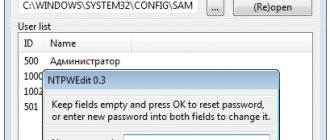
A few words about how it all works. First, launch the UltraVNC Edit Settings program and on the Security tab set a password to access the VNC server, then you need to launch the UltraVNC Server program. Then, on another computer, launch UltraVNC Viewer (Fig. 14) and enter the IP of the computer on which the VNC server is installed, and click the Connect button.
Rice. 14.UltraVNC Viewer
Conclusions:
- You need administrator rights, you need to configure a firewall.
- The same protocol can be used to control Windows, OS X and Linux, but these are the advantages not of a specific program, but of VNC itself.