There are several reasons why a green screen may appear when watching a video on Windows. More often, this problem occurs when watching online videos from Vkontakte, Odnoklassniki, YouTube, Rutub. These sites use a Flash player, which causes glitches in the form of streaking on the screen, artifacts, and green screens when watching videos. In this article, we will look at several methods to fix this problem.
What does a green screen look like when watching online videos?
Prevention, or how to protect yourself from green screens
The average user is surprised at the appearance of this problem, believing that its essence lies in the computer’s operating system. Most often, even outdated video card software can cause a green screen to appear while watching a video in a flash player.
- Before taking drastic steps to fix the problem, which we will consider, it is enough to simply update Adobe Flash Player. You can download the new software from https://get.adobe.com/flashplayer/?loc=ru. Some browsers automatically update it.
- Don’t forget about the video card: perhaps graphic artifacts appear while watching a video due to its incorrect operation. Download drivers for ATI Radeon and Nvidia GeForce graphics adapters from official websites. You can view your video card model using the AIDA64 program.
- Update your browser to the latest version.
Flash update.
Youtube by default uses HTML5 player instead of Flash whenever possible. Mozilla Firefox has stopped supporting Flash technology due to a large number of vulnerabilities.
Green screen material
If a blogger doesn’t have money for a green studio set or panorama, then your options are a homemade greenscreen or a universal filming kit.
Your budget and video script are the basis of the video. We wrote about how to write a script for a video in the blog.
Homemade greenscreen
Beginners think that to make a greenscreen, all they have to do is smear a little bright green paint on the wall and it’s done. But it's not that simple. The most important nuance on which the quality of chromakey depends is the material for the greenscreen. You can use paint, muslin, nylon, board. But before choosing background material, think about the following factors:
- Portability – Are you planning to create a studio space or a mobile option? Light, stretchy fabrics are better for transportation.
- Patience – Do you have the patience (or time) to iron or steam wrinkles on fabric? If this is the case, choose a heavy fabric that wrinkles easily but provides excellent photography.
- Work Area - Are you shooting an entire scene or subject at close range? The width and height of your work area will determine how much material you need. If the coverage area is small, then you can get by with a poster board.
Ready-made kits for chromakey
Ready-made kits are sold to video bloggers who want to start filming right away.
They make from small portable screens to full-size installations for long-term installation. They sell kits specifically for small filming on YouTube. They are designed for talking head segments, but have a wide working area to create a transparent background around the author's face.
Sets for mobile filming are easy to assemble, easy to dismantle and convenient to store. Mobile kits are useful for a traveling filmmaker or travel blogger.
Method one: disable hardware acceleration
When updating your drivers and browser does not help, you can use the simplest way to solve the green screen problem - disabling hardware acceleration.
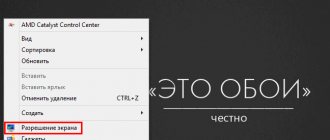
- We right-click on the video, even if it is a green or black screen.
- Select the “Options” item.
- Uncheck the “Enable hardware acceleration” checkbox.
- Restart the browser.
These settings apply separately to each site.
Disable hardware acceleration.
How to Shoot a Green Screen Scene
When shooting with greenscreen, plan the final scene. Concept art and video storyboard will help with this. Read what video storyboarding is on our blog.
But the main goal is to plan what is real and what is not in the scene. The author must determine in advance what will be physically present in the scene and what will be added during editing.
On set, you need real props that the actors can use to reference. Behind-the-scenes footage shows tennis balls hanging on a green screen. These are visual references for actors.
Lighting is the second point. Think about how to set your character's lighting to match the lighting in their environment. This will make a difference when it comes to the final chromakey work and compositing of all the layers in the scene.
Step 1: Planning your green screen shoot
Before filming, you need to calculate the scale of your final scene and choose lenses. When shooting with a wide-angle lens, you need to set the correct distance from the subject. This depends on the viewing angle of the lens used to capture the background.
Shoot the foreground and background with the same lens focal length.
Wider formats that include the actor's entire body and action scenes will require full green coverage, including the ground and possibly the side of the frame. If this is the case, make sure that the screen has no edges so that later, when processing chromakey, there will be no difficulties. You may need to use a curved screen or curtain without hard edges.
Prepare actors and props for greenscreen filming. Naturally, avoid green! Don't dress your actors in green, or they will appear transparent when keyed.
Avoid shiny objects as they may reflect the green color of the chromakey, resulting in transparent spots. When you need to shoot objects that reflect light, the author will have to manually mask them during installation. This may take a long time.
Step 2: Lighting
There are three immutable rules when lighting scenes with greenscreen:
- Keep the lighting even.
- Lighting should be soft and diffused.
- Light the green screen separately from the subject.
When working with chromakey, the result depends on the uniformity of the greenscreen. So when setting up your lighting, the goal is to make it as even as possible. This ensures that the green coloring is even and free of highlights or shadows.
You will also need to set up the lighting separately for the actors and the greenscreen. It is advisable that the props and actors be at least one and a half meters from the green background. Match the lighting on the actor to the scene he will appear in after changing the background to the video.
The secret to uniform lighting when shooting chromakey, like other types of shooting, is to use large, soft light sources. Hard light sources without diffusion will create glare and light spots on the green background of the screen.
To diffuse light, use light reflectors, also called light modifiers and diffusers. If you're on a budget, make a reflector out of a white sheet on a stand in front of the light source.
Placement of lighting equipment correctly. When only two background lights are running, place one lamp on each side of the green screen at a 45-degree angle. Set up and adjust the angle of each light so they don't overlap too much in the center.
On larger shoots you may need to use overhead lighting, additional lighting or more diffusion, but the basic principles outlined here will be the same.
Step 3: Getting a Clean Chroma Key
Chroma key refers to the technique of combining two images (or video clips) based on hues. Chroma key uses a green screen to replace the background behind the actors. You'll often hear the term “pure chromakey” when editors refer to green screen processing, since the end goal is a clean, high-contrast color background that's easy to remove.
Preventing reflexes
Pure chromakey ensures that actors or objects have sharp, precise edges that look natural. But often digital artifacts, jittery and jagged edges, and color spots can appear on a green screen.
Reflection is enemy #1 in chromakey. This is when the green screen reflects onto the props, creating a green halo that is difficult to get rid of in post-production.
Here are some helpful tips and tricks that will give you clean chroma key and prevent scattering.
One of the first points is to decide which screen to use - a blue or green background. On digital cameras, green will most likely give the best results. However, if the actor has blond hair or green clothing, then it is better to use a blue screen, as the green color may reflect on blond hair.
Motion Blur effect
The whole point of the chromakey technique is to get clear outlines, but the effect of motion blur can ruin everything. Shoot at a fast shutter speed to avoid motion blur.
And to make the actors' movements look natural, you can add a blur effect in post-processing. To do this, you can use the CC Force Motion Blur effect in After Effects or download the ReelSmart Motion Blur plugin.
Shooting at low ISO
ISO is a parameter that controls the light sensitivity of the camera sensor. We recommend the lowest ISO setting available to your camera.
High ISO levels create noise artifacts and these will appear against the green background of the screen. This will lead to dozens of “uncolored” spots, which will complicate the keying process.
Method five: system rollback
If the problem with the green screen appeared recently and the previous methods did not help, roll back the system.
- Open the Start menu - Programs - Accessories - System Tools - System Restore.
- In the window that opens, select the archive saved before the update and start the recovery.
- Restart the computer and disable subsequent Windows auto-updates.
We roll back the system. We tried to collect for you all the ways to solve this problem. Write in the comments which option helped you.
Green screen when watching video on phone
The steps above are for your computer to resolve the green screen issue when playing videos online. If you encounter such a problem on your phone, which often happens on smartphones running the Android operating system, you can try the following steps:
- Disable hardware acceleration in the browser.
The easiest way to do this is to insert the following command into the address: chrome://flags/#disable-accelerated-video-decode The desired page will open, where you just need to disable this setting; - If the problem occurs in the official VKontakte application, we recommend going to the program settings and setting the “Never” option in the “video autoplay” column. After that, restart your phone and try to play the video again;
- We also recommend trying to connect to a different Wi-Fi network. It is possible that a slow connection is preventing normal video processing.
If none of the above options solve the problem, try updating your Android phone to a more recent version. If all updates are installed, you can try installing “custom” firmware.
( 190 votes, average: 4.64 out of 5)
How to Make a Virtual Background in Zoom on Computer and Phone
How to buy a game on Steam for yourself or as a gift
Related Posts
Cable problem
If successive changes of VGA cables had not led to a noticeable improvement in image quality, then it would not have been possible to identify the culprit so quickly. The problem was that there was not enough space on the table for the monitor, so they did this with the cable:
The rich inner world of the cable could not stand it and burst.
There is one adequate solution here - replacing the cable, and don’t do that again!
Why is the screen green?
Sometimes some users encounter an unpleasant problem. It is connected with the fact that it is not possible to view some videos located on social networks, for example, Vkontakte, in My World or on common video hosting sites, for example Youtube, and similar sites. These sites use Flash Player for playback and display. This problem manifests itself in the fact that instead of video, the user sees a green screen. In this article we will try to figure out why the green screen appears. How to fix this problem?
Eliminating green screen
- The green screen problem can occur on a perfectly functional computer whose operating system is completely functional. Why the screen is green can be explained by incompatibility of the software, in this case the video adapter driver and the Flash player, which is installed on the system and is designed for watching videos online using a browser. Therefore, before proceeding with any actions, you must first install the latest Flash player and update the video card driver. The player can be downloaded from the Adobe software website. Video card drivers are downloaded from the website of the chip manufacturer.
- If the steps described above did not solve the green screen problem, or you were unable to download and update the drivers and player yourself, you will have to use the following method. In the Flash Player settings, you need to disable the use of hardware acceleration. This action does not solve the compatibility problem; it will simply assign video playback functions to the central processor and not to the video card. At the same time, the load on the processor will increase slightly. In addition, smoothing the image when stretching it to fill the entire screen will not work.
How to disable hardware acceleration
- open any online video;
- open the player's context menu;
- in the video area, right-click;
- select “Options”;
- in the window that opens, click on the small monitor icon and select the “From” section
elhow.ru
If all else fails
If none of the methods worked, there are several other steps you can take.
- It’s worth going to the video card manufacturer’s website and downloading the latest version of drivers for your equipment from there. After installation and restarting the computer, the problem may go away.
- You can also go to the flash player developer's and download the latest version from there. You can do this simultaneously with downloading the driver for the video card, so as not to restart the PC several times.
- You can try updating the Windows system ; perhaps the failure occurred due to the fact that some component is missing. If the problem arose after some update, then it can be removed.
- If all else fails, then you should go to the recovery center and roll back the OS to the date when everything worked.
Fixing error 0x80070002