How to disable screen sharing in Skype?
The end of the screen sharing will not necessarily coincide with the end of the call; often the conversation itself is still ongoing when the necessary actions are shown.
A new version
Ending a show in the new version of the program is very simple. During the demonstration, a small window appears in the corner of the PC screen, in which there is a “End (stop) demonstration” button. By pressing this key, the user will complete the transfer of the image to the interlocutor. Also in this window you can end the call, turn on/off audio and video.
Old version
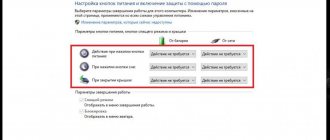
When working with older versions of Skype, there are two options for ending screen sharing. The first is using a special window that automatically appears when the show starts. You need to click the “End show” button in this window and the demonstration will stop. The second method is to click the “Calls” button in the Skype menu bar (top line) and select “Stop Screen Sharing.”
Show custom screen
Many users wonder why the screen sharing function in Skype was invented.
We hasten to satisfy the demanding reader:
- Creation of an interactive environment for joint viewing of video materials and graphic objects.
- Develop training activities using tables, graphs and other tools to enhance perception.
- The ability to solve a technical problem or explain things “on the fly.”
This is not a complete list, but it also makes it clear the importance of the implemented functionality.
Since there are now two versions of the program for PC (new and old), the methods for accessing this feature are different. Let's look at both of them in turn.
A new version
The update has significantly simplified access to certain functions. This also applies to showing a picture from your computer during a dialogue. Everything is done like this:
- Start a call to your interlocutor so that he picks up the phone.
- Maximize the conversation window to full screen.
- Click on the icon with two overlaid images .
- Configure and then run the function.
Old Skype
If you use the classic version, the function is called like this:
- We launch the application and go through the authorization procedure.
- Select the required contact and click on the call button.
- During a conversation, move the cursor over the blue cross, clicking will activate a dialog box in which you select the item “Screen sharing...” .
- There is another way - during a conversation, click on the “Calls” , activate the corresponding inscription by clicking LMB.
- After pressing the corresponding buttons, the user screen preview mode is activated.
- Confirm the function call.
There is no way to enable screen sharing in Skype on your phone. But you can do this in the opposite direction - from a computer to a mobile device. The function is activated in exactly the same way as described above.
Screen streaming doesn't work, what should I do?
Screen casting via Skype may not work for several reasons:
· First – during the transmission the call was interrupted for some reason. Solution: call the interlocutor back and connect the demonstration again;
· The second is the low speed of Internet data transfer. Solution: check the Internet speed, connect to another network, reboot the router;
· Third – the user has a version of Skype installed that does not support the screen sharing function. Solution: Update the application to the latest version or install a version that already supports the desired feature.
Screen sharing via Skype on desktops
For desktop computer devices - PCs, laptops, Windows tablets and similar equipment - Skype exists in three types of software solutions. This is a classic program, a UWP application for Windows 10 and a web version in a browser window. The classic program and the UWP application for Windows 10 are almost identical in functionality and interface. In them, in the process of communicating with the interlocutor, we press the button in the form of two rectangles.
Select demo options. We can specify to display our entire screen, or a window of a separate application. This could be a window of Skype itself, a window of any Windows system function, or a third-party program.
Note: At the time of writing this article, the option to show a separate application window is only available in classic and web versions of Skype. In the Skype UWP app for Windows 10, you can currently only share the entire screen. Perhaps in the near future the UWP application will be improved.
If you want to show only a separate window to your interlocutor, this window must be active so that it is displayed in the preview of the applications available for demonstration. In this preview, in fact, we select the window we need. Next, if necessary, turn on the audio broadcast slider. And finally, click the “Start Demonstration” .
You can also start screen sharing from the Skype widget; it is displayed in the upper right corner of the screen when we minimize the Skype window during communication. The widget provides access only to basic operations, and among them there is the same button in the form of two rectangles to launch the screen sharing function.
If two or more monitors are connected to the computer, we will be able to indicate which monitor we want to show to the interlocutor.
To stop sharing your screen in the Skype window, click the same button in the form of two rectangles. And select “Stop showing” . Also here we will have the opportunity to reconfigure the demonstration, i.e. we will be able to indicate the screen of another monitor or another window that our interlocutor will see.
To stop the demonstration, you can also use the Skype widget; here the button in the form of two rectangles is responsible only for stopping the screen display.
And in fact, in this way the interlocutor will see what is happening on our screen or in a separate window of some program.
Among the options available to the interlocutor during the demonstration are customizing the Skype application window and the ability to display the transmitted image on the entire screen.
How to show a presentation via Skype?
To show a presentation using Skype, you need to:
· Create and open a presentation in any program designed for this;
· Start a slide show;
· Make a call via Skype and wait for an answer;
· Start screen sharing;
· In the confirmation window in the lower left corner, click the extended menu icon (inverted triangle or down arrow);
· Select the “Show window” option;
· Mark the window with the presentation;
· Click “Start”.
Now the interlocutor will not see the entire screen, but only the window with the selected presentation.
Possible problems
Even in such a simple process as sharing your screen on Skype, a number of difficulties may arise that will interfere with a normal conversation.
Why is my interlocutor’s image slow and interrupted?
In order for screen sharing in Skype to proceed without lags or interruptions, it is worth checking the stability of the network connection for you and your interlocutor. Poor speed is the main cause of failure.
If the problems continue, you should reinstall the application or contact support.
How to share screen on Skype
If your computer is running an older operating system than Windows 10, or you don't want to use the UWP version of Skype, you're probably using the classic version. Sharing screens in this version is quite easy.
Step 1: Launch Skype and start calling someone by clicking the phone icon in the top right corner of the window.
Select a contact from the list, in the upper right corner click on the phone icon to call
Step 2: Click the "+" icon on the call screen to open more call options.
Click the “+” icon on the call screen
Step 3. Click “Screen sharing” and confirm your consent to this action in the window that opens.
Click the “+” icon on the call screen and select “Screen sharing” in the menu that opens.
To confirm, click on the “Start” button
Step 4. Now you are sharing your screen! A thin red line around the edge of your screen will outline the area that the other person can see. In addition, a small window will appear in the upper right corner showing how the other person sees your screen.
A thin red line around the perimeter of the screen shows us what area of the screen the interlocutor sees
Step 5. When you want to stop sharing your screen, click on again and turn off sharing.
Click on the “+” icon and click on “Stop showing”
Preparing for screen sharing.
You must be in Skype to share your screen. To open the program you need:
- Double-click the application icon on the desktop or in the folder with shortcuts to your programs.
- If you don’t find it there, then go to “Start” / “All Programs” / “Skype”.
- We launch the program and wait for the authorization window to appear.
- After the window loads, enter your login information and click the “Login” button.
- Don't worry if you don't remember your password, you can quickly and easily recover it by clicking on the appropriate link on the login window.
- After successful authorization, you need to make a call. Select the desired interlocutor from the contact list and click on the “Call” button.
- As a result, a conversation subwindow will appear in the program window.
- This concludes the preparatory part; advanced and curious users will quickly find a way to enable screen sharing. A hint for this is the small white button icons.
- It is important to remember that screen sharing can only be enabled while you are on a voice call with the other person.