How to expand your screen using resolution settings
Those who have often reinstalled the operating system know that when you first start the monitor displays standard settings and screen resolution - 800x600 pixels. This happens for all versions of Windows OS. Thus, the developers offer us to independently configure the desired screen resolution for comfortable further work. For older computers, this resolution may be sufficient to work primarily with text information. But for modern digital machines, such a resolution is, of course, unacceptable.
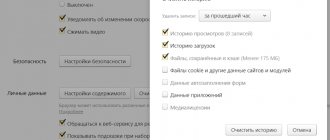
Instructions on how to change resolution in Windows OS.
| Right-click anywhere on your screen where there are no icons in Windows 10, 8.1. For Windows 7, you need to click additionally “display settings” |
|
| Select "screen resolution". In this window you will see a button with the size of your screen in pixels. Click the drop-down list and select the permission you need | Setting the screen resolution |
The system often advises you to select the maximum value for your screen. You can follow her recommendation. It is advisable not to touch other settings here. Click "Apply" and "OK".
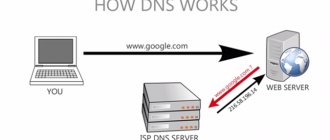
Why does my screen stretch in Windows 10?
In many cases, users get a distorted screen when the screen is stretched horizontally or vertically. A stretched display causes the screen to appear pixelated when the screen is stretched to fit the resolution and size of the monitor.
There are two main reasons why you are seeing this error. Firstly, there may be a resolution mismatch that causes the displays to become pixelated incorrectly, resulting in the ' Windows 10 screen is stretched horizontally '.
This is quite easy to solve as a simple adjustment in your settings should be to match the correct monitor size.
Secondly, outdated graphics drivers can cause your operating system to detect that your display is the wrong size. This can also happen when you upgrade your monitor to a newer model and the information is misinterpreted.
If the picture has narrowed, we restore the size using the monitor buttons
If you are worried about how to expand the monitor screen if the entire image has narrowed, how to restore it, for these purposes it is useless to touch the settings of the system itself. If there are black parts of the screen at the edges of the narrowed image, you need to adjust the picture on the monitor itself. As you might guess, it doesn’t matter what version of Windows 7 or 10 you have installed.
Buttons for settings on monitors from different manufacturers may differ in location and name.
The principle of operation is the same:
- The first thing you need to do is get to your monitor's menu - usually this is the largest button on the monitor panel and is located in the middle.
- Then select image settings - this item may also have a different name.
- When the settings are displayed, select the screen orientation and use the arrows (buttons on the monitor panel) to select the desired size so that the picture is positioned correctly, without running beyond the boundaries of the monitor and without leaving black bars.
- After that, confirm the settings and exit the menu.
Monitor adjustment buttons
These options should be saved and not lost throughout all subsequent computer starts. If after rebooting the monitor settings are not saved, your device is not working properly and needs technical inspection by specialists.
Good to know: when you turn on the computer, it asks you to press F1 - how can I remove it?
The screen has narrowed - reasons and solution
Narrowing of the monitor screen can be caused by:
- incorrect screen resolution (for example, the selected resolution is designed for a 16:9 ratio on a 4:3 monitor or vice versa);
- The video card driver is not installed;
- TV or second monitor connected;
- The monitor is not configured correctly.
Incorrect resolution
This problem can be checked through the Screen Resolution menu.
Lack of driver
The problem most often occurs when the OS is reinstalled or the driver or (less often) the video card itself malfunctions. If everything is fine with the video card, try downloading the latest version from the developer's website.
Video - How to install the driver if you don’t know the video card
Connected monitor or TV
Monitor settings
If none of the above methods are suitable, then the problem may be in changed settings of the monitor itself (changing the length and width of the image, for example). The solution may be to automatically adjust the image. Every monitor has this button.
Video - What to do if the image on the computer monitor screen has moved off
Installing the video card driver
Screen settings may reset due to problems with video card drivers. A driver is a software package that no computer device can operate without. It tells the operating system how to work with it, what it is intended for, and what function it performs. Every Windows operating system has a standard VGA graphics driver. After installing it, the system will display and work with graphic objects, but at a low level - text, simple graphics, and more.
But on more modern and powerful hardware, the computer desktop will look sparse - low-resolution icons, large and unclear letters, and so on.
To solve this problem, you need to reinstall or install new drivers for the video card:
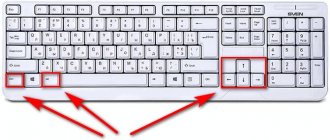
- To do this, press the WIN+PAUSE key combination and select “Device Manager” in the left block.
"Device Manager" item
- A list of devices that are installed on your computer will be displayed. Select "Display Adapters".
Updating drivers for the video adapter
- Select the device that appeared after right-clicking the previous item and click “Update Drivers”. Then you need to choose to automatically search and install the software, and then wait for the process to complete.
- If you have the driver installed, but it does not work correctly, you need to select the name of the RMB video card and click “Properties”. Then select the “Driver” tab and click the “Delete” button. After this, follow the recommendations from the third point.
After applying these instructions, you will not have such questions - how to expand the boundaries or restore the resolution of your monitor screen if it has narrowed.
Wrong resolution in graphics settings
Most often, this situation is encountered by users who have recently changed their system software. This can also happen after opening computer games with changed video settings. If after this your screen has narrowed and the video shows poorly, you should perform the following manipulations step by step:
- Start your device and open the desktop.
- Right-click on any free space to display a list of possible actions.
- From the proposed options, select one that can be edited depending on the software version: resolution, parameters or screen personalization.
- When choosing personalization, additionally go to the screen bar and then to the resolution settings.
- Now all that remains is to select a specific value for your monitor. Usually, opposite the appropriate format there is a corresponding inscription with the value “recommended”. It matches the required parameters. If it doesn't fit, try all the options until the desired format and configuration appears.
IMPORTANT: Most often there are several suitable sizes at once, but they differ slightly, watch the video and evaluate the condition of the picture to choose the best option.
Monitor settings
If all of the above does not suit you or does not apply to a specific situation, then try running the auto monitor settings. This is done by pressing one button on the monitor, which is usually labeled “Auto” and is located near the monitor’s power button on its front or side panel.
If you are reading these lines, then most likely you have encountered a problem when your monitor does not display the full picture, but is narrowed at the edges. Sometimes changes affect desktop icons - they become larger. The picture may also become unclear. This article will talk about how to expand the monitor screen using software and hardware if it has narrowed, and how to restore it.
How to stretch 4:3 to full screen: goodbye stripes!
Black bars on the sides of the screen are a common problem for those who like to game on laptops and rectangular monitors. It's unsightly, inconvenient and distracting. But, fortunately, the problem can always be eliminated. Let's figure out how to stretch 4:3 to the full screen on a laptop.
What does image stretching do?
The settings of the game itself allow you to create a widescreen image. But it simply increases the viewing angle, although it removes the black stripes on the sides. For real treasurers, this is not the most profitable option.
Therefore, you can use another method - stretching. What are its advantages:
- easier to aim - the enemy visually becomes wider due to image deformation;
- the mouse begins to move faster sideways, while maintaining vertical speed;
- aesthetic pleasure - black bars do not distract, the entire screen area is used.
If this is what you need, then let’s start analyzing how to stretch an image in CS GO!
Game and video card settings
How to stretch 4:3 to the entire screen so that it doesn't turn out to be 16:9? Easily. But to do this you will have to go further than the game settings. Now we will learn how to make 4:3 in the form of a rectangle. Even on awkward Windows 10.
First you will have to set the settings that are necessary to stretch the game. This is a 4:3 format (square) with a resolution of 1024x768 pixels, display mode is full screen. All methods work with such a base. After saving the settings, you need to close CS GO.
Then you will have to open the Game Library on Steam and find CS GO among the list. Then right-click on it and open “Properties”. Here we need the “Launch Options” section.
A window will appear with a line into which you need to copy two commands:
-window -noborder
With their help, the game will launch in a window, but without frames. After this, you will have to tinker a little with the settings of the video card itself. In this case, the image outside the game will also be stretched. So, if this option doesn’t suit you on a regular basis, you can either reconfigure it every time before playing, or try other methods.
So, most laptops have an Intel chip installed in addition to an NVidia or AMD video card. We will work through him. Necessary:
- Right-click on the desktop;
- Select the line “Graphic characteristics”;
- In the new window, click on the square labeled “Display”;
- Set the same resolution as the game (1024x768);
- At the bottom, find the “Zooming” section and check the “Zoom to full screen” checkbox;
- Save the settings and close the panel.
After this, the image will change. You can safely enter the game and enjoy the enlarged models. The result will be a standard 4:3, stretched onto a rectangular monitor. In some cases, especially on Windows 10, there will be no effect.
For NVidia and AMD
Video card drivers allow you to separately configure game stretching. Therefore, you can work through them. But first, we set the standard parameters in the game (4:3 and 1024x768). After which we proceed directly to stretching CS GO 4:3.
For NVidia:
- Right-click on the desktop;
- Select “NVidia Control Panel”;
- Find “Adjusting the size and position of the desktop”;
- Set the “Full screen” option;
- Save settings.
Attention! If there is no such item, you need to reinstall the drivers for the video card. The reduced functionality of the control panel is a problem of crookedly installed drivers.
For AMD:
- Similarly, right-click on the desktop;
- Select "Graphics Properties" from AMD;
- In the window that opens, click on the “Games” tab;
- Find in the CS GO list;
- Click on “Profile Settings”;
- Select “Display scaling” and o;
- Return to the main screen of the Graphics Control Panel;
- Click on the “Display” tab;
- Enable "GPU Scaling".
Instead of these settings, if you want to stretch all the games at once, you can immediately go to “Display” and turn on “GPU Scaling”, and then select the “Full Panel” scaling mode.
After this, the screen in CS GO stretches as planned. But the image on the entire computer will not suffer. Therefore, there will be no need to constantly change settings. Moreover, the method even works on Windows 10.