Flash Memory Toolkit is an extremely useful application that has a wide range of functions for working with removable media. Thanks to this program, you can easily cure a flash drive and return it to its functionality as it was after purchase. In this article we will look at the main features of the utility, understand the principle of operation and highlight the main advantages of this product.
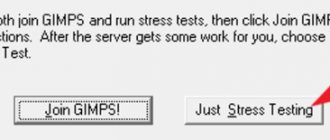
Receiving the information
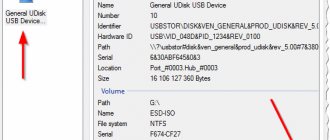
The program is very easy to use. To get started, just connect the drive to your PC and launch the program. Flash Memory Toolkit will scan your device and provide all the necessary information about it. If several devices are connected to the computer, in the program window you need to select the one you need from the list. You can get useful information such as compatibility, USB configuration, and basic drive specifications. If the scan is unsuccessful, click on the “Refresh” button and try again.
Basic functions step by step
Flash Memory Toolkit immediately sees all connected devices, and if there are several of them, then at the top in the line you need to select the flash drive to start working. The program also allows you to take a screenshot or format the drive in one click.
Flash Memory Toolkit:
- available in Russian;
- does not require installation and is compatible with all software versions starting from Windows 2000;
- takes up little space;
- does not affect the operation of the PC or other programs in any way.
The menu is located on the left side. It consists of seven tabs.
Information
In the tab you can see general information:
- what file system is used;
- capacity declared by the manufacturer;
- media performance;
- amount of free space, etc.
Finding errors
You can check the flash drive and correct errors related to reading or writing information. If you carefully study the tab, you will find that by default only the file reading test is checked.
When testing recording, the program writes some files to a USB flash drive for testing purposes, and this may result in partial loss of existing data. When you try to carry out a recording test, the program issues a warning where you must agree to this procedure, and only after that testing starts.
After the check is completed, the following is displayed below:
- number of faults;
- average write or read performance;
- duration of testing.
Deleting data
Flash Memory Toolkit deletes files using two methods: simple formatting and full formatting.
Simple method . When deleting a file from a USB flash drive in the usual way, the cleaning is superficial.
Complete erasure involves permanently deleting information.
Data recovery
If for some reason important files were lost, the program can return them. However, this function is not key, and for more complex tasks of recovering long-lost documents from a formatted or overwritten drive, you will need specialized utilities created specifically for solving such problems.
Archiving
This feature is also included in the Flash Memory Toolkit. Here you can make copies of the documents you need and archive them so that they do not appear on your drive or take up space, but can be opened and used if necessary.
Low level test
This is a more useful function - it helps determine the overall performance of the flash drive and its potential based on parameters such as:
- recording speed;
- reading speed.
The average value for both parameters is displayed.
Performance
The tab measures performance in a similar way, but in more detail. The program tests the drive on files of different sizes and evaluates each document tested. Upon completion of the test, a diagram is generated:
- vertically displays the amount of data for which the write and read test was performed from 1 to 15 MB;
- The horizontal line shows the speed scale in kb/s.
Flash drive treatment
Flash Memory Toolkit allows you to scan and restore drives. To start diagnostics, you must click on the “Error Scan” button, having first selected the device. The program will automatically check for read and write errors. You can choose one of the test options, or carry out two at the same time. It is recommended to perform these operations even if you purchase a new drive. At the end of the scan, the utility will suggest solutions.
How to check a flash drive for functionality
Once again connecting a flash drive to a PC, the user may encounter the problem of its incorrect operation. The reasons can be different, ranging from viruses to physical damage.
Therefore, in order to avoid erroneous actions in such a situation, many programs have been created to check the correct operation of the drive.
Method 1: Check Flash
This program is completely free and allows you to effectively check the media for failures.
To check your Flash drive for errors:
- We make a backup copy of the data, since it will be erased during verification.
- Open the program through “Start” or find it in “Search”.
- In the program window we note:
- “Device type”: “As physical media” (1).
- “Device”: name of the media being checked (2).
- “Action”: “Reading stability” (3).
- “Duration”: “Infinite” or at least 2-3 passes in order to exclude the possibility of missing any errors (4).
- Click “Start” (5).
During the check, you should pay attention to the “Disk Map”. It will display all verified blocks. Correct ones are blue, those with errors are yellow or red.
Method 2: Flash Memory Toolkit
A program with very rich functionality that allows you to perform various operations, from checking and disinfecting a disk to backing up and testing the performance of a flash drive.
To check for errors, you need to:
- Open the program through “Search” or find it in “Start”.
- Go to the “Error Scan” section (1).
- In the “Device” line, select the desired flash drive (2).
- There are 2 types of tests: reading test (“Write test”) and reading test (“Read test”). It is advisable to do both. To do this, put a tick in front of each (3).
- In the “Passes” field we set the value 2 or 3, for the greatest reliability of the check (4).
- Click “Start” (5).
After scanning is completed, it is advisable to format the flash drive.
Method 3: USB Flash Drive Tester
A small program whose functionality is limited only to checking media for bad sectors.
To check:
- We turn on the program.
- In the “Select flash drive/card” field, select the flash drive that needs to be checked (1).
- “Select test type”: - select “Write, read, and compare” (2).
- Click “Start test” (3).
During the scan, error data will be displayed in different lines at the bottom of the window.
- “Current operation” - current operation;
- “Last error” - the last detected error;
- “Error count” — counting of detected errors;
- “Device map” - a map of the media sectors.
The “Map legend” area deciphers the meaning of the colors marking the sectors being checked.
- Gray - not verified;
- Green - OK;
- Yellow—correctable reading error;
- Orange - unrecoverable read error;
- Dark yellow—correctable recording error;
- Red—uncorrectable recording error;
- Purple is a comparison error.
Formatting
Storing data on a flash drive is certainly a convenient means for any user. You can always have photos, videos and programs at hand that work without installation. But what if you wanted to sell a flash drive? Naturally, you will format it, but this does not mean that a new user will not be able to restore them. In this case, Flash Memory Toolkit comes to the rescue. The program offers a complete cleanup of the file system, and it will do it very quickly. Once this type of formatting is completed, you no longer need to worry about your data - even paid data recovery programs will not be able to do this.
Flash Memory Toolkit 2.01 + key download
Flash Memory Toolkit 2.01 is a program that allows you to quickly and efficiently test flash drives, checking their performance and reliability of stored data. The software algorithm allows not only to analyze the state of the storage medium, identifying broken and unreliable clusters, but also to restore deleted information. The information product was developed by EFD Software in 2014, and today there are convenient Russified versions.
Possibilities
After installing the program, the user immediately pays attention to the convenient interface and menu, on the right side of which there are options. A convenient error detection system makes it much easier for a person to test his flash drive. The program can be installed on a laptop or personal computer running Windows XP, 7, 8, 8.1 and 10 operating systems.
The capabilities of the software are quite wide, which is due to the presence of the following features:
- obtaining general information about the carrier;
- the presence of a module for permanent data deletion, which ensures complete data confidentiality;
- low-level testing, which can be used to determine the actual reading speed from the drive;
- recovery of accidentally deleted information (up to 95%);
- built-in error detection system, which allows you to know in advance about the unreliability of records on an electronic storage medium.
The program weighs only 2.46 MB, and it can be installed even on old machines. During operation, it does not load the operating system, which continues to operate normally. It is best to download the program with a built-in translation (rus), however, for those who use the English version, the following information will be useful:
- Info — information about the drive as a whole.
- Scan Error - testing for potential read/write errors.
- Eraser – the ability to format a flash drive, including low-level (Full Erase).
- Recovery File - recovering data that has been deleted.
- Backup/Restore - data backups
In practical use, the program has managed to prove itself positively, which is why many people use it. It will be useful both for ordinary users who want to be confident in the health of their Flash and micro CD drives, and for PC administrators.
Advantages and disadvantages
Let's start with the advantages of Flash Memory Toolkit 2.01, the main ones of which are the following:
- Intuitive - clear controls that make it easier for the user to get acquainted with the software
- Presence in the full version of both English and Russified programs
- Accurate identification of broken clusters and volumes with errors
- Low-level test to determine the maximum speed of writing information to the media
- Multifunctionality: identifying errors, marking broken clusters, restoring accidentally deleted data, the ability to completely and irrevocably erase information.
The disadvantages include a limited number of launches in the demo version and the need to purchase a paid version. At the same time, in DEMO mode you can test all the features in order to understand how popular this program is.
Download
On our website you can quickly and conveniently download the full version of Flash Memory Toolkit, which will become an excellent assistant on your PC. This is a good and time-tested utility, with the help of which a person will be informed about the status of a flash drive or Memory Card.
| Operating system: | Windows |
| Language: | Russian |
| License: | activation key, RePack, full version |
Flash Memory Toolkit 2.01 + key download
Source: https://electronics-workbench.ru/flash-memory-toolkit
Recovery
One of the most advanced features of the utility is the ability to recover information. It doesn’t matter what caused the files to disappear, be it accidental deletion or viruses, Flash Memory Toolkit will handle this task 100%.
To begin with, the program will scan for lost files and offer to restore data by format. Having selected everything, or marked a separate extension, you need to click on the “Scan” button and wait for the process to complete. All information that can be brought back to life should be checked and clicked on “Recover”. The last step is to specify the path to save the resuscitated data.
Important! There is no need to select the same drive as the storage location from which the recovery was carried out. This will affect the positive result and many data will not work correctly.
A utility for testing the speed of a flash drive. Download the USB Flash Benchmark application.
Details
Each USB-connected storage device has its own limitations. Often on the packaging the manufacturer indicates the speed of its operation. But, unfortunately, the actual data exchange speed does not match the declared one. This information may simply be a publicity stunt or a reflection of testing in some specific way. The real speed of a storage device can be checked using special tester programs. Most often, the user wants to know the true speed of his flash drive or external HDD device (hard drive).
Using a special free program for testing the speed of a flash drive or hard drive, USB Flash Benchmark, you can measure the real speed of exchanging information packets through a USB port. USB Flash Benchmark - a tester program will scan your external device, sending blocks of information ranging in size from 1 KB to several tens of MB to it. Please note that some anti-virus programs may “swear” at programs, but only because there is intensive access to the memory of a flash drive or hard drive. In such cases, you can temporarily stop the Anti-Virus program.
USB Flash Benchmark is easy to use.
In order to measure the speed of a flash drive or other storage device, just download and run the application. The user needs to select the device name from the drop-down list, specify the size of the maximum block of information and start testing. In a special window of the program you can see the verification report. Also, the free USB Flash Benchmark program will show information about the storage device - S/N (serial number), VID and PID, as well as Vendor, Model and Product.
Also, an additional service of the program is the collection of statistics through the website. Users can submit testing data of their flash drives and thus identify the fastest storage devices.
Minimum requirements for the USB Flash Benchmark program to work: free space on the device under test must be at least 100 MB, testing must be carried out in a Windows OS environment with the .NET Framework version 2.0 and higher installed.
File size: ~50 KB.
| resources: | basicsource | secondsource | moresource |
*if you have any questions, please write to us about it.
Developer of USB Flash Benchmark.
- FotoSketcher is a program for creating paintings from photographs.
- Qliner hotkeys 2.0.1. A program for creating hot keys on the keyboard.
How to clean a flash drive from viruses
Checking the speed of your hard drive or SSD
1) Checking the flash drive using an alternative antivirus
To begin with, I recommend using some kind of antivirus that does not require installation (they are also called scanners, online scanners).
You just need to download such products to your PC and run a scan of the system (and any drives). They can work in parallel with your installed antivirus and will not interfere with it in any way.
What to choose:
Running a flash drive scan in Dr.Web CureIt:
2) Checking special utilities AVZ, Malwarebytes
No matter how good your standard antivirus is (if one is installed on the system), it cannot “see” and recognize some types of threats (for example, adware, AdWare, SpyWare, TrojanSpy, TrojanDownloader, etc. “good”, which is only recently began to be included in antiviruses).
To check your system and flash drive for this, you need to use a special one. utilities. I would recommend getting acquainted with these products first:
- - helps not only to find viruses and malware, but also to configure the Windows OS correctly, to eliminate “holes” that may be present in your system;
- is one of the most effective tools for combating adware and malware (moreover, it has recently begun to include the equally well-known AdwCleaner).
Scanning a flash drive in AVZ:
- First download, extract the AVZ files from the archive (it does not need installation) and run the program. In the main window, you can immediately select the system disk and flash drive to scan. I recommend immediately checking the box next to “Perform treatment” and start scanning.
- After scanning and cleaning the system is completed, I recommend running the “Troubleshoot Wizard” (this is to close possible “holes” in Windows).
- After which I recommend selecting “All problems” and running a scan. In my case, AVZ recommended prohibiting the auto-launch of programs from CD/DVD disks, from removable media (the same flash drives), etc. I recommend selecting everything that the utility finds and fixing the problems.
Scan in Malwarebytes:
- after installing and launching the utility, open the “Scan” tab and open the custom scan settings (see screenshot below);
- Next, specify the scan of memory objects, auto-start, archives, specify the letters of the drives to be scanned and start the scan (an example is presented below).
- then wait until the scan is completed and agree to neutralize threats (if any are found).
3) Radical method: formatting the drive
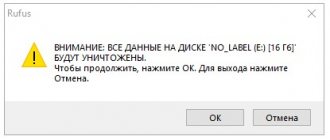
Another way to completely remove viruses from a flash drive (and with them all files from it! Be careful!) is to format the drive.
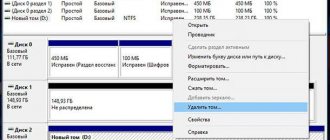
To start formatting, just open “My Computer” (“This Computer”), right-click on the flash drive and select “Format...” from the menu.
Formatting a flash drive
Next, specify the file system, set the volume label, and agree to the operation (you can find out more about formatting here).
Start formatting
4) Prevention: how to protect yourself from new infections
- install one of the modern antiviruses on the system, and update it regularly (you can find out about the best of them here: https://ocomp.info/antivirus-2019.html).
- configure your system so that auto-launch of applications from connected CD/DVD and USB drives is disabled (a little higher in the article I gave an example of how this is done in AVZ);
- If, as you work, you often have to connect your flash drive to other computers, then before opening any files from it on your system, check it for viruses;
- It would be a good idea to have those documents that you carry on a flash drive on your hard drive (such a copy can help if the flash drive is lost or a virus “irretrievably” corrupts the files on it).
Thank you for possible additions on the topic!
All the best!
RSS (how to read Rss)