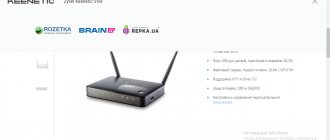
What is the Zyxel Keenetic Lite II model: case description, cost
Let's see what's on the front panel of the router: at the top for turning the network on and off and for connecting via WPS. There are also 8 output indicators.
There are 8 LEDs on the front to show the status of the router functions
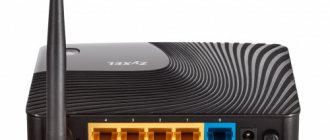
The rear panel is no different from other routers from the Zyxel Keenetic line: blue Internet output, 4 yellow ports for the home (local) network, a button for resetting user settings, and a power button. There are two antennas on the sides - they are not removable.
Yellow ports are needed to connect devices to the router’s local network
The model is no longer produced, as the two companies Zyxel and Keenetic now operate separately. The router can be purchased either from hand or in some individual stores where such models have not yet been sold out. The approximate price of the router is 1900 rubles if it is new.
Table: about some technical characteristics of the Lite 2 model
| CPU | MIPS(R) 24KEc 580 MHz MediaTek MT7620N with network hardware accelerator |
| Memory | DDR SDRAM 64 MB |
| Antennas | 2 external Wi-Fi antennas (3 dBi, non-removable) |
| Wireless standards | IEEE 802.11 b/g IEEE 802.11n (auto 20/40 MHz, 2x2 configuration, up to 300 Mbps*) |
| Frequency range | 2.4 GHz |
| Organization of up to four independent wireless networks on a Wi-Fi access point (Multiple SSID) | There is |
| Internet protocol support |
|
| SkyDNS Parental Controls | There is |
| Hardware support for IP television TVport | There is |
| SPI Firewall with DDoS Protection | There is |
Keenetic Lite 2 is an updated version of the previous generation Keenetic Lite, externally it differs from it in black color with a ribbed surface and the presence of 2 external Wi-Fi antennas (3 dBi).
There is a button on top of the case; it allows you to quickly and safely connect Wi-Fi 802.11g/n wireless devices that support the WPS standard, such as computers and laptops with the Microsoft Windows operating system, to the secure Wi-Fi network of the Internet center. Short press - Launches the quick connection function (WPS). Press for more than 3 seconds - Turns the wireless network on or off.
In addition to external changes, the hardware of Keenetic Lite 2 has also changed. While the previous versions had a MIPS architecture processor with a clock frequency of 320 MHz and 32 MB of RAM, the new one has a MIPS(R) 24KEc 580 MHz MediaTek MT7620N processor with a network hardware accelerator and DDR SDRAM memory. 64 MB. As you can see, the filling has seriously changed and prevents overload and overheating of the router.
At the back there are traditionally 5 ports (100 Mbit): 4 ports for local network + 1 port for the Internet.
On the front panel you can see 8 indicators.
Indicator - Status Off Zyxel Keenetic Lite 2 is turned off. Flashes rarely The router is loading. If the indicator blinks for more than two minutes, the Internet center may be faulty. Flashing rapidly Firmware update. is on - the center is turned on and functioning normally.
Indicators 0-4 Connection to network connectors Off The cable is not connected to the corresponding connector of the Internet center, or the network connection is not established. Lit or flashing The network connection has been established and information is being transferred.
Indicator - Wireless network Wi-Fi Off The Wi-Fi network is turned off. On The Wi-Fi network is on. Blinking, fast Data is being transmitted over the wireless network. Blinking, rarely A quick wireless connection setup session using WPS technology has been launched.
Indicator - Internet Off Zyxel Keenetic Lite 2 did not receive IP parameters from the provider to connect to the Internet or did not pass authorization. On The IP settings for connecting to the Internet have been set.
In order to set up the router, you need to connect it to your computer/laptop using an Ethernet cable and connect the Internet cable to the Internet port. Don't forget to connect power to the Zyxel Keenetic Lite 2 and press the power button on the case. In the computer/laptop settings, set to automatically receive network settings . After this, open any browser (IE, Chrome, Opera), the web interface of the router will open, if this does not happen, enter 192.168.1.1 or my.keenetik.net in the address bar, a web interface window will open offering a choice - go to the web interface or run quick setup . I suggest starting with a quick setup.
The first step will be setting up the Internet; the router supports various types of VPN connections (PPTP and L2TP), PPPoE, 802.1X, VLAN 802.1Q, IPv4/IPv6. In order to properly configure the Internet, I recommend contacting your provider. After the global network is configured, Zyxel Keenetic Lite 2 will offer to update its firmware, we agree and click “ Update ”.
After installing the updates and rebooting the router (this will take no more than 5 minutes), you will see a window stating that the Internet Center components are updated and you can proceed to the next step, click “ Next ”.
The next step is to suggest enabling the Yandex.DNS Internet Filter application; I recommend turning it on to make browsing the global network safer; if this function turns out to be unnecessary for you, you can always turn it off.
This completes the quick setup and you will be asked to go online or continue settings using the web interface.
Many may notice that in the quick setup there was nothing about Wi-Fi network settings, the whole point is that the router already has a secure Wi-Fi network configured, in order to find out the SSID and password, just turn the device over and on the sticker you You will see the name of the Wi-Fi network and its password. In my opinion, a reasonable solution, since many routers from other manufacturers have a default Wi-Fi network open to everyone, and this is not safe, and those who change the Wi-Fi network settings very often forget the password, in the same router everything can be seen on a sticker .
We return to the web interface, I suggest you look at the basic settings of Zyxel Keenetic Lite 2; for this, click the “ Web Configurator ” button.
The first thing you will be asked to do is enter a password to connect via the web interface; I recommend using a complex password consisting of at least 6 characters with numbers, large and small letters, and special ones. signs ( [email protected] #$), just don’t forget it later, otherwise you’ll have to press the Reset button and return the router settings to factory settings and then configure everything again.
After entering the password, you need to log in (enter your login and password), login - admin , the password is the one you just set.
After connecting to the web interface, you will see System Monitor, it shows information about the system, the status of the router, and network interfaces.
If you want to change the Wi-Fi network settings, you need to click the “ Wi-Fi network ” button and on the “ Access Point ” tab, make the necessary changes. For more stable and better operation of the Wi-Fi network, I recommend identifying a freer wireless channel and indicating it in the “Channel” line; for more details, see the article How to select/change a wireless channel on a router/router .
If you select the Guest Network , we can enable and configure another Wi-Fi network without access to the local network. Typically, the Guest Network is used in the office so that non-employees of the enterprise can connect to the Internet without access to the local network.
Video review of the Zyxel firmware update.
In order to manually update the firmware and components of the Zyxel Keenetic Lite 2, you need to go to the “ System ” tab, check the boxes which components need to be updated and click the “ Update ” button, after which the router will download, install the updates and reboot.
In order to set up IPTV, you need to click the “ Applications ” button and specify the settings for IPTV; these can be obtained from your digital television provider.
This is where I’ll probably finish the review and setup of Zyxel Keenetic Lite 2.
After configuring the router, you can begin setting up a local network on Windows XP or Windows 7 , making a network folder or setting up a network printer .
I really hope my article helped you! Please share the link with your friends:
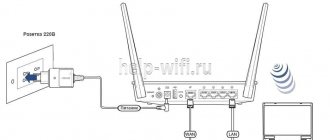
Connecting the router, preparing for setup
We need to connect the computer where the configuration is to be carried out and the router itself. Communication can be via Wi-Fi or cable. The last method is the most stable and therefore reliable. We will use it:
- We insert the plug of the Ethernet cable, which is included, into the first home port until it clicks.
- The second end remained free - we connect it to the “computer”. Find the same exit on the left or right if you have a laptop, or at the back if you work in a hospital.
- We insert the Internet provider cable, as you already guessed, into a separate blue output. We supply power to the router using the included adapter and click on Power on the back of the device. When the router boots up, it will, in principle, be ready for configuration.
Connect the router to the Internet provider via the blue connector
The only thing you can do is look at the settings of the network card before debugging the connection:
- Open the “Control Panel” window in Windows. This can be done through the “Start” itself or its context menu: right-click on “Start” and select a panel from the menu.
- We are looking for the “Network Control Center” link.
- Go to the section for changing adapter parameters.
- Call the context menu for the Ethernet connection. Select "Properties".
- In the new window, select IPv4 and go to the protocol properties.
- We set automatic receipt of IP and DNS and save immediately. After this, we proceed to setting up the router.
Turning on the router for the first time
Setting up the ZYXEL KEENETIC LITE 2 router for dummies begins with the user having to connect all the wires and the device itself in the correct sequence. To do this, the user must first connect the power supply to the mains. Next, you need to connect the Internet cable to the router. After which the user must connect the second cable included in the kit to the computer.
If everything is done correctly, a signal in the form of a round icon with a partially crossed out circle should light up on the case. It means that the device is powered from the mains.
The second signal in the form of a ball with a net should also light up.
This signal means that the user can begin setting up the router.
Video: Setting up the ZYXEL KEENETIC LITE 2 router
Hardware connection
There are many videos on the Internet “how to configure the ZYXEL KEENETIC LITE 2 router”. But you can do everything yourself and without outside help. Connecting the network kit occurs in several stages:
- checking the operation of the network card on the computer;
- connecting the router to an Internet cable and computer;
- setting up a local network and Internet connection.
Checking the functionality of the network card when connecting a router is as follows:
- go to “start” and select the “control panel” tab;
- select the “Network and Sharing Center” shortcut or the “Network and Internet” tab and “Network and Sharing Center”;
- open the option “change adapter settings”;
- right-click on the “Local Area Connection” shortcut;
- if the connection is not connected, then connect;
- in the connection properties, select the “Protocol…” line and click on the “properties” option;
- in the window that appears, check the automatic configuration of IP and DNS addresses;
- repeat the last operation with “Protocol...4”.
If the user has done everything correctly, a monitor icon with a yellow triangle and an exclamation mark will appear on the panel in the lower right corner of the desktop. This means that the computer and router are connected to the network and you can proceed to the next step of setting up the router to create an Internet connection.
Go to the settings panel
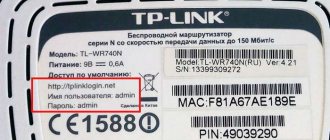
The panel opens using a browser - take any that is installed on your PC. Just write 192.168.1.1 in the address field. Click on Enter and enter the combinations in the lines: admin and 1234. These are the initial login data for any Zyxel Keenetic router.
Enter admin and password 1234
You will be taken to the Quick Setup Wizard. You can launch it immediately, or you can go to the panel itself with fine-tuning settings for the Lite II router. We choose the second option to look at the debugging process in more detail.
Changing the password to enter settings
If you want to set a new security key for your admin panel to prevent just anyone from entering the interface, go to the user section in the system section (gear icon). And then go to setting up access rights and enter the new key twice.
Change your web interface password immediately
If you change your password, you will be asked in a dialog box to re-login to the admin panel.
Connecting to the Internet manually
After the Lite II router is configured, start debugging the connection. Manual settings are more labor-intensive, however, all users will cope with the task without any problems.
- All routers, including Zyxel, have a special internal IP through which you can get to its settings. Enter “192.168.1.1” into the browser line, after which an extended menu should open. If it does not open, then the device and PC are not connected.
- Find the globe-shaped button at the bottom and click on it.
- Open the “PPPoE/VPN” tab and click the “Add connection” button.
- In this tab, all items should be checked “enable”, and also note that you want to use the device to access the Internet.
- Find the line “Connect via” and check the ISP option.
- There are two types of providers - some provide the server IP address, others provide automatic settings. If you have the first type, enter the numbers manually in the “Server Address” line. The same should be done with the rest of the access data.
Then click the "Apply" button and that's it.
Set up an Internet connection from your provider
Find an agreement with the provider and study it carefully - it should indicate which protocol the company works with. If the information is missing, call your provider immediately to find out the setup details - they will advise you.
L2TP, PPTP or PPPoE connection
The configuration of these three standards is, in principle, not much different from each other:
- We need a tab at the bottom with the designation of the planet. We go to the block indicating VPN (this is L2TP and PPTP) and PPPoE.
- Let's move on to creating the interface. We activate the connection and give the go-ahead to use it to access the Internet.
- In the protocol, we select one of three types. We write the login and password from the Internet provider. For VPN connections, additionally type the server address. It can be in the format of numbers or words. This is all stated in the document - an agreement between you and the provider.
- We leave the IP settings automatic, unless you have the “Static IP” option (it is purchased separately from the Internet package). We apply all the settings.
For PPPoE it is enough to specify the login and password from the contract
Dynamic or static IP
These protocols require switching to another tab - IPoE, but in the same "Internet" section (the block with the planet below). Let's start creating the interface:
- Check the WAN connector next to the “Use port” item. We activate the interface and check the next item to use this connection when accessing the Internet.
- If you have a dynamic address, leave the IP settings at automatic and save the settings. Debugging is now complete.
You need to set the IP settings to "Auto"
- If you have a static address, set the parameters to “Manual configuration” and enter the information from the contract in the fields below, including IP, DNS, gateway, etc. Save the settings.
Set a password for Wi-Fi
In addition to the new password for Lite II, we will set some more parameters:
- Click on the network icon in the list of icons below. Let’s go straight to the “Access Point”. Here we immediately turn on the network.
- We change the name of the point to a more original one (this is not at all necessary).
- We remove the check mark from the next item, otherwise you will not find your network in the list of available ones.
- In the protection we indicate the combined type WPA-PSK + WPA2-PSK. Immediately in the free line below we write the key - with numbers, small and large English letters. There are 8 characters in total - no less. You can take more.
Put protection on Wi-Fi so that attackers cannot easily enter your network
- It is advisable to set a mixed standard so that the router itself can decide which one to work with, depending on the circumstances.
- We set the channel automatically, and indicate the power depending on the area that needs to be covered by Wi-Fi, but usually it is set to 100%. Apply the settings.
Wireless network
Connecting Wi-Fi on this network device is one of the simplest tasks. Before going into the settings of the Zyxel Keenetic Lite 2 router, we recommend checking whether the Internet provider wire is included in the incoming LAN. The fact is that if the router is connected only to a PC, then the interface settings will open, however, the changes you make will not be correct, because There is simply no incoming signal.
- Select the “Wi-Fi” option and go to the “Access Point” functionality.
- In the “Name” column, enter the name of the wireless network that you want to see.
- Please note that your desired security protection is “WPA-PSK + WPA2-PSK”.
- In the “Key” column, enter a password that you think will reliably protect your wireless network.
- Click "Enable access" and click "Apply".
Setting up your home LAN and DHCP server
Debugging a local network is not necessary in all cases, but we will still tell you about it so that you know what to change and where:
- Expand the third block of parameters with the icon of two monitors. In the IP tab, you can set a different address for your Lite II router.
In the second section you can change the address of the router on your home network
- The next section contains settings for the DHCP server - this is an important component of the system that issues an IP address to each new device included in the Wi-Fi network. We will definitely turn it on.
- Using the first two lines, we set the number of IP addresses that can be issued to devices. Usually they take the maximum number of devices that can be present on the network at the same time.
The DHCP server must be enabled
- Here you can set specific DNS addresses that will be used by the router. Finally we apply all the settings.
How to block a user by their device's MAC address
Sometimes you need to deprive some user of your network of access to the Internet and to the local network in general. How to do it:
- Assign a permanent IP address to the device through the “Home Network” section in the “Devices” tab.
Click on the device in the list
- Click on the desired device and fill out the form to register the gadget, making sure to check the “Permanent IP” box. In the form you need to enter the MAC of the device (if it is not already there). You will find it on the back of the device (be it a phone or a laptop). The information should also be in the documentation for the device.
- Open the Wi-Fi block. From the Access List menu, select Blacklist. Check the box next to the gadget and save the changes. Now from this gadget the user will not be able to access the network using your Wi-Fi.
Check the device and click “Apply”
⇡#Options and appearance
The appearance of the Keenetic series has changed significantly and, in our opinion, not for the better. Now all cases are made mostly of black glossy plastic. It looks nice, but it collects dust and fingerprints instantly. About three quarters of the top cover is occupied by a deep ornament, the grooves of which will certainly be an excellent refuge for dust. On the lid, in its non-corrugated part, there is the manufacturer’s logo and a large, convenient button for launching WPS. When pressed for a long time, it turns Wi-Fi on or off.
The ends of the case are made of matte plastic. On the right side there are two USB 2.0 ports, and the front part is given over to not very bright green indicators. Nowadays, the absence of overly bright illumination can be considered a great blessing. Indicators indicate the presence of power, Internet connection and the status of active USB devices, and also display the activity of Wi-Fi and Ethernet ports. It is curious that the network ports are numbered from 0 to 4 and are essentially equal, since the router supports multiple connections to the Network and all this is quite flexibly configured. But we’ll talk about this a little later. Please note that the USB ports, as in the previous model, are not crowded on the rear side and are spaced so that connected devices are guaranteed not to interfere with each other.
On the other hand, they wouldn’t fit on the back wall. Along the edges there are RP-SMA connectors for connecting complete omnidirectional antennas with a gain of 5 dBi. Close to them are the power socket and the forced reset button. Next to the socket there is a power button, which is slightly difficult to get to if there is a cable in the adjacent port. To the left of the block of five slightly tight Ethernet ports is a mysterious FN button, which by default serves to safely disconnect all USB drives.
On the mirror-smooth bottom there is only a large information sticker, a pair of rubber feet and two ears for attaching the router to the wall, and only in one position - with the antennas and ports down. In general, the updated design is good and looks a little more neat, but the old one was not bad either. The main complaint is that the case is dirty, but if you are going to put the router in a quiet corner and only visit it occasionally, then this should not bother you. The router comes with an 18 W power supply, instructions, a warranty card, two removable antennas and a small patch cord.
For testing, we used a pair of ZyXEL NWD 2205 EE adapters. This model of Wi-Fi adapters with a USB 2.0 interface is quite suitable for us, as it supports the IEEE 802.11 b/g/n standard and provides a wireless connection at speeds of up to 300 Mbit/s. On the case there is a button to launch WPS, combined with a network activity indicator. The case is made of black glossy plastic, and its design is the same as that of the router. This module comes with detailed paper instructions, a warranty card, a silicone case and a disk with software, drivers and documentation.
Setting up IPTV
Debugging digital TV through a router will not take much of your time:
- Select the “Internet” tab.
- Next, select the “Connections” tab.
- Select the Broadband Connection line.
Open Broadband Connection
- Place a check mark next to the “Transfer VLAN ID tags” item under the home port to which you are going to connect the set-top box. Check the “Enable” and “Use to access the Internet” options.
- Specify the mode for automatic configuration of IP parameters. Apply the settings.
Set "Automatic" in IP settings
- We connect the set-top box to the router (use the port that you marked). Turn on the set-top box - synchronization should occur automatically.
Setting up Zyxel Keenetic Lite II in repeater mode
If you suddenly need to use the Lite II as a signal repeater to expand the Wi-Fi network at home, do the following:
- Go to the "System" section. In the “Mode” tab, select “Amplifier”. Apply the settings and wait for the router to switch to the new mode.
Change the router mode and click on “Apply”
- Now connect two devices: the main router and the Lite II. To do this, press the Wi-Fi button on the top of the repeater, and then the WPS button on the main device.
- Wait for the two devices to communicate with each other. As a result, Lite II will have a different IP address in the local area - it will be a derivative of the address of your main router.
Updating the operating system of the Zyxel Keenetic Lite II router
For your router to work without failures, you need it to have the latest firmware. Since the router is no longer produced, updates for its firmware also do not appear. However, you must ensure that the device is running the latest available firmware (v2.07).
Go to the first section on the panel below. In the “System” block, pay attention to the “Updates” item on the panel with information about the device. If there is a link to an update, click on it and confirm the upgrade. Wait until everything is downloaded and installed - do not touch the router at this moment.
Click on the "Available" link
Checking network card settings
It is best to immediately make sure that the network card settings are set correctly.
On Windows XP:
Go to “Start”, then find “Control Panel” and click on it. In the window that opens, click on the link “Switch to category view”; if there is no such inscription, then you have already switched. We look for the icon that says “Network connection” and double-click on it.
Then right-click on the “Local Area Connection” shortcut and select “Properties” from the drop-down menu. In the window that appears, select “Internet Protocols TCP/IP” from the list with check marks and click the “Properties” button. Then we check that the dots are opposite the words “Obtaining an IP address automatically” and “Obtaining a DNS server address automatically.”
On Windows 7, 8, 8.1:
In the lower right corner, you should have a "Network" icon. Right-click on the icon and select “Network and Sharing Center.”
A window will open in which we click on the link opposite the inscription “Connection:”, for me it is “Local Area Connection”
Then we carry out the same actions as shown in the figure below.