If you need to enable a mouse on a laptop keyboard, you should follow the path from light to heavy. Because by default, the touchpad (aka mouse) is activated literally with one button. But there are a lot of problems that complicate the activation process.
We have selected all possible ways to solve this problem, starting from new laptops, where everything should work perfectly, to faulty gadgets. So how can you enable a mouse on a laptop keyboard in your case?
How to turn on the mouse on a laptop keyboard
Special function
The reason that the touchpad does not turn on may also be a special function that is configured manually. The touchpad is automatically disabled when an external mouse is connected to the laptop. This option will have to be disabled manually if you are going to use both external peripherals and the built-in panel.
To do this, just five steps are enough:
Step 1. Find yourself in the “Control Panel”. How to do this without an external mouse is described above.
Click on the button with the Windows logo
Use arrows to move to the “Control Panel” line, press “Enter”
Step 2: Find the Hardware and Sound section.
In the “View” mode, check or set the “Category” value, find and open the “Hardware and Sound” section
Step 3. Select "Mouse".
Select "Mouse"
Step 4. In the properties there is a section “Pointer Parameters”, which is what you need.
In the “Pointer Options” tab, use the arrows to set up the ones that suit us
Step 5. Next, you should go to the appropriate tab, on different laptops it has a different name, “Enable” or “Disable” the option “Turn off the touchpad when an external mouse is connected”, confirming the decision with the “OK” button.
Go to the “Elan” tab, check the box “Disable when connecting an external USB mouse”, click “OK”
When a special function is not active, it is worth looking deeper for the reason. You can try setting up the mouse on the laptop keyboard via Bios.
Setting up the touchpad
In addition to the fact that this part can be turned on or off, the touchpad can be configured so that it is most convenient for you to use it at work or at leisure. Let's figure out how you can change its settings.
So, to change the touchpad operation parameters, you should follow these steps:
- Go through Start to Control Panel.
- Select Device Manager and Mouse section.
- Open the line with the name of the touchpad, select properties and in the window that appears, under the name of the equipment, click on parameters.
What settings might be useful for you? Please pay attention to the following parameters:
- You can enable or disable scrolling, activate the ChiralMotion function, which allows you to scroll through pages not only from top to bottom, but also in a circular motion - this is convenient if you are scrolling a long document or site.
- Modern laptop models support multi-touch, which allows you to work with the touchpad with not one, but several touches, which expands its functionality - you can also activate this tool here, in the device settings.
- One of the most important tools is sensitivity, which can be adjusted based on criteria such as random touches and finger typing. For example, if you constantly touch the touchpad when typing and it reacts, you should lower the scale in the Palm Touch Control parameter. If you want the touchpad to be less or more responsive to finger input, select Touch sensitivity.
BIOS
Any user can configure laptop settings via Bios, but if you don’t understand anything about this, it’s better to entrust the work to an experienced user. Setting up is easy and takes place in several steps:
Step 1 : Reboot the laptop. During startup, you need to have time to press the “F2” or “Delete” keys to get into the BIOS.
When the system boots, you can see a key to enter the BIOS
Step 2. In the “Internal Pointing Device” parameter in the “Advanced” tab, make sure that the value is “Enabled”. If not, install it yourself.
Go to the “Advanced” tab, in the “Internal Pointing Device” parameter, check the value so that it is “Enabled” or set it yourself
Step 3. Press the key combination “F10+Y” to save the setting.
Press the key combination “F10+Y” to save the setting
Important! There is a problem at this point. It lies in the fact that the BIOS can be of different versions, they all have different partition names.
The above are classic, but not available on every laptop. To find out exactly what parameters you need, you should go to the manufacturer’s website and carefully read the important operating instructions directly for your device model.
The computer does not respond to the mouse: possible problems
As for problems with manipulators specifically, when PS/2 standard devices are used, connected to stationary computer units through special connectors on the motherboard, damage to the connectors themselves cannot be ruled out. Quite often you can encounter problems associated with the effects of viruses or driver crashes.
At least, on all sorts of Internet forums, messages are often published that when the operating system starts, the computer does not respond to the mouse, but after putting it into a sleep state from the keyboard and then exiting it, everything falls into place and the manipulator works like nothing happened. Apparently the problem is with the drivers.
Finally, it is rare, but it is possible to encounter situations where the cause of a mouse failure is software installed by the user, although it is not known for certain why such a conflict occurs. But the fact remains a fact. If the computer does not respond to a mouse button or wheel action, there is either a mechanical fault or an incorrect setting in the operating system. As is already clear, you should check both the mouse and the settings for buttons or scrolling.
Drivers
One of the extreme but obvious measures to enable the touchpad on a laptop is to install drivers. In any case, software is needed for the correct operation of all devices. Usually it is installed when purchasing a gadget, but sometimes you have to install it yourself. You can find the official driver on the manufacturer's portal.
Incorrect operation of the touchpad may be caused by incorrect drivers.
Important! Before downloading the software, pay attention to the laptop model, as well as the category and version of Windows OS.
A driver can be compatible with a device even if one of the three parameters matches, but it is better that all of them match. Then in the future there will be no problems with the operation of the sensor.
In some cases, the driver is downloaded to the laptop as a file with an atypical *.exe extension. It is then installed as a regular program through the Installation Wizard. This is also done as follows:
Step 1: Launch Control Panel.
Use arrows to move to the “Control Panel” line, press “Enter”
Step 2: Enter Device Manager.
In the “View” mode, set the value to “Large icons”, find and open “Device Manager”
Step 3. Expand the “Mice and other pointing devices” (or simply “Mouse”) branch using the arrows and pressing the “Enter” key.
Go to the line “Mice and other pointing devices” using the arrows on the keyboard, press “Enter”
Step 4. Call the “Properties” of the device by pressing the “Enter” key on the line with the name, and see if it works correctly.
Go to the line with the device name, press “Enter”
Check the device status in the appropriate section
Step 5: Go to the tab called Driver.
Go to the “Driver” tab
Step 6: Try clicking the Roll Back Driver button. If this is not available in your OS version, or this does not help, click the “Update” button.
Click on the “Roll Back” button
Go to the “Update” option, press “Enter”
Step 7. When the necessary software is already on the laptop, all that remains is to select “Manual setup”.
Selecting the manual configuration option
Step 8. Indicate where the downloaded driver is located on the laptop by opening the “Browse” option and calmly wait for the installation to complete.
Open the “Browse” option
Find the folder with drivers, select it, click “OK”
Click “Next” and wait for the installation process to complete
Then it is important to restart the laptop and check the sensor again. If even after such manipulations it does not work, the cause is most likely a physical problem.
How to connect a wired mouse to a laptop
To do this, there is a USB connector in the laptop, to which the mouse is connected, just like a flash drive, phone data cable, etc.
REFERENCE! Some users use older models with a PS/2 connector, for which you must additionally purchase a USB adapter with the appropriate input.
A few seconds after connection, driver installation starts automatically. As a rule, it does not last long, so you just have to wait for it to end. Most often, this installation occurs only once, during the first connection; in the future it will not be required, since all the necessary components are already downloaded.
ATTENTION! If the laser LED on the mouse is working and the cursor is not moving, restarting the laptop may help. If this does not work, try connecting the device to a different USB port.
Mouse emulation mode settings on Windows 10
If you have Windows 10 on your laptop, the names of sections and tabs change slightly. To find a special function, driver or other touchpad settings, you need to do the following:
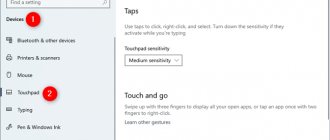
Step 1 : Open Settings. Open the Start menu and left-click on the gear icon.
Open the Start menu and left-click on the gear icon
Step 2. Select the “Devices” section.
Select the “Devices” section
Step 3. Click the “Touchpad” section.
Go to and click on the “Touchpad” section
Step 4. Click “Related parameters”.
In the right part of the window, go to the “Related parameters” section, open it
Step 5. Click the “Hardware” tab, then “Properties” of the selected mouse.
Click on the “Hardware” tab, then “Properties” of the selected mouse
Here you can change parameters, check how the device works, and update drivers. All this is done in the corresponding tabs of the same name.
Why doesn't my computer respond to my mouse and keyboard?
Speaking about the reasons, it’s probably worth starting with the worst. For now, let’s leave aside the problems associated with any one of the devices, and let’s focus on cases when the computer does not respond to both the mouse and the keyboard. Most often, this problem can occur on laptops. Most technicians claim that this is due to a failure or malfunction of the south bridge. It is in this case that all equipment can work, just except the manipulator and keyboard. However, this is, so to speak, a special case.
As for other, no less common situations, most often the problem is associated with equipment failure, although even completely trivial cases can be encountered. So, for example, if the computer stops responding to a USB mouse, this does not mean that the mouse is out of order.
It may very well be that the power button on the device itself is disabled or the batteries have become unusable.
Physical defects
The main damages that usually cause the touchpad on a laptop to not function include:
- There is a problem with the cable that connects the motherboard to the touchpad.
- Damage to the sensor, due to which it is unable to work normally. Even if it’s insignificant at first glance.
- Problems with the south bridge. This is the name of the microcircuit responsible for the operation of the peripherals. The problem is easy to detect - if the south bridge is damaged, the USB ports also become inoperable.
If the system methods do not help turn on the touchpad, check it for physical damage
To deal with physical problems, you can disassemble the laptop yourself, but only if you have the necessary skills for this. Otherwise, it is better to give the laptop to specialists who will repair it without harm. In extreme cases, only professional gadget repair can help.
What can't you do?
- If you recently purchased a mouse that is under warranty and it stops working, do not try to repair it yourself - this may void your warranty.
- You can damage the device if you try to repair it yourself without the necessary skills. Therefore, I recommend contacting specialists with such problems.
*****
Finally, I will say that in most cases it is quite easy to solve the problem yourself; to do this, you just need to find the cause of the problem, which most often lies in the “software”. If you have any questions, please contact us.
How to identify a malfunction?
If the mouse cursor does not move after connecting it, you can try turning the mouse off and on again. You can also try changing the USB port on your laptop into which the receiver (dongle) is inserted.
If this does not help, you need to refer to the “Problems” section of the manual supplied with the mouse to solve any problems that may arise.
If the mouse connects directly to your laptop, you can also try reinstalling the Bluetooth driver on it.
- Go to "Device Manager".
On a note! The correct connection of the RF mouse may also be interfered with by installed antivirus software, which can be disabled while it is running.
How to enable or disable the touchpad on a laptop with Windows 10 8 7 XP
A touchpad is a device that replaces the functions of a traditional mouse on a laptop. The touchpad is controlled by touching your finger in a specially designated area; the functions of the buttons can be duplicated by touch and/or provided with separate buttons located below the touch area. In this article, we will look at all sorts of ways to enable the touchpad on Windows 10 and other versions. The need for this may arise in the event of an accidental shutdown, software failure, or for other reasons.
Enabling the touchpad using function keys
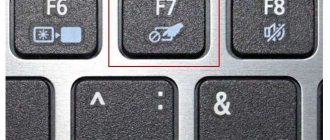
Almost every laptop has a function key Fn, which is responsible for quick access to control additional functions of the laptop. It is usually located between the left Ctrl button and the Windows logo key, and is often painted a different color from the main keyboard keys. The touchpad on Windows 10 and other versions is controlled using function keys, provided that the drivers for it are installed correctly.
In order to enable a function, you need to simultaneously press the Fn key and the key with the required function. In our case, the touchpad power key is usually located in the row of F keys and is symbolized by an image of a touchpad and sometimes a hand touching it. Depending on the laptop manufacturer, the image may differ, but is almost always completely understandable to the user. On a Lenovo laptop, the key looks like in the picture and has a basic value of F6.
After pressing Fn and F6, the state changes (on/off).
Enabling or disabling the touchpad using the BIOS
BIOS is software that contains all the information about the computer hardware and control of some of its settings. In order to make sure that the touchpad is enabled in the initial settings of the laptop, you need to go into the BIOS. When you turn on the laptop, a hint appears for a moment on how to enter the BIOS; these can be the F1, F2 and Del keys.
After entering the BIOS, do not change any settings that you do not know about. Rash actions with this tool can disrupt the operation of the laptop.
In the BIOS menu you need to find the “ Internal Pointing Devices ” item, its value should be set to “ Enabled ”. If set to " Disabled ", it means it is disabled. After this, you may need to repeat the activation procedure using the function keys.
Installing drivers on Windows
The most common reason for a touchpad not responding is incorrect or missing software. In order for it to turn on, drivers corresponding to it and the operating system are required. You can find a driver for your device on the official website of the laptop manufacturer, after which you need to select the operating system and install it.
Installing and updating the driver using Windows
If for some reason you cannot find a driver on the laptop manufacturer’s website, then you should use the built-in driver update system in Windows. To do this, you will need to open the device manager. The easiest way to open Device Manager in Windows is to press the Win + R key combination and enter the command devmgmt.msc In the window that opens, after clicking OK, the Device Manager will open.
In the “ Mice and other pointing devices ” tab there will be a list of all mice and other pointing devices. Even if your TouchPad is not indicated, but “ PS/2 - compatible mouse ” is indicated, then its driver should be updated. To do this, select the corresponding object and press the context menu key on the keyboard (looks like a list or cursor with a list). Select " Update Drivers... " and press Enter.
In most cases, it is the driver from the manufacturer’s website that solves the problem with a non-working device.
After updating drivers or installing drivers from the manufacturer's website on a Lenovo laptop, the touchpad appears differently in Device Manager, which means the driver has been reinstalled.
How to set up your touchpad
A properly configured touchpad can make working with a laptop much easier. In order to get into the settings, you need to go to the “ Control Panel ”, select the display of the “ Small icons ” elements and select the “ Mouse ” item. This window will contain all the basic settings for pointing devices and additional settings in the case of installed software from the manufacturer. Here you can turn the touchpad on and off.
Synaptycs allows you to perform many actions with the device through its software, which opens from the Windows tray:
- turn on and off;
- adjust the intensity of the pointer movement;
- configure scrolling options and other settings.
Without installed software from the manufacturer, the device works properly in most cases, but additional functions are not available.
Setting up touchpads from other manufacturers is similar.
How to disable the touchpad on a laptop
In addition to problems with turning on, often the switched-on touchpad interferes with the user's work due to involuntary touches with his hand. The methods for turning off are the same as for turning on.
Exceptions and nuances
On some laptops, turning the touchpad on and off is done using a specially made indentation (button) in the corner of the touch area or a separate button that does not require pressing Fn.
If none of the software methods work and the device remains turned off, it may be faulty. Remember if you spilled even a small amount of liquid on your laptop or if it was recently completely disassembled to clean it from dust; perhaps the cable was simply not connected during assembly.
If the touchpad does not work after updating Windows 10, then first of all you should update the drivers by downloading them from the manufacturer’s website. In some cases, the touchpad should be removed from Device Manager and the computer restarted. In this case, the installed driver will be reinstalled automatically.
In the settings of some touchpads, when you connect an additional pointing device, it is automatically disabled. These settings should also be found in the manufacturer's software.
Conclusion
If you have any problems turning the touchpad on/off, follow these steps:
- Check and update drivers. Do not forget that for the function keys to work correctly, drivers are required not only for the touchpad, but also for the keyboard.
- Check statuses in BIOS.
- If the laptop has recently been disassembled, then you should contact the person who assembled it.
- If it is impossible to turn on, contact the service center.
In most cases, problems can be resolved by simply reinstalling the drivers.
Video on the topic
Enable TouchPad via hotkeys
All laptops are equipped with fast functions for turning on Wi-Fi, changing brightness, volume, including turning on the TouchPad. They are located on the keys F1 to F12. Work in combination with the Fn button. On the keyboard, the touchpad enable function is shown in the video as an icon with a crossed out touchpad and a hand next to it.
Each laptop manufacturer sets different default numbers. In the table below, we show several examples of using hotkey combinations on different brands of laptops.
| Laptop brand | Hotkey combination |
| ASUS | Fn+F9 |
| Acer | Fn+F7 |
| Samsung | Fn+F5 |
| Dell | Fn+F5 |
| Lenovo | Fn+F8 and Fn+F5 |
| Toshiba | Fn+F5 |
| Sony | Fn+F1 |