A headset can be an important communication tool, especially when working from home, where you may have to block out ambient noise just to get work done. Headsets are also especially popular among gamers, who want headphones to clearly convey the atmosphere created by game developers and a microphone to effectively communicate with teammates.
Fortunately, Microsoft has always paid a lot of attention to the connection and operation of headsets on Windows.
What types of connectors are there?
Connecting headphones to a computer is not a difficult matter, but sometimes difficulties arise directly when setting up the equipment. Almost all PC models have a sound card. It can be built into the motherboard, or you need to connect to it through a special connector. In any case, the gadget can be connected either to the back panel of the computer or to the front (if there are appropriate sockets).
By looking at the figure below, you can understand how to connect headphones with a microphone to your computer.
The headset output is always green, and the microphone input is pink . Since the plugs of gadgets are also painted in corresponding colors, it is very difficult to make a mistake and insert them into other connectors. You need to insert the green plug into the green socket, and the pink plug into the pink socket. The pink jack can be used to connect both a headphone microphone and a third-party microphone to the computer. After which the connected equipment is configured using special software (in Windows 10, as well as versions 8 and 7, the configuration should take place automatically).
On a laptop, gadgets are connected in the same way. The manufacturer can place the connectors on the front panel of the device or on the left.
Sometimes laptop headset jacks are made tighter to increase their lifespan. Therefore, do not be afraid that the plug does not fit into the socket well.
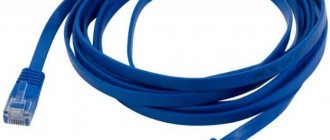
It should be noted that the plugs of headsets intended for computers are color-coded if there is a microphone on the headphones. The plugs of the rest of the headset do not have any color differences. There is a headset, for example, for a telephone, that has not 2 plugs, but one, which combines contacts for the microphone and audio channels. It clearly shows 3 stripes separating the contacts. Two contacts are used to connect audio channels, and one is for a microphone.
New laptop models have a combo jack to which you can connect headphones with a microphone that have one plug.
A special marking is placed near such a connector. If there is no such jack, but there are 2 standard ones, then such a headset can be connected through a special adapter.
Thus, it becomes clear how to connect headphones from your phone to your computer. Headphones on the front panel are connected according to the same principle: if there is a microphone on the headphones, then it is connected to the pink jack, and audio channels to the green one.
The problem can be solved if the headphones do not connect to the computer
What to do when headphones refuse to work on a “large” device. First of all, you need to figure out the reason and first check the device on another device. If everything is normal, we move on to the list of problems that can be solved in a matter of minutes.
There is no connection of the connector to the system unit
It happens that the front panel is not used in Device Manager, so it needs to be configured. Open RealtekHD, your software may be different. In the “Settings” window that appears.
Setting up headphones on a computer with Windows 7 - step-by-step instructions
On each OS, the method of setting up headphones may vary, so we will consider the installation for Windows 7 separately.
| Illustration | Description of action |
| Go to the tray, right-click on the speaker icon and go to “Playback devices”. Such a window opens in front of you. For playback to work properly, the speakers must be marked with a green checkmark, as in the photo. | |
| If it is missing, right-click and select “Show disabled devices.” | |
| On the selected utility, right-click again and turn on the device. | |
| Go to the speaker properties and check the volume, install the desired beacon in the desired location. |
USEFUL TO KNOW!
When working with sound card software, headphones must be connected to the correct jack. If they are not in the slot, the setting will not be performed correctly.
Checking the driver and setting up headphones on a computer running Windows 10
Most users are already switching to Windows 10, arguing that their action is improved by the system and the availability of extensive additional features. But they are faced with the problem of playing sound through headphones; the editors of Tehno.guru undertake to explain why this happens:
Despite recommendations to update drivers using Windows 10, you should only do this from official sources
- The first thing we do is check the manufacturer of the sound card (most of us have Realtek, if not, find yours).
- Then we go to the official website, it usually appears on the first page of the search results.
- Select the HDAC (High Definition Audio Codecs) tab. We launch the installation and carry out all the steps using prompts, removing the old software.
- Be sure to reboot the PC.
After this, the problem should be resolved, and in the “Device Manager” you will see everything connected to your PC without “attention signs” (yellow triangles). Next we move on to setting up the headphones.
| Illustration | Description of action |
| Go to “Playback devices” and see a window with connected devices. The launch can be done through the speaker icon in the lower right corner. | |
| Click properties twice to get to the drivers. | |
| Click the “Update” button. If it is not there, then the latest version of the utility is installed. |
Connecting the headset to a PC
Now you know how to connect headphones to your computer. But this action is not enough for the gadget to work properly, although most often it starts working right away and you don’t need to configure anything. But there are times when the connected gadgets do not work, so some actions need to be taken.
- Before you adjust the sound in your headphones, you need to test them for functionality in another device, for example, by connecting them to the headphone jack on your smartphone or tablet.
- If the headset is functioning, this means that the PC does not have the necessary drivers. To detect their presence on your computer, play any audio or video file. If sound appears in the speakers, this means that everything is in order with the drivers, and you just need to make small changes to their settings.
- If there are still no drivers, then you need to go to the PC control panel and click on the “Device Manager” item.
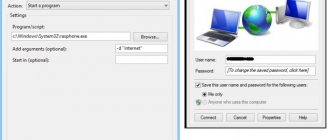
- After that, find the line “Sound video and gaming devices”. If there is an exclamation mark next to it, you will have to update the drivers. Before installing the driver, you must have a disk with the necessary programs prepared. After the software is installed, sound should appear. If there is no disk, select the option to search for software on the Internet, and then install the found one.
- It is also recommended to check the set volume level by clicking on the speaker, which is located in the lower right corner.
- You can also check the volume level through the “Control Panel” tab (in the tenth version of the operating system (Windows 10), all windows look similar). To do this, go into it, find the “Sound” item and click on the “Volume Settings” line.
- You can check if sound playback on your computer is working by looking at the volume controls. If after switching on the file is not played, then there will be no indication (pulsation) on the controller.
How to turn on the microphone on your phone through headphones?
Quite often the microphone in the headphones fails. There can be two reasons for this problem:
- Failure of the microphone itself or damage to the connector (headphone input hole). The check is carried out easily, using another device.
- It is possible that the headset settings on the device are set to “0”. To fix this problem, you need to go to the engineering menu, using the recommendations outlined above.
In both cases, we recommend passing these problems into the hands of repair specialists. You should not try to fix the problem yourself without the necessary experience.
In the engineering menu, you need to go to the Hardware section, where you click on the Earphones and Mic subsection (or something similar). After this, you should adjust the sensitivity of the microphone in the headphones in the Speech Enhancement sub-item (until a normal sound level occurs).
We recommend: Where is the recycle bin on Android: instructions for use and setup
Connecting a headset on Windows 7
Before setting up headphones on a Windows 7 computer, you need to connect them on the back or front panel of the device to the appropriate connectors (you already know how to connect correctly). Then you need to start playing the music file. If there is sound in the headset, then the connection can be considered complete. If there is no sound, do the following using headphones on your computer (this instruction is also suitable for setting up the gadget on a laptop).
- Hover your mouse over the speaker image at the bottom of the screen (right) and right-click.
- Next, you should select the line “Playback devices” in the tab that appears.
- In the next window you will see a list of devices installed on your computer. There can be from one to several of them in the list (depending on what type of device will be used for playback). You should make sure that there is a green checkmark next to the “Headphones” item.
- If the checkbox is not checked, you need to select this device: right-click and click “Set as default” in the pop-up window.
- In the next step, select “Speakers” and click on the “Configure” button located at the bottom of the window (left).
- Afterwards, select the “stereo” audio channels and click on “Check”. The test will begin and you should be able to hear audio from the channels displayed on the screen. If everything is fine, click “Next”.
- In the speaker settings, you need to check the box next to the line “Left and right front”, then click on “Next” and “Finish”.
- In the “Sound” window, opposite the “Speakers” item, there is an equalizer scale. When an audio file is playing, the bar should fill in green. If this does not happen, then you need to look for another reason.
- There may be no sound when the scale display is on and the volume level is set to zero.
- But, if the volume level is set correctly, and there is an indication indicating that music is playing, but you couldn’t turn on the headphones, then either the headset is faulty, or you connected it to the wrong jack.
The above settings can also be applied to the Windows 10 operating system (Windows 10), if you do not know how to enable the gadget directly in it.
Step-by-step setup of sound in headphones using software on a PC
To set up sound that does not irritate your ears, you can use the tools available in every Windows OS. Let's look at them in more detail:
Please note that there should be no marks about unknown drivers and devices in the Manager
- First, wait for the driver to respond, and only then, if the sound does not appear, you can try to look for the problem in the “Control Panel” (“Hardware and Sound”). Find your device and check the functionality of the driver in “Properties”.
- In the lower right corner there is a button with a speaker. See if there is a prohibiting sign on it (which characterizes the “Silent” mode). If it is installed, raise the scale up to the desired limit and check the sound.
- If the sound is played only in one earphone (left or right), then you need to check the device on another computer or laptop. If the situation is similar, then the headset itself is faulty.
- You can also try to clean the contacts of your listening device and connector using a cotton swab soaked in alcohol. It is enough to moisten it a little, and not to pour it in so that it drips.
- You can also reinstall the drivers for your PC's sound card. It is advisable to download them from the official resource so that they do not fail at an unforeseen moment.
HELPFUL INFORMATION!
The sound quality may depend both on the performance of the corresponding connector and sound card, and on the problem in the headphones themselves. Therefore, before removing normally functioning drivers, find the exact reason.
Microphone settings
Before you can use the microphone in Windows 7 or 8, as well as in Windows 10, you need to configure it.
- After connecting the microphone to the appropriate jack on your PC, right-click on the speaker icon and select “Recording Devices”.
- Set the microphone to your default device.
- In the next menu, check the microphone is working, for example, making any sounds. If it works, the jackal will react by pulsing.
- If there is no pulsation, or it is weak, right-click on “Microphone”, and then select “Properties”.
- In the window that opens, select the “Levels” tab and set the value to “80” on the regulator, then test the device again.
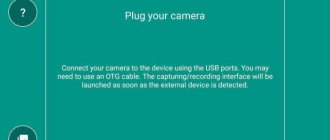
There are also headphones with a microphone that can be connected to a computer via a USB connector. In most cases, after connecting them, the configuration occurs automatically.
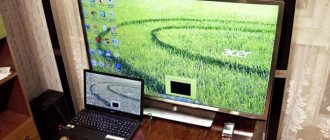
Connecting Bluetooth headphones to a laptop using the built-in module
For laptops that are equipped with a Bluetooth module, a wireless headset is suitable. To connect it and “make” it work, you need to make a number of settings:
Bluetooth headsets are characterized by the absence of wires. They don't connect any other way.
- Go to “Device Manager”. To do this, right-click on the “My Computer” shortcut on the desktop, find “Properties” and go there.
- Open the “Device Manager” tab (list on the left side), look at the performance of the Bluetooth drivers. If there is no exclamation mark on them, then we proceed to connecting the headphones (if there is, then update the necessary utilities).
- Find the power button on the headphones. It is usually marked accordingly; hold it until the indicator appears on the headset.
- In the lower right corner of the “Desktop” of the laptop, find the Bluetooth icon, right-click and select the “Add device” tab.
- Next, indicate the device you need and turn it on according to the prompts on the monitor.
bluetooth headphones
NOTE!
The next generation operating system may request a code for wireless equipment. Therefore, enter 0000. This is a standard indicator for this type of equipment.
How to connect wireless headphones to PC
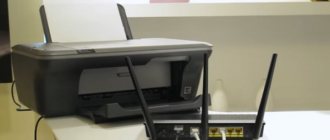
Having decided to connect a Bluetooth headset to a desktop computer, the first question that arises is whether the latter has a built-in module. Unlike a laptop, it is available in rare, expensive system units. If there is no module, you will have to purchase it separately.
When choosing a headset for your PC, you should pay attention to its parameters. The presence of Bluetooth does not guarantee that they will be able to work together. There are certain profiles and codecs for Bluetooth technology designed for different work. Some allow you to make only calls, others listen to music, and others are designed for file sharing. The good news is that modern models support all profiles, so it’s quite difficult to face the fact that the headset will not be able to play music from a PC.
Connecting headphones
To synchronize a PC running Windows 7 or 10 (there are no significant differences for different OSes) with a Bluetooth headset, you must do the following.
- Make sure your PC has Bluetooth. To do this, you can look in the tray; there should be a corresponding icon next to the clock. In the control panel, in the “devices” section, see if this type of connection exists. You can also open a command prompt (WIN+R) and enter “msc”. The wireless module must be listed in the list.
- If built-in Bluetooth is not provided, then an external adapter is purchased. It connects via USB and requires a driver to be installed to work - it is best to download it from the website of the company that produced it. The current version of the software will protect you from possible problems.
- You need to turn on search mode on your headset. You can find out how to do this in the instructions, but usually this is done by long pressing the power button. Accompanied by rapid blinking of the LED.
- Now on the PC we enter the Bluetooth settings. Click on the tray icon, go to “devices” - “Bluetooth” and click on “+”. The headset will appear in the list. By selecting it, a window will open where you can enter a code; as a rule, it is “1234” or “0000”, but the option may be different - in this case it is specified in the instructions. In some cases, the code may not be required.
The microphone on the phone does not work: causes and solutions
Failures can be different - hardware or software.
Water or dirt may get inside the device and cause damage. The user may try to remove them from the device and unintentionally break the gadget. The microphone may stop working due to mechanical impact caused by a fall.
But the program often crashes. The owner of the device can fix this problem himself by rolling back the system to factory settings. The device can also be “reflashed”.
Hardware failures are difficult to fix on your own. Often it is necessary to contact a specialized service center or repair shop. The problem may be a loose contact or its oxidation.
If a sound problem occurs when using a voice recorder, playing a recording using a player or any program (Skype, Viber, Telegram, WhatsApp), then the reason should be looked for in the settings of the application itself. A simple reinstallation of this software often helps.
And now in more detail about the possible reasons for microphone failure in Android devices.
Software glitch
Software problems are a common cause of microphone problems. To eliminate a common software failure, you must first reboot the device. Often this is enough. The device must be turned off and the battery removed for at least 10 seconds. After this, insert the battery, turn on the gadget and make a test call.
If the problem is not solved, then you need to connect the device to the computer using a USB cable. Check the availability of the latest version of the software and the necessary driver (its activity and performance).
If it is not possible to synchronize the device with a PC, you need to use the services of a service center.
Before doing this, you should connect a Bluetooth headset and make a test call. If it is possible to talk, then this is not a software error.
Dust and dirt
A smartphone that has been in use for a long time eventually becomes clogged. Particles of dust, debris, etc. penetrate into cracks and holes. This rarely results in complete failure of the sound. However, such a malfunction will definitely lead to distortion of voice transmission (sometimes the defects are very significant).
We recommend: How to delete a desktop on Android
To eliminate such defects, it is enough to clean the device. This can be easily done at home using a needle, toothpick, or cotton swab. But we should not forget that careless use of these cleaning tools can lead to more serious damage.
Poor contact
If the previous two methods did not help, then there is a possibility that there is no contact or the part itself has deteriorated. The first step is to find (or purchase) a working microphone. You should not begin such repairs yourself without experience in handling a soldering iron and rosin.
Poor contact, poor-quality soldering or contact failure due to mechanical stress is a common reason for the microphone not to work.
Instructions for replacing it:
- Remove the back cover of the device.
- Remove the battery, flash drive, SIM cards.
- Unscrew the screws and remove part of the case to gain access to the board.
- Unsolder the damaged microphone (it looks like a tablet on a thin cable located in a special chamber-recess in the body).
- Solder a new part.
- Reassemble the gadget in reverse order.
Moisture ingress
The result of moisture getting inside the device may be the complete disappearance of voice transmission during a call. Most often this occurs as a result of oxidation of contacts. To eliminate this problem, it is enough to clean the oxidized contacts.
If moisture gets directly into the microphone, only complete replacement of the part will help.
Actions to clean and replace elements should be carried out according to the algorithm outlined in the previous paragraph.