Compact OS compression in Windows 10
Windows 10 has several improvements to save hard drive space. One of them is the ability to compress system files, including pre-installed applications, using the Compact OS feature. By using Compact OS, you can compress Windows 10 (system and application binaries), thereby freeing up just over 2 GB of system disk space for 64-bit systems and 1.5 GB for 32-bit versions. The function works for computers with UEFI and regular BIOS.
Best Windows 10 Pro x64 x86 2020 Compact v2004 Full
Top build from Flibustier Windows 10 Compact 2020 with updates for May in Russian, integrated automatic activation in two versions of Windows 10 Pro 64 bit and 32 bit, the image is compact and fits on a 4 GB flash drive. Minimum computer requirements
2 GB of RAM for a 64-bit system and 1 GB for a 32-bit system. Monitor with a resolution of 800×600. The graphics adapter must support DirectX version 9 and the WDDM 1.0 driver. From 20 GB of unallocated space for Windows 10 Compact x64 rus and from 16 GB for x86. Processor with a frequency of 1 GHz or more SoC.
Screenshots:
System and installation features
The Windows 10 Compact 2004 Rus iso boot loader has been modified, so installation and configuration occur with virtually no user intervention. By default, the language is selected, the key is entered, and the license agreement is accepted. The user only needs to select the system partition and format it, since an exceptionally clean installation is possible. You will also need to enter your own username and password.
By default the following settings will be applied:
· Remote print manager. · Firewall SmartScreen. · Submitting bug reports. · User folders have been removed from the This Computer directory. · Program Compatibility Assistant.
There is one more nuance - when installing Windows 10 Compact by Flibustier 2020, flblauncher is launched, with which the user can choose which settings and tweaks from the author to use and which to ignore - disable or enable Defender and Firewall, telemetry components, change the interface. There are many more options and tweaks available that will allow you to start using the best Windows 10 Compact x64_x86 2004 without manual configuration after the first launch.
Recommendations for setting up Windows 10 Compact on an SSD
When installing Windows 10 Pro 2020 on solid-state drives, you need to make some settings to ensure maximum performance. Although many users think that the system automatically applies optimal settings by detecting the drive as an SSD, there is an opportunity to improve performance even further.
Automatic settings:
· Enabling TRIM – a function that clears memory cells in order to prevent the creation of temporary files. That is, there are no unnecessary actions - creating a copy of the cluster in the cache and clearing it. Only data is written to the cell. · Uses SuperFetch - a service to speed up the launch of the most frequently used applications. The determination comes from an analysis of the most frequent use. · ReadyBoost technology is disabled, which provides increased performance by using removable devices as cache storage. · The drive's power supply is automatically adjusted to optimal parameters. · Disables automatic defragmentation.
But not everything is so simple. It should be noted that SuperFetch in Windows 10 Compact x64_x86 rus iso significantly reduces the service life of the SSD drive. In addition, this function is harmful for gamers, since when running a game that requires more than 4 GB of RAM, the service periodically accesses the RAM. If the computer has less than 16 Gb of RAM, it causes freezing. It should also be added that despite the assurances of Microsoft developers that Superfetch reduces RAM consumption, this is not true - resource consumption when the service runs in the background is almost equal to the savings provided by its operation.
Bootable media creation and activation
First of all, download Windows 10 Pro 2020 Compact x64 x86 v2004 via torrent to your computer, and then you can burn it to a flash drive or DVD. One of the most popular programs for transferring an image to any media is UltraISO. Using this utility, you will create a bootable USB flash drive that will take no more than 15 minutes.
Installing Windows 10 Pro 2020 x64 x86 Compact will occur in exactly the same way as from the original disk from Microsoft, with the difference that the author has already noted the necessary points - you will not have to select localization, enter the activation key and accept the license agreement - all these steps are skipped. The most important thing for you is to select a partition for the system and format it, since only a clean installation can guarantee stable operation of the computer. Therefore, if you want to save data stored on the system disk, save it to removable media in advance.
There is no need to activate the image of Windows 10 Pro 2004 Compact x64_x86 by Flibustier, it is initially disinfected and activation begins when the system is first started. All you need to do is check the system status by going to the computer properties and make sure that Windows 10 activation has been completed successfully. Next, you can start installing drivers and programs, if you are a beginner and have no idea how to install drivers, for this case the Snappy Driver Installer driver assembly has been created; it will help to automatically identify and install the missing drivers.
949
Checking Compact OS status
Windows 10 can enable compression itself (or it can be enabled pre-installed by the manufacturer). You can check whether Compact OS compression is enabled using the command line.
Launch the command line (right click on the “Start” button, select the desired item in the menu) and enter the following command: compact /compactos:query and then press Enter.
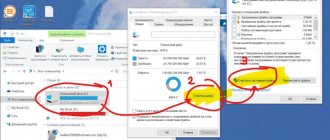
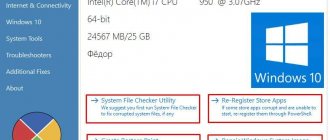
As a result, you will receive a message in the Command Prompt window stating either "The system is not in a compression state because it is not useful for this system" or that "the system is in a compression state." In the first case, you can enable compression manually. The screenshot shows free disk space before compression.
I note that according to official information from Microsoft, compression is “useful” from a system point of view for computers with sufficient RAM and a powerful processor. However, with 16 GB of RAM and a Core i7-4770, the response to the command was exactly the first message.
PC requirements:
CPU: minimum frequency - 1 GHz or single-chip system (SoC). RAM: for 32 bits at least 1 GB, for 64 bits - 2 GB. Space occupied: for 32 bits - 16 GB, for 64 bits - 20 GB. Graphics: support DirectX 9 + WDDM driver v 1.0
Screenshots:
Additions and changes:
- FLB launcher 32/64 bit - a special launcher customizable to your needs for convenient system installation. In the settings file with the *ini extension, you can change buttons, color schemes, fonts, etc. This version is the newest and easier to configure than previous ones. In the sources folder you need to place *wim and *esd files, which must subsequently be selected during installation. — Current updates for April 2020. - Windows Defender and SmartScreen have been removed. — Cortana AI assistant has been removed. — The Windows Store, the standard Microsoft browser (Edge), the OneDrive cloud storage and the XBox game center are initially absent in the LTSC version. If you wish, you can install it yourself directly from under the system. - Accessibility features like handwriting have also been removed, but can be set in the Language Options menu. — Bitlocker encryption, facial recognition login, performance assessment (Win SAT), standard recovery tools (WinRE) have been permanently removed. — Error reporting is disabled. — The ability to print via the Internet is disabled. — Location tracking and other collection of similar information is disabled. — Event logs are disabled.
Adjustments made to the Windows 10 Compact LTSC x64/x86 2020 image:
— The default computer name is HOME-PC — WORKGROUP — the name of the workgroup. — Default associations have been set for programs: notepad, PhotoViewer and standard calculator. — Warnings have been disabled when running files downloaded from the Internet. — The default keyboard layout is English. — All settings can be set according to your own needs in \sources\$OEM$\$$\Panther\first\
Tips for installing Windows 10 Compact LTSC 2020:
The torrent file contains 2 iso images: 32 bit and 64 bit. First you need to decide on the bit depth you need, and then download the required version of Windows 10 Enterprise LTSC Compact 2020 torrent program. Since the assembly is not combined into one image, you can save download time by half by selecting the desired version. It is usually recommended to install the system via a USB flash drive. Even a 2 GB flash drive will be enough to record one image. The site can also be found with the ability to update activated.
Using the Rufus program, you can quickly and easily transfer the Windows 10 Compact image onto a flash drive so that it becomes bootable. After launching the program, first select the inserted USB drive in the first list. After that, click on the button at the bottom of the window with the disk image and select the downloaded image. In the second drop-down list, you need to select your BIOS or UEFI system, as well as the hard drive partition table format: MBR or GPT. The file formatting system for the flash drive is FAT32. You can also burn the system in the classic way onto a DVD disc using UltraISO or a similar program at a minimum burning speed.
Enable OS compression in Windows 10 (and disable it)
To enable Compact OS compression in Windows 10, in the command prompt running as an administrator, enter the command: compact /compactos:always and press Enter.
The process of compressing operating system files and built-in applications will begin, which can take quite a long time (on a completely clean system with an SSD it took me about 10 minutes, but in the case of an HDD the time may be completely different). The image below shows the amount of free space on the system disk after compression.
To disable compression in the same way, use the command compact /compactos:never
If you are interested in the possibility of installing Windows 10 immediately in a compressed form, I recommend that you read the official Microsoft instructions on this topic.
I don’t know whether the described feature will be useful to anyone, but I can quite imagine scenarios, the most likely of which seems to me to be freeing up disk space (or, more likely, SSD) of inexpensive tablets with Windows 10 on board.
And maybe this will be interesting:
Distribution of new, sometimes interesting and useful, materials from the site remontka.pro. No advertising and free computer help for subscribers from the author. Other subscription methods (VK, Odnoklassniki, Telegram, Facebook, Twitter, Youtube, Yandex.Zen)
The hard drive is the slowest part in a PC. Compression speeds up reading and launching due to the smaller size of the stored data, slightly loading the memory and CPU for decryption. This function is useful for everyone, especially those with HDD. It is recommended to compress only system files, without touching personal ones. On any Windows system, cmd: compact /c /a /i /s:"c:/windows" compact /c /a /i /s:"c:/program files" compact /c /a /i /s:" c:/program files (x86)" Or through Explorer Directory properties - Attributes (Other) - Compress.. (skip busy files) I recommend compressing only on a CPU of 2 cores and memory of 3GB or more
How to compress files on an entire NTFS drive
Not only can you compress individual files and folders using NTFS, but you can also set compression for your entire hard drive.
This option works similarly to file compression, meaning once enabled, you can still access files as you normally would on any drive since the compression and decompression process is almost instantaneous.
To shrink an entire drive in Windows 10 using NTFS, follow these steps:
- Open File Explorer .
- Click on This PC.
- Right-click the hard drive you want to shrink and select Properties.
- Select the Compact this drive to save disk space check .
- Click Apply.
- In the Confirm Attribute Changes section, be sure to select the Apply changes to drive [drive letter]:\ and all subfolders and files option.
- Click OK and OK again.
The disk does not have to be empty. You can compress the disc containing the content. However, you should note that the OS will also have to compress files and folders, which can take a long time if there is a large amount of data stored on the disk.
How to install Windows 10 on a small MBR disk using Compact OS technology
About the Windows 10 operating system, installation requires about 15 GB of free hard disk space - not much if it is a regular HDD drive and too little if it is an SSD . As the latter became increasingly popular, shortly after the release of Windows 8.1, Microsoft introduced a new technology that offered an alternative way to install the system, in which most of the files from the installation image remained compressed.
The new technology is called Windows Image Boot or WIMBoot . With the exception of a slight, almost imperceptible decrease in performance, nothing changes for the user who used WIMBoot, but after installing the system using WIMBoot, there remains an order of magnitude more free space. By the way, you can use this technology when installing Windows 10, but, as in the case of the eighth and tenth versions of the system, certain restrictions apply.
Firstly, using WIMBoot during the installation process is only possible on computers and laptops with a modern BIOS , that is, UEFI , and secondly, installing a system using WIMBoot is done in a non-standard way using the command line and a pre-boot environment, which can cause difficulties for those who are not sophisticated in such user matters. But does this mean that saving space by compressing system files on a PC with a regular BIOS is impossible? Of course not. Because another, more advanced compression technology called Compact OS .
Compact OS , which is an improved WIMBoot technology, is also good because it can be used both on MBR disks with a regular BIOS and on GPT with UEFI with slight differences in the markup. In this article we will look at installing Windows 10 using Compact OS on an SSD with MBR partitioning and classic BIOS.
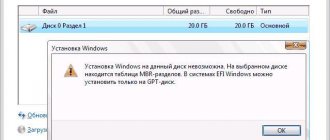
So, we have at our disposal a bootable flash drive (disk) with a recorded ISO image of Windows 10 and a laptop with a 16 GB hard drive. Boot from the installation media and when the installation wizard window appears on the screen, press Shift + 10
Windows 10 2004 Compact x86/x64 by flibustier [19041.264] (updated 05/14/2020) Russian
● Fast semi-automatic installation - languages are selected, agreements are accepted, keys are entered, sliders are disabled, at the beginning of the installation we select only the section, at the end the user name.
Hot keys:
F1
- help and change resolution.
Ctrl+Shift+Esc
- task manager.
Shift+F10
- command line (even though there are hotkeys for cmd, you can’t call it until you initialize and run setup.exe, now you can whenever you want.)
Win+Tab
- switch between the main window and the bottom panel.
[hr] Folder structure: \sources\flbfiles\packages\appx
- folder for UWP applications,
of Windows Store
.
\sources\flbfiles\packages\lang
- folder for language packs.
\sources\flbfiles\packages\netfx3
- for NetFx3.5 packages, added
.NET Framework 3.5
(
19041
)
\sources\flbfiles\packages\silent
- for silent installation of your programs, added
7-Zip
and
StartIsBack++
, by analogy you can install what whatever.
\sources\flbfiles\packages\upd
- folder for update packages; only Net and Flash updates can be integrated into this assembly.
into the same folder ( upd
) and download them below.
Folders specialize
,
setupcomplete
,
firstlogon
- for your tweaks and settings in checkboxes, written in
ini
and applied at the appropriate stages.
\sources\flbfiles\panther\firstlogon \sources\flbfiles\panther\setupcomplete \sources\flbfiles\panther\specialize
[hr]
Programs for WinPE:
A couple of pieces have been added as an example;
\sources\programs\Totalcmd \sources\programs\TrueImageHome
.
\sources\programs\
directory is not necessary here; these can generally be located anywhere, even on a flash drive, even on an HDD/SSD.
The main thing is that they work in WinPE
and correspond to its capacity.
We write the path in ini
and new buttons will appear. When you press the buttons on the bottom panel, the programs are collapsed/expanded, the launcher is now really a launcher.
In general, you can add anything, everything is limited only by your imagination and knowledge.
Transferring your wim/esd to any location:
By default, the
ini
contains the
installfiles
at the root of any section; the paths may be longer, but preferably without Cyrillic and spaces.
You can put as many of your wim/esd
, the file names must contain
*install*esd, *install*wim
.
\sources\flbfiles
folder can also be removed.
The main path should be the same \sources\flbfiles
in the root of any section.
*install*esd, *install*wim
can be added to this new
sources
, or a separate folder specified in
ini
.
What is flbsetup for:
flbsetup
in the root of the disk is a slightly modified and truncated version
of flblauncher
for deploying the system from Windows 10 to any
other
prepared and formatted partition.
flblauncher
itself is integrated into
boot.wim\Windows\System32\
.
[hr] Hidden function for extreme sports enthusiasts:
Hidden menu - RMB on the bottom bar with the copyright “
Cleaning WinSxS storage
”, total castration of WinSxS, will remain around 100MB on an x64 system.
After this, no components will be included, so if you need .Net 3.5
, we’ll integrate it during installation by checking the box.
How to create a bootable Windows 10 USB flash drive on the command line
Uncompress a folder or file from the command line
In order to uncompress data on a volume or disk via the command line, you must also perform an almost identical set of actions as in the compression instructions, but using different commands. It looks like this:
- Go to the command line via the Start menu. You can also simply enter the command “cmd” in the “Run” window and click “OK”.
- Wait for the window to load and enter the command “compact /u /s:”full path to the folder” /i /Q” to cancel folder compression and “compact /u “full path to the file” /i /Q” to cancel file compression.
- Press the enter key and wait for the command to complete.