This year, it's safe to assume that the majority of Windows 10 users have made the transition from SATA hard drives to SSD drives; be it a relatively new PC or an upgrade from an old one. Windows 10 has many features that help SSDs work to their full potential, but it doesn't always enable them by default. In addition, the first to appear and new SSDs are “optional and mandatory” for optimization. With each update of Windows 10, the functions of the system, which itself determines the parameters for the SSD, become more and more intelligent. You might be especially surprised to learn that defragmenting your SSD drive isn't such a bad idea!
Update the SSD firmware
To make sure your SSD performs as well as it can today, it pays to be on the latest firmware update. Unfortunately, they are not automated; the process is irreversible and slightly more complicated than updating software. Each SSD manufacturer has their own way of updating SSD firmware, so you will need to go to your SSD manufacturer's official website and follow the guides from there. However, a handy tool for you is CrystalDiskInfo, which provides detailed information about your drive , including the firmware version.
- Download from the official CrystalDiskInfo website.
Rules for using the disk
So, if you are an SSD drive user, then you should adhere to the following rules so that your drive lasts as long as possible:
- Always leave 10-16% free space of the total disk space. This needs to be done due to some of the operating features of SSD drives. If your disk was produced by a large and famous company, then most likely you will be able to use a special program to work with it, in which you can find a special function that allows you to block these same 10-16%.
Samsung disk setup program - Open Device Manager and expand Controllers. In the “Standard controller” sub-item there should be a mention that your computer is running in ACHI mode, not IDE. This is necessary because some functions that allow you to optimize the disk do not work in IDE mode. You can change the computer's operating mode in the BIOS settings.
Checking the operating mode
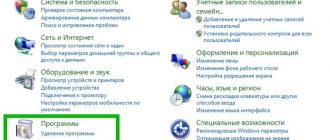
- Download a program to optimize it from the official website of your disk manufacturer. Use it, it will improve the speed of the disk and offer you all the necessary driver updates, which will also most likely bring positive changes.
2. Enable AHCI
Advanced Host Controller Interface (AHCI) is a major feature that ensures that Windows will support all the features that come with running an SSD on your computer, especially the TRIM feature, which allows Windows to help the SSD perform normal garbage collection. The term "garbage collection" is used to describe the phenomenon that occurs when a disk gets rid of information that is no longer considered in use. To enable AHCI, you will need to go into your computer's BIOS and enable it somewhere in your settings. I can't tell you exactly where the setting is as each BIOS functions differently. You'll have to do a little searching or Google images. Most likely, new computers will be enabled by default. It is recommended that you enable this feature before installing the operating system.
Windows installation steps
Read also: TOP-15 Programs for backup: saving data correctly | Windows + Android
In general, the installation of any operating system is divided into several stages. And they are all important in their own way. At every stage you need to be extremely careful. Because an error on any of them can make installation impossible.
- Selecting and downloading a distribution. At the moment, there are a huge number of Windows 10 builds of different editions. And each with its own characteristics. You need to choose the one that suits you specifically and download it.
- Preparatory stage. This includes the process of creating a bootable USB flash drive for installation. If you write the distribution kit onto a flash drive incorrectly, the computer will not even recognize it when connected. And there will be no installation.
- Actually, installation. The Windows 10 installation process is not that complicated. For the unforgettable XP, everything was much more complicated. But nevertheless, even the “ten” requires detailed instructions, as beginners can get confused
Only after completing all the above steps will Windows be installed correctly. And only after this it will be possible to begin basic configuration of the operating system. Now let's look at all the stages in more detail.
back to menu ↑ back to menu ↑
3. Enable TRIM
TRIM is vital to extending the life of your SSD, namely by cleaning it. Windows 10 should enable this by default, but it's worth double-checking that it's enabled. TRIM is a command that the operating system can use to tell the SSD which blocks of data are no longer needed and can be deleted or marked as free to be overwritten. In other words, TRIM is a command that helps the operating system know exactly where the data you want to move or delete is stored. This way, the SSD can only access blocks containing data without accessing unnecessary data again . Additionally, whenever a delete command is issued by the user or the operating system, the TRIM command immediately destroys the pages or blocks where the files are stored. To make sure, re-enable the TRIM feature by opening the Command Prompt and running the command below:
fsutil behavior set disabledeletenotify 0
Selecting and downloading a distribution
Read also: TOP 15 Programs for checking your hard drive for errors and bad sectors | Windows (7/8/10)
Selecting Windows Version
It all depends entirely on your own preferences. Just keep in mind that the Home or Starter editions are very limited in their functionality for full-fledged professional work.
It's better to choose something like Pro or VL. In some cases, the edition is determined by the key or UEFI of the computer.
Point two: never download homemade builds from torrents made by some crazy craftsman. It is unknown what he did there. The stability and functionality of such assemblies are questionable.
It is better to download original MSDN images from the official Microsoft website. This way you can be sure that no one dug into the distribution files and did not modify them in any way. And this is a plus for stability.
Now about the so-called “Insider Program” from Microsoft. Under no circumstances should you install test builds with weekly updates . Unless, of course, you want the OS to crash after the first update of the same type.
It is strongly recommended to download images for installing Windows 10 only from the official Microsoft website. If you do this in another place, then no one will guarantee that the system will be operational. And no one wants to reinstall Windows again. Value your time.
back to menu ↑ back to menu ↑
Make sure System Restore is enabled
In the early days of SSDs, when they were much less durable and prone to more breakdowns than they are today, many people recommended turning off System Restore to improve the drive's performance and longevity. This advice is pretty much redundant these days, but certain software, like Samsung SSD, automatically disables System Restore. System Restore is an extremely useful feature that I recommend keeping, so make sure you haven't disabled your SSD.
Disable indexing
Most of your SSD's speed is consumed in indexing files for Windows Search. This can be useful if you store everything you have on an SSD. Due to the high cost and small volume of the SSD disk itself, many simply install the operating system on it and accordingly disable file indexing. If you are experiencing slowdown due to the periodic indexing process that occurs every time you add new data to the disk, then it is better to work without indexing the files on the SSD drive because the speed boost from the indexing process is overkill in such environments.
- Right-click on your SSD and select Properties.
- Uncheck "Allow content on this drive to be indexed."
Are we saving the battery or the ssd?
As you already understand, we will talk about hibernation and how it is related to setting up an ssd disk for Windows 10 OS, the process is generally obvious, when we put our laptop into sleep mode, all data is saved and, of course, the data is recorded into memory and an endless process occurs - which has a bad effect on the durability of the solid-state drive. It turns out that laptop owners have a choice between saving the battery or the screw? It's actually not that bad! Hibernation is intended for equipment with a HDD, since the speed of loading the OS and accessing files is much longer, and it is easier for users to put the machine to sleep and then wake it up for work without first launching programs and applications - wasting time on this. In the situation with SD's, this is not required, since their main feature is performance - have you paid attention to how many seconds it takes your PC to turn on? We conclude that hibernation is not necessary if you have an ssd.
Indexing
One more tool can be sacrificed, we are talking about Windows indexing, the fact is that when the process is executed, it saves information about the location of files, thereby providing a quick search - which accordingly takes up space and constant overwriting of data - as you move them. Solid state drive technology provides fast access on its own, so feel free to disable it - the method is below.
Right-click on the drive, in this case selecting “C:”
- “Properties” → “General” tab → uncheck “Allow file_contents to be indexed…” → ok
- In the window that appears, select “To the C:\ drive and all attached files and folders” → ok
All that remains is to wait for completion and close the window.
Don't touch Windows defragmentation
Another relic of the early days of SSDs was that defragmenting SSDs was not only unnecessary, but potentially dangerous. Defragmentation takes away resources by wearing out read/write cycles of data remaining on the SSD drive. This is true, but today's Windows 10 already knows this, and if you have defragmentation enabled, Windows will detect your SSD and will not defragment it. It's better to think of today's defragmentation in Windows 10 as a more versatile tool for protecting your drive. Even the button refers to the process as "Optimization" rather than "Defragmentation". The process will also " recover " your SSD, which triggers the excellent TRIM feature we talked about earlier. Now I dug up an article with facts.
Scott Hanselman spoke with the team of developers working on bringing storage to Windows:
Drive Optimization (in Windows 10) defragments the SSD once a month if Volume Shadow Copy (System Protection) is enabled. This is due to the impact of SSD fragmentation on performance. The misconception here is that fragmentation is not an issue for SSDs - if the SSD becomes highly fragmented, you can reach maximum fragmentation where the metadata can no longer represent file fragments, causing errors when attempting to write or increase file size. In addition, a larger number of file fragments means that more metadata needs to be processed to read/write a file, which leads to performance losses.
As for Retrim, this command runs on a schedule and is required due to the way the TRIM command is executed on file systems. The command execution occurs asynchronously on the file system. When a file is deleted or space is otherwise freed, the file system queues a request for TRIM. Due to peak load restrictions, this queue may reach its maximum number of TRIM requests, causing subsequent ones to be ignored. In the future, Windows drive optimization automatically performs Retrim to clean up blocks.
Result:
- Defragmentation is performed only if system protection is enabled (restore points, file history using VSS).
- Disk optimization is used to mark unused blocks on the SSD that were not marked when TRIM was running.
- Defragmentation for SSDs may be necessary and is automatically applied if necessary. At the same time (this is from another source) a different defragmentation algorithm is used for solid-state drives compared to HDDs.
In other words, Windows defragmentation adapts to your SSD, so leave this feature alone, turn it on and forget it!
Defragmentation of SSD in Windows 10
The “ten” introduces the principle of not defragmentation, but disk optimization - it cleans disk blocks using the Retrim function.
Many users find this feature completely unnecessary. In earlier versions of the OS it was disabled. But many experts consider it important in order to improve the performance of the SSD.
Here are the key points of automatic SSD optimization:
- defragmentation is possible only when system protection is enabled (connected recovery points, VSS file history);
- the TRIM function does not mark unused disk blocks, but the Retrim command allows you to mark them;
- To optimize SSDs, a different algorithm is used compared to defragmenting HDD hard drives.
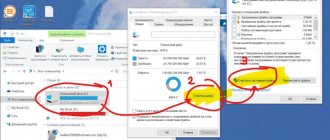
In general, you can leave automatic defragmentation. But it’s easy to turn it off: in the optimization parameters (shown in the previous screenshot), select the desired drive and click “Change parameters”. We remove the marker from automatic scheduled optimization.
Disable Prefetch and Superfetch
Sometimes Windows places information in physical memory and virtual memory that belongs to programs that are not currently used or that you use very often. This is called "Prefetch" and "Superfetch". When installing an SSD, these functions are disabled automatically, and for all drives, unfortunately. Many SSD manufacturers believe that it is better to leave these features in Windows 10, but Samsung thinks otherwise and recommends disabling them. It will be much easier to go to the website of the SSD drive manufacturer and read about these functions and what they recommend. If you are experiencing problems with a high SSD drive, high memory consumption, or notice a deterioration in performance during active RAM operations, then disable these functions through the registry. I would like to note that on slow SSDs there is no point in disabling these functions. Tips 7 and 8 are interconnected, you need to do both of them.
- Open Registry Editor and navigate to the path.
- You will see two keys “EnablePrefetcher” and “EnableSuperfetch”.
- Double-click on them and set their value to 0. Restart your computer or laptop.
HKEY_LOCAL_MACHINE\SYSTEM\CurrentControlSet\Control\Session Manager\Memory Management\PrefetchParameters
A nuance when turning them back on: If you wanted to turn them back on, you will only see one EnablePrefetcher , don’t be alarmed, just set it to 3 and restart the computer. After the reboot, it will automatically create EnableSuperfetch immediately with the value 3.
ReadyBoot, Superfetch/Prefetch and power
To address the most popular question - whether it is necessary to configure an ssd on Windows 10, let's talk about functionality that is very familiar from previous versions, but causes heated debate in Windows 10.
So, ReadyBoot is immediately disabled - a function that analyzes paths and files that are frequently requested over the last 5 loads and caches space in RAM for faster access to them the next time you work.
Superfetch / Prefetch also raises a lot of debate - they are used, but do not need to be disabled, this is what Intel manufacturers say, but Samsung thinks otherwise. The question arises, how then to optimize the ssd-disk in window's 10, if opinions differ, here I would like to note that with versions 7 and 8.1 - the above functions have also evolved, but for peace of mind, consult the advice of the hardware developer.
And an important aspect is that the operating system automatically optimizes the power supply of your SSD drive.
Disable Windows Search and Superfetch service
Even with the above-mentioned registry disabling, your computer may continue to slow down your hard drive with the help of related services. Let's disable two services Windows Search and Superfetch .
- Press Win + R on your keyboard, type services.msc and press Enter. Find both services mentioned above.
- Double-click on the service (one, then the other) and select Startup Type: Disabled, and Stop > Apply > OK.
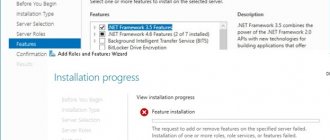
Installing Windows 10
Read also: TOP-12 Programs for computer diagnostics: description of proven software tools
Now let's move on to the most interesting part: installing Windows 10 on a computer or laptop. The process itself should not cause any problems even for those who have never done it. But you will still have to give some explanations during the installation.
So, first you need to insert the recorded flash drive into the USB port of a switched off computer . Then you need to turn on the PC and get to the boot disk selection menu. This may be the “F12” button or another. Depending on the installed BIOS. And then all you have to do is select the flash drive as the boot drive. After this the fun begins.
1 After loading from the flash drive, the main installer window will appear. There you need to select the installation language, keyboard layout, etc. Then click on the “Next” button.
2 After this, a window will appear with only one button “Install”. This is what you need to press.
3 Next, the installation program will ask you to enter a license key. If you have it, then enter it. And if not, then click on the text “I don’t have a key.”
4 After this you will be taken to the Windows edition selection window. If you selected the option “I don’t have a key” . Here you need to select the edition you require and click on the “Next” button.
5 The installer will now ask you to accept the license agreement. Check the box next to the desired item and click “Next”
6 After accepting the agreement, the installer will ask you to select a Windows installation type. It's better to click on custom installation.
7 Now very carefully. You will be taken to the partition selection menu for installation. Select the one with enough free space (minimum 20 GB) and click on the “Next” button.
8 After this, the process of unpacking the image and copying the files to your hard drive will begin. Once completed, the computer will reboot.
9 After the restart, the installation will continue. First, a window will appear in which you will need to select your region of residence. Select the one you need and click on the “Yes” button.
10 Next you need to select a keyboard layout. Click on “Russian” and then click on the “Yes” button.
11 The installer will now prompt you to add another layout. If you don't need this, click "Skip".
12 Next you will need to enter your name and password (if you plan to set one). And after that a window with privacy settings will appear. It is better to move all the sliders to the “Off” . Unless, of course, you don't mind Microsoft spying on you. Then click the “Accept” button.
13 After clicking the button, all settings will be applied. It doesn't take much time.
14 After completing the setup, you will be taken directly to the operating system desktop.
That's the whole installation. As you can see, everything is not as scary as it seems.
In any case, everything is much simpler than when installing Windows XP. There is even a very good graphical interface. And this greatly simplifies the installation process. It is only worth remembering that immediately after installation the system will not work normally, since the necessary drivers and other software are not installed. But all this will be installed as soon as you connect your computer to the Internet.
It is worth remembering that after connecting to the Internet, Windows 10 may start to work very slowly. This is due to the fact that after the first connection, the system downloads the necessary drivers and updates and immediately installs them. After the first reboot everything will go as it should. So there is no need to panic under any circumstances. There is no point in preventing the installation of updates either. A system with fragmentarily installed updates will not please you with either stability or speed.
back to menu ↑ back to menu ↑
Set up write caching
On many SSD devices, user-level caching can have a detrimental effect on the disk. To understand this, you will have to disable this option in Windows and see how the drive performs after that. If your drive is performing worse, turn it back on.
- Press Win + R and type devmgmt.msc to open Device Manager.
- Find Disk Devices and select your SSD.
- Right-click on it and click Properties .
- Go to the Policy and uncheck “ Allow record caching ...”.
- Test your SSD with the feature disabled and enabled.
Installing Windows 10 on an SSD - sleight of hand and no fraud
From the point of view of the operating system and computer hardware, a solid-state drive (SSD) is no different from a classic hard drive with magnetic platters. Accordingly, installing an operating system on an SSD will be no different from installing it on a regular hard drive.
The only nuances will be in setting up the disk subsystem for maximum performance and in creating partitions on the disk before installing the system. Since the disk is new, a clean copy of the OS will be installed.
Installing an OS on a blank disk will always be more difficult than updating, which will download itself from the Internet and carry out all the manipulations in the background, requiring literally a few mouse clicks from the user.
Installing a clean copy consists of several sequential steps that should go smoothly and without errors. Let's get started?
Preparing bootable media (flash drive)
As practice shows, when installing Windows 10 on an SSD using a bootable DVD, errors often occur that prevent normal installation of the OS. This happens especially often on laptops in which both the optical drive and the hard drive are connected to the same SATA controller: accessing the optical drive causes the computer to not optimally configure the controller, and the SSD may not work correctly.
Therefore, to install the system, you need to prepare a bootable USB flash drive, installation from which will allow you to carry out the process quickly and without errors.
To prepare bootable media with the OS distribution, you need to download the Windows 10 distribution image, format the flash drive and unpack the image onto it. And if there are no problems with downloading, then further preparation of the flash drive can be carried out by a dozen different programs, similar in function, but different in settings and interface.
We will focus on the official image deployment tool from Microsoft - Microsoft USB/DVD download tool. The program is so simple that it is impossible to make mistakes when using it.
- Find the Microsoft USB/DVD download tool on the Internet and download it.
- Connect a USB flash drive to a free USB port to which the system image will be deployed.
Insert the USB flash drive onto which you want to burn the Windows 10 boot image into the USB port.
- Open File Explorer and note the logical drive letter of the flash drive. In our case this is the letter L.
The connected flash drive was mounted in the file explorer as drive L:
- Launch the Microsoft USB/DVD download tool.
- Using the Browse button, select the ISO image with the operating system distribution and click Next.
Step 1: select the image that you will burn to the flash drive
- Select the media type - USB Device (flash drive).
Select the type of media that you will make bootable via the USB/DVD download tool
- Select the disk (flash drive) to deploy the media from the drop-down list and click the Begin copying button.
Select your flash drive from the available devices and click the Begin copying button
- When asked about erasing media, answer yes. The program will format the flash drive and start copying files to it.
- When the progress bar reaches 100% and a message about successful media creation appears, you can close the program.
The bootable USB flash drive has been successfully created, and the Windows 10 distribution files have been transferred to it.
The bootable USB flash drive has been created, and you can begin installing the operating system using it.
The occurrence of any errors while the program is running indicates a faulty flash drive. Change the media to a known good one and repeat the process of creating a bootable disk.
In addition to its simplicity, this method is good because using an official Microsoft tool instead of one of the “free” programs guarantees a secure installation. Using it, you will not infect your computer with keyloggers or annoying adware.
Video: creating a bootable USB flash drive with Rufus
Activating AHCI mode
In order not to find yourself in a situation where the OS installer does not see the disk on which Windows 10 should be installed (this applies not only to SSDs, but in general to all hard drives with a SATA interface), using BIOS settings, you need to switch the SATA controller to AHCI mode .
- When you turn on (restart) your computer, enter the BIOS settings. Depending on the motherboard manufacturer, you will need to press either the Del key or the F1 key to do this. Information about the required key is displayed on the loading screen.
Press Del key to enter BIOS settings
- Go to the Integrated Peripherals section.
Enter the peripherals section on the main BIOS screen
- Select “SATA control mode” and switch it to “AHCI” mode.
Switch the SATA controller to AHCI mode
- If you did not find SATA settings in the Integrated Peripherals section, then there will be a subsection “IDE function setup” or similar - look for the SATA controller settings there.
SATA controller settings can be found in the IDE function setup section
- Restart your computer and proceed to install the operating system.
Preparing an SSD disk for OS installation
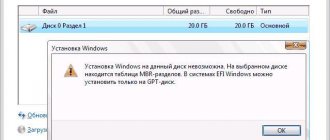
To avoid problems when installing the Windows 10 operating system, the disk on which the installation will be carried out must be completely cleared of partitions. If you do not do this, the system installation program may display a message stating that this disk cannot be used to install the OS. The reason will be the lack of space to create service partitions, invisible to the user, but vital for the operating system.
To prevent this from happening, remove all partitions from the SSD disk. You can do this using the console command diskpart:
- Connect the SSD drive to the computer; the ideal option would be to use a “pocket” with a USB interface.
- Launch a command prompt window (WIN+R, cmd.exe).
Press Win+R and enter cmd in the line that appears
- In the command line, enter the word diskpart and press Enter - the diskpart program will start.
- Enter the list disk command - a list of connected physical disks will be displayed. Find your SSD in it and write down its number (0, 1, etc.).
In the list of disks, we are interested in the SSD number from which we will delete partitions
- Enter the select disk n command, where n is the disk number recorded in step 4.
- Enter the list partition command - a list of partitions on the disk will be displayed on the screen. If there are no partitions, then simply close the program window. If there are sections, then continue to follow the instructions.
List of available partitions on the SSD disk obtained with the list partition command
- Enter the select partition n command, where n is the partition number.
- Enter the delete partition command. If there are several sections, then repeat steps 7 and 8 until the sections end.
- Exit the program window with the exit command.
All partitions from the SSD have been removed, and it is ready to install the Windows 10 operating system.
This method requires care and a lot of keystrokes, but it gives complete control over the process. If you are a fan of beauty and mouse clicks, you can find hard drive management programs with a graphical interface.
Video: how to manage disks using Minitool PartitionWizard
Disable ClearPageFileAtShutdown and LargeSystemCache.
Windows quickly implements things that are no longer needed. An SSD works with flash memory, making it easy to overwrite things on the drive. Therefore, the page file does not need to be deleted when the computer is turned off. This will speed up the process of shutting down Windows. On the other hand, LargeSystemCache is enabled mostly in server versions of Windows and tells the computer whether it should use a large cache for pages on disk.
- Open the registry editor and follow the path below.
- Find LargeSystemCache and ClearPageFileAtShutdown , double-click on them and set the value to 0 .
HKEY_LOCAL_MACHINE\SYSTEM\CurrentControlSet\Control\Session Manager\Memory Management\
Setting up Windows 7 to work with an SSD drive
More precisely, Windows 7 will work anyway, our task is to make sure that our solid-state drive lasts as long as possible and without various errors.
As I already wrote at the beginning of the article, to optimize Windows for a solid-state drive, we will use the SSD Mini Tweaker utility. You can disable all unnecessary options manually, but in the SSD Mini Tweaker program this can all be done in a few clicks. You will only need to manually disable indexing of files on local drives.
First we need to download SSD Mini Tweaker. Download version 2.1 from the link below:
SSD Mini Tweaker 2.1 Versions for x32 and x64.
There is no need to install the program, just extract it from the archive and run it.
Launch the SSD Mini Tweaker utility.
You can tick all the boxes, or rather, it’s not possible, but it’s necessary. I have checked all the boxes, except that you can leave only SuperFetch; disabling this service may increase the startup time of programs. Check the boxes for the required services and click the “Apply changes” button. Almost everything, in the same utility there is a “Manual” item, this means that you need to manually disable services. There are two of them, disk defragmentation on a schedule and indexing the contents of files on the disk.
If scheduled defragmentation is disabled automatically after the changes we have made, then indexing of files on the disk must be disabled manually on each local partition.
This is interesting: About SSD drives - review and reflections
Set the High Performance option
When your SSD turns on and off all the time after being idle in "sleep mode", you will notice a slight lag.
- Press Win + R and type control.exe powercfg.cpl
- Set the power plan to " High Performance ".
See also:
- Disk is 100% loaded in Windows 10 Task Manager
- 9 Reasons Why Your Windows Computer Freezes
- How to speed up your Windows 10 computer
- Correct paging file size for stable system operation
- Why is the Sound Lost and Not Working in Windows 10?
comments powered by HyperComments
After installation
Read also: Startup in Windows 7/8/10: where is it located, how to open it, how to add or remove a program
Now let's talk about what should be done immediately after installing Windows 10. If it is not configured correctly, then there can be no talk of any performance. And the to-do list is surprisingly short.
- Installing drivers. Those drivers that the OS installs on its own are hopelessly outdated. To work more efficiently, you need to visit the website of the laptop or computer motherboard manufacturer, download new versions and install them manually. Only then will it be possible to achieve high productivity and error-free operation
- System activation. If you do not need an OS with reduced functionality, then you should activate it. You can buy an official key or use an existing one. If you don’t have a key and have no desire to purchase one, then the KMS Auto NET activator will help. It can activate not only Windows, but also Microsoft Office
- Create a recovery disk. This thing is necessary, since the updates that come to the “top ten” are extremely unstable. They can not only delete user data, but also successfully crash the entire operating system. And in this case, the recovery disk will not be superfluous
If you follow all the above steps, the system will work perfectly. In general, Windows 10 has much better performance than the same “seven”. So it's definitely worth installing.
back to menu ↑
Conclusion
So, we have covered a very complex topic about installing Windows 10 on a computer or laptop. The process itself will not raise any questions. The main thing is to choose the right distribution and correctly write it to the drive.
And during the installation process, you need to remember to reset your privacy settings in order to reduce Windows 10 spying activity to a minimum . Otherwise, the process should not raise any questions. Especially with such detailed instructions.
back to menu ↑