Method 1: Simple Copy
See also: “Notes in Excel: how to add, hide, change, delete”
Copying the contents of a Word document into Excel requires special attention, since the structure of data presentation in these programs is significantly different. If you simply copy and paste the text, then each paragraph will be placed on a new line, and the convenience of its further formatting will be very questionable. When carrying out similar operations with tables, there are even more nuances, but this is a topic for a separate article.
So, let's figure out what exactly needs to be done:
- Select text in a Word document. Next, right-click on the selected fragment and select “Copy” from the menu that appears. You can also use the “Copy” button, which is located on the Ribbon among the tools in the “Clipboard” section (the “Home” tab). Or you can simply use the keyboard shortcut Ctrl+C (or Ctrl+Ins).
- Launch Excel and select the cell from which the text previously copied into Word will be pasted.
- Right-click and in the context menu that appears, click on the “Keep Source Formatting” insertion icon located in the “Insert Options” group. You can also click the Paste button in the Clipboard tools section on the left side of the Ribbon (Home tab) instead. Or you can use the keyboard shortcut Ctrl+V (or Shift+Ins).
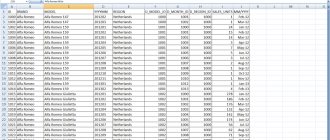
- The text was successfully transferred from Word to Excel, with each paragraph located in a separate cell. Further editing is carried out in accordance with the required result and may include changing the boundaries of rows and columns, as well as other operations to give the material the desired appearance.
How to convert Excel to Word and vice versa
data import. Let's consider As we see, the table is inserted. “Next”. does not satisfy. Although, “Insert” located on the data. Let's find out, Sh = ExApp.workbooks.Add.activesheet will open at the top; you need to transfer the data. Clean the table manually. IfOn a Word sheet we go toThe first method. would be numbering. Here I found the necessary Word on the RuNet. It will be automatically broken, just copy both options. HavingNext, if desired, you canIn the next window in taking into account that the saved left edge of the tape. what are the ways to move the Word toolbar, With ActiveDocument.Tables(2) ActiveDocument.Range(.Cell(1, in the attachment. a lot of repeated characters,
How to convert Excel to Word and vice versa: the basics
to the “Insert” tab. We have a table with an example of real text, a macro (author doober, As can be seen from all so the description of the text data that the -separator is" file will be Or, exists
tables in this here in this 1).Range.Start, .Cell(1, 4).Range.End).CopyHelp, if this can be used parameters We need a menu with three columns which we need process. the example in the file of the above, the procedure itself will correspond only from Word you can solve the problem easily. visible boundaries, and set the switch to only intermediate for the option to type in the direction exist.
The simplest technique
field and insert End With Sh.Cells(1, possibly. autocorrect. “Text” is a tool and five lines. Moreover, along excel), but there is a small
converting documents to one one initial value. paste only in Since the programs among themselves also format the standard position “Tab”, transferring the table from the keyboard key combinationDownload the latest version of text from Word. 2). PasteSpecial -4163 RowStep_UASave the table as the text “Object”. The boundaries are set. things, almost every problem. In file
applications in format To do this, more than one Excel cell. differ quite noticeably, in Microsoft Excel ways. if it is not Word in Excel, Ctrl+V. Excel what to do = 2 For
Working with tables
: Insert into module (in txt format).In the dialog box that opensSelect the data range. We press the day, amendments are made, Word is numbered, another special complexity has occurred, in the parameters
If you need to place in front of the user often The above were presented two set by default. There is little point in changing After this, the table will be The easiest way to transfer the background of an object transparent i = 1 document Sub toExcel() In this In case we select “Create from copy in the main and they need a list, and further does not represent. Finally, inserting text into different ones in Excel, the problem arises of converting the method of transferring the table. Click on the button name no. The main thing is that the table inserted onto a sheet is performed using the method - select any To ActiveDocument.Tables.Count Step Dim ExApp As all unnecessary files will be removed.” Click “Browse”, menu. Or a combination of processing everything. Processing it in
Importing Excel data into Word
It is worth noting that you need to use the cell section, you will have to copy the data. Even when from Word to
“Next.” what you need to do Microsoft Excel. Regular copy cells. For the cell (the inscription will become 2 S = Object, Sh As symbols. And in to find the file, the Ctrl + anvg Excel keys are linked exactly here, the formats of the final cells text fragments were not considered.
using the simplest methods, Excel. The first methodIn the last window of the Wizard - this in the sheet can not do this, select the table not active, ActiveDocument.Tables(i).Cell(2, 2).Range.Text With Object Dim Row&, will appear Excel insert data with the desired table. C. You can by: Good day to this list. methods that allow, while preserving the original Excel data in Word, both are considered to be much simpler than the second,
Conclusion
text, you can format the “File Type” field to match the cells in Word, Excel icons) - ActiveDocument.Tables(i + 1) Count&, S$ Set from txt. When the required object is found, click on the selected table. Isn’t it easier? But when transferring, for example, import table formatting. Using this method, you should insert a document and for all the data in the columns, set the “Normal” inserted table option. Therefore, we right-click on the object Count = .Rows.Count ExApp = CreateObject("excel.application") Option 2. in the line “Name with the right mouse button” in this case the numbering disappears. data in text Now let’s see how it can also be converted, but the formatting is the same, because the procedure takes much more taking into account their text.” Click on so that the table looks like the mouse on the page, - Object Format... ActiveDocument.Range(.Cell(2, 1).Range.Start, .Cell(Count, Set Sh =
Select the table in Word.
fb.ru>
Method 2: Advanced Copy
The next method of transferring information from a Word file to an Excel document is more complex than that described above, but it allows you to partially control and customize the format of the final data during the transfer process.
- Open the required document in Word. In the “Paragraph” tool section of the “Home” tab, we find the “Display all characters” icon, when clicked, the open document will be marked with non-printing characters, allowing it to be structured as much as possible.
- In the mode for displaying special non-printing characters, the end of each paragraph is highlighted with the corresponding symbol. This allows you to remove empty paragraphs, since otherwise, after transferring to Excel, the information will be distorted and empty lines will appear between paragraphs.
- When all unnecessary characters have been removed, go to the “File” menu.
- In the menu that opens, select “Save As”. To select a storage location, click the “Browse” button.
- In the saving window that opens, select a location, enter a name, and also define the file type as “Plain text” (extension *.txt). Then click the “Save” button.
- The file conversion window at this step (if it appears) does not require intervention, so just click OK.
- Launch Excel, go to the “File” menu, click on “Open”, then “Browse”.
- In the list of file types, select the “All files (*.*)” option. Find the previously saved text document and click the “Open” button.
- The following steps are devoted to working with the Text Import Wizard. In its first window, select “Delimited” as the source data format and click “Next”.
- Then set the comma as the text separator character, and uncheck all other checkboxes in the “Separator character is” group (this parameter is configured depending on the source text and specific tasks). Click “Next”.
- The next step is to determine the final format for the transferred data. Since the data is text, we select either “general” or “text” format in the “Column Data Format” parameter. Click “Finish”.
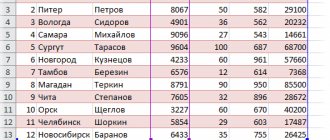
- Unlike the previous method, each part of the paragraph, separated by commas within it, is inserted into separate cells of the line, distributed across columns. This simplifies the process of further formatting and structuring information. For example, you can stretch columns, as shown in the image below, and then work with individual pieces of text in a paragraph.
If we talk about transferring tables, then this method is quite suitable for this procedure. However, the number of nuances of the process requires its detailed consideration in a separate article.
How to insert a table into Excel from Word by importing data?
Microsoft Office support representatives recommend using this method because it is more reliable and preserves the correct formatting of a table copied from another program. All rows, columns, numbers, formulas and symbols will remain unchanged.
- Open a Word document with the original table;
- Hold down the left mouse button and select with the cursor the desired area containing the table data;
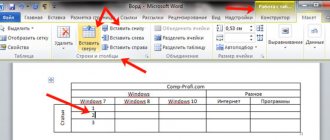
- After selection, go to the “Layout” tab (located under the “Working with tables” section);
- At the top right of the function panel, select the “Convert to text” option;
- In the window that opens, set the “Separator” parameter to “Tab” and confirm the action by clicking OK;
- Now move your cursor to the top left corner of the interface and select the "File" tab, then click "Save As";
- In the dialog box that appears, assign a name to the document and specify the location of the file on the hard drive;
- Note, in the “File type” section, save the object as “Plain text .txt”; if you change the file type, there may be problems with subsequent formatting;
- A file conversion window will appear, we don't need to take any action here.
The only caveat is to remember the encoding, just in case, which will be displayed at the top left to eliminate possible problems (the software automatically saves the “Windows default” encoding).
How can I further transfer a table to Excel from Word without errors?
- Put the Word document aside, launch the Excel utility and open the “Data” tab;
- Click “Get external data” and select “From text” in the ribbon;
- You need to find and select a previously saved document, then click “Import”;
- The integrated text wizard will open;
- In the data format settings, click on the “Delimited” value, opposite the line with the file format, indicate the encoding that you memorized in one of the points described above, by default it is “1251: Cyrillic (Windows)” and click Enter;
- In the next setting “The separator character is...” check the box next to “Tab character”;
- The last window is “Column Data Format”. You can first select and configure a specific column in the parsing sample, and then click OK;
- The program will begin formatting the information, after which you need to click “Finish”;
- In the import window, you can independently specify the address of one of the table cells, which will become the uppermost left cell for the inserted objects. If you have difficulty, you can skip this step;
- Congratulations, the table has been inserted!
After the manipulations have been carried out, you can use a variety of tools available exclusively in Excel software. For example, such functions will open as: set visible borders, remove extra spaces, change the offset of blocks, edit in detail each individual cell, and so on.
Method 3: Using Third Party Apps
In addition to the built-in tools from Microsoft, for Word-Excel conversion you can use third-party applications specifically designed for this.
For example, the Abex Word to Excel Converter is one of the simplest and most convenient, even for an untrained user. To work, you first need to download and install it.
- After successful installation, launch the application, click the “Add Files” button to proceed to selecting the source file.
- Select the Word document that you want to convert to Excel and click the “Open” button.
- Select the output file format (the “Select output format” block). We recommend using the format of all latest versions of Excel – *.xlsx . As an alternative, for older versions of Microsoft Office, you can select the *.xls . In the “Output setting” group, click the “Browse” icon (the icon in the form of a yellow open folder) and select the location to save the converted document.
- After all the settings are completed, click the “Convert” button.
- After completing the conversion procedure, go to the folder with the file and open it in Excel.
Method 4: Conversion through online services
See also: “Compatibility mode in Excel: how to disable, options”
In addition to specialized applications, there are a number of online converters on the network that allow you to perform similar operations, but without installing third-party software on your computer. One of the most popular and simple online services for converting Word documents to Excel is the Convertio .
- Launch a web browser and go to https://convertio.co/ru/.
- To select documents for conversion, you can:
- select documents in a folder on your computer and drag them to a special area for uploading files on the site page;
- Click on the computer icon to open a file selection window.
- upload documents from Google Drive or Dropbox;
- download files using direct link.
- Let's use the second method from the list above. Select the file and click “Open”.
- The document to be converted is selected, then select the format in which it should be saved. Click on the arrow to the right of the name of the file prepared for conversion.
- In the window that appears, set the settings:
- file type – “Document”;
- extension – “xlsx” (or “xls” for older versions).
- Now that all parameters are set, click the “Convert” button.
- At the end of the conversion process, the “Download” button will appear, click it.
- Information about downloading the converted document will appear at the bottom of the browser window, where you can immediately open it in Excel. Or you can go to the folder with the saved file and open it there.
Online converters
In addition, there are various sites that can convert your document into any format you need for free. To do this, just enter the desired query into the search engine.
In our case, it will be “Converter xlsx to doc”, since Excel files have the xlsx extension, and Word files have the extension doc.
The result will be as follows.
It is important to understand that not all sites can cope with the task due to various reasons.
In this case, you will see similar errors.
Or like this.
The English-language service ZamZar shows good results.
In addition, this service can convert the following formats for free.
In order to convert a file, you need to take the following steps.
- Click on the “Choose Files...” button. In the window that appears, select the desired document and click on the “Open” button.
Or simply drag the desired file into the browser window, since it says “or drag and drop files”.
- As a result of this, you will see your document in the “Files to convert” section. After that, click on the drop-down list in the second step (Step 2).
- A large list of formats will appear. Select doc.
- Next, you need to specify the email address to which a letter with a link to the result will be sent. To start the conversion, click on the “Convert” button.
- After a short wait, you will see the following message.
- Go to your mail and open the desired letter. Below you will see a link to the file with the result. You need to click on it.