Method No. 1.
This is the easiest way in my opinion.
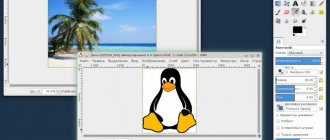
- Open Photoshop and load the image that we will change. In my case, this is Princess Elsa from the cartoon Frozen.
- In the lower right corner (where the layers are) double-click on the “lock” icon. After this, a window will appear in which you need to click “OK”.
- Take the “Magic Wand” tool and set the parameter to 10 in the “Tolerance” window.
- Click on the empty space with the wand and click on the Delete button. And now we see that the background becomes transparent.
How to remove white background in Photoshop and make it transparent?
In this version, we will look at how to make a white background transparent. In fact, this option works well for any plain background.
So, open the program and upload your photo into it. Immediately unlock the layer by double-clicking on it. A window for creating a new layer will appear. Click OK and, as a result, the icon with the image of a lock should disappear.
After that, select the “ magic wand ” tool located on the toolbar.
Having selected the tool, click on the loaded document. A selection like this will appear:
The last step left is to press the DELETE . As a result, the background will disappear, leaving a clear space that appears as squares:
All that remains is to insert this photo onto another background. In order for a photo to be used repeatedly, it, of course, must be saved. But there is a nuance here. If you save it in jpg format, it will be saved not with a transparent, but with a white background. In order for the transparent background to remain when saving, you must select the PNG format!.
Method No. 2.
This method is a little more complicated than the previous one and will require a little perseverance on your part. In this option we will use the Magnetic Lasso tool.
- In the column with tools, click on “Lasso” and three options will open in front of you. We choose the magnetic lasso.
- Using this tool, we select the main character who needs to be saved.
- After selection, click on “Selection” in the top panel. In the menu that appears, select “Inversion”. After that, click on Delete. That's all. We made a transparent background.
Advice! This method is best used if the picture is on a white background!
Removing the background from an image in Photoshop
When creating collages and other compositions in Photoshop, there is often a need to remove the background from an image or move an object from one picture to another.
Today we’ll talk about how to make a picture without a background in Photoshop.
There are several ways to do this.
The first is to use the Magic Wand . The method is applicable if the background of the image is monochromatic.
Open the image. Since pictures without a transparent background most often have a JPG , the layer called “Background” will be locked for editing. It needs to be unlocked.
Double-click on the layer and click OK .
Then select the Magic Wand and click on the white background. A selection appears (marching ants).
Now press the DEL . Done, the white background has been removed.
The next way to remove the background from a picture in Photoshop is to use the Quick Selection . The method will work if the image has approximately the same tone and does not blend into the background anywhere.
Select “Quick Selection” and “paint over” our image.
Then invert the selection using the key combination CTRL+SHIFT+I and press DEL . The result is the same.
The third method is the most complex and is used on color images, where the desired area blends into the background. In this case, only manual selection of the object will help us.
There are several tools for manual selection in Photoshop.
1. Lasso. Use it only if you have a steady hand or a graphics tablet. Try it yourself and understand what the author writes about.
2. Straight-line lasso. It is advisable to use this tool on objects that contain only straight lines.
3. Magnetic lasso. Used on monochromatic images. The selection is “magnetized” to the edge of the object. If the shades of the image and background are identical, then the edges of the selection appear jagged.
4. Feather. The most flexible and convenient selection tool. With a pen you can draw both straight lines and curves of any complexity.
So, select the Pen and trace our image.
Place the first anchor point as accurately as possible on the boundary of the object. Then we place the second point and, without releasing the mouse button, drag it up and to the right, achieving the desired radius.
Next, hold down the ALT and return the marker you pulled to its place, to the second anchor point. This is necessary in order to avoid unwanted kinks in the contour during further selection.
Anchor points can be moved by holding down the CTRL on the right, and deleted by selecting the appropriate tool from the menu.
The pen can be used to select several objects in an image at once.
Once the selection is complete (the path must be closed by returning to the first anchor point), right-click inside the path and select “Create selected area” .
Now you need to remove the background in Photoshop by pressing the DEL . If suddenly the selected object is deleted instead of the background, then press CTRL+Z , invert the selection using the combination CTRL+SHIFT+I and delete it again.
We've covered basic techniques for removing backgrounds from images. There are other methods, but they are ineffective and do not bring the desired result.
We are glad that we were able to help you solve the problem. Add the Lumpics.ru website to your bookmarks and we will be useful to you. Thank the author and share the article on social networks.
Describe what didn't work for you. Our specialists will try to answer as quickly as possible.
Did this article help you?
NO
Method number 3.
The essence of this option is to use a tool such as a mask.
- Select the “quick mask” and then click on the brush.
- We paint only the character, and at the same time, without affecting the background.
- Next, you need to click on the mask again and the Delete button. All background has been removed.
Proper saving.
The last step is to properly save the image. After all, if you choose the wrong image format, the white background will remain, but we need it to be transparent.
The white rear view remains in GEPG format. Therefore, it is better to save as either PNG or GIF. I prefer PNG.
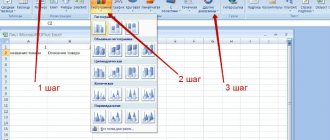
To save the result, go to the top line. Click on “File”. After this, a list of functions will appear in front of us, select “Save as...”. Next, a window will open in front of us in which we can come up with a unique file name and type.
Remember that we select the type either PNG or GIF. I chose the first option.
And also in this window you can select a location to store the image.
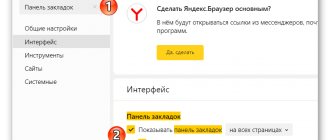
What program to open png
The Png file itself can be opened simply using standard Windows tools. To do this, click on the corresponding picture twice with the left mouse button (Screen 1).
After that, it should open either in your browser or through the Windows Photo Viewer.
You can also right-click on the file and select the following options from the menu – “Open with”, “Yandex” (Screen 2).
After this, the PNG file will open in this browser and you can view it.
It can also be opened with special programs. For example, the Paint program. To do this, right-click on the picture. Next, select the “Change” button from the mouse menu. At the same time, your picture will be opened in this program.
There are also programs that help you work with Png files. They will be discussed below in the article.
Did you know?
Imagine, the Photoshop program was developed by a student from the University of Michigan named Thomas Hall.
Nowadays, the word Photoshop has become a household word. Many non-specialists call many graphic editors this way.
This program remains paid and quite expensive. Therefore, an alternative option appeared for it - Corel.
In this program, it turns out, you can not only edit existing images, but also create new ones, that is, draw. Nowadays, many paintings and portraits that artists sell on the Internet were created in Photoshop. So you have something to strive for.
Creating a watermark on an image
Here, in principle, there is nothing complicated. The first thing you need to do is open a new image. Then add a new layer to the layers menu and go to the “Text” tool. We enter the desired text and transform it the way we need, using control elements. Then we begin to create transparency in Photoshop. Make sure that you have the text layer selected, and then adjust its transparency using the sliders we are already familiar with. Then again go to the layers menu and execute the “Flatten Layers” command. The result must again be saved in PNG format.
This way you can add more than just text as a watermark. You can use any image as a logo. Naturally, in this case there is no need to use the “Text” tool. It will be enough to drag the desired image onto a newly created layer and reduce it to the desired size. And then do everything according to the instructions.